


10
11
At the beginning of the alignment process, users are asked to choose an alignment method.
The available alignment methods differ between the mount types, as listed below:
•
For an equatorial mount:
1-Start Alignment
(1-Star Align.)
,
2-Star Alignment
(2-Star
Align.)
or
3-Star Alignment
(3-Star Align.)
•
For an alt-azimuth mount:
Brightest Star Alignment
(Brightest Star)
or
2-Star Alignment
(2-Star Align.)
Note:
For a detailed description and comparison of each alignment method, please
refer to
Section 3.7
.
Operation:
•
The LCD screen displays “
Alignment:
” in the first line.
•
Use the two scrolling keys to select an alignment method in the second line of the LCD
screen.
•
Press
ENTER
to confirm selection and proceed to the next step
(Section 3.2)
.
•
Press
ESC
to skip the alignment process and enter standby mode.
3.1 Choosing an Alignment Method
PART III : ALIGNMENT
In this step, user will be asked to choose one or multiple alignment stars from a list provided
by the SynScan hand control, and then control the mount to center the star(s) in the FOV of
the telescope’s eyepiece. The SynScan hand control will then use the data collected in this
process to transform between the mount coordinates and the sky coordinates.
The operating steps of aligning to alignment stars may differ depending on the type of mount
used, as well as the chosen alignment method. Users should read the following section which
meets your mount and alignment method:
•
Section 3.3: Alignment Method for Equatorial mounts.
•
Section 3.4: Alt-azimuth mounts using the Brightest Star Alignment method.
•
Section 3.5: Alt-azimuth mounts using the 2-Star Alignment method.
3.2 Aligning to Alignment Stars
3.3 Alignment Method for Equatorial Mounts
Aligning the 1
st
Star:
1.
The LCD screen displays “
Choose 1st Star
” in the first line. Use the scrolling keys to browse
through a list of star names and Press
ENTER
key to pick the one on the screen as the 1
st
alignment star. The mount will then automatically slew and point the telescope towards the
1
st
alignment star in the sky.
2.
After the mount stops, the hand control will display “
Use arrow buttons Ctr. to eyepiece..
”.
Now the telescope should point rather closely to the 1
st
alignment star (generally, in the
FOV of the finder scope), and the mount’s tracking function is also turned on by the hand
control to prevent the objects drift in the FOV of the telescope.
PART III : ALIGNMENT
3.
Now users can use the direction keys to move the telescope to align with the 1
st
alignment
star. That is, center the 1
st
alignment star in the FOV of the finder scope, and then center
it in the FOV of the telescope’s eyepiece; press
ENTER
key to confirm centering of the star
and proceed to the next step. Generally, users can use Rate 5 or 6 to center the star in the
finder scope and use Rate 2 or 3 to center the star in the telescope’s eyepiece.
4.
If the user has chosen 1-Star Alignment method before, the SynScan hand control will now
display “
Alignment Successful
”. Press
ENTER
to complete the alignment process.
5.
If the user has chosen 2-Star Alignment or 3-Star Alignment before, the SynScan hand
control will then proceed to the next step.
The operation is the same as that of
Aligning the 2
nd
Star.
1.
While the mount is slewing during the alignment, users may press the ESC key to stop the
mount. The hand control screen will display “
MOUNT STOPPED!!. Press any key…
”
2.
Press any key and the SynScan hand control will ask the user to select another alignment
star.
3.
Press the
ESC
key again, the LCD screen will display “
Exit Alignment? 1) YES 2) NO
”. Press
key
1
to exit the alignment process; press key
2
to go back to choose an alignment star.
1.
Find the brightest stars in the current sky with naked eyes, and estimate its horizontal re-
gion (orientation).
2.
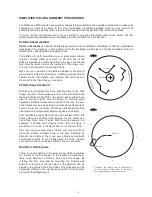
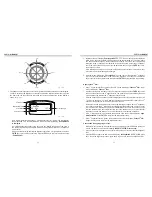
The hand control displays “
Select Region
”. Use the scroll keys to pick one of the eight re-
gions shown in
Fig 3.4a
, which matches the horizontal region of the brightest star. Press
ENTER
to confirm selection and proceed to the next step.
3.4 Alt-Azimuth Mounts using
Brightest Star Alignment Method
Aligning the 2
nd
Star:
Selecting and Aligning the 3
rd
Star:
Cancellation During Aligning Process:
1.
Again, the SynScan hand control asks the user to choose and align a 2
nd
alignment star.
The operation is the same as that of aligning the 1
st
alignment star.
2.
If the user has chosen 2-Star Alignment before, the SynScan hand control will display
“
Alignment Successful
” after confirmation of centering the 2
nd
alignment star.
3.
Two seconds later, the LCD screen will display the polar-alignment offset of the mount. The
“
Mel
” value is the offset in elevation, and the “
Maz
” value is the offset in azimuth.
4.
If the user has chosen 3-Star Alignment before, the SynScan hand control will then pro-
ceed to the next step.
Aligning the 1
st
Star:
Содержание EQ5
Страница 1: ...INSTRUCTION MANUAL Telescopes with NEQ3 EQ5 Mount 031007V3 ...
Страница 14: ......
Страница 27: ......
Страница 29: ...INSTRUCTION MANUAL SynScan TM 140303V4 Copyright Sky Watcher ...
Страница 51: ...SynScan TM ...


