I-F4621
Pg 7
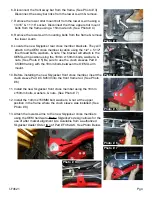
30. Lower the axle down so there is no load on the rear leaf
springs. Remove the rear leaf spring eye bolts using a
21mm socket. (See Photo # 19)
Note:
It will be necessary
to loosen the gas tank straps to allow the gas tank to slide
over enough to get the leaf spring eye bolts out. (See Photo
# 20) Be sure to support the gas tank with a transmission
jack. On the passenger side, it will be necessary to
disconnect / remove the exhaust. Disconnect in front of the
muffler & remove. Remove the OEM leaf spring.
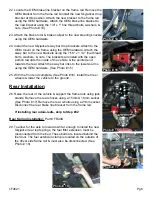
31. Install the new Skyjacker rear leaf spring on top of the OEM
block. (See Photo # 21)
Note:
Be sure to install the new
leaf spring with the long end of the leaf spring towards the
rear of the vehicle. There is a degree shim attached to the
bottom of the new leaf spring to correct pinion angle. Be
sure that the thick portion of the shim is towards the rear of
the vehicle. Make sure the tie bolt heads seat securely into
the OEM block. Install the new Skyjacker rear u-bolts &
torque to 130 Ft. Lbs. Skip to Step # 35. Do not tighten the
leaf spring eye bolts until the vehicle is on the ground with
the weight on the leaf springs.
Rear Add-A-Leaf Installation:
Part # R3440
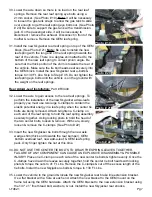
32. Lower the axle to gain access to the rear leaf springs. To
perform the installation of the new Skyjacker add-a-leafs
properly you must use two large C-clamps to contain the
elastic potential energy in a leaf spring when the center tie
bolts are being removed. Attach & tighten a C-clamp on
each end of the leaf spring to hold the leaf spring assembly
securely together. Using locking pliers to hold the head of
the two center bolts, loosen & remove. With care, slowly
loosen & remove the C-clamps. (See Photo # 22)
33. Insert the new Skyjacker tie bolts through the new axle
wedge shim (thick end towards the rear bumper), OEM
bottom overload leaf, new add-a-leaf, & OEM leaf spring
pack. Only finger tighten the nut at this time.
34. DO NOT USE THE CENTER TIE BOLTS TO DRAW THE SPRING LEAVES TOGETHER.
FAILURE OF ANY COMPONENT CAN CAUSE AN EXPLOSIVE DISASSEMBLY & POSSIBLE
INJURY! Place one C-clamp on each side of the new center tie bolts & tighten evenly. Once the
C-clamps have drawn the leaves securely together, hold the center tie bolt heads with locking
pliers & torque the nuts to 41 Ft. Lbs. Remove the C-clamps & cut off the excess length of the
tie bolts. Install the new Skyjacker u-bolts & torque to 130 Ft. Lbs.
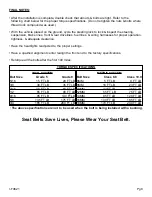
35. Lower the vehicle to the ground & locate the new Skyjacker rear brake line extension bracket.
It’s a flat bracket with a hole at each end. Attach the new bracket to the OEM mount on the
frame rail using the OEM hardware. Attach the OEM bracket to the new extension bracket using
the 1/4" x 1” fine thread bolt, washers, & nut. Install the new Skyjacker rear shocks.
Photo # 19
Photo # 20
Photo # 21
Photo # 22


