background image

5.5.3 Default program setting on Smart mode 

The following table shows our default program settings of the Smart 
mode. To modify the program on Smart mode, we suggest you calibrate 
the clock setting, then make a similar table as our example and set 
according to the table. Of course, you can also set up each day di

erently 

according to your schedule.

5.6 Holiday mode 

The Holiday mode on Smart1.0 is a useful feature that you can use in 
order to avoid frozen or bursting water pipes during a prolonged leave. It 
has a countdown timer of your holiday date and the remaining days of 
your holiday will be shown on the thermostat. After the holiday period, the 
thermostat will switch back to Manual or Smart mode as of your previous 
settings.

5.6.1 Enter Holiday mode 

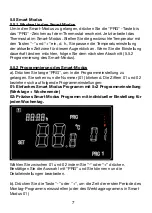
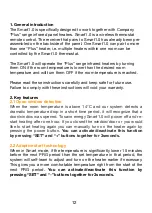
Long press the “Holiday” button on the thermostat. The days setting of 
the holiday period will start to flash, the screen on the thermostat will be 
as shown below.

8

Monday/Tuesday/Wednesday/Thursday/Friday

Period

PRG1

PRG2

PRG3

PRG4

Time

6:30

8:00

18:00

22:30

Temperature

21

18

21

16

Saturday/Sunday

Period

PRG1

PRG2

PRG3

PRG4

Time

8:00

10:00

18:00

23:00

Temperature

21

18

21

16

17

Содержание SDUM-200101

Страница 1: ...1 Smart1 0 Programmable Wireless thermostat Programmierbare Funk Thermostat Operation Instructions Version SDUM 200101 DE EN ...

Страница 2: ...eiteinstellungen und Kalibrierung der Temperatur 5 3 Kurze Einleitung der Bedienungsmodi 5 4 Manueller Modus 5 5 Smart Modus 5 5 1 Wechsel in den Smart Modus 5 5 2 Programmierung des Smart Modus 5 5 3 Standardprogrammeinstellung im Smart Modus 5 6 Urlaubsmodus 5 6 1 Wechsel in den Urlaubsmodus 5 6 2 Urlaubsmodus abbrechen 5 7 Kindersicherung 6 Technische Daten 7 Garantie und Entsorgung 11 DE 2 ...

Страница 3: ...Raumtemperatur über 14 C liegt und unser System in einem kurzen Zeitraum einen drastischen Temperaturabfall erkennt erkennt es dass eine Tür ein Fenster geöffnet wurde Um Energie zu sparen schaltet sich Smart1 0 für eine Stunde aus und startet die Heizung dann erneut Wenn sich Smart1 0 ausschaltet wird auf dem Bildschirm das Signal off angezeigt Wenn Sie das Fenster die Tür geschlossen haben oder di...

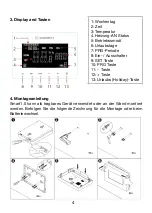
Страница 4: ...n der Wand montiert werden Befolgen Sie die folgende Zeichnung für die Montage oder beim Batteriewechsel 13 1 Wochentag 2 Zeit 3 Temperatur 4 Heizung AN Status 5 Betriebssmodi 6 Urlaubstage 7 PRG Periode 8 Ein Ausschalter 9 SET Taste 10 PRG Taste 11 Taste 12 Taste 13 Urlaubs Holiday Taste 4 ...

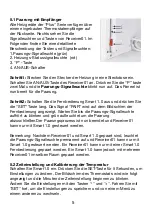
Страница 5: ...ng angezeigt Warten Sie bis die Paarungs Signalleuchte aufhört zu blinken und grün aufleuchtet um die Paarung abzuschließen Der Paarungsprozess ist nun beendet und Receiver01 kann nur mit Smart 1 0 gesteuert werden Bemerkung Nachdem Receiver01 und Smart 1 0 gepaart sind leuchtet die Paarungs Signalleuchte permanent auf und Receiver01 kann nur mit Smart 1 0 gesteuert werden Ein Reveiver01 kann nur ...

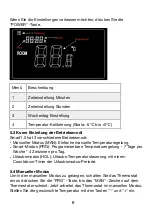
Страница 6: ...modus HOL Urlaubs Temperatursteuerung mit einem Countdown Timer der Urlaubsmodus Periode 5 4 Manueller Modus Um in den manuellen Modus zu gelangen schalten Sie das Thermostat ein und drücken Sie die PRG Taste bis das MAN Zeichen auf dem Thermostat erscheint Jetzt arbeitet das Thermostat im manuellen Modus Stellen Sie die gewünschte Temperatur mit den Tasten und ein 15 Menü Beschreibung 1 Zeiteinst...

Страница 7: ...t Modus 5 5 2 Programmierung des Smart Modus a Drücken Sie lange PRG um in die Programmeinstellung zu gelangen Sie sehen nun die Nummer 01 blinkend Die Ziffern 01 und 02 beziehen sich auf folgende Programmeinstellungen 01 Einfaches Smart Modus Programm mit 5 2 Programmeinstellung Werktage Wochenende 02 Präzises Smart Modus Programm mit individueller Einstellung für jeden Wochentag Wählen Sie zwisch...

Страница 8: ...eitlich zu verlassen drücken Sie die Power Taste 5 5 3 Standardprogrammeinstellung im Smart Modus Die u Tabelle zeigt unsere Standardeinstellungen des Smart Modus Um die Programmierung im Smart Modus zu ändern empfehlen wir Ihnen die Uhreinstellung zu kalibrieren dann eine ähnliche Tabelle wie unten zu erstellen und entsprechend der Tabelle einzustellen Natürlich können Sie jeden Tag anders je nac...

Страница 9: ...eige auf dem Bildschirm a Passen Sie an wieviele Tage Sie im Urlaub sind indem Sie oder drücken b Drücken Sie die Holiday Taste nochmals um die Temperatur während Ihrer Abwesenheit einzustellen c Drücken Sie die Holiday Taste nochmals um die Einstel lungen abzuschließen 5 6 2 Urlaubsmodus abbrechen Das Thermostat wird automatisch nach der eingestellten Urlaubsperiode auf die vorherigen Einstellung...

Страница 10: ...e Reparatur oder den Ersatz des Gerätes selbst Bitte beachten Sie dass das Entfernen der Seriennummer auf der Rückseite des Gerätes das Erlöschen Ihrer Garantie zur Folge hat Bitte entfernen Sie keine Etiketten Jegliche Schäden die durch unsachgemäße Nutzung verursacht wurden werden von der Garantie nicht gedeckt Dies schließt Kratzer an der Oberfläche ein Hersteller haftet nicht für Schäden Verlu...

Страница 11: ...Pair to the receiver 5 2 Time settings and temperature calibration 5 3 Brief introduction of operation modes 5 4 Manual mode 5 5 Smart mode 5 5 1 Entering smart mode 5 5 2 Smart mode program setting 5 5 3 Default program setting on smart mode 5 6 Holiday mode 5 6 1 Entering holiday mode 5 6 2 Quitting holiday mode 5 7 Child lock 6 Technical specifications 7 Warranty and disposal 2 EN 11 ...

Страница 12: ...Key features 2 1 Open window detection When the room temperature is above 14 C and our system detects a dramatic temperature drop in a short time period it will recognize that a door window was opened To save energy Smart1 0 will power off and re start heating after one hour If you closed the window door or you would like to start heating again you can manually turn on the heater again by pressing ...

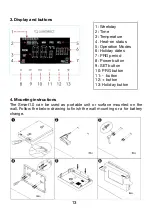
Страница 13: ... or surface mounted on the wall Follow the below drawing to finish the wall mounting or a for battery change 4 1 Weekday 2 Time 3 Temperature 4 Heat on status 5 Operation Modes 6 Holiday dates 7 PRG period 8 Power button 9 SET button 10 PRG button 11 button 12 button 13 Holiday button 13 ...

Страница 14: ...ash and is ready for pairing Step2 Power off the Smart 1 0 long press the SET button The PAIR signal will show on the screen of the remote control Wait until the Pair signal light stops flashing and glows green to finish the pairing Note Once Receiver01 and Smart 1 0 are paired the pair signal light will always be on and the Receiver01 will be only commanded by the Smart 1 0 One Receiver01 can only...

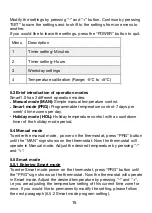
Страница 15: ...e manual mode power on the thermostat press PRG button until the MAN sign shows on the thermostat Now the thermostat will operate in Manual mode Adjust the desired temperature by pressing and 5 5 Smart mode 5 5 1 Entering Smart mode To enter Smart mode power on the thermostat press PRG button until the PRG sign shows on the thermostat Now the thermostat will operate in Smart mode Adjust the desire...

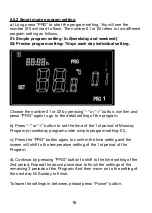
Страница 16: ...etail setting of the program b Press or button to set the time of the 1st period of Monday Program or weekday program under simple program setting 01 c Press the PRG button again to confirm the time setting and the screen will shift to the temperature setting of the 1st period of the Program d Continue by pressing PRG button to shift to the time setting of the 2nd period Repeat the above procedure...

Страница 17: ...water pipes during a prolonged leave It has a countdown timer of your holiday date and the remaining days of your holiday will be shown on the thermostat After the holiday period the thermostat will switch back to Manual or Smart mode as of your previous settings 5 6 1 Enter Holiday mode Long press the Holiday button on the thermostat The days setting of the holiday period will start to flash the ...

Страница 18: ...he thermostat will automatically shift back to the previous settings after the set holiday period However if you need to shift back to your regular mode before the set holiday time is over press the PRG button to quit Holiday mode 5 7 Child lock Press SET and Holiday buttons at the same time for 3 seconds to activate child lock and the signal will show on the screen Please press again SET and Holi...

Страница 19: ...ers the repair or replacement of the Smart1 0 only The removal of the serial number on the back of Smart1 0 will also void this warranty All labels shall not be removed Any damages to Smart1 0 caused by the user are not covered by this warranty This includes scratches on the surface Smart1 0 is not responsible for any damages losses or injuries due to the ingress of water or moisture accidental da...

Страница 20: ... Suttner StraBe 8 2120 Wolkersdorf ÔSTERREICH Tel 43 2245 90160 Fax 43 2245 90160 10 ARA Nr 18156 FNr Fn440145y UID AT ATU69903312 UID DE DE302049370 Rechnungsadresse Redengasse 31 1220 Wien ÔSTERREICH office simka at www simka at ERA Nr 51866 ...

Отзывы: