background image

ISSUE DATE: FEBRUARY 2018 

ORIGINATOR: SKILTEC 

REPLACES ISSUE DATE: FEB 2018 

APPROVED BY: S. GONZALEZ 


PAGE 24 OF 29

PRODUCT INFORMATION MANUAL

SECTION: 12B LUMINETTE PRIVACY SHEERS POWERVIEW MOTORISATION

Problem

The vanes do not rotate or they rotate incorrectly.

Solution

Check that the fabric is fully traversed.

Check that there are no obstructions to the movement of the vanes. Replace 
protruding window cranks with T-cranks. 

Problem

A vane does not hang correctly.

Solution

Check that the vane is completely inserted into the pinion clip. See “Attach the 
Vanes to the Pinion Clips” on page 16.

Problem

A vane is out of alignment.

Solution

Manually turn the pinion clip to align it with the remaining pinion clips.

Problem

The end treatment arm does not swing around the end cap.

Solution

On inside mounts, check that there is clearance between the end of the headrail 
and the window casement. See “Install the SofTrak

™ 

Headrail” on page 12.

If the fabric stops before it has fully traversed, reset the system. See “Resetting 
the Sheer” on page 20.

Problem

The rail makes noise while traversing.

Solution

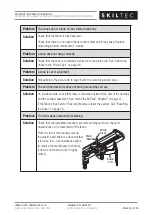
Check that the installation brackets are level and aligned. Also, check for 
obstructions to the movement of the fabric.

From the top of the headrail, pull up  
the plastic bead chain to check whether  
it is loose. If so, use needlenose pliers  
to remove the metal bead, then move  
it down a notch and crimp it tightly  
closed.

Swivel

Arm

Pull Up

Slack

Metal

Bead

Содержание LUXAFLEX LUMINETTE

Страница 1: ...018 ORIGINATOR SKILTEC REPLACES ISSUE DATE FEB 2018 APPROVED BY S GONZALEZ PAGE 1 OF 29 PRODUCT INFORMATION MANUAL SECTION 12B LUMINETTE PRIVACY SHEERS POWERVIEW MOTORISATION LUMINETTE PRIVACY SHEERS POWERVIEW MOTORISATION ...

Страница 2: ... SKILTEC REPLACES ISSUE DATE FEB 2018 APPROVED BY S GONZALEZ PAGE 2 OF 29 PRODUCT INFORMATION MANUAL SECTION 12B LUMINETTE PRIVACY SHEERS POWERVIEW MOTORISATION LUMINETTE PRIVACY SHEERS PowerView Motorisation Installation Operation Care ...

Страница 3: ...S POWERVIEW MOTORISATION Product View Left Stack Right Stack SofTrak Headrail Swivel Plate Rivet Swivel Arm Left Stack Shown Inside Ceiling Mount Bracket Installation Bracket Faceplate DC Power Supply DC Power Supply Cable C Clip Modular Motor Assembly Manual Control Button PowerView Remote Drive Assembly Spacer Block with Bushings Pinion Clips Swivel Plate End Treatment ...

Страница 4: ...ed Nuts and Screws Provided Extension brackets come with screws and speed nuts Drywall Anchors Not Provided Use drywall anchors when mounting into drywall Unpack the Components Make sure you have clean hands or wear disposable gloves when handling Luminette fabric To avoid wrinkling the fabric do not fold it or drape it over furniture One or more fabric panels may be packaged in a carton The fabri...

Страница 5: ...p review the mounting types and basic window terminology illustrated below For proper operation the fabric must clear all obstructions including window cranks handles and moldings Replace protruding window cranks with T cranks as needed Refer to the appropriate page below based on your order Reveal Ceiling Fit Page 4 Face Fit Page 7 Collectively the sill and jambs are called the window casement Mo...

Страница 6: ...ed varies with headrail width as shown below Measure and Mark Bracket Locations Mark 130mm from each jamb on the mounting surface If more than two installation brackets are required see table above mark the locations of additional bracket s spaced evenly between the two end brackets CAUTION Installation brackets should be fastened into wood whenever possible Use drywall anchors when mounting into ...

Страница 7: ...ust align to each other Align the outside edge of the end brackets on your marks then mark each of the screw holes Center additional brackets on the marks to mark their screw holes The minimum mounting depth required is 25mm To fully recess the fabric in the window casement the mounting depth required is 160mm See the illustration below Bracket Headrail Stacked Fabric Vane 160mm Minimum Fully Rece...

Страница 8: ...level Use a laser level to check that the installation brackets are level and aligned Shim the brackets if necessary The brackets may also need to be shimmed if the mounting surface is heavily textured To Shim the Brackets Snap off the top of the shim for use with inside ceiling mount brackets Use the shims as needed between the mounting surface and the reveal ceiling fit brackets Use a laser leve...

Страница 9: ...close to the ceiling If the sheer will not be mounted at ceiling level the tabs can be removed Adding Clearance Use spacer blocks to add additional clearance Spacer blocks add clearance in 13mm increments One spacer block is used with the faceplate for standard installation Three additional spacer blocks may be added for an extra 38mm clearance Use optional extension brackets to add more clearance...

Страница 10: ...n previous page mark the locations of additional bracket s spaced evenly between the two end brackets CAUTION Installation brackets should be fastened into wood whenever possible Use drywall anchors when mounting into drywall When attaching brackets into drywall additional brackets may be required to keep the headrail level after the fabric is attached Mark the bracket mounting height to allow pro...

Страница 11: ...ter any additional brackets on the bracket location marks to mark their screw holes CAUTION The rear of the spacer blocks or extension brackets must be flush against a flat mounting surface Do not mount blocks brackets on curved molding Mount the Spacer Blocks or Extension Brackets Drill the screw holes using a 3mm drill bit CAUTION Use drywall anchors when mounting into drywall Attach the spacer ...

Страница 12: ...rackets are level and aligned Shim the brackets if necessary The brackets may also need to be shimmed if the mounting surface is heavily textured To Shim the Brackets Loosen the installation screws securing the spacer block or extension bracket Insert one or more shims between the spacer block or extension bracket and the mounting surface Tighten the installation screws Finish Bracket Assembly Spa...

Страница 13: ...he flat bracket cover to length Slide a cover onto each bracket Attach inside ceiling mount installation brackets using the screws and speed nuts provided Proceed to Install the SofTrak Headrail on page 23 Bracket Locations Corner and Bay Windows For bracket placement mount the spacer blocks or inside ceiling mount brackets 200mm from the corner IMPORTANT The ends of the headrails should be locate...

Страница 14: ...stallation bracket With the top groove in place on all brackets tilt the headrail down so the bottom groove fits into the bottom tabs on the installation brackets Position center the headrail and tighten the locking screws until snug Do not overtighten Reveal Fit and Wall To Wall Face Fit Installations After the SofTrak headrail is installed into the installation brackets check the clearance at ea...

Страница 15: ...ted split stack the fabric opens in the center is two side stack systems installed with the non control ends side by side Adjust the SofTrak headrails according to the illustration for proper swivel arm operation IMPORTANT Be sure to measure the spacing from end cap to end cap not from the swivel arms Non Control End Cap Non Control End Cap 38mm Swivel Plates Swivel Arm Swivel Arm RTW Swivel Plate...

Страница 16: ... with the holes in the drive assembly as shown below Press the motor up into the drive assembly until it clicks into place IMPORTANT If snapping the motor onto the drive assembly seems difficult grasp the lead carrier and pull the carriers slightly away from the motor as shown at right The motor should now snap in easily If you remove the motor and need to reinstall it check the drive assembly and...

Страница 17: ...TRANGLE They can also put small parts in their mouths and CHOKE WARNING Electric shock and or a fire hazard may occur if not properly installed 385mm Maximum DC Power Supply Wire Retainer Extension Cable Power Cable Motor Assembly Test Headrail Operation Use the manual control button on the motor to test the operation of the headrail following the sequence below 1 Press and release the button to t...

Страница 18: ... to an appropriate length Do not unroll the fabric until you begin attaching the vanes to the pinion clips CAUTION Be very careful when trimming the tube to avoid damaging the fabric in any way Remove the protective wrapping from the fabric Attach the Vanes to the Pinion Clips Unroll the fabric to gain enough slack to attach the first vane to the pinion clip on the motor drive assembly To attach v...

Страница 19: ...Snap the rivet on the swivel plate into the front clip on the control end cap Swivel plates attached on the left will have STD L stamped on the top Swivel plates attached on the right will have STD R on the top Snap the rivet on the other swivel plate onto the swivel arm side stack or into the front clip on the non control end cap split stack Swivel plates attached on the right will have STD R sta...

Страница 20: ...ate at a height where the end vanes hang straight and the top of the end treatment is approximately 3mm above the top of the swivel plate Attach the end treatment by pressing it onto the swivel plate If the end treatment is not hanging straight separate the swivel plate from the end treatment and reposition it Separate the swivel plate by pulling up on the end treatment while holding the swivel pl...

Страница 21: ...h to show it is selected 3 Press and hold the manual control button on the motor 4 While continuing to press the manual button press OPEN on the remote The sheer will move slightly to indicate it has joined the group Release the manual control button 5 Press and hold STOP for 4 seconds to exit program mode The lights will stop flashing Basic Operation 1 To wake up the remote simply pick it up or p...

Страница 22: ...e PowerView Scene Controller For information regarding operation and programming of the PowerView Scene Controller refer to your PowerView Motorisation Scene Controller Guide PowerView App Operation The PowerView Hub is required for PowerView App operation Resetting the Sheer If Necessary Basic Reset The basic reset is used to reset the sheer s travel limits 1 Press and hold the manual control but...

Страница 23: ...he motor has power Check that the DC power supply is securely plugged into the wall outlet and that the outlet has power Check that the DC power supply is securely connected to the barrel connector from the motor See Connect the DC Power Supply on page 15 Problem The sheer is not responding to the PowerView remote Solution IMPORTANT A sheer will not operate until it is joined to a group Check that...

Страница 24: ...nment Solution Manually turn the pinion clip to align it with the remaining pinion clips Problem The end treatment arm does not swing around the end cap Solution On inside mounts check that there is clearance between the end of the headrail and the window casement See Install the SofTrak Headrail on page 12 If the fabric stops before it has fully traversed reset the system See Resetting the Sheer ...

Страница 25: ...ic to the fully stacked position Detach both end treatments from the ends of the headrail as shown Remove the fabric from each pinion clip Hold the top of the vane near the polytab and pull down and to the left Lay the fabric flat on a clean surface with the vanes facing in the same direction If the original tube is available gently roll the fabric onto it making sure the fabric stays straight Do ...

Страница 26: ... the motor assembly to separate Method 2 This method works best when fabric is still installed on the headrail Insert a hex key into the side slot on the drive assembly either front or back to release the spring latch then pull down gently on the motor assembly to separate Remove the Headrail With the fabric and motor removed loosen and push firmly up on the locking screws of the mounting brackets...

Страница 27: ...horizontal strokes while steadying the fabric with your free hand Each stroke should be approximately the width of two to three vanes Do not use long horizontal or vertical strokes as these actions will crease the fabric Continue to the bottom of the fabric CAUTION Do not use a brush attachment or rigorous vacuuming since either could distort the fabric Electrostatic Cleaning CAUTION Do not use el...

Страница 28: ...nes to the right and use a 100mm upholstery tool Start in the upper left corner and using short horizontal strokes about the width of three vanes move across the fabric Clean from the top to the bottom Allow the fabric to dry in the fully traversed position with the vanes opened Steam out any wrinkles Ultrasonic Method Professional ultrasonic cleaning is a process in which the fabric is inserted i...

Страница 29: ...cloth Let the area air dry Steam Machine Method Rotate vanes to the fully opened position Steam from the back side of the fabric whenever possible Set the steamer to its lowest possible setting not to exceed 100 C The steaming unit should never directly touch the fabric Hold the wand 50mm to 75mm away from the fabric Use slow continuous vertical movements Begin at the top of the fabric and work yo...

Отзывы: