22
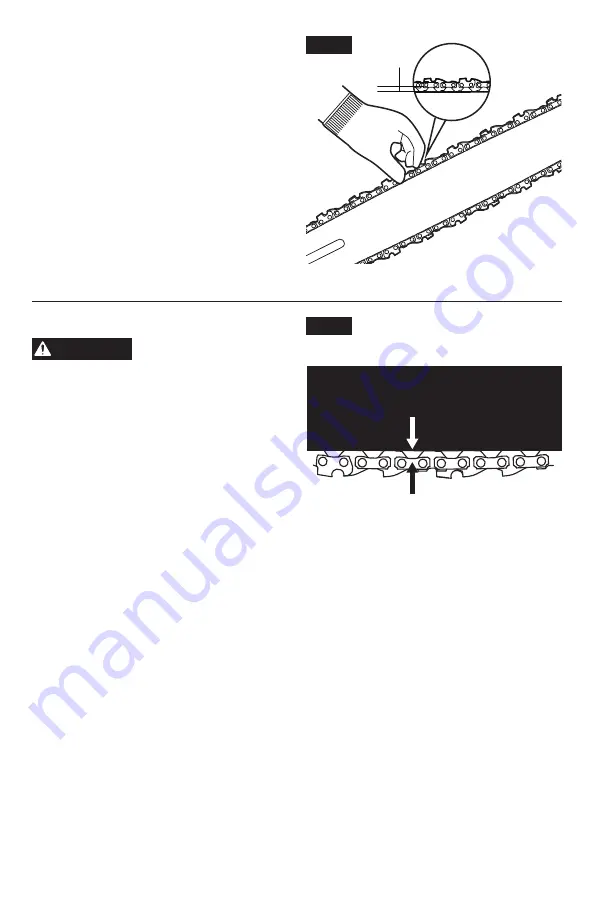
9. Check the chain tension using one hand,
by pulling upwards on the chain against the
weight of the product. The correct chain
tension is achieved when the saw chain
can be lifted by approx. 1/4 in. (6 mm) from
the guide bar in the center (Fig. 16b).
10. Re-adjust the tension as described above
if you find that the chain saw is too loose or
too tight.
11. Pull the saw chain along the upper
side of the guide bar by hand (WEAR
PROTECTIVE GLOVE!) from one end to
the other several times. The chain should
feel tight but still move freely.
12. Tighten the side-cover knob firmly to fix the
guide bar.
Adjusting the Chain Tension
WARNING
Always check the saw-
chain tension before use,
after the initial cuts, and regularly during
use.
Upon initial operation, new chains can
lengthen considerably. This is normal during
the break-in period and the interval between
future adjustments will lengthen quickly.
Always maintain proper chain tension! A
loose chain increases the risk of kickback!
A loose chain may jump out of the guide
bar groove! This may injure the operator
and damage the chain! A loose chain will
cause rapid wear to the chain, guide bar and
sprocket!
Tensioning the chain too tightly will overload the motor and cause damage, and
insufficient tension can cause chain derailing, whereas a correctly tightened chain
provides the best cutting characteristics and prolonged working life! The chain life
mainly depends upon sufficient lubrication and correct tensioning!
1. Stop the motor and remove the battery pack before adjusting the chain tension.
2. Loosen the side-cover knob.
3. Turn the chain-tensioning adjusting knob to adjust the chain tension. See the section:
“Replacing the Bar and Chain” in this manual for additional information.
A cold chain is correctly tensioned when there is no slack on the underside of the guide bar
and the chain is snug, but it can be turned by hand without binding. The chain must be re-
tensioned whenever the flats on the drive links do not sit in the bar groove.
During normal saw operation, the temperature of the chain will increase. The drive links of
a correctly tensioned warm chain will hang approximately 3/64 in. (1.3 mm) out of the bar
groove (Fig. 17).
NOTICE:
New chains tend to stretch; check chain tension frequently and tension as required.
NOTICE:
A chain tensioned while it is warm may be too tight upon cooling. Check the cold
tension before next use.
Fig.17
Approximately 3/64” (1.3mm)
Fig.16b
1/4''
(6mm)


