27
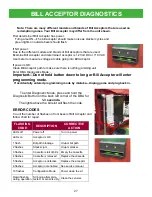
BILL ACCEPTOR DIAGNOSTICS
FLASHING
CODE
DESCRIPTION
CORRECTIVE
ACTION
LEDs off
Power off
Turn on power
LEDs on
Acceptor is OK
1 flash
Bill path blockage
Un-jam bill path
2 flashes
Stacker jam
Un-jam stacker
3 flashes
Cassette is full of bills Empty the cassette
4 flashes
Cassette is removed
Replace the cassette
5 flashes
Acceptor is defective
Replace the acceptor
6 flashes
Acceptor not enabled
See service manual
10 flashes
Configuration Mode
Power down to exit
Rapid flashing
during operation
Stringing attempt de-
tected; or sensors dirty
Clean the sensors
To enter Diagnostic Mode, press and hold the
Diagnostic Button on the back left corner of the DBA for
1-3 seconds.
The lights above the bill sl
ot will flash the code.
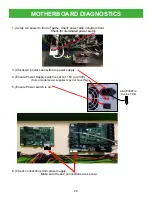
First determine if Bill Acceptor has power:
Turn game ON—The bill acceptor should make noise as stacker cycles and
green lights on outside bezel should flash.
If NO power:
Due to the different models and brands of Bill Acceptors that are used:
Examine Bill Acceptor and determine if acceptor is 12 Volt DC or 110 VAC
Use meter to measure voltage at cable going into Bill Acceptor.
If power is OK:
Clean Bill Acceptor path to make sure there is nothing jamming unit.
Enter DBA Diagnostics Mode -
Important—Do not hold button down to long or Bill Acceptor will enter
programming mode.
If accidentally entered programming mode by mistake—Unplug game and plug back in.
ERROR CODES
Count the number of flashes on front bezel of Bill Acceptor and
follow chart for repair.
Note: There are many different models and brands of Bill Acceptors that are used on
redemption games. Your Bill Acceptor may differ from the unit shown.
Содержание 920.822.3951 X 1101
Страница 1: ...1 ...


