background image

26

TROUBLESHOOTING GUIDE

Problem

Probable Cause

Remedy

Game does not 
coin up. 

Game

does not 

have

audio track 

"clinking” sound 
from speakers 

when coin switch 

triggered.

Pinched, broken, or  

disconnected wiring. 

Faulty 2300 Board

Check connections from coin switches to 

“Coin” connector on 2300 board. Check 

continuity on wires.  

         (AACE1527 & AACE3852) 

Replace main board. (A5CB2300)

   2300 Board and wiring to coin switch OK. 


    Check for power at the 2300 board 


   Ensure AACE3852 cable is 

plugged into blue “IN” socket   

on main board. (C5)

      Replace if needed. 

   Replace 2300 board. 

(A5CB2300)

Communication to Motherboard faulty. 

      (Motherboard is located behind monitor.) 

Check AACE2011 cable from Serial Interface 

board to coupler between head and ramp

(A5CO2002) up to motherboard behind the 

display .Check Comm between 2300 and 

Main board. 

Game does not 
coin up. 

 Game 

has

 audio 

track "clinking” 
sound from 

speakers when 

coin switch trig-

gered.

Game scores 

wrong.

Game starts with a score  

     already on display or scores 
     double points.

Opto is defective under score hole.  
Enter menu, go to Diagnostics Menu to check 
sensors.  

      Replace defective opto. (AACB2203)

Содержание 920.822.3951 X 1101

Страница 1: ...1 ...

Страница 2: ...36 E sales baytekgames com All games are proudly manufactured at our factory in Pulaski Wisconsin USA JOIN OUR SERVICE FIRST NETWORK This free service is intended to keep you up to date on the latest game information early notification of parts specials pertinent technical bulletins updates on retro fit parts software upgrades and much more Log on to www baytekgames com parts then click on the Par...

Страница 3: ...FICATIONS 7 SAFETY PRECAUTIONS 7 MAIN MENU FUNCTIONS 8 TICKET PATTERNS 10 HOW TO OPEN CLOSE SHIELD 14 HOW TO ACCESS CIRCUIT BOARDS 14 BOARD PINOUTS 15 WIRING DIAGRAMS 16 21 TROUBLESHOOTING GUIDE 22 26 BILL ACCEPTOR DIAGNOSTICS 27 MOTHERBOARD DIAGNOSTICS 28 MAINTENANCE LOG 29 TECHNICAL SUPPORT 30 WARRANTY 31 ...

Страница 4: ... Please take a moment to read through this manual and be sure to contact our factory if you have any questions or would like some more information Thank you for your purchase Your business is important to us and we hope you enjoy this game as much as we do Your Friends at Bay Tek Games GAME INSPECTION Inspect the game for any damaged loose or missing parts If damage is found please contact your fr...

Страница 5: ...5 HOW TO PLAY Roll 9 balls up the ramp and into the playfield Win tickets according to your score Score a perfect game to win the Jackpot ...

Страница 6: ... them before pushing them together Using the 5 16 allen wrench in the cashbox turn the latches on either side of the ramp into the hasps on the target cabinet to secure them together Plug the cabinet into a standard electrical outlet and turn the power strip to ON Locate the box of balls and place them into the playield You re ready to roll ...

Страница 7: ...ns WARNING Use of flammable subtances can cause sever burns or serious injury Always use NON FLAMMABLE solvents for cleaning DO NOT use gasoline kerosene or thinners CAUTION Lifting heavy objects can cause back neck or other injuries Be sure adequate lifting and moving devices are available when unloading unpacking and moving this game ATTENTION Be sure the electrical power matches the game requir...

Страница 8: ...elections with the MENU SELECT button MENU DESCRIPTION N1 Credits per Play N2 Game Volume N3 Ticket Patterns N4 1 2 Ticket Dispense N5 Fixed Tickets N6 Game Timeout N7 Game Mode N8 Extra Last Ball N9 Last Game Score Display N10 Ring of Fire Gameplay N11 Payout Display N12 Statistics N13 Clear Stats N14 Sensor Test N15 Solenoid Test N16 Factory Settings ...

Страница 9: ...ough the N1 menu with the MENU button Make your selection with the SELECT button The factory settings are highlighted below Scroll through the N2 menu with the MENU button Make your selection with the SELECT button The factory settings are highlighted below 0 1 2 3 4 5 6 7 ...

Страница 10: ...50 1000 13 4 5 6 7 8 9 10 15 20 25 35 50 100 1000 14 1 3 5 7 9 11 13 15 17 20 25 50 75 100 15 2 4 6 8 10 12 14 16 18 20 30 40 50 100 16 2 4 6 8 10 12 14 16 18 25 50 75 100 1000 17 6 8 10 12 14 16 20 30 40 60 100 200 500 1000 18 4 8 10 12 14 18 20 25 30 35 50 75 100 1000 19 8 10 12 14 16 18 20 22 24 26 28 30 50 250 20 8 10 12 14 18 22 30 35 40 50 60 70 80 100 21 6 8 12 16 20 22 24 26 30 35 50 100 1...

Страница 11: ...icket value This setting will override any ticket pattern n5 or mercy tickets n6 selected 0 off 1 2 3 4 5 6 7 8 9 10 11 12 DISABLED ENABLED N6 GAME TIMEOUT Scroll through the N6 menu with the MENU button Make your selection with the SELECT button The factory settings are highlighted below 30 SEC 1 MIN 1 5 MIN 2 MIN 3 MIN 5 MIN NO OFF N10 MUST BE SET TO NO OFF FOR WASHINGTON STATE COMPLIANCE N7 GAM...

Страница 12: ...factory settings are highlighted below Set how long the final score displays on screen after the game is over Scroll through the N11 menu with the MENU button Make your selection with the SELECT button The factory settings are highlighted below Ring of Fire gameplay consists of individually lit targets that count for double points Scroll through the N11 menu with the MENU button Make your selectio...

Страница 13: ...es paid out in each ticket bucket described on page 10 Press the MENU SELECT button 3 times to clear the game statistics Press the MENU SELECT button to enter Sensor Test mode Break the sensor beam in each target with a ball or a hand to verify sensors are functioning correctly While in Solenoid Test mode press the Menu Select button to activate the ball release solenoid ...

Страница 14: ...o close push up on the upper center of the shield to release the catch mechanism Slowly lower it back into place and lock to secure Unlock the center front door of the ramp and pull out the drawer to access the controlling circuit boards and menu buttons HOW TO OPEN CLOSE TARGET SHIELD HOW TO ACCESS CIRCUIT BOARDS ...

Страница 15: ...ck Sensor AACE3866 Rack Sensor AACE3867 Rack Sensor AACE3868 AAMB3852 Motherboard Shield LED AACE3889 AACE3888 Display Com Power In from Power Supply AACE3878 Ribbon Cable to Display Vibration Sensor AACE3886 Power In AACE3860 Ball Track Sensors AACE3857 DBA In AACE3859 Coin In AACE3852 Ball Release Alley Edge Led AACE3851 Power In AACE3860 1 Counters Menu Buttons AACE3861 Com AACE3860 Tickets AAC...

Страница 16: ...tch Wired Normally Open AASW200 1 4 Spacer A5SENY020 AACE3850 To Bill Acceptor Part A5AC9091 A5PL4200 Mounting Plate needed to install DBA AACE3879 AAMB3855 Aux I O Board To Coin Door Cable AACE3852 AACE3861 Menu Select Button AAPB2700 Menu Button AAPB2700 AACE3861 AACE3850 To Game Ground AACE3859 AACE3859 Green Orange is DBA coin signal UCL Connector Card Swipe system cable would be plugged into ...

Страница 17: ...ations provided AACE3868 AACE3866 AACE3867 AACE3862 AACE3863 AACE3864 AACE3865 AACE3870 AACE3874 AACE3875 AACE3876 AACE3877 AACE3873 AACE3869 AACE3871 The AACB3851 Sensor Boards plug into the motherboard as shown AACE3872 Rack Sensor AACE3862 Rack Sensor AACE3863 Rack Sensor AACE3864 Rack Sensor AACE3865 Rack Sensor AACE3866 Rack Sensor AACE3867 Rack Sensor AACE3868 AAMB3852 Motherboard ...

Страница 18: ...3884 Front Bumper LED s AACE3851 Ball Release AABR3850 110 Volt Games AABR3851 220 Volt Games AABD5029 AC Driver Board A5FUSE3 2 Amp Fuse Ball Release is controlled by signal to AC Driver Board There is a 2 amp fuse in black box on board Green LED will be ON when ball release activates AACE3853 Cable to Ball Release AACE3851 Ball Release Signal AAMB3855 Aux I O Board AACE3857 AACE3857 AACE3860 Thi...

Страница 19: ...880 1 AACE3880 3 Power Strip A5OU1000 To AC Driver Board AACE3855 To DBA AACE3859 AACE3858 1 AACE3858 2 Speaker AACE8811 Thick Red Black Wires from AACB9503 Board 4 3 1 2 AACE3882 4 3 1 2 AACE3882 Cable from top of head to ramp AACE3860 AACE3882 Comm Cable to Aux Board AAMB3855 Aux I O Board AACB3804 Display Driver AACE3888 AACE3860 Com to Motherboard AACE3860 Power In Power In To Display LED Ligh...

Страница 20: ...ips LED Light Strip LED Light Strip From Power Supply AACE3890 12 V Jumper AACB3804 Display Driver From Power Supply 4 3 1 2 AACE3891 A5LD1052 Display Modules 2 per game AACE3891 A5LD1052 Display Modules 2 per game AACE3892 AACE3878 Ribbon Cable to Display ...

Страница 21: ...21 OPTIONAL GRAND MARQUEE WIRING DIAGRAMS Power Supply A5PS1008 FT AC Power In A5CORD5 Speaker AACE8811 Speaker AACE8811 ...

Страница 22: ...itor Motherboard Power Supply Diagnostics section Chase lights on ramp do not flash LED strip faulty Faulty Cable Faulty Light Board Unplug one strip from the Light Board and see if both strips are bad or just one Remove plastic cover and examine LED strip Check cables from LED strips to Light Board AACE3885 2 AACE3583 AACE3587 Replace Light Board A5CB3860 LED s lighting up playfield rings not wor...

Страница 23: ...ting section of dollar bill ac ceptor manual included with this game or the diagnostics label of the back of the unit Low tickets displays on monitor Stack of tickets not resting properly on either of the low ticket switches Faulty switch Faulty wire or connection Faulty 2300 board Adjust stack of tickets so they hold both the switch actuators down Replace low ticket switch AASW200 Check for prope...

Страница 24: ...cessary Clean with compressed air and if necessary wipe sensor with isopropyl alcohol on a cotton swab Flip tickets and load upside down to have large cut notch toward opto sensor Replace dispenser with spare working dispenser A5TD1 Replace main board if possible to isolate the problem to the main circuit board A5CB2300 Wrong number of tickets dispensed Ticket Pattern set wrong Dirty opto sensor o...

Страница 25: ...Replace if needed AACB2203 Check connections from sensor board to main board Check continuity on wires Not enough balls are released Game is waiting for player to throw balls and there are none left in track Ball count opto sensor is defective Opto sensor at ball release is defective If this sensor misses a ball the game will continue waiting until game time outs Replace sensor AACB2203 If this se...

Страница 26: ...852 cable is plugged into blue IN socket on main board C5 Replace if needed Replace 2300 board A5CB2300 Communication to Motherboard faulty Motherboard is located behind monitor Check AACE2011 cable from Serial Interface board to coupler between head and ramp A5CO2002 up to motherboard behind the display Check Comm between 2300 and Main board Game does not coin up Game has audio track clinking sou...

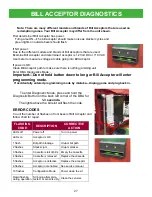
Страница 27: ...ash the code First determine if Bill Acceptor has power Turn game ON The bill acceptor should make noise as stacker cycles and green lights on outside bezel should flash If NO power Due to the different models and brands of Bill Acceptors that are used Examine Bill Acceptor and determine if acceptor is 12 Volt DC or 110 VAC Use meter to measure voltage at cable going into Bill Acceptor If power is...

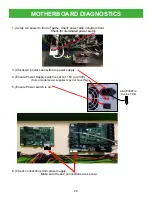
Страница 28: ...nsure Power Supply switch is set to 115V or 230V Some model power supplies may not have this 5 Ensure Power switch is on 6 Check connections from power supply Make sure these 2 connections are secure 1 Verify AC power to front of game Check power strip in bottom front Check for illuminated power switch ...

Страница 29: ... LOG If repairs are necessary it is good practice to keep a log of repairs done and parts ordered The chart below will assist you in tracking your game s maintenance DATE MAINTENANCE PERFORMED PARTS ORDERED INITIALS ...

Страница 30: ...he quickest and provide you a valuable troubleshooting option Call our technicians to get recommendations for what you should keep on hand for spare parts Technical Support You are the best tool for troubleshooting Your abilities to understand the game and your skills to repair the game are invaluable to us If you need help you know you can call us It s not easy to diag nose a game remotely by pho...

Страница 31: ... product or as a result of any unauthorized repairs or alterations The warranty does not apply if any serial number decal is altered defaced or removed from its original position Should you need your game serviced determine the serial number from the decal placed on the front of this manual or locate it on the back of the game Then contact our Service Department at 920 822 3951 or e mail service b...

Отзывы: