Wir freuen uns, dass Sie sich für ein Skandika-Zelt entschieden haben. Es bietet Ihnen viel Platz und Komfort in bekannt hoher
Skandika-Qualität.
bauen Sie das Zelt sicherheitshalber vor dem urlaub einmal zu hause auf.
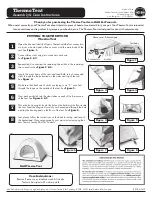
1 a) Breiten Sie das Außenzelt möglichst flach auf dem Boden aus.
b) Führen Sie die Stangen in die jeweiligen Stangenkanäle am Außenzelt - die Farbkodierung hilft Ihnen hier.
c) Schieben Sie die Ring-Pin Befestigungen am Außenrand des Zeltes in die hohle Enden der Stangen.
2 a) Befestigen Sie die Clips am Außenzelt an die Stangen.
b) Befestigen Sie die Stangen und die Ecken des Außenzeltes mit den mitgelieferten Nägeln/Heringen.
c) Die Stahlstangen dienen als Aufstellstangen für den Eingang. Die Spitzen werden durch die Ösen in der Tür eingesteckt.
3 Befestigen Sie die Abspannseile mit den mitgelieferten Nägeln/Heringen.
4 Hängen Sie die Innenkabine ein. Sie wird mit Knebeln/Ringen bzw. Haken/Schlaufen wie abgebildet am Außenzelt befestigt.
6 Legen Sie die wannenförmige Zeltbodenunterlage in das Zelt und befestigen Sie sie mit den mitgelieferten Nägeln/Heringen..
d
gb
f
Thank you for choosing your new tent from the Skandika range. It provides you with a lot of room and high level of comfort in
the well-known superior quality of Skandika.
before you go on holiday with the new tent, please built it once.
1 a) Lay the rain fly on the ground as flat as possible.
b) Insert the color coded poles to the corresponding sleeves.
c) Insert the pins found at the bottom of the tent into the poles.
2 a) Clip the hooks to the poles.
b) Stake down the poles and the other tent corners.
c) Erect the steep poles to lift doors through eyelets of doors.
3 Pull the guy ropes and stake down - this will keep the tent more stable in the strong winds.
4 Hang the inner tent with toggles and hooks to the fly.
6 Lay the tub style groundsheet and stake the corners of the tent.
Nous nous réjouissons que vous ayez choisi une tente Skandika. Ces tentes offrent beaucoup d’espace et de confort et ceci en
qualité supérieure marque Skandika.
Nous vous conseillons de faire un essai de montage avant de partir en vacances.
1 a) Etalez la toile extérieure sur le sol, le plus à plat possible.
b) Insérez les arceaux dans les manches correspondantes situées sur la toile extérieure - les repères de couleur sont là pour
vous aider.
c) Introduisez les chevilles du système Ring & Pin dans les extrémités des arceaux.
2 a) Fixez les clips se trouvant sur la paroi de la toile extérieure, aux arceaux.
b) Fixez les arceaux et tous les coins de la toile extérieure à l‘aide des sardines et cornières recues.
c) Les arceaux en acier servent à monter la porte d‘entrée. Les pointes doivent être insérées à travers les oeillets de la porte.
3 Fixez la tente au sol à l‘aide des cordes d‘ancrage et des sardines et cornières recues.
4 Accrochez la chambre intérieure. Elle se fixe grâce aux crochets et aux attaches, comme représenté sur le schéma.
6 Etalez le tapis de sol en forme de baignoire dans la tente et fixez-le à l‘aide des sardines et cornières recues.
pour plus d‘informations et de conseils sur les tentes Skandika, cliquez sur le lien suivant
www.skandika.de
.
AufbAuANleiTuNg · SeT up iNSTRucTiON - iNSTRucTiONS de MONTAge