background image

Chapter 5-10 

CE34/44/54 Pilot menu & navigation examples

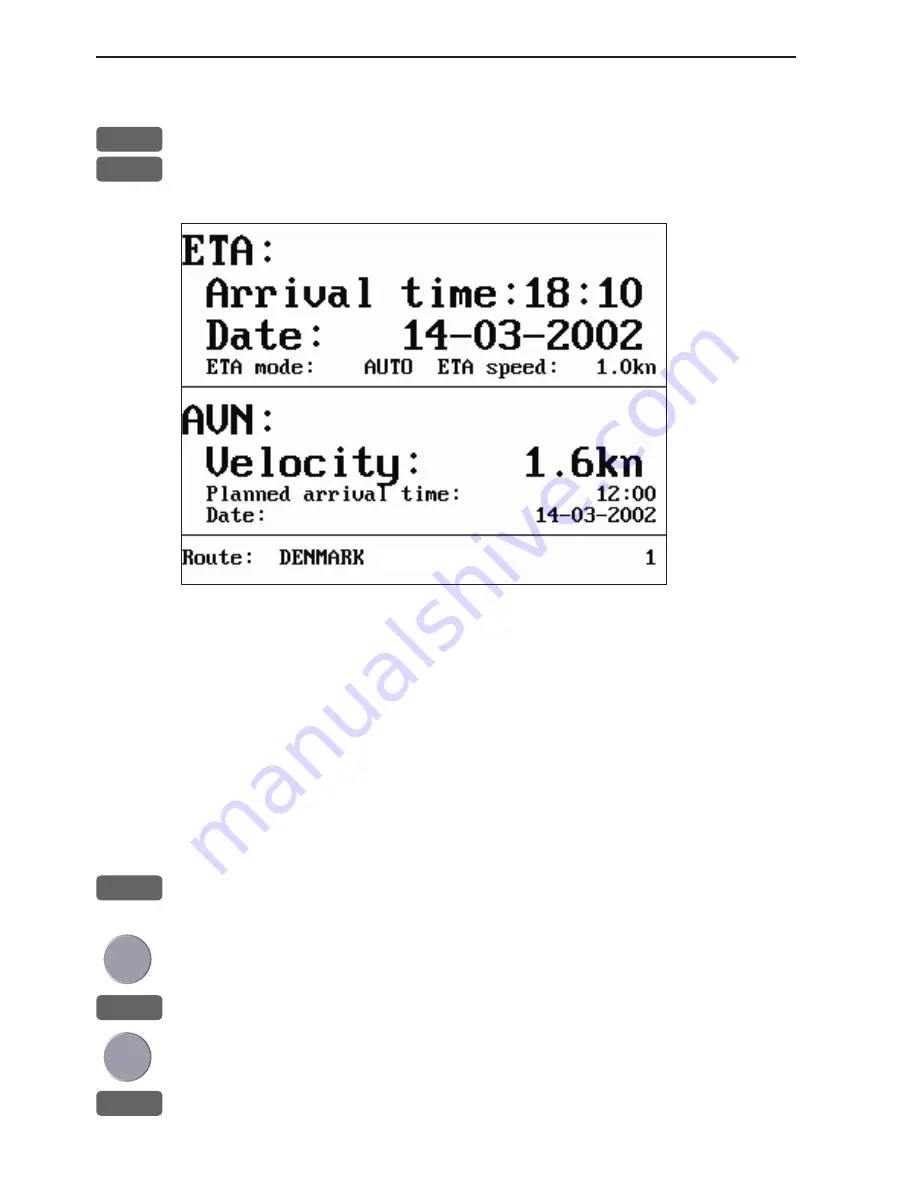
5.5 ETA & AVN display

MENU


Call up the menu bar, and...

3,4


load the ETA & AVN display

-to receive any data will require that navigation mode is active.

ETA - Estimated Time of Arrival - refers to the inserted local time, 
and can be calculated to any point used for navigation.

AVN - Approximate Velocity Necessary - is automatically calculated 
in knots after you key in the planned arrival time and date.

In route navigation the approaching point and present speed over 
ground (AUTO) is automatically used for the calculation.
You can change to any waypoint in the route and also insert an alter-
native ETA speed (MANUAL).

ADJ


Open for change - 

in route navigation the approaching point is auto-

matically suggested and present speed is used for calculation.


If required - go to, and...

0-9


Insert alternative routepoint - 

only in Route navigation.


Go to ETA mode, and...

+/-


Select AUTO or MANUAL

Содержание CE34 ChartSounder

Страница 1: ...through SETUP menu or when unit is off All electronic navigation equipment is subject to external factors beyond the control of the manufacturer Therefore such equipment must be regarded as an aid to navigation The prudent navigator will for that reason never rely on a single source for position fixing and navigation ...

Страница 2: ...ing MOB Window 3 Window 1 Data display will provide information of Course Bear ing and Distance to MOB position time elapsed since the incident occurred first in seconds and then in minutes if is shown instead of numbers of minutes means that the elapsed time has exceeded 9999 minutes The two lines after the TIME shows the MOB position in Lat Long Window 2 The chart display will provide a graphica...

Страница 3: ... Menu bar 2 5 2 4 Menu layout 2 6 2 5 Choice of symbols 2 7 2 6 Naming of routes points etc 2 7 2 7 Initial start up 2 7 2 8 Turn power on 2 9 2 9 Turn power off 2 9 Chapter 3 Chart menu and INFO windows 3 Chart menu 3 1 3 1 Shortcut to the pages in the chart series 3 1 3 1 1 Data field on chart 3 2 3 1 2 Ship symbol 3 3 3 1 3 Cursor function 3 3 3 1 4 Range or zoom function 3 4 3 2 Dual Chart dis...

Страница 4: ... of the vessel s speed 4 12 Chapter 5 Pilot menu navigation examples 5 Pilot menu 5 1 5 1 Shortcut to the pages in the pilot series 5 1 5 2 Highway display and Navigation setup 5 3 5 2 1 Highway display when navigation mode is active 5 5 5 3 Position display 5 6 5 4 Dual speed display trawling speed display 5 9 5 5 ETA AVN display 5 10 5 6 Trim Highway display 5 11 5 7 Set Drift display 5 12 5 8 P...

Страница 5: ...alculation 7 8 7 4 Lines stored in the memory 7 9 7 4 1 Delete lines via menu 7 10 7 5 Start stop track 7 11 7 6 Tracks stored in the memory 7 12 7 6 1 Delete tracks via menu 7 13 7 7 Targets stored in the memory 7 14 7 7 1 Delete target via menu 7 15 7 8 MOB data 7 15 7 9 Data transfer via DataCard or disc 7 16 7 9 1 List of criteria for data transfer in the Action column 7 19 7 10 Data transfer ...

Страница 6: ...1 9 2 Preventive maintenance 9 2 9 3 Repair and service 9 2 9 4 Specifications 9 3 Appendix A Glossary of terms A 1 Appendix B List of datum B 1 Appendix C C MAP attributes C 1 Index end of manual Declarations of conformity end of manual International warranty end of manual List of Simrad distributors end of manual ...

Страница 7: ... and reliable service which include a 24 hour global cover age The GPS system consists of approx 24 satellites which orbit around the Earth at an altitude of approx 20 200 km The satellites transmit perfectly synchronized data However depending on the position the signals will reach the receiver at a slightly different time By adding the measured time difference to the known position of the satell...

Страница 8: ... of the glass pieces The lifetime of the internal battery is minimum 5 years If not exchanged before it goes flat all data in the unit s memory will be lost We strongly recommend that you frequently store your data on a Simrad DataCard For exchange of battery call your local Simrad workshop Power source fuse and power cable Check that the DC power supplied to the unit is within the range of 10 to ...

Страница 9: ...een The system will perform a software update and check for communica tion activity When finished a new start up window will be presented on the screen After making sure that all connected products are turned ON ENT Press ENT to start automatic input source setup if a new product is connected later on refer to section 8 5 Interface setup New window Automatic input source setup listing Data type Gr...

Страница 10: ...nates will stop flashing and the will be replaced by actual course and speed figures 1 3 1 Dedicated function keys TRACK Short press will activate CHART Short press will toggle between Chart data field placed either at the right side or at the top and echo data CHART Long press will toggle between Chart in full screen Dual Chart Custom screen1 Custom screen2 ECHO Long press will toggle between Ech...

Страница 11: ...t Drift When navigation mode is active these two displays will be included ETA AVN Trim Highway PILOT Long press will toggle between Highway Custom screen1 Custom screen2 PAGE Short press will toggle between the current active pages under the main function keys Long press will start a rotation of the three pages section 2 1 ...

Страница 12: ...light to call up a small data window with details on the object The data window will stay on screen for about 10 seconds or till cursor is moved Press ENT 2 to access further details on C MAP objects or user data i e waypoints routes etc Press ENT 5 to lock cursors in Dual Chart screen and ENT 5 to release cursors again Press CLR to switch off cursor function The ship symbol will now automatically...

Страница 13: ... when ready to save the route You can enter a new name for the route change type and color for the course line 5 Press ENT to accept and save the route How to make a route from existing waypoints stored in the WP list 1 Press MENU 5 2 to call up the route list 2 Press CLR Make new route from WP list 3 Move cursor up down to select the WP position for the first routepoint and press PLOT 4 Repeat po...

Страница 14: ...o go to 1 Press GOTO 2 2 Press ENT to start navigation Without placing cursor on the symbol of the WP you wish to go to 1 Press GOTO 2 2 Use the keys to select the WP you wish to go to 3 Press ENT to start navigation How to start route navigation two ways Place cursor on the routepoint you wish to go to first 1 Press GOTO 3 2 Select direction in route Forward or Reverse 3 Press ENT to start naviga...

Страница 15: ...t point in the route Press GOTO 3 to stop navigation Start and stop track 1 Press TRACK to call up Start track window 2 Before tracking is started you can give the track a new name make changes to track interval track line type and color 3 Press ENT to start track 4 When you wish to stop tracking press TRACK ENT ...

Страница 16: ... lock display Press ENT 4 Bottom lock is a combination of stan dard echo display and extended area around the bottom Zoom display Press ENT 5 The expansion is a combination of standard echo display and extended area around the VRM Variable Range Marker Shift display Press ENT 6 when operating in deep waters Select the range for an expansion window The expansion window can automati cally follow a c...

Страница 17: ...ations be suf ficient information for the operator In split screens consisting of up to four displays the active display is indicated by a solid red frame Use the WIN key to clockwise toggle between which display on the screen is active Only active displays are operable The PAGE key differs from the other function keys There are three pages under the PAGE key which can be set up to the pres entati...

Страница 18: ...he PAGE key until the full screen Chart display appears MENU Call up the menu bar and 1 2 collect the Dual Chart display or you can toggle between the available displays in the CHART function by pressing long press the CHART key repeatedly The same applies for the other two pages in the PAGE system ie press the PAGE key until a display from the ECHO or PILOT function appears and then collect a new...

Страница 19: ...Press for two seconds to activate the MOB Man overboard function MENU Turns the menu bar on off Exits any data display without taking any action ENT Confirms insertion and editing of data Calls up information on marks waypoints etc on chart together with several INFO win dows Moves cursor in data displays and charts activates cursor on chart Moves left right up down in the menu system Adjusts gain...

Страница 20: ... i e CHART ECHO and PILOT Long press starts automatic rota tion of these pages Press any key to stop rotation ADJ Gives access to setup displays related to active display A B Shortcut to the A B function with cursor active on chart display which provides bearing and distance from your current cursor posi tion A to an arbitrary point B WIN Toggles between active windows in split screen The active w...

Страница 21: ...key to highlight the function and press ENT If you want to switch to a different menu use the cursor key left right to move to the adjacent menu Most functions in the menus are general and can be called forward at any time Functions not currently available will have a different color from the rest of the functions Not all functions are available in any window size i e full screen half screen or qu...

Страница 22: ...oints CHART C MAP cartridge 2 Speed diagram 2 Routes ECHO Echosounder setup 3 Decca lanes 3 Route calculation PILOT Pilot Position setup 4 Loran C 4 Lines 1 Speed alarm units 5 Satellites 5 Tracks language 6 DGPS 6 Targets 2 Interface setup 7 SDGPS 7 MOB data 3 Palette setup 8 DSC info 8 Data transfer 4 Factory settings 9 Depth temp diagram 5 QuickGuide When selecting a sub menu in the SETUP menu ...

Страница 23: ... you make a mistake Depending on the selected language the 0 zero key will hold special charac ters e g Æ Ø Å Ä Ö Ü Ñ and the 9 nine key will hold empty space Press the CLR key to delete everything from cursor position and to the right of cursor in that row 2 7 Initial start up When starting up for the very first time the first time after loading a new software or after a master reset Make sure th...

Страница 24: ...guide which informs of the use of the keys and where you can enter owner s setup etc the quick guide is also accessible via MENU 6 5 ENT Press ENT when ready to assume normal operation go to MENU 6 2 if you wish to make adjustments to the interface setup Heading is only available if a compass was detected at start up PWR Press PWR again to adjust the lighting in the screen and select day or night ...

Страница 25: ... time or after loading a new software or after a master reset see section 2 7 Starting up at any other time PWR To turn on the CEXX press and hold the PWR key until you have a picture on the screen ENT Press ENT when the system is ready 2 9 Turn power off PWR Call up INFO window and PWR Press and hold until the curtains begin to close The CEXX is now turned off All the data and setups are saved an...

Страница 26: ...Chapter 2 10 CE34 44 54 Fundamentals initial start up ...

Страница 27: ...Chart display will provide a chart in two different scales one for detail smaller range and one for overview greater range The two custom screens will present multiple window combina tions section 3 1 where the chart with greater range as default will be fixed in a quarter window The chart with smaller range will be fixed in the left half window in both custom screens Adjustments can be made indiv...

Страница 28: ...ll toggle between different pres entations of the data field on the chart e g 3 1 1 Data field on chart Chart range indicator 0 11nm can be set ON OFF in Show range section 3 5 Chart setup under General During chart update redraw a progress bar will cover the chart range indicator Depending on different situations the data field on the chart display will give you the ship s current speed speed thr...

Страница 29: ... instantly center the ship on the chart with cursor off 3 1 3 Cursor function With chart display active Press the cursor key to activate the chart cursor cross hairs CLR Press CLR to turn the chart cursor off As default section 3 5 Chart setup under General the chart cursor will automatically switch off if not used in the last five minutes The chart will update and bring the ship s position to the...

Страница 30: ...e extended level range is switched off and the chart changes to a new level of details The extended level range can be toggled OFF ON in General settings default OFF see section 3 5 Chart setup Chart details may not be available in all scales in all areas Non covered areas will be marked as hatched or all blue white with coordinate grid when Grid is set to AUTO default in chart setup depending on ...

Страница 31: ...r and indi vidual chart setup MENU Call up the menu bar and 1 2 press 1 and 2 to call up the Dual Chart display WIN Press the WIN key to select active display red frame ENT Press the ENT key to call up the chart s Quick menu with access to e g Chart info Lock cursors to the same position in both charts on the screen etc refer to section 3 4 2 for more details ADJ Press the ADJ key to call up the c...

Страница 32: ... consist of multiple window combinations e g The displays which are not related to the chart function can be exchanged with a different one It is also possible to change the right half of the screen from two quarter windows to half screen window and vice versa See section 2 1 2 how you go about changing the displays ...

Страница 33: ...following to choose from Scale 1 6600000 Actual chart scale No user data at ship s position 1 Edit user data Inactive function 2 Chart info Refer to Appendix C 3 Find nearest port services Refer to Appendix C 4 Bearing and dist from A to B Inactive function 5 Lock cursors Inactive function 0 Ship to center PAGE More user data MENU Exit Exit info window 0 Ship to center will update the chart and pl...

Страница 34: ...cursors 0 Cursor to center PAGE More user data Inactive function MENU Exit Exit info window 4 Bearing dist from A to B will quickly provide the bearing and distance from your current cursor position A to an arbitrary point B Move cursor to point B and see the calculation in the small info window Press CLR to exit the function 5 Lock cursors will lock the cursors in two chart displays on the same s...

Страница 35: ...Refer to Appendix C 3 Find nearest port services Refer to Appendix C 4 Bearing and dist from A to B Refer to section 3 4 2 5 Lock cursors Refer to section 3 4 2 0 Cursor to center Refer to section 3 4 2 PAGE More user data MENU Exit Exit info window 1 Edit user data opens a new info window Waypoint 1 Edit Edit name symbol color etc 2 Move Move waypoint with cursor CLR Delete Delete waypoint MENU E...

Страница 36: ...ppendix C 3 Find nearest port services Refer to Appendix C 4 Bearing and dist from A to B Refer to section 3 4 2 5 Lock cursors Refer to section 3 4 2 0 Cursor to center Refer to section 3 4 2 PAGE More user data MENU Exit Exit info window 1 Edit user data opens a new info window Route leg 1 Edit leg Open new info window to edit route leg 2 Insert point Move cursor to insert new point 3 Edit Open ...

Страница 37: ...to Appendix C 4 Bearing and dist from A to B Refer to section 3 4 2 5 Lock cursors Refer to section 3 4 2 0 Cursor to center Refer to section 3 4 2 PAGE More user data MENU Exit Exit info window 1 Edit user data opens a new info window Routepoint 1 Edit point Open new info window to edit routepoint 2 Move point Move point with cursor CLR Delete point Delete routepoint 3 Add point Add point to rout...

Страница 38: ... 4 Bearing and dist from A to B Refer to section 3 4 2 5 Lock cursors Refer to section 3 4 2 0 Cursor to center Refer to section 3 4 2 PAGE More user data MENU Exit Exit info window 1 Edit user data opens a new info window Trackpoint CLR Delete point Delete trackpoint 1 Delete points from A to B See below 2 Edit Open new info window 3 Delete Delete the whole track MENU Exit Exit info window Press ...

Страница 39: ...rt info Refer to Appendix C 3 Find nearest port services Refer to Appendix C 4 Bearing and dist from A to B Refer to section 3 4 2 5 Lock cursors Refer to section 3 4 2 0 Cursor to center Refer to section 3 4 2 PAGE More user data MENU Exit Exit info window 1 Edit user data opens a new info window Target 1 Edit Edit name color position etc 2 Move Move point with cursor CLR Delete Delete target MEN...

Страница 40: ...Navigation examples Anchor guard when setting anchor a pre set alarm distance will be activated so in case the ship is drifting too far away from the anchored position the system will initiate a visual and acoustic alert refer to section 5 10 Anchor guard If pressing the GOTO key while one of the NAV modes is active this pop up window will appear on the screen Navigation is ON 1 Advance 2 Restart ...

Страница 41: ...ine 6 Plot target 7 Start track 8 Stop track 9 Set vertical mark MENU Exit PLOT From any display Plot and save mark on ship s position including actual depth indication Preset name sequence SHIP 1 SHIP 2 etc 1 From any display Plot and save waypoint Ship s position is sug gested but you can key in a new position from keypad change the location name cf section 2 6 or change the symbol cf section 2 ...

Страница 42: ...ypoints can be used for making the route simply by placing the cursor on the waypoints and plot the positions In case you make a wrong plot press CLR to erase the last plotted posi tion Save the route with ENT or exit the function with MENU to abandon the route Do not use the exact position of buoys markers etc as waypoints and routepoints The high accuracy of the system may result in a col lision...

Страница 43: ...Auto chart select ON Extended level range OFF Show range WITH BACKGROUND MENU Exit Accept ENT The tabs indicate which groups are available in each display mode e g the above example shows that in FULL display mode you have access to the groups in black General Areas and User data The two groups in red i e Presentation and Depth are only adjustable in CUSTOM display mode See further on in this chap...

Страница 44: ...le on previous page for all display modes except for GRID which has three adjustable functions Motion RELATIVE Cursor 5 min time limit ON Show range WITH BACKGROUND Group Presentation specifies presentation of marine land and chart topics The default settings in this group are fixed in all display modes except for Custom where it is possible by the user to turn a feature ON shown on the chart or O...

Страница 45: ... chart The default settings in this group are fixed in all display modes except for Custom where it is possible by the user to alter the features The color indica tion for depth levels 1 2 and 3 is determined by the color palette in the SETUP menu C MAP features are not available in GRID display mode C MAP features Full Custom Simple Fishing Low Soundings Underwater objects Depth Lines Depth Lines...

Страница 46: ...settings will be applied in all display modes Chart features Defaults and choice of settings Waypoints Non active waypoints ON Waypoint names ON Waypoint depths ON Routes Non active routes AS SELECTED Route names ON Tracks Non active tracks AS SELECTED Track names ON Lines Lines AS SELECTED Line names ON Targets Targets AS SELECTED Target names ON All the features in the user data that are set as ...

Страница 47: ...entified by different colors The number of meters in the levels can be changed The colors are preset in the Palette setup Depth areas can be set ON or OFF Not shown on chart FILLED the depth areas will be filled with the color preset in the Palette setup CONTOUR the depth areas will be marked by a contour line only and the fill will be the same as the background water color on the chart Depth line...

Страница 48: ...as will be reduced as the C MAP library will find the missing area in a different level to cover the blank area otherwise left on the screen However when using this feature chart re draw time will be increased a little Orientation can be set to NORTH UP COURSE UP or NAV UP and the mode can be RELATIVE or TRUE motion COURSE UP the chart will always be presented as north up HEAD UP the chart will au...

Страница 49: ...he line equals a certain number of nautical miles km the indication is highlighted with a background color ON same as above but without background color OFF indication is not shown on chart Soundings can be set to ON or OFF ON the information will be shown as selected i e in feet fathoms or meters OFF soundings are not shown on chart Underwater objects can be set ON or OFF Not shown on chart ...

Страница 50: ...Chapter 3 24 CE34 44 54 Chart menu and INFO windows ...

Страница 51: ...e transmitter is converted into an ultra sonic signal by the transducer and transmitted into the water Any reflected signals from intervening objects such as a fish school are received by the transducer and converted back into an electri cal signal It is then amplified in the amplifier section and finally displayed on the screen The picture displayed is made up of a series of vertical scan lines p...

Страница 52: ...present multiple window combinations section 4 2 where one of the main echo displays i e 50kHz or 200kHz will be fixed in the left half of the screen Adjustments can be made individually to both displays section 4 7 To access one of the displays via the menu e g MENU Call up the menu bar and 2 2 press 2 and 2 to call up the Echo display for 200kHz in full screen see display example on next page 4 ...

Страница 53: ...line Time scale Depth range is adjust able with keys or the Quick range keys 1 9 Press key 0 to return to Auto range The data field is preset to show Gain level Frequency Transmit pulse length A SHORT set to AUTO Transmit power A 10W set to AUTO see section 4 7 Water temperature T in Celcius or Fahrenheit in 1 10 degrees water or SOG speed S in knots or kilometers hour or miles hour actual depth D...

Страница 54: ...values ENT Confirm changes or MENU Abandon changes and exit Setup display 4 4 Variable range marker The VRM Variable Range Marker refers to a horizontal black line shown on the display screen The user can measure the range to targets shown on the display screen by use of the VRM The depth to the VRM can be seen in the top left side of the screen for a few seconds after the VRM line is moved From a...

Страница 55: ... ter beam 38 50 kHz is for searching in a wider area determining bottom conditions and going the deepest 2 Hide Activate A scope The amplitude scope at the right side of the echo display indicates the precise amplitude or strength of the last received ping sounding which often can be used for determining individual species of fish or hardness of the bottom 3 Standard Echo display Return to the bas...

Страница 56: ...r to observe noise picked up by the transducer MENU Abandon the Echo quick menu without making any changes 4 6 Plot waypoint or event mark via PLOT menu From active echo display PLOT Call up the PLOT menu with the following to choose from 9 Set vertical mark will plot a vertical marker line at the current ping or you can plot the position of a given echo on the chart 3 Insert waypoint will activat...

Страница 57: ...rmal 20 log R Ping to ping filter ON Signal threshold OFF Color threshold OFF Depth grid OFF Transmit pulse length AUTO Transmit power AUTO Scroll synchronization TIME Scroll speed HIGH Use the cursor key to move cursor around in the display 0 9 Key in new figures or Toggle between available values ENT Confirm changes or MENU Abandon changes and exit display Range start allows the user to set the ...

Страница 58: ... those of the sea floor itself Expansion window zoom level can be selected in eight steps ranging from 1 to 50 meters or converted to feet or fathoms refer to Setup for units section 8 4 This function allows you to take a closer look at a particular section of the water underneath your boat You can expand the view near the bottom Bottom expansion or near the Variable Range Marker VRM expansion TVG...

Страница 59: ...epth grid enables a more precise reading of depth and target rela tions across the screen Transmit pulse length can be set OFF to observe noise in the water Auto range will switch to manual mode Set to AUTO the optimum setting will be applied according to the water depth Or it can be set manually if a specific pulse length is required SHORT less than 10m deep water MEDIUM between 10 and 50 m deep ...

Страница 60: ...Transmi ed ping from the transmi er receiver The sound waves move through the water until they encounter a change in density such as a fish or the bottom This causes the sound waves to echo back up through the water When the reflected sound waves echoes hit the transducer the ceramic disk vibrates at the same frequency This generates a varying voltage between the disk surfaces This volt age goes b...

Страница 61: ...mount going out to the sides The amount of focusing of the sound beam is expressed as a beamwidth Transducer Approximation of the sound pattern below the transducer This angle is the transducer s beamwidth 1 2 maximum intensity Maximum intensity Fig 3 A representation of a transducer bemwidth The center of the sound beam is the most intense then as you move out towards the sides of the sound beam ...

Страница 62: ...h When the vessel is at rest the echo traces will appear stretched and flattened As the vessel s speed becomes greater the echo traces will become shorter and more arched The reason for this change in appearance is that as the vessel speed increases fewer number of sound pings strike each fish A low vessel speed will provide the most accurate information of where fish are loacted ...

Страница 63: ...ation The two custom screens will present multiple window combinations section 5 1 where the window in the top left quarter of the screen will present a fixed display from the pilot menu To access one of the displays via the menu e g MENU Call up the menu bar and 3 1 press 3 and 1 to call up the Highway display in full screen 5 1 Shortcut to the pages in the pilot series The PILOT function is one ...

Страница 64: ...om screen 2 From one of the pilot displays i e full screen and active window in the top left quarter PILOT Short press on the PILOT key will toggle between Highway Position Dual Speed ETA AVN Trim Highway Set Drift The sequence of the six displays under the PILOT key is available when a navigation mode is active If no navigation mode is active then the ETA AVN and the Trim Highway displays will no...

Страница 65: ...larm 00 10nm ON Navigation mode RHUMBLINE Route navigation XTE alarm OFF Auto waypoint shift WP circle Track navigation XTE alarm 00 10nm OFF Auto trackpoint shift WP circle Navigation mode RHUMBLINE Toggle between available values or 0 9 key in a new alarm limit ENT Confirm entry Anchor alarm distance When setting anchor check change the preset alarm distance etc so you will be warned in case you...

Страница 66: ...In Route navigation the XTE alarm value can be specified for each route leg see section 7 2 Navigation mode RHUMBLINE navigation is used for shorter distances and GREAT CIRCLE for long trips especially when crossing at high latitudes COMPOSITE navigation is used when all the legs in a route are not set to the same navigation mode Auto waypoint shift can be set to WP circle WP line or OFF When set ...

Страница 67: ...ntended track between two waypoints XTE alarm lines refer to sec 5 2 for alarm setup Ship s posi tion and course in relation to intended track C Course over ground X XTE Cross track error S Speed over ground B Bearing to approaching point D Distance to approaching point V Speed towards point Route Name number of active route and aproaching routepoint BN Bearing to next point TDG Total distance to ...

Страница 68: ...no position update from GPS or external sensor the displayed position will start to flash and an alarm will be activated to alert the operator Reset the Posi tion missing alarm by CLR The alarm can be set ON OFF see section 6 5 The displayed position will stop flashing once normal position update is resumed Internal POS indicates the source of position data i e Internal External or DeadReckoning G...

Страница 69: ... dif ferential data The accuracy will typically be 2 5 meters for DGPS and 3 7 meters for SDGPS In order to utilize the high accuracy of the GPS system it is neces sary to align the lat long calculations to the paper charts you are using Refer to Position display setup below When using C MAP electronic charts the datum will be aligned automatically Position display setup The general Position setup...

Страница 70: ... will refer to the selected datum To select a new datum place the cursor next to Datum and key in a new number or go two spaces to the right 000 and leaf through the datum list with The datum in the chart display is fixed i e WGS84 Log reset log or insert alternative start figure by altering the value in the Log 1 and or Log 2 line Press CLR to reset the figure and press the numeric keys 0 9 to al...

Страница 71: ...t of the scale MENU Call up the menu bar and 3 3 load Dual Speed display Water speed readout from connected log trans ducer Position with three decimals in minutes Analogue differential speed indicator scale Dynamic speed with short filtering time is reacting quickly to changes but is also more unsteady Average speed with long filtering time gives a very stable reading Course over ground magnetic ...

Страница 72: ...is automatically calculated in knots after you key in the planned arrival time and date In route navigation the approaching point and present speed over ground AUTO is automatically used for the calculation You can change to any waypoint in the route and also insert an alter native ETA speed MANUAL ADJ Open for change in route navigation the approaching point is auto matically suggested and presen...

Страница 73: ...ely on data from external log and compass The Trim Highway display will provide information on actual and mean speed velocity and water speed see also section 5 7 Set Drift display MENU Call up the menu bar and 3 5 load the Trim Highway display B Bearing X XTE Cross track error D Distance to point ADJ Open for change ENT Reset mean speed indication in display ...

Страница 74: ...bar and 3 6 load the Set Drift display Relative direction True direction Speed The Set Drift display will show how fast the current is moving in knots in what direction true it is moving and what direction in relation to the vessel relative To obtain information on actual and mean speed velocity and water speed see the Trim Highway display in section 5 6 ...

Страница 75: ...t menu or via the menu Bottom left quarter window shows the Position display which can be exchanged with any display that will fit into a quarter window Right half screen shows the Chart display which can be exchanged with a different one in same size window or you can change the window combination from half to two quarter windows These custom screens can actually have several displays presented f...

Страница 76: ...ay with indication of how fast the current is moving in knots in what direction true it is moving and what direction in relation to the vessel relative see section 5 7 These readings rely on data from external log and compass With the PILOT key you can toggle between all the displays in the pilot serie see section 5 1 Shortcut to the pages in the pilot serie 5 9 1 Cursor navigation Cursor navigati...

Страница 77: ...int is stored in the memory Refer to section 3 4 9 PLOT menu CHART Shortcut to chart display Place cursor on destination waypoint GOTO Call up the GOTO menu and 2 Select Waypoint navigation mode This will activate the pop up window Navigate to WP and if the highlighted waypoint is the point you wish to sail to then just press ENT to start navigation However if you wish to sail to a different waypo...

Страница 78: ...heck if any of the cur rent settings need to be changed e g forward or reverse direction in route ENT Start navigation From the chart without first placing cursor on a routepoint GOTO Call up the GOTO menu and 3 Select Route navigation mode This will activate the pop up window Navigate in route from where you can choose which route you wish to select for navigation Scroll up down in the route list...

Страница 79: ...rt Track navigation will require that at least one track is stored in the memory Tracks which are not yet completed can not be used for navigation Refer to section 7 5 Start Stop track There are two ways to start Track navigation From the chart Place cursor on the track at the point where you wish to start your navigation from GOTO Call up the GOTO menu and 4 Select Track navigation mode This will...

Страница 80: ...in the window if anything needs to be changed such as Direction in track etc 0 9 Key in the number of the first trackpoint you wish to sail to ENT Start navigation A course line will now be drawn from ship s position to the first point of destination GOTO Pressing GOTO from chart display during navigation will activate an INFO window with the following functions to choose from 1 Advance to next tr...

Страница 81: ...d off again GOTO Call up the GOTO menu and 3 turn anchor guard off 5 11 MOB alarm and navigation The MOB Man overboard alarm and display will be activated if you press the MOB key on the CEXX keypad and hold it depressed for two seconds or activate an external MOB switch hold five sec onds and then press the ENT key to start MOB navigation The MOB display will provide all relevant data for an effi...

Страница 82: ...Chapter 5 20 CE34 44 54 Pilot menu navigation examples ...

Страница 83: ...n 6 4 5 Satellites see section 6 5 6 DGPS see section 6 6 7 SDGPS see section 6 7 8 DSC info see section 6 8 9 Depth temperature diagram see section 6 9 6 1 Wind display The CEXX is ready to present wind data from connected instru ments MENU Call up the menu bar and 4 1 load the Wind instrument display True wind direction Wind rela tive to vessel Wind speed apparent or true ...

Страница 84: ... wish to change Toggle between settings or 0 9 Key in new figure ENT Confirm entry and return to Wind display Damping level can be set to LOW MEDIUM or HIGH The higher level the more steady and slow reacting reading Apparent wind scale can either be set to NORMAL 0 180 or MAGNIFIED 0 60 Wind angle offset can be from 0 to 360 Show wind speed as TRUE or APPARENT Wind speed unit can be either METER S...

Страница 85: ...the menu bar and 4 2 load Speed diagram S Speed over ground V Velocity towards waypoint W Speed through water SD Set and drift Speed and direction true or relative WIND Speed and direction Connection to external sensors is required ADJ Call Speed diagram setup see next page ...

Страница 86: ...e for the speed diagram can be adjusted in this display Time interval can be set in 8 intervals from 1 minute to 3 hours and freeze Go to the function you wish to change Key in new figure or change setting ENT Confirm entry and return to Speed diagram ...

Страница 87: ...26 S Persian 1C 03 North Humber 2A 27 Bombay 7B 04 Holland 2E 28 Calcutta 8B 05 British 3B 29 Bangladesh 6C 06 Lofoten Norway 3E 30 Hokkaido 9C 07 German 3F 31 Tohoku 6C 08 N Baltic 4B 32 Kyusyu 7C 09 NW Spanish 4C 33 Namaqua 4A 10 Trondelag N 4E 34 Cape chain 6A 11 English 5B 35 E Province 8A 12 N Bothnian 5F 36 Dampier 8E 13 S Spanish 6A 37 Port Hedld 4A 14 N Scottish 6C 38 Hokuriku 2C 15 Finlan...

Страница 88: ...or negative offset to the time delay toggle positive negative with ENT Confirm entry To change the position readouts to Loran C mode see section 8 3 under Pilot Position setup where Display position as can be tog gled to Loran C List of Loran C chains Central Pacific Gulf of Alaska Southeast U S Great Lakes Northeast U S Canadian West Coast Canadian East Coast Labrador Sea West Coast U S North Pac...

Страница 89: ...ellites in the GPS system starting from left to right with the num bers 1 to 32 Satellite status bottom line indicates the satellite is healthy excluded or non existing satellite 0 satellite data is faulty satellite is manually excluded You may want to exclude a satellite manually in case a particular satellite is disturbing the navigation ADJ Open for change and Place the cursor on the satellite ...

Страница 90: ... the satellite geometry in relation to 2D positioning and a fixed antenna altitude PDOP position dilution of precision is equivalent to 3D positioning The values will typically stay between 1 3 and 8 The lower the value the higher the quality A poor geometry might produce a value of more than 20 If preset DOP limit is exceeded indicated by in the position display it will cause the position updatin...

Страница 91: ...ddendum part no 183 0122 501 MENU Call up the menu bar and 4 6 load DGPS setup display with built in module To receive valid differ ential data will require that the navigator is locked in on a beacon station Frequency station and bit rate can be selected manually ADJ Open for change and Go to the function you wish to alter Toggle the function or 0 9 insert new figures ENT Confirm entry Beacon inf...

Страница 92: ...have to use the received differential data with cau tion as there is no guarantee it is not faulty Frequency the frequency of the beacon station can be set manually if known However when left in AUTO the navigator will always search for the nearest station with a good signal strength Bit rate indicates bits per second and can be set manually to 25 50 100 or 200 bps Signal strength a good signal st...

Страница 93: ...ages ok NO Range used for position fix NO Type 0 warning received NO CHANNEL 2 sat no Corrections NONE Integrity messages ok NO Range used for position fix NO Type 0 warning received NO Ignore type 0 warnings NO ADJ Open for change Go to the function you wish to alter see below Toggle the function ENT Confirm entry SDGPS select mode determines which differential corrections can be used in the posi...

Страница 94: ...tion Integrity messages ok the SDGPS system will transmit messages concerning the integrity of the GPS satellites This line will indicate whether such messages are received and reliable Range used for position fix if the receiver is tracking a particular SDGPS satellite it knows the distance to that satellite This line will indicate whether the distance is used in the position determina tion Type ...

Страница 95: ...these areas we recommend that the SDGPS select mode is changed from AUTO to PASSIVE Refer to Addendum no 183 0002 000 included in the package for up to date information on the current status of the SDGPS system Number Name System Area 120 AOR E EGNOS EU Atlantic ocean region east 122 AOR W WAAS US Atlantic ocean region west 124 ARTEMIS EGNOS EU 126 INMARSAT EGNOS EU 129 MTSAT 1 MSAS JAPAN 131 IOR ...

Страница 96: ...ephone The data is transmitted via NMEA or SimNet The message from the VHF will appear in a pop up window together with an acoustic alarm Press CLR to reset the alarm or press ENT to stop alarm and select the suggested channel for communication refer to the VHF manual for further details To view the last received message MENU Call up the menu bar and 4 8 load the DSC info display ...

Страница 97: ...erature diagram Present water temperature and depth Depth over time or dis tance Temperature over time or distance ADJ Call Setup for Depth Setup for Depth Scale for depth 0 100 m Color for depth Scale for temperature 0 20 C Color for temperature Interval of screen TIME Time interval 5 MIN Go to the function you wish to change ...

Страница 98: ... be changed Toggle between available colors by means of the keys Scale for temperature can be set to 0 10 0 20 0 30 10 20 and 10 10 Interval of screen the interval for updating of screen can be related to TIME or DISTANCE TIME interval can be set in 6 intervals from 5 minutes to 3 hours freeze for refreshing of the screen DISTANCE can be set in 7 intervals ranging from 0 05nm to 90nm in order to a...

Страница 99: ...ored in the memory The waypoint list will appear in alphabetical order and will include the waypoint s position in lat long To edit one of the stored way points MENU Call up the menu bar and 5 1 load waypoint list Waypoint WP 2 x WP 1 57 14 853N 9 51 966E x WP 10 55 59 954N 10 47 247E x WP 11 55 59 203N 11 15 562E x WP 2 57 20 289N 10 01 404E x WP 3 57 24 990N 10 15 561E x WP 4 57 24 990N 10 39 83...

Страница 100: ...ion to ship s position ENT Confirm entry and return to WP list Plot new waypoints with the PLOT key refer to section 3 4 9 7 1 1 Delete waypoints via menu MENU Call up the menu bar and 5 1 load waypoint list Select waypoint you wish to delete ENT Open for editing WIN Delete waypoint CLR Confirm that you want to delete the selected waypoint if not sure press MENU to exit the display without having ...

Страница 101: ...he chart via info windows refer to sec tions 3 4 4 and 3 4 5 To delete a route refer to section 7 2 1 Making new routes can be done directly on the chart with the PLOT function refer to section 3 4 9 or from the WP list using existing waypoints refer to section 7 2 2 MENU Call up the menu bar and 5 2 load route list display Toggle through the stored routes with the keys or A Z Select route by ente...

Страница 102: ... you wish to make any changes Editing a route currently used for navigation is not possible Setting the Course line to OFF in this display will make the route invisible on the screen Put it back on the screen by setting it ON again The course line and XTE line can be changed in color there are a total of 15 colors to choose from together with 9 different line types ...

Страница 103: ...tween available values if no more alterations are required go to ENT or you can insert remove routepoints from the route by entering a new display PLOT Open for the function Remove insert routepoints Existing routepoints can be removed by using the keys to high CLR light the routepoint you wish to remove and press CLR New routepoints can be added to the route by using the cursor to go up down in t...

Страница 104: ...r as a route it is easily done via the route list MENU Call up the menu bar and 5 2 load route list display CLR Make new route from WP list Use the cursor to go up down in the WP list to select the position you wish to add to the route then By means of the keys you can control where the highlighted posi PLOT tion is placed in the route press PLOT the last point in the RtePt panel is empty and as s...

Страница 105: ...NT and go to the Edit display or leave the function with MENU to abandon the route In the Edit route display you can set up the route preferences you need and also change the name of the route Place the cursor on the function you wish to change 0 9 Key in new figures and toggle between available values ENT Confirm editing MENU Return to route list ...

Страница 106: ...menu bar and 5 3 load route calculation display Toggle between available routes in the memory Go to Routepoint A and 0 9 Select the first routepoint A from where you wish to start the calcu lation in the route and then select the second point B Present speed is automatically used for calculating the arrival time but if required an alternative speed can be inserted ENT Open for change 0 9 Key in a ...

Страница 107: ...o draw new lines you need a chart in the active window place the cursor where you wish to start the line and press PLOT Then follow the instructions in the info windows Refer to section 3 4 9 Lines can also be edited directly on the chart via info windows refer to section 3 4 4 and 3 4 5 MENU Call up the menu bar and 5 4 load line list display only plotted lines saved in the memory can be called f...

Страница 108: ...change i e name line type or color Toggle between available values ENT Confirm editing MENU Return to line list 7 4 1 Delete lines via menu MENU Call up the menu bar and 5 4 load line list display Select the line you wish to delete ENT Call up the details on highlighted line ENT Open for editing WIN Delete line CLR Confirm that you want to delete the selected line if not sure press MENU to exit th...

Страница 109: ...n TRACK Load Start track pop up window If you wish to change the default values Move cursor to where you wish to make a change Toggle between available values or 0 9 key in new values ENT Start track Name of track can be altered max 25 characters Display track can be set ON and OFF where OFF will make it invisible on the screen Turn ON to put it back on the screen Update of the track can be perfor...

Страница 110: ...n the memory All tracks of more than 1 trackpoint will automatically be stored in the memory To see which tracks are registered you can scroll through the list by MENU Call up the menu bar and 5 5 load track list display Toggle through the stored tracks with the keys or A Z Select track by entering its name Move the cursor up down to select a specific track ENT Call up the details on highlighted t...

Страница 111: ...MENU Return to track list 7 6 1 Delete tracks via menu MENU Call up the menu bar and 5 5 load track list display Select the track you wish to delete ENT Call up the details on highlighted track ENT Open for editing WIN Delete track CLR Confirm that you want to delete the selected track if not sure press MENU to exit the display without having made any changes Edit tracks directly on the chart via ...

Страница 112: ...plotted target position is automatically preset to actual position of ship or to cursor position when the chart display is active and the cursor is on see INFO windows section 3 4 7 MENU Call up the menu bar and 5 6 load target display Make the target invis ible on the screen by turning it OFF Put it back on the screen by turning it ON again Select the target you wish to change or replace with a d...

Страница 113: ...hat you want to delete the selected target if not sure press MENU to exit the display without having made any changes Edit targets directly on the chart via info windows refer to section 3 4 7 7 8 MOB data MENU Call up the menu bar and 5 7 load MOB data display MAN OVERBOARD DATE 12 03 2004 TIME 14 23 34 MOB 56 52 489N POS 009 50 305E The MOB display will provide information of the last activated ...

Страница 114: ... data you have created plus the current setups in the internal memory of the unit Do it whenever you have added important data or when you wish to transfer routes and waypoints etc to another compatible unit The storage capacity of the Data Card TL50 disc is divided into two databanks of each 450 Kb mean ing that the entire internal memory can be stored in one databank External memory with data tr...

Страница 115: ... databank Use the cursor key to go to the Action column to decide which action you want taken for each mentioned category of data toggle with keys see section 7 9 1 If you choose to MERGE the data already stored on the DataCard with the data coming from the Internal memory the bottom line in the window will ask you to press ENT to Calculate databank after merge ENT Press ENT to activate Save selec...

Страница 116: ...t Bytes DataCard Amount Bytes Internal after Amount Bytes Action Marks waypoints Lines Routes Targets Tracks Setup 9 244 0 0 1 168 0 0 8 190480 1 2501 11 256 2 168 4 408 1 100 0 0 1 1745 9 244 2 168 4 408 1 100 8 190480 0 0 NO OVERWRITE OVERWRITE OVERWRITE NO NO MENU Exit Load selected data from DataCard ENT Use the cursor key to go to the Action column to decide which action you want taken for ea...

Страница 117: ...d automatically return to the active display on the screen before you made the transfer Transfer of Setup can only be completed between identical units MERGE will mix the transferred data with the data in the memory you are transferring to Press ENT to calculate memory after merge Identical data will be sorted automatically and not saved twice i e Marks waypoints of same position name and symbol L...

Страница 118: ...ffer in operation and performance beyond the control of Simrad MENU Call up the menu bar and 5 8 load the Data transfer window Data transfer 1 DataCard upper drawer see section 7 9 3 DataCard lower drawer see section 7 9 7 NMEA connection MENU Exit 7 Select the NMEA connection CE44 54 example WARNING The normal communica tion via this NMEA port is temporarily abrupted during the time of data trans...

Страница 119: ...on of all waypoints stored in the CEXX WP list to PC When the transmission is completed you will receive a new info window informing of how many waypoints were transferred MENU Exit function and return to normal NMEA communication Transmit routes 3 Press 3 to start transmission of all routes stored in the CEXX Route list to PC When the transmission is completed you will receive a new info window i...

Страница 120: ...stop collecting data if not already finished and start saving the collected data Waypoints routes transmitted to the CEXX are added to the WP route list However if two waypoint route names are identical the latest transferred one will not be saved even though position s may be different Routepoints will not be included in the WP list Saving the collected data can take anywhere from less than a sec...

Страница 121: ... 8 8 1 C MAP cartridges On the unit s front below the keypad are two watertight drawers wherein you place the C MAP cartridge C card you wish to load Do not attempt to insert or remove a cartridge unless the unit is turned off or chart reading is in stand by see below MENU Call up the menu bar and 6 open the SETUP menu and CHART load the pop up window for C MAP cartridges which also brings the cha...

Страница 122: ...ver the boundary lines for the C MAP chart areas can be turned off so they will not be visible on the chart refer to section 3 5 Chart setup Other chart areas can quickly be reached by means of the zoom keys Zoom out until desired area becomes visible Move cursor to approximate area and Zoom in The chart will automatically start to move when cursor reaches the edge of the screen When cursor is swi...

Страница 123: ...c Echo sampling BOTTOM Demo mode OFF MENU Exit Accept ENT CE44 54 example Echosounder setup Select transducers TYPE PORT Transducer 1 NONE ECHO1 Transducer 2 NONE ECHO2 BEAM ANGLE DEPTH Keel depth below surface 00 0 m Display DEPTH BELOW KEEL Data on NMEA out from NONE Alarm for fish Strength 065 OFF Depth DS fish min 0005 m max 0030 m Depth DK alarm min 0005 0 m OFF Depth DK alarm max 0030 0 m OF...

Страница 124: ...l Water profile choose between SALT and FRESH water The set ting will reflect on the Velocity of sound in water SALT 1470 meters per second and FRESH 1430 meters per second as standard The standard set tings can be even more accurate by slightly increasing the number of meters in warm waters and decreasing in cold waters Time distance scale will indicate the elapsed time or distance for the echo p...

Страница 125: ... the display will be simulated 8 3 Pilot Position setup MENU Call up the menu bar and 6 open the SETUP menu and PILOT load Pilot Position setup display Pilot Pos setup Display position as LAT LON Start position 56 57 000N 010 25 000E Speed and course filter level 3 Display speed as SOG Course and bearing as MAGNETIC COG vector length 06 min Time UTC Time 13 43 56 Date 14 02 2004 MENU Exit Accept E...

Страница 126: ...e STW information will require connection of external instrument via the SimNet system or the NMEA port Course and bearing as readings of course and bearing can be made in either MAGNETIC or TRUE Toggle with COG vector length default to 6 minutes indicates own course and speed The length of the COG vector reflects a distance run during the specified number of minutes at the immediate speed Time ca...

Страница 127: ... GPS receiver type N11999 PAGE rotation interval 05 sec Display text in English GB CE34 MENU Exit Accept ENT Software version CE44 54 2 20 TL50 version Not connected AT44 version HW rev 2 SW 12 34 GPS receiver type N12000 PAGE rotation interval 05 sec Display text in English GB CE44 54 MENU Exit Accept ENT Scroll up down to go to the function you wish to change 0 9 Key in new values or Toggle betw...

Страница 128: ...version CE44 54 indicates if an AT44 SimNet converter is connected and which revision hardware and software is implemented Serial number CE34 indicates the unit s internal serial number Interface software version CE34 indicates which version is installed in the CE34 unit for technicians only GPS receiver type indicates which type is installed in the unit for technicians only PAGE rotation interval...

Страница 129: ...speed etc for all other SimNet products connected This means that if two Chartplotters are con nected they will both use position data from the same GPS and heading from the same compass If you wish to use the built in GPS also on the Chartplotter which automatically was set to operate with an external position you can change the Group selection from SIMRAD to STAND ALONE Multi source If a main pr...

Страница 130: ...ating on the SimNet bus See below example Move the cursor up down to select one of the listed products Press the key to access additional data Example CE34 CHART SOUNDER SimNet number 100003 Address 1 Device class 60 function 170 Instance system 0 device 1 SimNet Compatible YES Ver 1 000 E Ver NMEA2000 1 004 SW 02 00 Product code FFFF Unique no 138003 The name CHART SOUNDER can be user defined see...

Страница 131: ...ALONE manually selected data source and third party units Source depending on which products sources are connected the legend will indicate none available one available multiple avail able or owned data type locked PLOT Go to Position interface step back with GOTO Position mode INTERNAL the applied position is compiled by the in built GPS receiver EXTERNAL the applied position is compiled by an ex...

Страница 132: ...ion of DGPS data from external receiver The input port will switch from NMEA0183 to RTCM104 standard but the output will continue transmitting NMEA0183 data Datum 000 World Geodetic System 1984 the internal datum is applied if the datum line is light grey If you wish to apply the datum received from external unit and as such need to change the type the position mode must be EXTERNAL Enter a new da...

Страница 133: ...ucer DBT OFF MENU Exit Accept ENT Water CE34 44 54 Setup menu Chapter 8 13 PLOT Go to Water interface step back with GOTO Input INTERNAL ONLY indicates that no external source can be selected for depth Water temperature offset a figure can be keyed in to compensate for differencies in temperature sensor LOG speed calibration the unit is preset to receive 19000 pulses per nautical mile from the log...

Страница 134: ... Exit Accept ENT Compass Chapter 8 14 CE34 44 54 Setup menu PLOT Go to Compass interface step back with GOTO Source indicates that there is one source available Simrad RC35 Use COG as internal heading if no compass is connected you can use the course COG from the built in GPS module by changing NO to YES When using the GPS course as replacement for heading input the accuracy will be reduced in rel...

Страница 135: ...34 Alarm Output REMOTE pin 2 5 ON Alarm stand by level LOW MOB input REMOTE pin 1 5 Long press 5 sec EXTERNAL MOB Short press OFF MENU Exit Accept ENT Alarm CE34 44 54 Setup menu Chapter 8 15 PLOT Go to Waypoint interface step back with GOTO Source will indicate how many units are connected and available NMEA0183 output see also section 8 5 1 Description of sentences PLOT Go to Alarm interface ste...

Страница 136: ... the external switch for more than 5 seconds to activate the MOB function fixed setting and press the ENT key to start MOB navigation Short press on the external switch less than 5 seconds will shift page or plot ship s position Use the keys to toggle between OFF SHIFT PAGE and PLOT SHIP s POS SHIFT PAGE short press on the external switch will shift to next page stored under the PAGE key PLOT SHIP...

Страница 137: ...s detected a fault For instance if the SimNet cable is pulled the counter will be acti vated and once the cable is back in place the counter will stop but will stay at the figure it has reached So therefore a figure other than 0 does not necessarily mean that something is wrong only if the figure continues to increase Prior to call for technical assistance 1 Check connected cabling 2 Check supply ...

Страница 138: ...Net input SimNet output NMEA0183 input and NMEA0183 output are for technicians only PLOT Go to the next and last interface Identification step back with GOTO Unit description can be customized to read e g MAIN UNIT or BACK UP UNIT Maximum number of characters is 16 The identification name can be seen in the Nodes interface refer to the beginning of this section ENT Confirm editing or MENU exit fun...

Страница 139: ...emperature RMB Recommended minimum navigation information RMC Recommended minimum specific GPS data RNN Routes RTE Routes ONC ON Complete route or ONW ON Working route VHW Water speed and heading VTG Course over ground and ground speed WPL Waypoint location XTE Cross Track Error measured ZTG UTC time to destination waypoint ZDA Time and date Description of NMEA0183 instrument input HDG Heading Dev...

Страница 140: ...83 external position heading and speed input GLL Geographic position latitude longitude RMA Recommended minimum specific Loran C data RMC Recommended minimum specific GPS data GGA Global Positioning System fix data VTG Track made good course and ground speed ...

Страница 141: ... Palette setup Palette 1 to 4 are preset to 1 Bright sunshine 2 Day normal day light 3 Dusk and 4 Night settings These four setups are not adjust able Palette 5 to 9 can be customized to suit individual needs and wishes If you wish to make your own special palette setup in e g palette 5 then 5 Select Palette setup 5 Use cursor to scroll up down in display ...

Страница 142: ... However an alternative is to store the data on a DataCard or disc refer to section 7 9 FACTORY PRESETS If the unit is still alive but has ceased to respond to normal operation it could become necessary to return to the factory presets but first check Troubleshooting in section 9 1 MENU Call up the menu bar and 6 4 activate the display for Factory settings DELETE MEMORY 1 Delete all WAYPOINTS 2 De...

Страница 143: ...ive two choices Press 1 Product SimNet reset Reset this unit only Will bring this unit only back to factory defaults of the Interface setup The unit will restart with Automatic input source setup as described in section 2 7 Initial start up Press 2 Global SimNet reset Reset entire Simrad group on the network Will bring this unit together with all connected units which are not turned off at the mom...

Страница 144: ...cture appears on the screen All user made data will be erased and all settings are returned to factory presets 8 8 QuickGuide A description of the key functions and general guidance is available in a QuickGuide which can be accessed either at start up display press PAGE or via the menu MENU Call up the menu bar and 6 5 activate the QuickGuide PAGE Leaf through the information help text in the PAGE...

Страница 145: ...on 8 7 No GPS position update Check that position mode is INTERNAL refer to interface setup in MENU 6 2 Position Check antenna and cable Replace antenna or cable Screen update is extremely slow Check that the stored Tracks and Routes not currently in use are not all drawn up on the chart Turn off Course line for each stored route in sec 7 2 and turn off Dis play track in sec 7 6 Echo picture appea...

Страница 146: ...ore wiping the unit Never use cleaning solutions containing spirit alcohol gasoline or oils Electrical connections periodically check the electrical connections Make sure that connections are tight and that no cables are frayed or worn Transducer periodically clean the face of the transducer with a plastic uten sil using a scrubbing action Do not use a harsh abrasive or a solvent to clean the tran...

Страница 147: ...t NMEA 0183 incl SimNet NMEA2000 via AT44 Active Tee PC up download WPL and RTE alarm Alarm relay contact closure CE44 54 Signal output 5 V 50 mA CE34 log out 200 pulses nm 5 Volt pulses CE44 54 Main fuse T6 3A slow 5x20 mm SimNet control Maximum number of products connected in a network 50 units Maximum cable length excl 30 m wind transducer cable 120 m 400 Bit rate of the bus 250 kbit second Max...

Страница 148: ...ual scales and detail levels Internal memory Dynamic storage with combinations of or totals up to 35 000 marks waypoints 10 000 waypoints with name 25 characters 50 000 trackpoints 50 000 line sections 1 000 routes Echosounder section CE34 Frequencies 50 and 200 kHz selectable Output power Variable up to 600W RMS 4 800 W PP Impedance 175 425 ohms Display ranges 5 to 1000 m in 21 steps manual and a...

Страница 149: ...de Detection ranges Frequency Beam Fish Bottom 38 kHz 13x21 410m 1800 m 50 kHz 10x16 430m 1500 m 200 kHz 7 280m 400 m Single Fish Target Strength 30dB 60cm cod Bottom Back Scattering Strength 20dB Simrad transducer C38 200 or C50 200 Pulse length Short medium long and auto Transmission rate 10 pings per second Alarms Fish max and min depth Zoom mode Shift bottom and VRM expansion 3 to 50 meters fe...

Страница 150: ... 200 300W wide beam high performance combi transducer 38 and 200kHz 32 beams Airmar B260 22 1kW combi transducer 50 and 200kHz 19 and 6 beams Cables included Power cable 2 m 4 pin female connector incl fuse 153 5000 006 NMEA cable 1 5 m 9 pin female connector 153 3002 005 Antenna cable 10 m RG58 Accessories included for CE44 54 AT44 Active Tee with connector for SimNet control 153 5555 449 SimNet ...

Страница 151: ...ual Station 7 TFT LCD color screen DS44 Dual Station 10 TFT ATFT LCD color screen DS54 Dual Station 15 TFT LCD color screen incl 15 m cable 153 3002 023 max length 25 m Extension cable for dual station 10 m 153 6080 004 Options only for CE34 Alarm NMEA cable 2 m 153 6080 001 Options only for CE44 TiltFrame 10 700 5000 042 Options only for CE44 54 NMEA1 cable 1 5 m 9 pin male connector 153 3002 004...

Страница 152: ...Chapter 9 8 CE34 44 54 Troubleshooting Service and Specifications ...

Страница 153: ... Menu languages Scroll speed etc dGPS differential data is received from satellites via built in DGPS module or an external DGPS Receiver ETA Estimated Time of Arrival at a specific waypoint if keeping a steady speed Great circle the shortest distance between two points on the globe Heading the direction of which the vessel is pointing from ext compass Measurement units the user may select the dis...

Страница 154: ...ing NMEA National Marine Electronics Association The NMEA is an organi zation of manufacturers of marine electronics equipment They have adopted the NMEA0183 as a standard for communications between various types of marine electronic equipment Port side left red Position update if for some reason there is no position update from GPS or external sensor the displayed position will start to flash and...

Страница 155: ...t strength but also in a width representing their target strength Depths DK Depth below keel DS Depth below surface DT Depth below transducer Echogram background color is the color shown on the CEXX in the event no target is present There are three colors to choose from white blue or black where black is especially useful during nighttime operation when the white background could appear too bright...

Страница 156: ...Appendix A 4 CE34 44 54 Glossary of terms ...

Страница 157: ...tory 025 Campo Inchauspe 026 Canton Astro 1966 027 Cape 028 Cape Canaveral 029 Carthage 030 Chatham 1971 031 Chua Astro 032 Corrego Allegre 033 Djakarta 034 DOS 1968 035 Easter Island 1967 036 Gandajika Base 037 Guam 1963 038 GUX 1 Astro 039 Hjorsey 1955 040 Hong Kong 1963 041 Indian 042 Ireland 1965 043 ISTS 073 Astro 1969 044 Johnston Island 1961 045 Kandawala 046 Kerguelen Island 047 Kertau 194...

Страница 158: ... 1984 095 World Geodetic System 1972 096 World Geodetic System 1984 097 World Geodetic System 1984 098 World Geodetic System 1984 099 Lisboa Datum 100 Pulkovo 1942 101 North Am 1927 Alaska Can 102 South American Yacare 103 Old Hawaiian Maui 104 Old Hawaiian Oahu 105 Old Hawaiian Kauai 106 Bukit Rimpah 107 Camp Area Astro 108 Guam 1963 109 G Segara 110 Herat North 111 HU TZU SHAN 112 Indian old 113...

Страница 159: ...ormation place the cursor on a C MAP object and press ENT to call up an info window Scale 1 20000 Actual chart scale No user data at cursor position 1 Edit user data Inactive function 2 Chart info See details below 3 Find nearest port services See details below 4 Bearing and dist from A to B See sec 3 4 2 5 Lock cursors See sec 3 4 2 0 Cursor to center See sec 3 4 2 PAGE More user data Inactive fu...

Страница 160: ...l be provided in relation to the ship s position ENT Press ENT from the chart display to call up the Info window 3 Find nearest port services will call up a list of symbols with rel evant information on each symbol The details in the right column will indicate the distance from the ship to the selected service The services with the shortest distance are listed first Use the cursor to go to the obj...

Страница 161: ...e Port Marina symbol press ENT and 2 2 to call up the details on the facilities at this location Use the cursor key to scroll up down in the objects in the left colum and look in the right column for details on the objects The objects next to symbols have additional information for which you can Open Close by the ENT key ENT Exit Chart info ...

Страница 162: ...h the cursor placed on the tide symbol press ENT to call up the INFO window 2 Press 2 to access chart info MENU Press MENU when you are ready to exit Tide height If you wish to see the low and high tides for a different date in the past or in the future it is possible to change the date Day In the display there will be a red box cursor on the number of the day in the month Toggle to a different nu...

Страница 163: ...e information system is quite accurate However the predic tions are subject to variables which like the weather are beyond the control of man The tide predictions are based on normal weather conditions Hur ricanes and strong winds will often have a strong influence on the water level which can vary several meters Changes in a coast line either due to natural erosion major storms or larger man made...

Страница 164: ...area Railway Road in general Overhead cable w pylons Overhead pipeline Fence line Telepheric Bridge Tunnel tunnel entrance Landmarks Building religious single Cemetery Fortifid structure Siloway route part Tank chimney Dish aerial Radar dome Flagstaff Flagpole Flare stack Mast tower Monument Windmill windmotor MARINE SETTINGS Names Text Nav Aids Light Sectors Lighthouse Light float Lighted offshor...

Страница 165: ... diving gear Scuba recharge Hotel Inn Restaurant Bank Exchange office Pharmacy Port Marina Boat hoist Fuel station Water Electricity Showers Laundrette Public toilets Post box Public telephone Refuse bin Visitor s berth Chaneler Provisions Bottle gas Car parking Parking for boat trailer Caravan site Camping site Sewerage pump station Public telegraph Public radio Public radiotelegraph Tracks route...

Страница 166: ...e economic zone Fishery zone Fishing ground Free port area Harbor area administr Incineration area Log pond Military practice area National territorial area Restricted area Sea plane landing area Spoil ground Straight territorial sea baseline Submarine transit lane Territorial sea area DEPTH SETTINGS Soundings Spot sounding Underwater objects Rocks Wreck area Obstruction Submarine cable Submarine ...

Страница 167: ... menu 3 7 cursor active but not placed on any object or data 3 8 cursor inactive 3 7 cursor placed on route leg or line section 3 10 cursor placed on routepoint or linepoint 3 11 cursor placed on target 3 13 cursor placed on trackpoint 3 12 cursor placed on waypoint 3 9 GOTO menu 3 14 PLOT menu 3 15 C MAP 8 1 attributes C 1 chart info C 1 features 3 18 3 19 find nearest port services C 1 C 2 inser...

Страница 168: ... 8 3 scroll speed 4 7 scroll synchronization 4 7 selecting displays 4 1 4 2 setup 8 3 set vertical mark 4 6 3 16 shift display 4 5 Echosounder functions continued shortcut to echo serie 4 2 signal threshold 4 7 standard display 4 3 4 5 time distance scale 8 3 transducer 8 3 A 3 transducer beamwidth 4 11 transmission line 4 3 transmit power 4 5 4 7 transmit pulse length 4 7 TVG 4 7 variable range m...

Страница 169: ...ry 5 10 auto waypoint shift 5 3 cursor navigation 5 14 Estimated Time of Arrival 5 10 examples 5 14 Navigation continued highway display 5 5 orientation on chart 3 17 restart to approaching point 3 14 route navigation 5 16 set drift display 5 12 setup 5 3 simulator DeadReckoning 8 11 A 2 track navigation 5 17 trim highway display 5 11 turn navigation off 3 14 5 15 waypoint navigation 5 15 NMEA int...

Страница 170: ...gh water 5 9 Status indicator and accuracy 5 7 Symbols 2 7 Targets delete all 8 22 edit via chart 3 13 Targets continued plot new target 3 15 setup edit target 7 14 7 15 stored in the memory 7 14 Track function 7 11 auto trackpoint shift 5 3 delete all 8 22 display track 7 11 edit via chart 3 12 edit via menu 7 13 interval 7 11 line type 7 12 navigation 5 17 navigation setup 5 3 start stop track 7...

Страница 171: ...CE34 44 54 ChartSounder Index ...

Страница 172: ...n of their conformity Conformity assessment Annex II of 1999 5 EC internal production control Employed standards Article 3 1 a EN60945 Article 3 1 b EN60945 Equipment category Navigational equipment intended for world wide use aboard non SOLAS vessels Model s Simrad CP34 CP44 and CP54 DGPS Chartplotter Simrad CE34 CE44 and CE54 DGPS ChartSounder Remarks Manufacturer Simrad Støvring AS Østre Allé 6...

Страница 173: ...products claimed to be defective ON BOARD SERVICE can be arranged by authorized local service dealers or national distributors upon request Labor costs for the repair replacement of the defective modules parts will be free of charge provided a valid warranty is confirmed Overtime travel lodging per diem insurance duties or any other costs are the responsibility of the customer Additional expenses ...

Страница 174: ..._____ EQUIPMENT ________________________________________________________________________ ____________________________________ ____________________________________ ______________________ __________________________ YES ________ NO ________ DATE OF PURCHASE DATE OF INSTALLATION INSTRUCTION FOR USE GIVEN ___________________________________________ AUTHORIZED INSTALLER DEALER STAMP Simrad Støvring AS Ø...

Страница 175: ...______________________ ___________________________________________ TYPE __________________________________________________________ EQUIPMENT ________________________________________________________________________ ____________________________________ ____________________________________ ________________________________________ ________________________________________ DATE OF PURCHASE DATE OF INSTA...

Страница 176: ...___________________________________ _________________________________________________________________________ _________________________________________________________________________ _________________________________________________________________________ STAMP HERE ...

Отзывы: