background image

3/10

IMPORTANT

 : 

Please read this manual carefully before beginning

assembly of this product

Keep


this manual for future reference. 

SAFETY INFORMATION

Identify all the parts and hardware. Do not discard of the packaging until 
you have checked that you have all of the parts and hardware required. 
Hardware package may have spare parts.

WARNING:

 This item contains small parts which can be swallowed by 

children and pets. Keep children and pets away during assembly. 
To avoid danger of suffocation, always keep plastic bags away from 
children and pets.
We recommend that you assemble this unit on a carpeted floor to avoid 
scratches.

May require 2 people for ease of assembly.

CARE and MAINTENANCE

For regular cleaning, use a damp cloth with warm water, rinse and dry 
thoroughly to prevent streaks.

Содержание AXCMRURBB-2230

Страница 1: ...MIRROR 1 10 ...

Страница 2: ...d Hardware package may have spare parts WARNING This item contains small parts which can be swallowed by children and pets Keep children and pets away during assembly To avoid danger of suffocation always keep plastic bags away from children and pets We recommend that you assemble this unit on a carpeted floor to avoid scratches May require 2 people for ease of assembly CARE and MAINTENANCE For re...

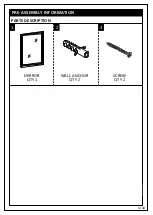
Страница 3: ...4 10 PRE ASSEMBLY INFORMATION 1 2 PARTS DESCRIPTION MIRROR QTY 1 3 WALL ANCHOR QTY 2 SCREW QTY 2 ...

Страница 4: ...top of the vanity Lay the Mirror 1 face down on a soft no scratch surface Measure the distance from the top of the Mirror to the top of the slot of the Mirror bracket Record this measurement Measurement A Mark the vertical centerline of the Mirror Determine the height of the mirror noting where the top edge of the Mirror will be Record this measurement Measurement B ...

Страница 5: ... from Measurement B to get Measurement C this will give the height position of the Screws 3 on the wall On the vertical center line mark Measurement C Use a level to draw a horizontal line Measure the center distances between the Mirror brackets on the rear of the Mirror ...

Страница 6: ...distance between the mirror brackets and divide by 2 Mark this dimension on both sides of the center line and on the horizontal line Drill 8 mm pilot holes into the wall WARNING When drilling the holes in the wall please be sure to avoid any internal cables and pipelines ...

Страница 7: ...hors 2 into the holes and insert the Screws 3 leaving 5 mm of the Screw exposed Lift the Mirror above the Screws 3 at an angle and align with the clips Reduce the angle of the Mirror to the wall and slide it down so the Mirror brackets catch the mirror clips ...

Страница 8: ...9 10 ASSEMBLY STEP 5 Securing the Mirror Check that the Mirror clips are secured in the Mirror brackets ...

Страница 9: ...We reserve the right to repair or replace the defective product at its discretion This product is guaranteed for 12 months if used for normal purposes Any warranty is invalid if the product has been overloaded or subject to neglect improper use or an attempted repair by other than an authorized agent Heavy duty or daily professional commercial usage are not guaranteed Due to continuous product imp...

Отзывы: