background image

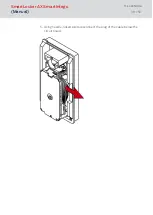
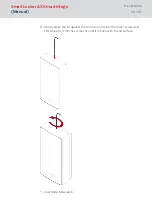
21. Gently press the lid against the floor and unscrew the lower screw anti-

clockwise (0.9 mm hex wrench) until it is flush with the lid surface.

9

LockNode installed in .

SmartLocker AX SmartIntego

(Manual)

8. LockNode

38 / 53

Содержание SmartLocker AX SmartIntego

Страница 1: ...SmartLocker AX SmartIntego Manual 14 07 2022 ...

Страница 2: ...fixation on wooden doors 25 7 Operation 26 8 LockNode 27 8 1 Intended use 27 8 2 Installation 27 9 Battery change 39 9 1 Emergency power supply 41 10 Signalisation 42 11 Disassembly 43 12 Technical specifications 44 12 1 Dimensional drawings 45 12 2 Drawings of installation situations 46 13 EU UK Declaration of conformity 50 14 Help and other information 51 SmartLocker AX SmartIntego Manual Conten...

Страница 3: ...ockers conveniently and efficiently You can programme directly from your workstation or carry out remote opening via the optional radio link SmartLocker AX is operated with passive identification media active transponders or both SmartLocker AX SmartIntego Manual 1 Intended use 3 53 ...

Страница 4: ... your own malfunctions can occur and access through a door can be blocked Modify the product only when needed and only in the manner described in the documentation CAUTION Fire hazard posed by batteries The batteries used may pose a fire or burn hazard if handled incorrectly 1 Do not try to charge open heat or burn the batteries 2 Do not short circuit the batteries IMPORTANT Damage resulting from ...

Страница 5: ...es or mains adapters Operational malfunction due to radio interference This product may be affected by electromagnetic or magnetic interference Do not mount or place the product directly next to devices that could cause electromagnetic or magnetic interference switching power supplies NOTE Intended use SmartIntego products are designed exclusively for opening and closing doors and similar objects ...

Страница 6: ...r installation Modifications or further technical developments cannot be excluded and may be implemented without notice The German language version is the original instruction manual Other languages drafting in the contract language are translations of the original instructions Read and follow all installation installation and commissioning instructions Pass these instruc tions and any maintenance...

Страница 7: ...dered M4 screws with round head 16 mm 20 mm 25 mm M4 hex nut Tensioning element with tapping screw 4 bolt blocks one of which is pre fitted 2 fastening pieces for wooden doors 0 9 mm hex wrench Fastening tool for M4 screws Tool for ribbon cable connectors Quick guide The reader unit also contains two spare screws for the cover lock ex works SmartLocker AX SmartIntego Manual 3 Scope of delivery 7 5...

Страница 8: ...4 Exploded view SmartLocker AX SmartIntego Manual 4 Exploded view 8 53 ...

Страница 9: ...ead bolt fixture flange extensions and screw Additional parts can be ordered see manual Inner side of door up to dead bolt stop A Adapter plate P LL PLATE5 Dead bolt fix ture R 0 0 mm to 5 95 mm None 4 5 9 mm 6 05 mm to 7 25 mm None 3 7 5 mm 7 35 mm to 8 85 mm None 2 9 1 mm 8 95 mm to 10 45 mm None 1 10 4 mm 10 55 mm to 10 95 mm 5 mm 4 5 9 mm 11 05 mm to 12 25 mm 5 mm 3 7 5 mm 12 35 mm to 13 85 mm...

Страница 10: ...m 3 5 mm 1 10 4 mm Dead bolt fixtures are numbered Door door panel thickness B ad apter plates P Flange exten sions F Screw 10 mm to 16 0 mm None M4 16 mm 16 1 mm to 19 0 mm 1 M4 20 mm 19 1 mm to 25 0 mm 2 M4 25 mm 25 1 mm to 30 mm 3 M4 30 mm 5 3 Installation The adapter plates are not used for wooden doors Use the supplied fastening pieces You will need the following tools 0 9 mm hex wrench inclu...

Страница 11: ...d bolt extended programme if necessary see Programming 9 ü Door and parts calculated see Measurement and calculation 9 1 Insert the 0 9 mm hex key into the lower screw 2 Gently press the reader cover against the floor and turn the lower screw clockwise inwards until you can lift off the cover SmartLocker AX SmartIntego Manual 5 Initial operation 11 53 ...

Страница 12: ... disconnect the plug of the cable below the circuit board 5 Disassemble the reader and engine block 6 Insert the socket into the D hole mount for nut pointing towards the edge of the door SmartLocker AX SmartIntego Manual 5 Initial operation 12 53 ...

Страница 13: ...the forced guide out until it rests against the inner edge of the door 9 Continue to press the forced guide against the inner edge and screw the screws tight with approx 20 Ncm PH1 screwdriver until the forced guide can no longer be moved SmartLocker AX SmartIntego Manual 5 Initial operation 13 53 ...

Страница 14: ...lates into the socket 11 If necessary lever the dead bolt block out of the engine block using a slotted screwdriver 12 If necessary insert another dead bolt block into the engine block SmartLocker AX SmartIntego Manual 5 Initial operation 14 53 ...

Страница 15: ...nd hold it in place 14 Fix the screw through the dead bolt side hole on the back with the plastic mounting tool 15 If necessary plug in the flange extensions on the engine block SmartLocker AX SmartIntego Manual 5 Initial operation 15 53 ...

Страница 16: ...the recesses provided 17 Hold the plastic mounting tool with one finger and place the engine block on the adapter plate or through the D hole bushing 18 Thread the socket cable through the socket SmartLocker AX SmartIntego Manual 5 Initial operation 16 53 ...

Страница 17: ...19 Place the nut on the screw and carefully tighten the nut with the as sembly tool already inserted until it sits on the hexagonal mount SmartLocker AX SmartIntego Manual 5 Initial operation 17 53 ...

Страница 18: ... wooden doors Straighten the motor block and firmly tighten the fastening pieces with suitable screws 21 Tighten the nut with 1 Nm 2 5 mm hex wrench SmartLocker AX SmartIntego Manual 5 Initial operation 18 53 ...

Страница 19: ...22 Insert the clamping element and the plastic countersunk screw into the D hole bushing from the front SmartLocker AX SmartIntego Manual 5 Initial operation 19 53 ...

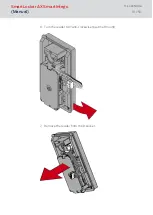
Страница 20: ...23 Screw the tensioner until it stops TX10 key without screwing through the screw 24 Place the reader at an angle approx 60 SmartLocker AX SmartIntego Manual 5 Initial operation 20 53 ...

Страница 21: ... Route the cable past next to the area of the light guide 27 Insert the plug into the socket with the lug facing the circuit board using the special tool 9 The reader beeps and flashes three times SmartLocker AX SmartIntego Manual 5 Initial operation 21 53 ...

Страница 22: ...h the light guide and press it firmly 9 Reader protected against twisting 29 Store the excess cable in the gap next to the PCB 30 Hook the lid on top SmartLocker AX SmartIntego Manual 5 Initial operation 22 53 ...

Страница 23: ...d downwards 32 Gently press the lid against the floor and unscrew the lower screw counterclockwise 0 9 mm hex wrench until it is flush with the lid sur face SmartLocker AX SmartIntego Manual 5 Initial operation 23 53 ...

Страница 24: ...9 SmartLocker AX is completely assembled SmartLocker AX SmartIntego Manual 5 Initial operation 24 53 ...

Страница 25: ...n doors You can also attach the fixings to the after installation To do this insert the fixing elements into the already mounted and then screw them tight SmartLocker AX SmartIntego Manual 6 Subsequent fixation on wooden doors 25 53 ...

Страница 26: ...7 Operation Present an ID medium to the SmartLocker AX 9 SmartLocker AX signals reaction see Signalisation 42 9 SmartLocker AX reacts as configured SmartLocker AX SmartIntego Manual 7 Operation 26 53 ...

Страница 27: ...integrated LNI installed you can network the and connect to WaveNet 8 2 Installation You will need the following tools 0 9 mm hex wrench included Electronics needle nosed pliers TX6 screwdriver SmartLocker AX SmartIntego Manual 8 LockNode 27 53 ...

Страница 28: ...Insert the 0 9 mm hex key into the lower screw 2 Gently press the reader cover against the floor and turn the lower screw clockwise inwards until you can lift off the cover 3 Remove the cover SmartLocker AX SmartIntego Manual 8 LockNode 28 53 ...

Страница 29: ...4 Pull the optical fibre out of the reader SmartLocker AX SmartIntego Manual 8 LockNode 29 53 ...

Страница 30: ...5 Using needle nosed pliers disconnect the plug of the cable below the circuit board SmartLocker AX SmartIntego Manual 8 LockNode 30 53 ...

Страница 31: ...6 Turn the reader 60 anti clockwise bayonet mount 7 Remove the reader from the D socket SmartLocker AX SmartIntego Manual 8 LockNode 31 53 ...

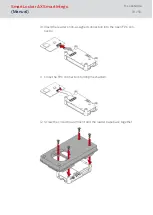
Страница 32: ... the four screws from the circuit board mount to separate the cir cuit board mount from the reader base 9 Open the FPC connector folding mechanism on the LNI SmartLocker AX SmartIntego Manual 8 LockNode 32 53 ...

Страница 33: ...r s non assigned connection into the open FPC con nector 11 Close the FPC connector s folding mechanism 12 Screw the circuit board mount and the reader base back together SmartLocker AX SmartIntego Manual 8 LockNode 33 53 ...

Страница 34: ...13 Place the reader at an angle approx 60 14 Turn the reader clockwise straight bayonet mount SmartLocker AX SmartIntego Manual 8 LockNode 34 53 ...

Страница 35: ...next to the area of the light guide 16 Insert the plug into the socket with the lug facing the circuit board using the special tool 9 The reader beeps and flashes three times SmartLocker AX SmartIntego Manual 8 LockNode 35 53 ...

Страница 36: ...17 Attach the light guide and press it firmly 9 Reader protected against twisting 18 Store the excess cable in the gap next to the PCB SmartLocker AX SmartIntego Manual 8 LockNode 36 53 ...

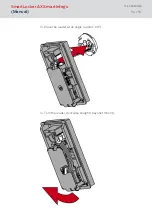
Страница 37: ...19 Hook the lid on top 20 Close the lid downwards SmartLocker AX SmartIntego Manual 8 LockNode 37 53 ...

Страница 38: ...ly press the lid against the floor and unscrew the lower screw anti clockwise 0 9 mm hex wrench until it is flush with the lid surface 9 LockNode installed in SmartLocker AX SmartIntego Manual 8 LockNode 38 53 ...

Страница 39: ...driver available 1 Put the slot screwdriver in the intended notch 2 Turn the screwdriver as shown to lift the battery lid Push the lid to the case s edge 3 Change the battery see Technical specifications 44 SmartLocker AX SmartIntego Manual 9 Battery change 39 53 ...

Страница 40: ...re for the other battery 9 SmartLocker AX beeps three times 9 Batteries are changed IMPORTANT Varying behaviour due to rechargeable batteries Rechargeable batteries discharge differently compared to batteries Using rechargeable batteries results in varying battery life and faulty battery warnings Avoid using rechargeable batteries SmartLocker AX SmartIntego Manual 9 Battery change 40 53 ...

Страница 41: ...ly for changing the batteries 9 1 Emergency power supply 1 Turn the screw at the reader s bottom clockwise to push it in 0 9 mm hexagon key 2 Remove the cover 3 Connect a power supply to the micro USB connector e g USB plug USB charger powerbank 4 Present an ID medium 9 SmartLocker AX opens 5 Open the locker remove the micro USB cable and reassemble the reader SmartLocker AX SmartIntego Manual 9 B...

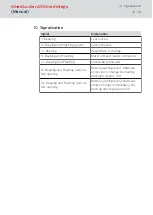
Страница 42: ...eader connected 4 Beeping and Flashing LockNode connected 8 Beeping and Flashing red be fore opening Battery warning level 1 Batteries empty soon Change Remaining openings Approx 100 16 Beeping and Flashing red be fore opening Battery warning level 2 Batteries empty Change immediately Re maining openings Approx 10 SmartLocker AX SmartIntego Manual 10 Signalisation 42 53 ...

Страница 43: ...11 Disassembly Disassembly is reversed to assembly Carefully press the light guide down to make it easier to remove the cover SmartLocker AX SmartIntego Manual 11 Disassembly 43 53 ...

Страница 44: ...40 years standby limited by the life of the battery itself Signalisation Audible signal buzzer and or visual signal LED green red Network capability Yes integrated LockNode can be ordered and retrofitted Frequency range max transmission power RFID 13 56 MHz 13 560060 MHz 13 560719 MHz 14 dBμA m 10 m distance Frequency range max transmission power 868 MHz 868 000 MHz 868 600 MHz 25 mW ERP depending...

Страница 45: ...12 1 Dimensional drawings SmartLocker AX SmartIntego Manual 12 Technical specifications 45 53 ...

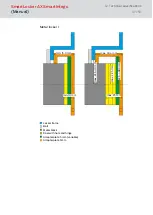
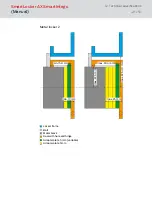
Страница 46: ...altogether With metal spindles at least two adapter plates must therefore be used for standard material thicknesses 1 mm to 2 mm However due to the rebate in the door or frame the use of adapter plates is usually required anyway The deadbolt stop of the frame may not be more than 30 4 mm from the inside of the door when closed The distance between the outside of the door and the inside of the bolt...

Страница 47: ...Motor block Door with hole and hinge Adapter plate 5 mm variable Adapter plate 5mm max 30 4 mm min 15 9 mm min 10 mm max 25 mm max 22 5 mm max 22 5 10 mm 22 5 42 83 mm SmartLocker AX SmartIntego Manual 12 Technical specifications 47 53 ...

Страница 48: ...in 10 mm min 15 9 mm max 30 4 mm max 22 5 10 mm max 22 5 mm Locker frame Bolt Motor block Door with hole and hinge Adapter plate 5 mm variable Adapter plate 5mm SmartLocker AX SmartIntego Manual 12 Technical specifications 48 53 ...

Страница 49: ... 25 mm min 5 9 mm max 30 4 mm 22 5 32 5 mm Door frame with stop bracket Bolt Motor block Door with hole and hinge Adapter plate 5 mm variable Adapter plate 5 mm SmartLocker AX SmartIntego Manual 12 Technical specifications 49 53 ...

Страница 50: ...C 2012 19 EU WEEE as well as the corresponding UK statutory 2013 3113 WEEE 2011 65 EU RoHS with 2015 863 and 2017 2102 as well as the corresponding UK statutory 2012 No 3032 RoHS with 2014 No 1771 2019 No 492 and 2021 No 422 and regulation EG 1907 2006 EU REACH as well as the corresponding UK REACH The full text of the EU UK Declaration of conformity is available at the following internet address ...

Страница 51: ...spose of it at a collection point for electronic waste as per European Directive 2012 19 EU Recycle defective or used batteries in line with European Directive 2006 66 EC Observe local regulations on separate disposal of batteries Take the packaging to an environmentally responsible recycling point Technical support Our technical support will be happy to help you landline costs depend on provider ...

Страница 52: ...Address SimonsVoss Technologies GmbH Feringastr 4 D 85774 Unterfoehring Germany SmartLocker AX SmartIntego Manual 14 Help and other information 52 53 ...

Страница 53: ...e sustainable thinking and action and heartfelt appreciation of employees and partners SimonsVoss is a company in the ALLEGION Group a globally active network in the security sector Allegion is represented in around 130 countries worldwide www allegion com Made in Germany SimonsVoss is truly committed to Germany as a manufacturing location all products are developed and produced exclusively in Ger...

Отзывы: