background image

PAGE 52 

MAINTENANCE  

5.2.2 To Open the Blade 


1. 

Remove the 2 x M3 Pan Head screws 
one each side of the lid. 

2. 

Lift and pull the front edge of the lid to 
remove the lid. 

5.2.3 To Remove a Tx or Rx Assembly 

1. 

  Disconnect the BNC connector. 

2. 

Disconnect the DB15 power connector. 

3. 

Disconnect the appropriate miniature 26-
way and the long ribbon cables 

(when 

refitting, take care to align centrally). 

4. 

Undo the two quarter-turn Dzus fasteners. 

5. 

Lift the rear of the sub-assembly then 
slide backwards until the Heatsink clears 
the front lip of the recess (take care not to 
damage any of the components on the 
control board). 


Receiver 

Transmitter 

BNC Connectors 

DB15 Connectors 

Miniature Ribbon  

Cables


Dzus Fasteners 

Long Ribbon  

Cable


Qty 2 Fixing Screws M3  

Содержание Xfin Blade

Страница 1: ...in Blade SERVICE MANUAL XFIN BLADE SM Issue 1 0 October 2006 Team Simoco 2006 Team Simoco Ltd Field House Uttoxeter Old Road Derby DE1 1NH Tel 44 0 1332 375 500 FAX 44 0 1332 375 501 www teamsimoco co...

Страница 2: ...accuracy and completeness of the information contained within it Whilst every endeavour has been made to eliminate any errors some may still exist It is requested that any errors or omissions noted sh...

Страница 3: ...paring the radio for alignment will erase from the radio all customer PMR and Trunking configuration data channel signalling information etc The only data retained by the Alignment Tool is the factory...

Страница 4: ...Address 9 2 1 3 Modification State 9 3 DESCRIPTION 11 3 1 Ventilation 11 3 2 SRM9000 Sub assembly 12 3 3 Specifications 12 3 3 1 General 12 3 3 2 Transmitter 13 3 3 3 Receiver 14 3 4 Front Panel Contr...

Страница 5: ...mplifier 36 4 3 2 2 First Mixer and IF Section 38 4 3 2 3 Quadrature Demodulator 38 4 3 2 4 Receiver Audio Processing 38 4 3 3 Transmitter 38 4 3 3 1 Drivers and PA Stages 39 4 3 3 2 Tx Power Control...

Страница 6: ...y 54 5 3 1 To Fit an MMI Board 54 5 3 2 To Fit the Front Assembly 54 5 3 3 To Fit the Control Board 54 6 PRODUCT VARIANTS AND ACCESSORIES 55 6 1 Variants 55 6 2 Accessories 55 6 2 1 TSF ACCORD 56 6 2...

Страница 7: ...1 1 Main Screen 67 9 2 Database 67 9 2 1 Creating a New Database 67 9 2 2 Opening a Database 68 9 3 Communications Settings 68 9 3 1 Connection Type 68 9 3 2 Serial Communications 68 9 3 3 Ethernet C...

Страница 8: ...runking system with an integrated basestation and the capability to provide a control and or traffic channel It incorporates the established MPT1327 trunking standard with next generation hardware and...

Страница 9: ...n releases 6 7 Reserved 8 9 Tx Rx frequency band designation alphanumeric 10 11 Year of manufacture 12 13 Week of manufacture 14 16 Unique serial number 2 1 1 Hardware Variant Code The hardware code i...

Страница 10: ......

Страница 11: ...ssemblies The fans are mounted in a bulkhead located immediately behind the front panel The front panel MMI board and fan bulkhead are separately assembled and removed from the unit as sub assemblies...

Страница 12: ...ained in the Blade chassis by the front edge of the Heatsink that inserts underneath the fan baffle the rear of the subassembly is held in place by the quick release fasteners These units are electric...

Страница 13: ...gnal EN60950 Safety TBR15 17 and 21 Line Dimensions 44mm 1U High x 437mm Wide x 450mm Deep Excluding cables and ears In Wall Mount 125mm High x 465mm Wide x 470mm Deep Weight 6 95 kg 3 3 2 Transmitter...

Страница 14: ...nse 3dB of de emphasised 300 to 3000Hz with CTCSS Audio Output 2Wrms internal monitor speaker Blocking 95dB at 1Mhz Hum and Noise 40dB 12 5kHz CCITT weighted 3 4 FRONT PANEL CONTROLS 3 4 1 LED Indicat...

Страница 15: ...XFIN BLADE SM DESCRIPTION PAGE 15 3 4 3 Control Knob The control knob is used in conjunction with the LCD Display to operate the menu system and provide volume control...

Страница 16: ...output channel The pinout is listed below where for the purpose of this table pin 1 is the left most pin when looking into the RJ45 socket Pin Function Pin Function Pin Function Pin Function 1 Tx Data...

Страница 17: ...ntre pin to minimise passive inter modulation A minimum of 85dB transmit receive isolation should be provided by the antenna system and associated filters It is recommended that a good quality flexibl...

Страница 18: ...12V line to the PCB In event of failure the reason for the failure should be investigated prior to replacement The fuse should only be replaced with a correctly specified component 3 5 4 Ethernet Thi...

Страница 19: ...ntroller The interface supports full speed operation and 16 endpoints and includes an integrated transceiver There are six isochronous endpoints three input and three output one control endpoint three...

Страница 20: ...ble in order to re route signals and become plug compatible with certain products Pin Description Pin Description Pin Description 1 Tx line connection A 14 CTCSS decode defeat 27 I O 5 2 0v 15 RSSI O...

Страница 21: ...ommand 23 Rx line connection B 36 Channel line C3 11 Alarm 1 24 Squelch 37 Channel line C1 12 0v 25 I O 1 13 Alarm 2 26 I O 3 3 5 10 PSTN Port RJ11 This is a 6 4 RJ11 socket with the following pins co...

Страница 22: ......

Страница 23: ...4 TECHNICAL DESCRIPTION 4 1 MMI BOARD Figure 4 1 MMI Board Layout Control Knob LCD Display Handset Jack LEDs Fan Connectors MMI Connector Power Connector...

Страница 24: ...r displaying an interactive menu which is accessed via a control knob An audio amplifier is provided to drive a loud speaker at up to 2W with volume adjustment via the control knob An RJ45 interface f...

Страница 25: ...XFIN BLADE SM TECHNICAL DESCRIPTION PAGE 25 4 2 CONTROL BOARD 4 2 1 Circuit Board Layout Figure 4 3 Control Board Layout with Main Sections Labelled...

Страница 26: ...DL1 indicates Ethernet connection LINK LED DL2 indicates the Flash device at U46 is being written to 4 2 2 2 Test Points Figure 4 4 Block Diagram of Control Board IXP DSP CODECs Analogue I O Digital...

Страница 27: ...lock Driver U12 Clock Signal 15 SPI_MISO signal to IXP GPIO 2 3 3V Digital 16 TX_DATA signal for High Speed Serial Port 1 on the IXP U34 3 3V Digital 17 RX_CLK signal for High Speed Serial Port 0 on t...

Страница 28: ...Digital 44 TX_FRAME signal for High Speed Serial Port 0 on the IXP U34 3 3V Digital 45 DSP_IRQA output from CPLD U22 3 3V Digital 46 GPIO_IN5 to CPLD U22 3 3V Digital 47 TMS JTAG Signal to CPLD U22 3...

Страница 29: ...wer Supply 5V0D D C 71 Analogue 5V Supply Rail used by ADC and 5V Op Amps A5V D C 72 Codec Reset CODRST_N generated by DSP PF5 3 3V Digital 73 Digital Ground DGND D C 74 Pin 23 of P5 Rx Radio Header 7...

Страница 30: ...45 The rear of the Blade contains a standard RJ 45 Serial connection in order that an engineer may connect a PC to the DSP via an RJ 45 to DB 9 cable Debug commands may then be issued to the DSP for d...

Страница 31: ...P is performed reset circuitry monitoring voltage supplies Watchdog The IXP processor has its own internal watchdog Fan Control The IXP performs fan control via Maxim Fan Regulator devices monitoring...

Страница 32: ...ue gain adjustment under software control 4 2 2 7 Audio Interface General External audio equipment is connected to either of the two independent audio ports which are presented barriered on the RJ45 c...

Страница 33: ...uit Ringer Equivalence 0 01B REN Return Loss 26 dB typical into 600 at 1800Hz Insertion Loss 0 4dB to 0 4dB Tx and Rx 30 to 4000Hz Tx Rx Level 2 2Vp p max for a single tone sine wave 4 2 3 Links For F...

Страница 34: ...e Select LN17 1 2 Line 2 Four Wire Mode Out 2 3 Line 2 Two Wire Mode LN8 In Line 1 Two Wire 600R Impedance select LN18 1 2 Line 1 Two Wire 600R Imped Hybrid Balance Out 2 3 Line 1 Adjustable Hybrid Ba...

Страница 35: ...XFIN BLADE SM TECHNICAL DESCRIPTION PAGE 35...

Страница 36: ...a transceiver module in receive mode diodes D3 D4 and D5 in the antenna switch are reverse biased allowing the receiver input signal to be coupled through to the front end with minimal loss The overal...

Страница 37: ...D3 D4 D5 Antenna Filter L10 L11 L12 90 MHz L O Q402 Rx VCO Q600 Rx VCO Switch Q601 VCO Buffer Q604 605 Synthesiser Buffer Q607 to U701 To Tx Buffer to U701 To Tx PA CPP VCO Control Volts Rx PSU Tx Rx...

Страница 38: ...set of AGC operation occurs when RF input signal levels at the antenna exceeds 90dBm Conversion of the 45MHz IF signal to I and Q baseband signals is carried out by the demodulator section of U401 The...

Страница 39: ...controlled by the power control loop to ensure that transmitter output power remains within defined limits The PA driver output level is typically 25dBm PA module U2 utilises three stages UHF and two...

Страница 40: ...PA U2 Tx PA Filter Switch Q14 17 18 19 Power Control Detector D6 Buffer U3B Antenna Switch D3 4 5 Antenna Filter L10 11 12 Rx AF Switch U103C ADC DAC CODEC U800 From FPGA DSP Rx AF TX MOD1 VCO Contro...

Страница 41: ...unding its input at C28 The short circuit at the receiver input is transformed to an effective open circuit at D3 by L13 which minimises transmitter loading With the transmitter switched off the diode...

Страница 42: ...3 4 3 VCO The transmitter and receiver VCOs use low noise JFET transistors Q600 RX Q602 TX and inductors L602 RX L608 TX to generate the signals for the required band coverage Electronic tuning is pro...

Страница 43: ...des 6dB per octave attenuation to frequencies above approximately 180Hz Modulation balance adjustment is carried out using a CODEC generated 100Hz square wave applied to TX MOD1 A DAC output from the...

Страница 44: ...uffer Q604 605 Tx Rx Switch D601 611 To Rx Mixer LO1Rx To Tx Buffer Synth Buffer Q607 From FPGA Tx MOD Switch U103A Rx Tx AF Switch U103B Mic Amp Q812 I AFC IN MOD1 ON Tx MOD1 ADC DAC CODEC U800 Q Ref...

Страница 45: ...U106 Flash Memory U104 Synthesiser U701 Loop Volts Ramp Gen U105C ADC DAC CODEC U800 Multiplexer U902 Tx Power Control Buffer U802B MOVEX Loop Volts MUX EN MUX AO MUX A1 AUX CTL FE Tune Front End Tune...

Страница 46: ...F Sub Assembly Internal Memory Memory consists of the internal DSP memory and an external 4MB non volatile Flash Memory U104 When power is off program and data is retained in Flash Memory At power on...

Страница 47: ...circuit that is activated by a pulse from the control unit or microphone handset via PWR ON or PWR OFF and controls the FET power switch Q350 A PWR OFF operation requires the button to be held down f...

Страница 48: ...upply for CODEC U800 Regulated 3 3V supply 3P3 PLL U701 TCXO divider U702 Unregulated 13 8V 13V8 UNSW TX PA module U2 TX PA power control circuit Q3 Active filter Q14 17 18 19 Antenna changeover switc...

Страница 49: ...n the equipment This should be connected using heavy duty Green Yellow earthing wire capacity greater than mains feed to equipment as few bends as possible and an appropriate eyelet tag Mains protecti...

Страница 50: ......

Страница 51: ...screws on the Blade and SRM sub assemblies is 8 10Lb in 0 90 1 13 Nm For all other small screws Phillips pozi head use a maximum of 8 Lb in 0 90Nm 5 2 DISASSEMBLY When disassembling any part of the Bl...

Страница 52: ...3 Disconnect the appropriate miniature 26 way and the long ribbon cables when refitting take care to align centrally 4 Undo the two quarter turn Dzus fasteners 5 Lift the rear of the sub assembly then...

Страница 53: ...e the Thermistor assembly underneath the board Ensure that the Thermistor assembly is protected from damage when the Control Board is out of the Base Station chassis 5 2 5 To Remove the Front Assembly...

Страница 54: ...eas of concern they are described in this section 5 3 1 To Fit an MMI Board 1 Fit the new MMI Board to the three support brackets using six M3 mm Pan Head Screws 2 Offer the front panel into position...

Страница 55: ...1 XFINBLADEI R1 XFINPWRBLADE R1 400 450 MHz TK Band XFINBLADE TK XFINBLADEI TK XFINPWRBLADE TK 400 480 MHz TU Band XFINBLADE TU XFINBLADEI TU XFINPWRBLADE TU 440 500 MHz UW Band XFINBLADE UW XFINBLADE...

Страница 56: ...ct country TSF ACCORD EU TSF ACCORD UK TSF ACCORD US 6 2 1 TSF ACCORD A 2m long cable used to connect the AC Mains Supply to the Blade using the Wallmount or a PSUtray in the Rackmount Request the ver...

Страница 57: ...1 3 Basestations Rack mount PSU tray 19 1U for 1x 25W Blade TSF 1PSU1U Rack mount PSU tray 19 1U for 2x 25W Blade TSF 2PSU1U Rack mount PSU tray 19 1U for 3x 25W Blade TSF 3PSU1U 6 2 6 TSF 1BS PSUTRA...

Страница 58: ...PAGE 58 PRODUCT VARIANTS AND ACCESSORIES...

Страница 59: ...fuses Faulty units are to be returned to a level 2 service facility with an attached fault report This level of service should not exceed 20 minutes SRM sub assembly by band Control board MMI board F...

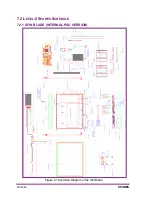
Страница 60: ...PAGE 60 SPARES 7 2 LEVEL 2 SPARES SCHEDULE 7 2 1 XFIN BLADE INTERNAL PSU VERSION Figure 6 1 Exploded Diagram of the Xfin Blade...

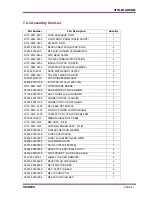
Страница 61: ...R 25MM 1 01109 0000120 0 LIGHT GUIDE 14mm ROUNDED 5 00304 0002190 0 CONNECTOR IEC FLANGED 1 00304 0002110 0 CONNECTOR CLIP RETAINING 1 D116 0013 W 02 RF CABLE RX TSC2000 1 D116 0022 W 01 X FIN DC POWE...

Страница 62: ...RD AC POWER UK 1 D116 0030 W 01 XFIN CTRL PCB TO PSU CBL FRM 1 02313 0000010 0 ENCODER 15mm KNURLED SHAFT 1 01108 0000010 0 DISPLAY LCD WHITE BLUE 1 7 3 WARRANTY Unless superseded by specific contract...

Страница 63: ...ny s written consent nor to copy or modify any software The Company may at its discretion carry out minor modifications to software Major modifications may be undertaken under a separate agreement and...

Страница 64: ...PAGE 64 SPARES...

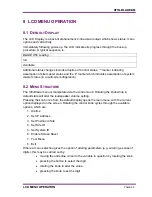
Страница 65: ...CTURE The Xfin Blade menu is manipulated via the control knob Rotating the knob while in default state will alter the loudspeaker volume setting Pressing the knob once from the default display opens t...

Страница 66: ...is section 8 2 3 Set Position in Site Accessing this menu displays the current position in site as a 2 digit decimal number This number may be altered from this section 8 2 4 Set Site ID Accessing thi...

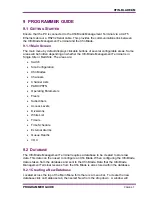
Страница 67: ...te Configuration Xfin Blades Channels Channel Lists PABX PSTN Operating Parameters Fleets Subscribers Access Levels Diversions White List Timers Time Schedule External Alarms Queue Depths VOX 9 2 DATA...

Страница 68: ...buttons in the Ethernet Communications box 9 3 2 Serial Communications The Serial Communications needs to be configured when Serial is selected in the Connection Type box There are five setting in the...

Страница 69: ...ed between the Xfin Blade Management Terminal and Xfin Blade Ensure that the Communication settings are correct From the main menu window select Communications from the menu bar that is located across...

Страница 70: ...e any changes that have been made and return back to its previous state 9 5 2 Add Add mode allows a new record to be added to the Xfin Blade Management Terminal Left click on the add button which is l...

Страница 71: ...Configuration offers the user the choice to delete everything that is in the Xfin Blade Management Terminal s current database for that area or to delete everything in the database for that area for t...

Страница 72: ...PAGE 72 PROGRAMMER GUIDE...

Страница 73: ...Team Simoco Ltd Field House Uttoxeter Old Road Derby DE1 1NH Tel 44 0 1332 375500 FAX 44 0 1332375501 www teamsimoco com...

Страница 74: ...Universal Asynchronous Receiver Transmitter MMI Man Machine Interface RTC Real Time Clock PA Power Amplifier CoDec Coder Decoder TSC Trunked Site Controller RTS Request To Send RS232 flow control sign...

Страница 75: ...XFIN BLADE SM CONTROL CARD BLOCK DIAGRAM PAGE 75 B CONTROL CARD BLOCK DIAGRAM...

Страница 76: ......

Отзывы: