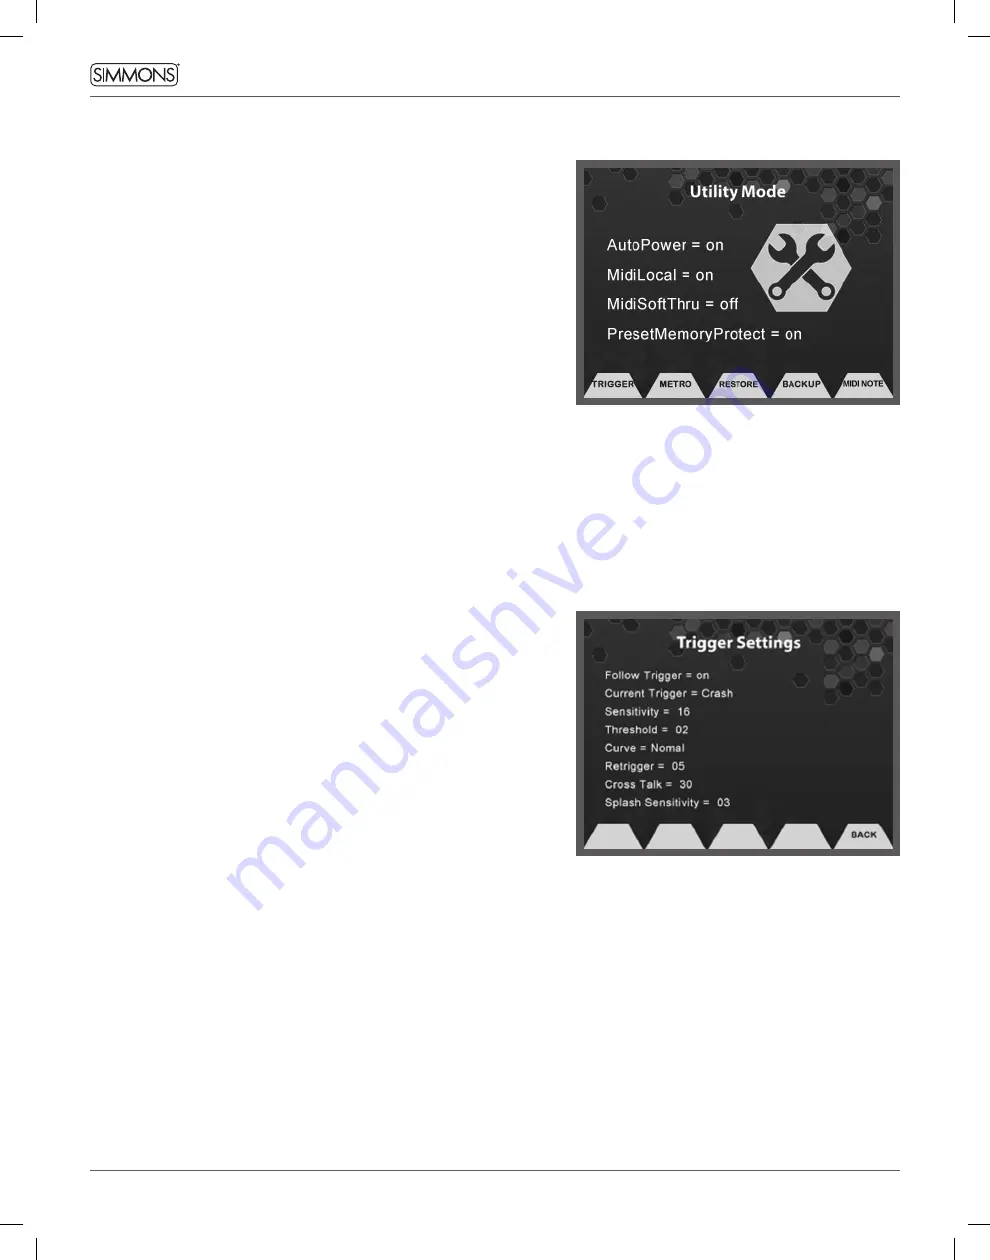
background image

22

OWNER’S MANUAL

UTILITY MODE  

The Utility mode contains the settings for the module operations that 

aren’t in the Kit or Song modes.

The main screen settings are: 

•  Auto Power- on/off: Turns off module after 4 hours of no use.

•  MIDI Local- on/off: Local on/off helps to fix MIDI loop issues. Set to 

off if you are recording to an external MIDI sequencer.

•  MIDI Soft Thru- on/off: Turns the MIDI out into a MIDI Thru to 

daisy-chain several MIDI devices.

•  Preset Memory Protect on/off: This protects the preset Kits from 

Modification. When set to OFF, you can save into the preset kit 

locations. 

TRIGGER

The Trigger settings are optimized for the best playability  for the 

SD1250. However some players will want different settings, add other 

brands of pads, or may place the drums on the rack in a different 

manner than the factory setup. In these cases, you may find it helpful 

modify the trigger settings for your own playability. To Enter the 

Trigger settings menu press the Function button under Trigger on the 

Main Utility screen.

Note: When changing the trigger parameters on the various parts 

of the kit, the trigger responses with the kit will be slow. This is 

due to the module refreshing the information on the screen. We 

recommend setting the trigger parameters one drum or cymbal at 

a time and then verifying your settings by pressing the Function 

Back button to return to the main Utility screen.

TRIGGER SETTINGS (GLOBAL): 

•  Follow Trigger - On/Off: This allows you to select the drum or 

cymbal to edit by striking it.

•  Current Trigger: This allows you to manually select the trigger input 

for editing.

•  Sensitivity: This adjusts the sensitivity of the pad trigger to regulate 

the pad response. Higher settings result in higher sensitivity, so that 

the pad will produce a loud volume even when struck softly. The 

range is 1 to 32.

•  Threshold: This setting allows a trigger signal to be received only 

when the pad is struck harder than a specified force. This can be 

used to prevent a pad from sounding in response to extraneous 

vibrations from another pad. The range is 0-50. 

•  Curve: These curves can be set per pad. Depending on your playing 

style you may want to use different curves for different drums and 

cymbals. There are four choices: 


Easy:

 Good for players that want to reach high dynamic response 

without hitting too hard.


Fixed:

 The sound will be at a fixed volume each time, regardless of 

how hard a pad is hit. 


Normal:

 The most linear playing curve.


Dynamic:

 Offers the highest dynamic range. 

•  Retrigger -1-8: The trigger response of the SD1250 has been 

designed to exactly match the signals produced by the SD1250 

drum and cymbal pads. Triggering the SD1250 from other 

commercially available pads or triggers may result in ‘double 

triggering’ due to the long decay characteristics of some types of 

pickups. Setting the retrigger value to a lower number can in most 

cases eliminate unwanted double triggering, although this may 

prevent intentional rapid playing such as a drum roll or flam. If you 

experience an unwanted double trigger, try reducing the default 

value (6 for most drums). The value 1 will prevent rapid triggers 

of 500ms or so, where the value 8 will let all triggers through no 

matter how close together they are.

•   Crosstalk - 0-75: When two pads are mounted on 

the same stand, the vibration produced by hitting 

one pad may trigger the sound from another pad 

unintentionally (This is called crosstalk.) You can 

avoid this problem by adjusting Crosstalk Cancel on 

the pad that is sounding inadvertently. If the value 

is set too high, then when two pads are played 

simultaneously, the one that is struck less forcefully 

will not sound. So be careful and set this parameter 

to the minimum value required to prevent such 

crosstalk. With a setting of 0 crosstalk prevention 

does not function. 

•  Splash Sensitivity - 1-8: This adjusts the hi hat pedal 

splash sensitivity.

Содержание SD1250

Страница 1: ...SimmonsDrums net OWNER S MANUAL ELECTRONIC DRUM KIT WITH MESH HEADS...

Страница 2: ...DE TO CONSTITUTE A RISK OF ELECTRIC SHOCK TO PERSONS APPARATUS SHALL NOT BE EXPOSED TO DRIPPING OR SPLASHING AND THAT NO OBJECTS FILLED WITH LIQUIDS SUCH AS VASES SHALL BE PLACED ON THE APPARATUS THE...

Страница 3: ...Send Settings 14 Pattern Play 15 Changing a Drum Sound in a Kit 15 Changing Drum Parameters 15 Filter Edit 16 Envelope Edit 16 What is a Drum 17 What is a Sound 17 Saving Your Drum Settings 17 Saving...

Страница 4: ...ncluding a 12dB octave low pass filter with variable cutoff and resonance octave pitch shifts independent velocity control of filter cutoff resonance pitch shift and envelope length Up to 23 programma...

Страница 5: ...Dual zone with multi positional controller Ride Triple Zone Tom 4 and Crash 2 inputs Dual Zone RACK Aluminum hex with steel support rods Adjustable mounts Snare Stand DRUMS 12 Mesh Dual Zone Snare 8 8...

Страница 6: ...1250 and all related devices OFF prior to connecting or disconnecting cables Powering down the SD1250 other than by pressing the power button risks losing user program data HANDLING AND TRANSPORT Neve...

Страница 7: ...Dual Zone 12 Snare S1250SN10 Dual Zone 8 Tom x2 S1250PAD8 Dual Zone 10 Tom x2 S1250PAD10 Kick Drum and Stand S1200KICK Hi Hat Controller S1200HHC SD1250 Module S1250M Accessories AC Adapter Multi pin...

Страница 8: ...RUM Remove the snare stand from its packaging Open the stabilizing legs insert the clamp into the base and tighten into position Place the snare onto the snare stand then tighten the bottom nut to sec...

Страница 9: ...9 FINAL ASSEMBLED KIT Kick Drum Pedal not included...

Страница 10: ...nual these are referred to as F1 through F5 10 LCD Display 11 Cursor buttons Cursors between fields on menus 12 Exit Used to exit a mode or screen 13 Faders Changes the fader functions as displayed by...

Страница 11: ...Once you ve made any adjustments they will stay active and be applied to any kit you select to play To clear all current fader controlled adjustments hold the FADERS button 3 seconds All 3 banks of f...

Страница 12: ...or connecting the module to a PC tablet or smartphone 9 9V Power input for the included power adapter 10 Power switch Hold for a few seconds to turn the power on or off LEFT SIDE PANEL 11 Volume Contr...

Страница 13: ...her functions related to the current screen and mode ADVANCED OPERATIONS EDITING A DRUM KIT All settings in Preset and User Kits can be edited Edits made or saved to user kits are always retained edit...

Страница 14: ...se Cursor up or down Use the value dial and flanking buttons to adjust the left to right placement of the sound of that drum or cymbal C indicates the sound is centered L indicates the sound is left o...

Страница 15: ...m Sound Set this to Off if you only want to hear the pattern when you hit the pad and don t want to hear the sound the pad would normally play Set it to On to hear the pad each time it is hit along wi...

Страница 16: ...lter creating a more pronounced effect Velocity To Cutoff Sets the filter cutoff to respond to the dynamic velocity of your playing Velocity to Resonance Sets the filter resonance to respond to the dy...

Страница 17: ...your sound 3 Use the Value dial to change the character and move to the next character with the cursor buttons 4 After you complete changing the characters you then should press the Save Enter button...

Страница 18: ...and closed You can also strike the heel of the hi hat pedal hard with your foot to emulate the splash sound you get with an acoustic hi hat pedal SONG MODE The song functionality in the SD1250 is desi...

Страница 19: ...After you make your settings you are ready to record Press the Rec button on the bottom right of the module to start recording TO PLAY A MIDI FILE On the Song Main screen select the Function button f...

Страница 20: ...I Channel 10 BLUETOOTH MIDI The SD1250 supports Bluetooth MIDI connection to smartphones tab lets and computers Note that it doesn t include Bluetooth Audio and the SD1250 won t show up in the Setting...

Страница 21: ...or Up and Down to move the cursor to the sample parameter press button UP DOWN to move the cursor up and down to the Sample position 1 4 4 Press the Load Wave Function button and select the sample tha...

Страница 22: ...This setting allows a trigger signal to be received only when the pad is struck harder than a specified force This can be used to prevent a pad from sounding in response to extraneous vibrations from...

Страница 23: ...nstruments that have been created Clear User Samples This will delete any user samples that have been imported into the flash memory BACKUP Backup of all the Internal User programs and Samples to USB...

Страница 24: ...note Press UTILITY then F5 MIDI NOTE to see the note assignments Play a pad to choose the MIDI note or cursor to Pad and use the value knob You can change these note values to any note number you like...

Страница 25: ...50 TOM2 45 TOM2 RIM 47 TOM3 43 TOM3 RIM 58 TOM4 41 TOM4 RIM 39 HH PEDAL 44 HH CLOSED BOW 42 HH OPEN BOW 46 HH CLOSED EDGE 22 HH OPEN EDGE 26 CRASH1 BOW 49 CRASH1 EDGE 55 CRASH2 BOW 57 CRASH2 EDGE 52 R...

Страница 26: ...Get Loud 18 Solid Oak 19 Acrylic 20 Arena Rock 1984 21 Modern Metal 22 R nB 23 Funk Rock 24 Hip Hop 25 Classic Funk KIT LIST Kit Order Screen Name 26 Reggae 27 Jazz 28 Fusion 29 Jazz Brush 30 Maple R...

Страница 27: ...RS 20 March RS 21 14x5 Mp RS 22 14x5 SM RS 23 13x7 Mp RS 24 13x5 Mp RS 25 14x5 VM RS 26 14x5 Mp RS 27 14 6 BB RS 28 14x5 AM RS 29 14x5 AL RS 30 14x5 Bb RS 31 14x6 Mp RS 32 14x6 Rt RS 33 14x8 AM RS 34...

Страница 28: ...mp 70 16 BubDamp 71 18 BubDamp 72 909 Tom Hi 73 909 Tom Mid 74 909 Tom Low CYMBAL 1 16 P Bow 2 16 P Edge 3 18 P Chna 4 20 P Chna 5 16 S Bow 6 16 S Edge 7 18 S Bow 8 18 S Edge 9 18 S Evo 10 18 ZD Bow 1...

Страница 29: ...30 MtlShker 31 MtlShker2 32 MtlShkrLay 33 Conga Opn 34 CowbelMute 35 CB Mt2Opn 36 Shaker 37 Tmbl Hi RS 38 Timbale hi 39 Tmbl Lo Sd 40 Timbale Lo 41 Tumba DT 42 Tumba 8 43 TmbLo Dyn 44 Tumba 7 45 Tumb...

Страница 30: ...le 1 23 Bottle 2 24 Bottle 3 25 Bottle 4 26 Bottle 5 27 Bottle 6 28 Bottle 7 29 Metal 1 30 Metal 2 31 Metal 3 32 Bucket 1 33 Bucket 2 34 Bucket 3 35 Pipes 1 36 Pipes 2 37 Pipes 3 38 Bench 1 39 Bench 2...

Страница 31: ...7 6 Gamelon 2 7 Gamelon 3 8 Gamelon 4 9 Gamelon 5 10 Gamelon 6 11 Gamelon 7 12 Gamelon 8 C 13 Gamelon 9 14 Taiko 1 15 Taiko 2 16 Taiko 3 17 Tam Tam NATIVE AMERICAN 1 Cantaro 2 DeerSkin 1 3 DeerSkin 2...

Страница 32: ...Tom 4 13 SDS7 Tom 5 14 SDS7 Tom 6 15 SDS7 Tom 7 16 SDS7 Tom 8 17 SDS7 Tom 9 18 SDS7 Tom10 19 SDS7 Tom11 20 SDSV Tom 1 21 SDSV Tom2 22 SDSV Tom3 23 SDSV Tom4 24 SDSV Tom5 25 Tekno Tom1 26 Tekno Tom2 2...

Страница 33: ...808HHOpn 1 3 808HHOpn 2 4 808HHOpn 3 5 808HHOpn 4 6 SDSV HHPed 7 SDSV HHOpn 8 SDSV HHCl 9 HipHop Cl 10 HipHop Opn 11 R nB Open 12 R nB Clsd 13 LoFi HH Cl 14 LoFi HH Ft 15 LoFi HH Op 16 E Hi Hat 17 SD...

Страница 34: ...Dist5 8 GTRLPDist6 9 GTRLPDist7 10 Slap Bass 1 11 Slap Bass 2 12 Slap Bass 3 13 Slap Bass 4 14 Slap Bass 5 15 Slap Bass 6 16 Wah Gtr 17 Scratch 1 18 Scratch 2 19 Scratch 3 20 Scratch 4 21 Scratch 5 22...

Страница 35: ...41 ShouCha 42 Bo1 43 XiaoCha1 44 XiaoCha2 45 JingJuDaLuo 46 JingJuXiaoLuo 47 Bo2 48 PengLing2 49 Luo1 50 ZG32XiaoBo2 51 XiaoLuo L2 52 XiaoLuo H2 53 Luo2 54 XiaoCha4 55 Luo3 56 Luo4 57 jingjuM 58 Meil...

Страница 36: ...m 1 Rim 9 BollyHood 90 4 4 10 India 90 7 8 India Tom 1 Rim 11 MidEast 1 98 4 4 12 MidEast 2 80 5 8 MidEast Tom 1 Rim 13 NA Ritual 85 4 4 Native American Tom 2 Rim 14 SD Perc 1 90 4 4 15 SD Perc 2 125...

Страница 37: ...Bender X O Control Change 0 32 1 6 7 10 11 64 66 67 80 81 84 91 93 98 99 100 101 121 X X X X X X X X X O X X X O X X O O O O O O O O O O O O O O O 1 O Bank Select Modulation Data Entry Volume Pan Exp...

Страница 38: ...38 OWNER S MANUAL...

Страница 39: ...39...

Страница 40: ...gistered trademarks mentioned herein are recognized as the property of their respective holders FCC STATEMENT 1 Caution Changes or modifications to this unit not expressly approved by the party respon...

Отзывы: