


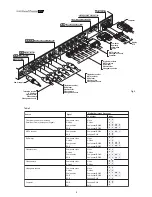


15
Generally, the HIGH value is more suitable for displaying graphic
images, MEDIUM and LOW for video images.
We recommend that only expert users make these adjustments
since there is a risk of obtaining results that could lower the
quality of the projected image.
GAMMA CORRECTION
Determines the system’s response to the “grey scale,” placing
more or less emphasis on the various tones of brightness (black,
dark grey, medium, light grey, white) making up the projected
image.
The GRAPHIC value is more suitable for computer images, while
the FILM and VIDEO values are more suitable for video images.
Y/C DELAY
In the case of Video and S-Video signals, it may be necessary
to horizontally align the colours within the borders of the various
objects making up the image. For a given video standard (e.g.
PAL or NTSC) the stored value does not normally require further
fine-tuning, unless the source or the cable connection has
changed.
MAGNIFICATION
Allows you to magnify the image (electronic zoom) and select
the area to be enlarged.
The level of magnification is adjusted in Zoom mode (identified
by a magnifying glass in the centre of the image) using the keys
and
. The area of the image to be enlarged is selected in Pan
mode (symbol in the centre of the image) using the arrow keys
and
.
It is possible to switch from one mode to the other with the remote
control by pressing
.
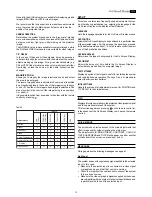
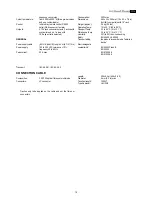
Position
Aspect
Video
S-Video
RGBS 32 kHz
YCrCb 32 kHz
RGB Gr
afico
DV
I-
D
RGBS 15kHz
YCrCb 15kHz
Adjustments
Inputs
Frequency
-
-
Phase
Gamma Correction
Colour Temperature
Y/C Delay
Magnification
-
-
-
-
-
-
-
-
-
SET-UP
This menu contains less frequently used adjustments that can
be of help during installation (e.g. selecting the language for the
On Screen Display or the display of Test Patterns).
LANGUAGE
Lists the languages available for the On Screen Display menus.
OSD POSITION
Allows the On Screen Display to be positioned in a particular area
of the projected image. For this purpose, the arrow keys are used
for fine adjustments and keys 1...9 on the remote control to select
one of the 9 predefined positions.
OSD BACKGROUND
Determines the type of background for the On Screen Display.
OSD TIMEOUT
Adjusts the amount of time before the On Screen Display is
automatically erased from the projected image.
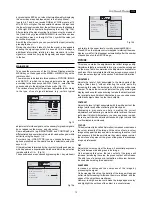
TEST PATTERNS
Displays a series of test signals, useful for installing the system
and verifying its basic operation. The keys
and
are used to
select the various test patterns.
INITIAL SETTINGS
Resets the values of all adjustments (except for POSITION and
Y/C DELAY) to their initial values.
INFO
Displays information relating to the projected video/graphic signal
and the operational status of the system.
This function appears on pressing on the remote control (or,
in the absence of the On Screen Display, the
key on the remote
control).
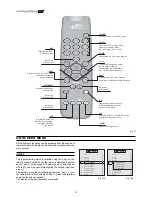
QUICK MENUS
The quick menus provide access to the main adjustments that
effect image quality, without recalling the main menu.
The adjustments for BRIGHTNESS, CONTRAST, COLOUR,
TINT, SHARPNESS and FILTER will appear one after another
at the bottom of the screen, on pressing
and
.
MESSAGES
During operation the following messages can appear:
No Signal
The system does not recognise any signal applied to the selected
input. In this case:
•
Make sure the selected input is connected to a video signal
or graphic source and that that source is working.
•
Check the integrity of the cables used to connect the system
to the various sources.
•
Make sure the video or graphic signals supplied by the source
are compatible with the system’s technical specifications and,
in particular, with those of the selected input.
Table 5


