background image

1.

2.

3.

4.

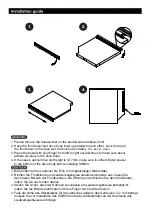
1. Please remove the release liner on the double-sided adhesive first.
2. Have the front bezel and drive body lined up parallel to each other, hook the top of 
    the front bezel to the open slot, then close by rotatin

g the bezel down.

3. Press the bezel with your finger from left to right several times to make sure bezel 
    adhere securely to the drive body.
4. If the case’s optical drive slot height is 12.7mm, make sure to adhere Mylar spacer 
    to the bottom of the drive body before installing SOB03.

1. Bitte entfernen Sie zunächst die Folie am doppelseitigen Klebemittel.
2. Richten Sie Frontblende und Laufwerksgehäuse parallel aneinander aus, haken Sie 
    den oberen Bereich der Frontblende in die Öffnung und schließen Sie dann die Blende, 
    indem Sie sie nach unten drehen.
3. Stellen Sie sicher, dass der Rahmen zuverlässig am Laufwerksgehäuse befestigt ist, 
    indem Sie die Blende mehrmals mit Ihrem Finger nach rechts drücken.
4. Falls die Höhe des Steckplatzes für das optische Laufwerk des Gehäuses 12,7 mm beträgt, 
    müssen Sie vor Installation des SOB03 den Mylar-Abstandhalter an der Unterseite des 
    Laufwerksgehäuses anbringen.

Содержание SOB03

Страница 1: ...9 5mm SATA Slot Load 8X Blu ray Disc Drive SOB03...

Страница 2: ...ax CD ROM DVD ROM SL BD ROM SL Caution The use of any controls adjustments or procedures other than those specified in the manual may cause a risk of exposure to radiation Do not disassemble this prod...

Страница 3: ...the drive body before installing SOB03 1 Bitte entfernen Sie zun chst die Folie am doppelseitigen Klebemittel 2 Richten Sie Frontblende und Laufwerksgeh use parallel aneinander aus haken Sie den obere...

Страница 4: ...girar el panel hacia abajo 3 Presione el frontal con su dedo de izquierda a derecha varias veces para asegurarse de que el panel se adhiere firmemente al cuerpo del dispositivo 4 Si el z calo para el...

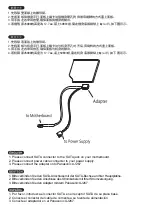
Страница 5: ...nasonic UJ267 1 Por favor introduzca el conector SATA en el receptor SATA de su placa base 2 Conecte el conector del cable de corriente a su fuente de alimentaci n 3 Conecte el adaptador en el Panason...

Страница 6: ...ur sur le Panasonic UJ267 1 Connettere il cavo SATA al connettore della scheda madre 2 Connettere il cavo di alimentazione all alimentatore 3 Connettere l adattatore su Panasonic UJ267 1 SATA SATA 2 3...

Страница 7: ...s distintos a los especificados aqu podr an provocar una exposici n a radiaci n Por favor no desmonte este producto para evitar cualquier exposici n a emanaciones l ser que podr an ser da inas para lo...

Страница 8: ...PBDE PBB Cr VI Cd Hg Pb SJ T11364 2014 SJ T11364 2014 RoHS 2011 65 EU 01...

Отзывы: