background image


CD-R :  
CD-RW :
High Speed CD-RW :
Ultra Speed CD-RW : 
DVD-R :
DVD-R DL :
DVD-RW :
DVD+R :
DVD+R DL :
DVD+RW :
DVD-RAM
BD-R (SL/DL)
BD-RE (SL/DL)
BD-R (TL/QL)
BD-RE (TL)

Max.24X CAV
4X CLV
10X CLV
Not Support
Max.8X CAV
Max.4X Zone CLV
Max.6X Zone CLV
Max.8X CAV
Max.4X Zone CLV
Max.8X Zone CLV
3X-5X PCAV ( 4.7GB)
Max.6X CAV
2X CLV
2X CLV
2X CLV

DVD-ROM
CD-ROM
BD-ROM

 8x CAV
24x CAV
2.0x CLV(for Video) / Max 6X CAV(for Data)
 

Max. Write Speed

Max. Read Speed

Model No.                          SST-SOB03
Power Requirement 


DC 5V ± 0.25V, 1800mA (Max.)

CD-ROM
DVD-ROM SL
BD-ROM SL

Caution:
The use of any controls, adjustments or procedures other than those specified in the manual may cause 
a risk of exposure to radiation. Do not disassemble this product yourself to avoid exposure to laser 
radiation (laser rays are harmful to eyes)

Interface
Buffer memory
Power Supply
Eject
Temperature

Humidity

MTBF
Net Weight
Dimension
Note

SATA interface (150 Mbyte/s).
2MB.
5V DC from PC’s power supply
Soft Eject
Operating guarantee : 5~50 

Non operating : -20~60

Operating guarantee : 10~80% RH
Non operating : 5~90% RH
60,000hr (Duty : 20%)
140±10g
128mm (W) x 9.5mm (H) x129mm (D) (without bezel)
8cm Media : Does not support

180ms (Typ.)
190ms (Typ.)
300ms (Typ.)

Access Speed

Содержание SOB03

Страница 1: ...9 5mm SATA Slot Load 8X Blu ray Disc Drive SOB03...

Страница 2: ...ax CD ROM DVD ROM SL BD ROM SL Caution The use of any controls adjustments or procedures other than those specified in the manual may cause a risk of exposure to radiation Do not disassemble this prod...

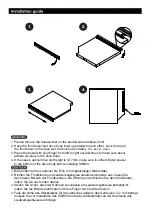
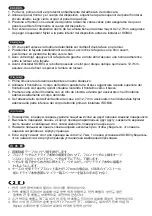
Страница 3: ...the drive body before installing SOB03 1 Bitte entfernen Sie zun chst die Folie am doppelseitigen Klebemittel 2 Richten Sie Frontblende und Laufwerksgeh use parallel aneinander aus haken Sie den obere...

Страница 4: ...girar el panel hacia abajo 3 Presione el frontal con su dedo de izquierda a derecha varias veces para asegurarse de que el panel se adhiere firmemente al cuerpo del dispositivo 4 Si el z calo para el...

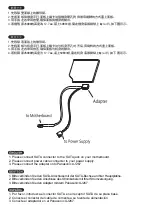
Страница 5: ...nasonic UJ267 1 Por favor introduzca el conector SATA en el receptor SATA de su placa base 2 Conecte el conector del cable de corriente a su fuente de alimentaci n 3 Conecte el adaptador en el Panason...

Страница 6: ...ur sur le Panasonic UJ267 1 Connettere il cavo SATA al connettore della scheda madre 2 Connettere il cavo di alimentazione all alimentatore 3 Connettere l adattatore su Panasonic UJ267 1 SATA SATA 2 3...

Страница 7: ...s distintos a los especificados aqu podr an provocar una exposici n a radiaci n Por favor no desmonte este producto para evitar cualquier exposici n a emanaciones l ser que podr an ser da inas para lo...

Страница 8: ...PBDE PBB Cr VI Cd Hg Pb SJ T11364 2014 SJ T11364 2014 RoHS 2011 65 EU 01...

Отзывы: