SilverStone sg12 Скачать руководство пользователя страница 7

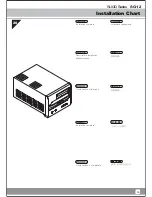
have all components collected
check that all components do not have compatibility problems with each other or with the case
if possible, assemble the components outside the case first to make sure they are working
keep the motherboard manual ready for reference during installation
prepare a Philips screwdriver.
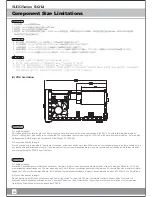
Installation Chart

 SUGO 

Series

SG12

4

1

2

3

4

5

Before you begin, please make sure that you

01

02

스크루드라이버를 사용하여 상부 
커버를 고정하는 나사를 푼 후 커
버를 뒤쪽으로 당기고 바깥쪽으로 
들어올려 섀시에서 분리합니다.

請以螺絲起子卸下鎖固上蓋的螺絲,
向後拉並提起自機箱中取出。

请以螺丝起子卸下锁固上盖的螺丝,
向后拉并提起自机箱中取出。

上面カバーを固定しているネジを
ドライバーで外し、後方に引き上
げてケースから取り外します。

확장 카드 슬롯 커버를 고정하는 
나사를 풀어 커버를 분리합니다.

請卸下鎖固擴充卡槽檔板螺絲
並卸下檔板。

请卸下锁固扩充卡槽档板螺丝
并卸下档板。

拡張カードスロットカバーを固定
しているネジを外し、カバーを取
り外します。

Please remove the screws holding 

the top cover with a screw driver, 

and then pull it toward back and lift 

it outward away from chassis.

С


помощью


отвертки


удалите


винты

крепящие


верхнюю


крышку

а


затем


потяните


ее


назад


и

подняв


в


направлении


наружу

снимите


с


корпуса

.

Bitte entfernen Sie die Schrauben, 

die die obere Abdeckung halten, 

mit einem Schraubendreher; ziehen 

Sie die Abdeckung dann nach 

hinten und nehmen Sie sie nach 

außen vom Gehäuse ab.

Please remove the screws holding 
the expansion card slot cover, and 
remove it.

Выверните


винты

крепящие


крышку


слота


платы


расширения

и


снимите


ее

.

Veuillez retirer les vis qui retiennent 

le couvercle supérieur avec un 

tournevis, puis le tirer vers l'arrière 

et le soulever vers l'extérieur du 

châssis.

Por favor, quite los tornillos que 

sujetan la cubierta superior con un 

destornillador y luego tire hacia 

atrás y levántela apartándola del 

chasis.

Utilizzando un cacciavite, rimuovere 

le viti che fissano il coperchio 

superiore, quindi tirarlo indietro e 

sollevarlo allontanandolo dal telaio.

Bitte entfernen Sie die Schrauben, 

die die Abdeckung des 

Erweiterungskartensteckplatzes 

halten; nehmen Sie die Abdeckung 

ab.

Veuillez retirer les vis retenant le 

cache de l'emplacement pour carte 

d'extension, puis enlever celui-ci.

Quite los tornillos que sujetan la 

cubierta de la tarjeta de expansión 

y retírela.

Rimuovere le viti che fissano il 

coperchio dell'alloggio della scheda 

di espansione, e rimuoverlo.

Содержание sg12

Страница 1: ...SUGO Series Refinement of classic small form factor case SG12 SUGO Series Refinement of classic small form factor case...

Страница 2: ......

Страница 3: ...erforming maintenance on your system A copy of this manual can also be downloaded from our website at Warranty Information Installation and system optimization guide Product Overview Specification Dis...

Страница 4: ...standard for which retail small form factor cases are defined The introduction of SG12 is both a tribute and advancement to one of the most revered case designs within SilverStone product portfolio th...

Страница 5: ...f Cable management Installation and maintenance guide Manage Cables Manage Cables 8025 FAN X 2 OPTIONAL TOP COVER 2 5 HDD X 2 OPTIONAL ATX PS2 PSU OPTION POWER BUTTON RESET BUTTON 5 25 BAY X 1 HANDLE...

Страница 6: ...Exterior Overview SUGO Series TOP FRONT BACK RIGHT SIDE LEFT SIDE SG12 3...

Страница 7: ...lease remove the screws holding the expansion card slot cover and remove it Veuillez retirer les vis qui retiennent le couvercle sup rieur avec un tournevis puis le tirer vers l arri re et le soulever...

Страница 8: ...ntilateur puis retirez le support vers l ext rieur du ch ssis Quite los tornillos del bracket para ventilador y luego saque el bracket del chasis Rimuovere le viti sul supporto ventola quindi allontan...

Страница 9: ...instale su placa base en el chasis como se muestra Installare la scheda madre nel telaio come mostrato Please secure your motherboard with included screws screw A A Bitte befestigen Sie Ihr Motherboa...

Страница 10: ...dalla parte superiore come mostrato e fissarlo utilizzando le viti fornite in dotazione viti B Please remove 2 5 hard drive bracket and press the area as shown to release 5 25 device bay cover 2 5 5...

Страница 11: ...tornillos incluidos tornillos A Inserire le unit ottiche dalla parte anteriore come mostrato e fissare utilizzando le viti fornite in dotazione viti A Remove the screws holding the hard drive tray and...

Страница 12: ...t Placez votre disque dur sur le plateau et fixez le avec les vis fournies vis B Puis ins rez votre disque dur avec le plateau dans le ch ssis et fixez le avec des vis tape 10 Attention le support du...

Страница 13: ...please refer to the installation guide of it Installieren Sie eine Grafik oder Erweiterungskarte Falls eine Erweiterungskarte installiert werden muss beachten Sie bitte die zugeh rige Installationsan...

Страница 14: ...on los tornillos incluidos tornillo B luego vuela a reinstalar el bracket para dispositivo en el bracket para ventilador Fissare l unit da 2 5 al supporto utilizzando le viti fornite in dotazione viti...

Страница 15: ...mm peuvent tre install s sur le support de ventilateur 80mm 1 2 Reinstale el bracket para ventilador en el chasis y aseg relo con tornillos Se pueden instalar uno o dos ventiladores opcionales de 80m...

Страница 16: ...fixez le avec des vis Reinstallare il coperchio dell alloggio della scheda di espansione e fissarlo con le viti After all cables and wirings are connected reinstall the top cover and secure it Nachdem...

Страница 17: ...Installation Chart SUGO Series SG12 14 20 Installation complete Damit ist die Installation abgeschlossen L installation est termin e Instalaci n completa L installazione completata...

Страница 18: ...rs du panneau frontal et des des connecteurs du panneau syst me Les interrupteurs d allumage et de r initialisation ne poss de pas de polarit donc ils peuvent tre branch dans les deux sens Por favor c...

Страница 19: ...des broches des connecteurs du panneau syst me Les c bles color s en blanc noir sont n gatifs alors que ceux d une autre couleur sont positifs Les c bles de la LED Power sont s par s afin d tre compa...

Страница 20: ...tambi n debe consultar el manual de su placa base para c omprobar la referencia de los pines para E S frontales Los conectores de E S de SilverStone son de bloque para simplificar la instalaci n Di s...

Страница 21: ...bo tier alors il y a 45 mm de place en moins depuis le bord de la carte m re Si aucun ventilateur de flux d air transversal n est install alors la carte m re peut utiliser toute la place A Limitaci n...

Страница 22: ...t cable kit A Length limitation Maximale Gesamtl nge von Netzteil und optischem Laufwerk Netzteil und optisches Laufwerk befinden sich auf derselben Ebene im SG12 bei einer erlaubten Gesamtl nge von 3...

Страница 23: ...one ST1500 GS B Recommended cable length Ya que la fuente de alimentaci n se monta en mitad de la carcasa ning n dispositivo estar a m s de 250mm de la fuente de alimentaci n luego no habr problemas p...

Страница 24: ...icke nutzen m chten kann die Hauptlaufwerkshalterung des SG12 zu dessen Aufnahme angepasst werden Nachstehend sehen Sie eine Tabelle die die Unterst tzung der Hauptlaufwerkshalterung im Hinblick auf v...

Страница 25: ...cambiar a otro ventilador con un grosor diferente el bracket para dispositivo principal de la SG12 se puede ajustar para adaptarlo y permitir usar tarjetas gr ficas m s largas A continuaci n hay una...

Страница 26: ...8 SG12 A SG12 25mm 9 8 SG12 A SG12 25mm 9 8 SG12 A SG12 25mm 1 9 8 SG12 SUGO Series SG12 25mm 15mm 10mm 11 5 11 5 CP11 25mm 15mm 10mm 11 5 11 5 CP11 25mm 15mm 10mm 11 5 11 5 SATA SilverStone CP11 25m...

Страница 27: ...de ventilateur pour les cartes jusqu 14 5 368mm C Si la carte graphique sera install e sur le quatri me emplacement de carte m re sa longueur ne doit pas d passer 9 6 244mm sous peine d interf rer av...

Страница 28: ...stalled drive First 2 5 drive Second 2 5 drive Third 2 5 drive Fourth 2 5 drive Fifth 2 5 drive Sixth 2 5 drive Seventh 2 5 drive Graphics card length limit 13 3 12 7 12 1 11 5 10 9 10 4 9 8 Installie...

Страница 29: ...ptimo dispositivo de 2 5 Longitud l mite de la tarjeta gr fica 13 3 12 7 12 1 11 5 10 9 10 4 9 8 Unit installata Prima unit da 2 5 Seconda unit da 2 5 Terza unit da 2 5 Quarta unit da 2 5 Quinta unit...

Страница 30: ...Series SG12 2 5 2 5 2 5 2 5 2 5 2 5 2 5 13 3 12 7 12 1 11 5 10 9 10 4 9 8 1 2 5 2 2 5 3 2 5 4 2 5 5 2 5 6 2 5 7 2 5 13 3 12 7 12 1 11 5 10 9 10 4 9 8 2 5 2 5 2 5 2 5 2 5 2 5 2 5 13 3 12 7 12 1 11 5 1...

Страница 31: ...Stone NT06 PRO avec ventilateur mont sur processeur pour souffler de l air vers le haut et ainsi obtenir des performances optimis es 1 Para refrigerar la CPU le recomendamos el SilverStone NT06 PRO co...

Страница 32: ...sto con il flusso d aria dell alimentatore causando cos prestazioni meno ottimali Cooler Cooler CPU CPU CPU cooler as shown here does not allow fan to be reversed so its fan may fight with power suppl...

Страница 33: ...ht Si possible choisissez des refroidisseurs de processeur qui permettent de monter le ventilateur librement pour qu il fonctionne avec le sens du d bit d air global du bo tier Si es posible escoja di...

Страница 34: ...l alimentation nous vous conseillons d obtenir des mod les avec un ventilateur d au moins 120 mm voire plus pour contribuer au refroidissement global du SG12 2 Para seleccionar la fuente de alimentaci...

Страница 35: ...SG12 1 Fan removal steps Hard drive bracket fan 01 8 Remove all hard drive trays Alle Festplatteneins tze entfernen Retirez tous les plateaux de disques durs Retire todas las bandejas de discos duros...

Страница 36: ...Schrauben der Festplattenhalterung von der Unterseite des Geh uses entfernen Retirer les vis du support de disque dur depuis le fond du bo tier Retire los tornillos del bracket para discos duros de l...

Страница 37: ...ttenhalterung zum Entfernen aus dem Geh use nach links schieben Faites coulisser le support des lecteurs vers la gauche pour le retirer du bo tier Deslice el bracket para discos hacia la izquierda par...

Страница 38: ...angen Schraubendreher von der Festplattenhalterung entfernen Utilisez un long tournevis pour retirer les vis du ventilateur depuis le support du lecteur Use un destornillador largo para retirar los to...

Страница 39: ...tallation Befolgen Sie zur Installation die obigen Schritte in umgekehrter Reihenfolge R p tez les tapes ci dessus dans l ordre inverse pour le remontage Repita los pasos anteriores a la inversa para...

Страница 40: ...de votre processeur et de la quantit d air que l alimentation peut extraire de la zone du processeur Nous n avons pas de r ponse g n rale cette question vous devez donc le tester par vous m me P Si te...

Страница 41: ...e acepten dispositivos adicionales D Ho installato tutte le unit ma la scheda madre non le supporta tutte R Acquistare schede di espansione che supportano le unit aggiuntive Q A Q A Q A Q A SUGO Serie...

Страница 42: ......

Страница 43: ...uring the warranty period please contact your retailer reseller SilverStone authorized distributors or SilverStone http www silverstonetek com Please note that i You must provide proof of original pur...

Страница 44: ...G11223200...

Отзывы: