9
SKR 800 A1
GB
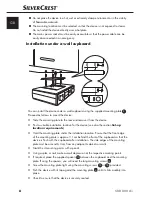
Dismantling
♦
Pull the device forwards off the mounting plate.
♦
Unscrew the screws (
15
or
16
) on the mounting plate and remove the mounting plate
from the wall cupboard.
Setting up the device
As an alternative you can stand the device on a level surface. To prevent the ventilation slots
and speaker
10
on the bottom of the device from being covered, the device's stand
9
must be folded outwards:
♦
Reach into the recess on the side of the stand and pull it out as far as it will go.
♦
Select a suitable location for the device (see also the section
Set-up location
requirements
).
Connecting the power supply
CAUTION
►
Before connecting the device compare the connection data (voltage and frequency)
on the rating plate with that of your electric supply. These data must agree so that
no damage is sustained by the device.
♦
Insert the power plug into a mains wall socket. The time (
) flashes on the display
5
.
Inserting batteries
By inserting 2 x 1.5 V batteries (type AA/Mignon/LR6) you can prevent the programmed
time or saved stations from being lost in the event of a power failure. The batteries make
sure that the internal clock continues to run even during a power outage. When power is
restored, the correct time automatically appears on the display.
NOTE
►
The device can also be operated without a battery. The display, radio and alarm
do not function in emergency mode.
♦
Open the cover of the battery compartment
12
on the bottom of the device.
♦
Insert 2 x 1.5 V batteries (type AA/Mignon/LR6) (not supplied) into the battery
compartment. Insert the batteries as shown on the polarity diagram in the battery
compartment.
♦
Then close the battery compartment by replacing the cover and snapping it into place.
FM wire aerial
♦
Completely unwind the wire aerial
13
for FM radio reception.


