background image


Bedienungsanleitung


Operating Instructions 

Instructions d’utilisation 

Istruzioni operative 


C

R

 1

0

5

U

n

iv

e

rs

a

R

D

S

 R

a

d

io


Содержание CR 105K

Страница 1: ...Bedienungsanleitung Operating Instructions Instructions d utilisation Istruzioni operative CR 105K Universal RDS Radio ...

Страница 2: ...BEDIENELEMENTE _____________________________________________________________ 1 DE ...

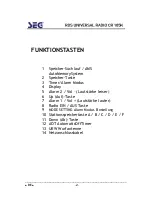
Страница 3: ...Vol Lautstärke leiser 6 Up Auf Taste 7 Alarm 1 Vol Lautstärke lauter 8 Radio EIN AUS Taste 9 MODE SETTING Alarm Modus Einstellung 10 Stationsspeichertaste A B C D E F 11 Down Ab Taste 12 AOT AutomaticOffTimer 13 UKW Wurfantenne 14 Netzanschlusskabel _____________________________________________________________ DE 2 ...

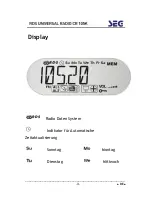
Страница 4: ...Display Radio Daten System Indikator für Automatische Zeitaktualisierung Sonntag Montag Dienstag Mittwoch ____________________________________________________________ 3 DE ...

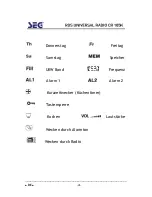
Страница 5: ...g Samstag Speicher UKW Band Frequenz Alarm 1 Alarm 2 Kurzzeitwecker Küchentimer Tastensperre Kochen Lautstärke Wecken durch Alarmton Wecken durch Radio _____________________________________________________________ DE 4 ...

Страница 6: ...enung 12 3 1 Auto Run Einstell Modus Radio AUS 12 3 2 Grundfunktionen Radio ausgeschaltet 13 3 3 Grundfunktionen Radio eingeschaltet 13 3 4 Stellen Sie die Uhrzeit ein manuell 14 3 5 Stellen Sie das Datum ein manuell 15 3 6 Einstellen der Erinnerungsfunktion SDA SpecialDateAlert 15 3 7 Auto Update Funktion EIN AUS 16 3 8 Display Dimmer EIN AUS 16 3 9 Uhrzeitanzeige im 12 bzw 24 Stunden Modus wähle...

Страница 7: ...utomatischer Suchlauf Manuelle Frequenzabstimmung 21 3 19 Automatische Speicherabfrage 21 3 20 AMS Funktion Automatischer Suchlauf mit automatischer Speicherung von Radiosendern 21 3 21 AOT Funktion Auto Off Timer 22 3 22 Elektonische Lautstärkeregelung EVC 22 3 23 Tastensperre 22 4 Unterbaumontage 23 5 Technische Daten 24 _____________________________________________________________ DE 6 ...

Страница 8: ...ng aufmerksam durch und bewahren Sie sie für späteres Nachlesen an einem sicheren Ort auf Im Sinne der eigenen Sicherheit und um den gesamten Funktionsumfang Ihres Gerätes zu erfahren sollten Sie den Anweisungen der Anleitung genau folgen Bei Weitergabe des Gerätes an andere Personen geben Sie auch diese Bedienungsanleitung mit Bitte beachten Sie auch die Anweisungen der Bedienungsanleitungen alle...

Страница 9: ...ker aus der Steckdose ziehen Auch wenn Sie das Gerät für längere Zeit nicht benutzen empfehlen wir den Netzstecker aus der Steckdose zu ziehen und die Batterien aus der Fernbedienung zu entnehmen 1 4 Gegenstände im Gerät Achten Sie darauf dass keine Gegenstände oder Flüssigkeiten durch die Lüftungsschlitze oder andere Öffnungen des Gehäuses ins Geräteinnere gelangen können es besteht Lebensgefahr ...

Страница 10: ... Um Ihr Gerät vor Schäden und Fehlfunktionen zu schützen sollten Sie frühestens 2 Stunden warten bevor Sie das Gerät in Betrieb nehmen 1 7 Kinder Lassen Sie Kinder niemals unbeaufsichtigt mit elektrischen oder elektronischen Geräten spielen da sie Gefahren noch nicht richtig einschätzen können 1 8 Batterien Batterien sind von Kindern fernzuhalten Alle Batterien eines Gerätes sind gleichzeitig zu e...

Страница 11: ... Wartung Das Gerät bedarf bei bestimmungsgemäßer Verwendung keiner besonderen Wartung Im Falle von Leistungseinbußen der sonstigen Funktionsstörungen wenden Sie sich bitte an eine qualifizierte Fachwerkstatt 1 12 Reparaturen öffnen Sie niemals das Gerät Überlassen Sie evt notwendige Reparaturen ausschließlich einer qualifizierten Fachwerkstatt Durch unsachgemäßen Fremdeingriff erlischt jeglicher G...

Страница 12: ... Kalenderfunktion Dual Alarm mit mehreren Alarm Modi Wecken durch Radio oder Summerton 6 User Einstellung SDA Special Datum Alert Kurzzeit Timer Küchentimer von 1 Minute bis 23 59 AMS Funktion Automatic Memory System 60 Programmspeicher für Radiosender Automatische Manuelle Sendersuche Memory Scan Funktion Elektronische Lautstärkeregelung EVC LED Hintergrundbeleuchtung mit Dimmer Funktion Key Lock...

Страница 13: ...uten dauern bis die korrekte Uhrzeit eingestellt und angezeigt wird Hinweis bei besonders kritischen Empfangsverhältnissen kann es vorkommen dass die automatische Einstellung von Uhrzeit Datum nicht funktioniert Die beiden Alarmzeiten sind derweil auf 0 00 voreingestellt Modus täglich aber deaktiviert Das Radio ist beim erstmaligen Einstecken des Netzsteckers ausgeschaltet Das Gerät schaltet nach ...

Страница 14: ...normalen Betriebsmodus Uhrzeitanzeige 3 2 Grundfunktionen Radio ausgeschaltet Drücken Sie die ALARM 1 Taste Radio Aus um eine Alarmzeit einzugeben bzw die Alarmzeit abzufragen Drücken Sie die ALARM 2 Taste Radio Aus um eine zweite Alarmzeit einzugeben bzw die zweite Alarmzeit abzufragen 3 3 Grundfunktionen Radio eingeschaltet Im Radio Modus zeigt das Gerät in der Regel den Namen des ______________...

Страница 15: ...espeicherten Sender hintereinander kurz anspielen für ca 10 Sekunden drücken Sie kurz die Taste SPEICHER SUCHLAUF AMS um die Funktion zu aktivieren nochmaliges kurzes Drücken der gleichen Taste stoppt die Anspielfunktion und verbleibt beim gerade eingestellten Speicherplatz Drücken und Halten der gleichen Taste aktiviert die AMS Funktion das Gerät sucht und speichert automatisch bis zu 60 empfangb...

Страница 16: ...rinnerungsfunktion SDA SpecialDateAlert Sie können bis zu 6 verschiedene Erinnerungsfunktionen aktivieren z B Geburtstage Jahrestage Ereignisse etc Drücken Sie die Taste MODUS einmal wenn Sie im Datum Einstellmodus sind Im Display blinkt SDA und das entsprechende Datum Sie ändern das Datum für das gewünschte Ereignis durch Drücken der Taste UP jeder Druck auf die Taste stellt das Datum um einen Ta...

Страница 17: ...r Drücken Sie erneut die Taste MODUS um die Dimmer Funktion einzustellen 3 8 Display Dimmer EIN AUS Drücken Sie die Taste MODUS einmal wenn Sie im Auto Update Einstellmodus sind Das Display zeigt DIM ON oder DIM OFF Drücken Sie UP oder DOWN um die Einstellung zu ändern Bei eingeschalteter Dimmer Funktion wird die Beleuchtung des Displays nach 10 Sekunden automatisch reduziert und nur bei Betätigen...

Страница 18: ...n zum erneuten Starten des Timer nochmals TIMER ALARM MODUS drücken 30 Sekunden vor Ablauf der Timer Zeit ertönt ein Beep Sound welcher in kürzer werdenden Abständen wiederholt wird bei 25s 20s 16s 12s 9s 6s 4s 2s Ist die Kurzzeit Timer Zeit erreicht ertönt der Beep Sound in kurzen Abständen Drücken Sie TIMER ALARM MODUS um den Timer zu beenden und zu deaktivieren Drücken und halten Sie die Taste ...

Страница 19: ...e TIMER ALARM MODUS so oft bis die gewünschten Tage an denen der Alarm aktiv wird blinken wählen Sie zwischen Wochende Su Sa blinken oder Wochentags Mo Tu We Th Fr blinken oder jeden Tag Su Mo Tu We Th Fr Sa blinken Sie können auch einen einzelnen beliebigen Tag auswählen drücken und halten sie dazu die Taste TIMER ALARM MODUS Mo Montag wird angezeigt drücken Sie nun die gleiche Taste kurz und so ...

Страница 20: ...nn Sie die Weckfunktion aktiviert haben und die tatsächliche Zeit mit der eingestellten Weckzeit übereinstimmt ertönt je nach Einstellung ein Alarmton oder das Radio schaltet ein Sobald die Weckfunktion aktiv ist und der Alarm ertönt werden evt programmierte Kurzzeit Timer außer Kraft gesetzt Wenn die Weckfunktion per Alarmton programmiert wurde a ertönt der Alarmton über den Lautsprecher lauter w...

Страница 21: ...F bis zu 10 Sender ablegen abrufen dazu Drücken Sie entsprechend oft auf die entsprechende Speichertaste z B A0 9 oder B0 9 usw 3 17 Abspeichern von Radiosendern Sie können bis zu 60 Radiosender abspeichern Zum Speichern der Tuning Frequenz des gerade eingestellten Radiosenders drücken Sie SPEICHER Taste einmal Das Symbol MEM sowie der Speicherplatz z B A0 blinken im Display Legen Sie nun fest auf...

Страница 22: ...matischen Suchlauf auch in die andere Richtung starten indem Sie die Taste DOWN drücken und halten 3 19 Automatische Speicherabfrage Wenn das Radio eingeschaltet ist können Sie die gespeicherten Sender nacheinander anspielen drücken Sie dazu kurz auf die Taste SPEICHER SUCHLAUF AMS Im Display erscheint das Symbol MEM sowie der Speicherplatz wurde keine der Speichertasten A F zuvor gedrückt startet...

Страница 23: ...t der AOT Taste eingeschaltet werden Jeder weitere Druck auf die Taste AOT verringert die AOT Zeit um 5 Minuten drücken und halten Sie AOT um die AOT Zeit im Fast Modus zu ändern Um AOT zu deaktivieren drücken Sie die Taste AOT so oft bis im Display AOT 0 angezeigt wird 3 22Elektonische Lautstärkeregelung EVC Sie können die Lautstärke des Radios mit Hilfe der beiden Tasten ALARM1 VOL bzw ALARM2 VO...

Страница 24: ...4 Unterbaumontage _____________________________________________________________ 23 DE ...

Страница 25: ...annungsversorgung AC 230V 50Hz Backup Batterie 3V 2 1 5V UM 4 AAA Microzelle Ausgangsleistung 500mW Temperaturbereich 5 35 ___________________________________________________________ DE 24 Product of Schmid Electronics GmbH D 66780 Rehlingen Siersburg ...

Страница 26: ...ätedefekts durch Kurzschluss Notfalls ziehen Sie sofort den Netzstecker und wenden Sie sich an eine qualifizierte Fachwerkstatt Aufstellung Aufstellung Aufstellung Aufstellung das Gerät sollte auf einer ebenen Fläche sicher aufgestellt werden Die Lüftungsschlitze des Gerätes dürfen niemals verdeckt sein um das Gerät herum muss eine ausreichende Luftzirkulation gewährleistet sein nach hinten und se...

Страница 27: ...ACHTUNG Nicht öffnen Stromschlaggefahr _____________________________________________________________ 25 DE ...

Страница 28: ... PC Monitoren betreiben um Empfangsstörungen Radio RDS Signal zu vermeiden Nur Alkaline Batterien als Gangreserve verwenden die zu 100 frei von Cadmium und Quecksilber sind Immer kompletten Batteriesatz wechseln Nie ALT NEU vermischen Verbrauchte Batterien sind Sonderabfall und gehören NICHT in den Hausmüll Geben Sie diese an geeigneten Sammelstellen oder bei Ihrem Händler ab Batterien NIEMALS ins...

Страница 29: ...Over View _____________________________________________________________ 1 GB ...

Страница 30: ...RY SETTING 3 TIMMER ALARM MODE 4 Display 5 ALARM 2 VOL 6 UP 7 ALARM 1 VOL 8 POWER ON OFF 9 MODE SETTING 10 Preset key A B C D E F 11 DOWN 12 AOT 13 FM antenna 14 AC adaptor _____________________________________________________________ GB 2 ...

Страница 31: ...Display Radio Data System The indicator of auto update time function Sunday Monday Tuesday Wednesday _____________________________________________________________ 3 GB ...

Страница 32: ...mory FM Band Frequency Alarm 1 Alarm 2 Cooking time Key lock Cooking Volume Select the alarm output format is Beep sounds Select the alarm output format is Radio _____________________________________________________________ GB 4 ...

Страница 33: ...atteries 9 1 10 Cleaning 9 1 11 Servicing 10 1 12 Repairs 10 1 13 WARNING 10 2 General Description 11 3 How to used 12 3 1 Auto run Mode Radio OFF 12 3 2 Set the clock manually 13 3 3 Set the date 13 3 4 Set the SDA 14 3 5 Switching automatic update ON OFF 14 3 6 Switching dimmer ON OFF 15 3 7 Select 12 24 hour 15 3 8 The Cooking Timer 16 3 9 Timer Value Preset 16 3 10 ALARM1 ALARM2 setting Radio ...

Страница 34: ...5 Store into memory 19 3 16 Search up Down 20 3 17 Memory review 20 3 18 AMS Using 21 3 19 AOT function 21 3 20 Electronic Volume Control 21 3 21 Key lock 21 4 Disposal 22 4 1 Packing 22 4 2 Device 22 4 3 Batteries 22 4 4 Assembly 23 5 Technical Date 24 _____________________________________________________________ GB 6 ...

Страница 35: ...f with the different functions of the product please follow the instructions in this manual carefully When passing this product to other persons please also hand over this User Manual Please also read the user manuals of all devices that you are going to connect to this device 1 3 Connecting to the Power Supply do not use the device if the device or its cables present visible damage Connect the de...

Страница 36: ... 1 5 Objects inside the device Make sure that no foreign objects or liquids enter the device via the ventilation holes or other openings There is risk of electric shock damage to the device and short circuit In case of any emergency immediately pull the power plug and contact a qualified service technician 1 6 Installation place the device onto a flat and even surface Never cover the ventilation h...

Страница 37: ...ies Do not place any objects on the device and never apply any pressure onto the housing or the display Do not place any recipients containing liquids beverages vases etc onto or next to the device Do not place any fire sources such as candles onto the device This could damage the product Environmental effects Keep the device away from any heat sources heating equipment ovens cooking places candle...

Страница 38: ...rs Never open the device Any repairs must be performed by authorized technicians or service personnel Any unauthorised opening or modification will void the warranty and also the safety of the product may be altered 1 13 WARNING Inside the device there is dangerous voltage Never open the housing of the device there is risk of personal injury by electric shock ______________________________________...

Страница 39: ... daily weekday week end and daily independently Alarm output can be set to radio or Buzzer sound 6 User setting SDA Special Date Alert 6 1 preset able cooking Timer 1 minute to 23 59 AMS function Automatic Memory System 60 memories pre set radio station Automatic Manual search Up Down features are provided Memory scan feature is provided Electronic Volume Control LED back light with smooth dimmer ...

Страница 40: ...he SDA with Clock display select 12 24 hour Dimmer ON OFF Automatic update ON OFF In radio mode If RDS information is transmitted by the station the station name appears in place of the frequency the frequency is displayed when there is no RDS information had been received Press Alarm 1 Vol to review set the alarm 1 Press Alarm 2 Vol to review set the alarm 2 When the radio is ON press A 0 9 B 0 9...

Страница 41: ...flashing the LCD with day flag cleared The second keeps counting up once per second Press UP to advance the clock by 1 minute Press DOWN to move the clock back by 1 minute Press and hold UP or DOWN to set the clock in fast mode of 10 minutes per step Press MODE SETTING once to set the date Press other key to start its corresponding function When no key has been pressed for 10 seconds the current s...

Страница 42: ...ate setting mode The date SDA goes flashing alternative Press UP or DOWN to set the Special Date Press TIMER ALARM MODE to ignore the year Press MODE SETTING once to confirm the current setting and go to set the automatic update ON OFF Press A F to select the number of SDA Press other key to start its corresponding function When no key has been pressed for 10 seconds the current setting is confirm...

Страница 43: ... once in the automatic update setting mode The display show DIM ON or DIM OFF Press UP or DOWN to switch dimmer ON or OFF Display show DIM ON the display is illuminated for 10 seconds when any key had been pressed Display show DIM OFF the display is illuminated for all time Press MODE SETTING once to confirm the current setting and it switches to 12 24HOUR Press other key to start its correspondin...

Страница 44: ...ing timer When the timer is running press TIMER ALARM MODE to pause the timer To restart the timer press TIMER ALARM MODE again When the timer remain 30 seconds the remind tone be will sound it also sound at 25s 20s 16s 12s 9s 6s 4s 2s the time reach to 00 00 the voice be be be be be will be heard for ever Press TIMER ALARM MODE to terminate the timer and exit Press and hold TIMER ALARM MODE for 2...

Страница 45: ...ance the setting by 1 minute Press DOWN to move the setting back by 1 minute Press and hold UP or DOWN to change the setting in fast mode of 10 minutes per step Press TIMER ALARM MODE to change the type of alarm between daily weekday weekend and daily independently which are reflected by the 7 day flags Press and hold TIMER ALARM MODE to enter daily independently mode Press TIMER ALARM MODE again ...

Страница 46: ...ven radio ON The SDA goes flash on LCD display The beep will sound ever hour for 10 minutes until 23 00 Press any key to terminate the SDA when SDA is sounding 3 12 When alarm is active When the real time clock matches with the alarm which has been enabled alarm becomes active As the alarm becomes active the Cooking timer if exists is terminated immediately If beep sounds alarm is selected a Sound...

Страница 47: ...lect the preset memory between 0 9 Similar to A 0 9 press B 0 9 C 0 9 D 0 9 E 0 9 or F 0 9 to select the desired preset memory station When new preset memory key is pressed MUTE is active When keying the preset memory has been released for 1 second the selection of preset memory is considered as valid and the radio will be tuned to that frequency immediately with MUTE idle At any time press other ...

Страница 48: ...arch the next radio station by moving the receiving frequency up Press and hold DOWN to search the next radio station by moving the receiving frequency down 3 17 Memory review When the radio is ON press MEMORY REVIEW A M S once to scan the 10 preset memory stations in folder A Select folder B F to review corresponding preset memory stations The review starts from the next memory station or A 0 if ...

Страница 49: ...the multiple of 5 For example the preset ATO time is 10 press once AOT to change time to 5 press again to OFF 90 85 80 10 5 OFF When the time is reach to preset it will turn off the radio automatically 3 20 Electronic Volume Control When radio is on Press ALARM1 VOL once to increase speaker volume by one step Hold for continually Press ALARM2 VOL once to decrease speaker volume by one step Hold fo...

Страница 50: ...ever dispose off your RDS Kitchen Radio in the normal household garbage Ask your shire council for options on disposing of the appliance and in an environmentally friendly way 4 3 Batteries Do not dispose off used batteries with normal household waste Batteries should be disposed off at special collection points as they contain harmful substance ____________________________________________________...

Страница 51: ...4 4 Assembly _____________________________________________________________ 23 GB ...

Страница 52: ... 108MHz Rated Voltage AC 230V 50Hz Backup Battery 3V 2 1 5V UM 4 AAA Output 500mW Operation temperature 5 35 _____________________________________________________________ GB 24 Product of Schmid Electronics GmbH D 66780 Rehlingen Siersburg ...

Страница 53: ...Liste des clés _____________________________________________________________ 1 FR ...

Страница 54: ...e de mémoire 3 TIMMER MODE ALARME TIMMER 4 Display 5 ALARM 2 VOL 6 UP 7 ALARM 1 VOL 8 POWER ON OFF 9 MODE RÉGLAGE 10 Preset touche A B C D E F 11 BAS 12 AOT 13 FM antenna 14 AC cord _____________________________________________________________ FR 2 ...

Страница 55: ...Display Radio Data System The indicator of auto update time function Sunday Monday Tuesday Wednesday _____________________________________________________________ 3 FR ...

Страница 56: ...mory FM Band Frequency Alarm 1 Alarm 2 Cooking time Key lock Cooking Volume Select the alarm output format is Beep sounds Select the alarm output format is Radio _____________________________________________________________ FR 4 ...

Страница 57: ...Piles classiques 9 1 10 Protection de l appareil 9 1 11 Nettoyage 9 1 12 Entretien et maintenance 10 1 13 Réparations 10 2 Description générale 11 3 Comment faire pour utiliser 12 3 1 Terme Mode Auto OFF Radio 12 3 2 Réglez l horloge manuellement 13 3 3 Régler la date 14 3 4 Réglez le SDA 14 3 5 Commutation mise à jour automatique ON OFF 15 3 6 Commutation variateur ON OFF 15 3 7 Sélectionnez 12 2...

Страница 58: ... préréglage de mémoire radio 19 3 15 Boutique en mémoire 20 3 16 Recherche Up Down 20 3 17 avis de la mémoire 21 3 18 AMS aide 21 3 19 fonction AOT 21 3 20 réglage électronique du volume 22 3 21 serrure à clé 22 4 Assembly 23 5 Technical Date 24 _____________________________________________________________ FR 6 ...

Страница 59: ...pre sécurité et afin de vous familiariser avec les différentes fonctions de ce produit nous vous conseillons de lire attentivement toutes les instructions du présent manuel Si vous cédez cet appareil à une tierce personne veillez à lui remettre ce manuel d utilisation Veuillez également lire les manuels d utilisation de tous les appareils que vous souhaitez connecter à l appareil 1 3 Branchement s...

Страница 60: ...re à l intérieur de l appareil à travers ses orifices de ventilation ou autres ouvertures afin d éviter tout risque de court circuit d électrocution ou d endommagement de l appareil En cas d incident débranchez immédiatement le câble d alimentation et faites appel à un personnel technique qualifié 1 6 Installation placez l appareil sur une surface plane et régulière Ne recouvrez jamais ses orifice...

Страница 61: ...ecte des piles comporte un risque d explosion Ne placez aucun objet sur l appareil et n exercez jamais de pression sur la carcasse ou l écran de l appareil Ne placez aucun objet contenant du liquide verres vases etc sur l appareil ou à proximité Ne placez pas de sources incandescentes bougies etc sur l appareil vous risqueriez de l endommager 1 10Protection de l appareil protégez l appareil de tou...

Страница 62: ...rformances diminuent considérablement faites appel à un personnel technique qualifié 1 13 Réparations n ouvrez jamais l appareil Toute réparation doit être réalisée par un service ou un personnel technique agréé Toute ouverture ou modification non autorisée de l appareil annule automatiquement la garantie et risque de compromettre votre sécurité et celle du produit ATTENTION l appareil renferme un...

Страница 63: ...maine week end et tous les jours de façon indépendante Sortie d alarme peut être réglée à la radio ou bip sonore 6 User mise en SDA Special Date d alerte 6 1 préréglage de cuisson en mesure Timer 1 minute à 23 59 fonction AMS Système automatique de la mémoire 60 mémoires mis en avant la station de radio Recherche Automatique et Manuel Up Down caractéristiques sont fournis Mémoire fonction de balay...

Страница 64: ...le mode automatique 3 1 Terme Mode Auto OFF Radio Appuyez sur MODE fois pour passer en mode séquentielle différents Mode Auto run Avec l horloge d affichage régler l horloge Réglage de la date Réglez le SDA mise à jour automatique ON OFF Variateur ON OFF Sélectionnez 12 24 heures En mode radio si les informations RDS est transmise par la station le nom de la station s affiche à la place de la fréq...

Страница 65: ...comparé avec le réglage de l alarme si elle a été activée Pour plus de détails s il vous plaît se référer à la section des Quand l alarme est active 3 2 Réglez l horloge manuellement Appuyez sur MODE une fois lorsque l appareil reste en mode affichage de l horloge L horloge va clignoter l écran LCD avec le jour drapeau autorisé La seconde tient compte jusqu à une fois par seconde Appuyez sur up po...

Страница 66: ...e en cours est confirmée et il passe à terme le mode automatique automatiquement 3 4 Réglez le SDA Appuyez sur MODE une fois en mode de réglage de la date La date et DPS va clignoter alternative Appuyez sur up ou down pour définir la date spéciale Appuyez sur TIMER ALARME mode d ignorer l année Appuyez sur MODE SETTING une fois pour confirmer le réglage actuel et aller pour régler la mise à jour a...

Страница 67: ...ée et il passe à terme le mode automatique automatiquement 3 6 Commutation variateur ON OFF Appuyez sur MODE SETTING une fois dans la mise à jour automatique en mode de réglage L écran affiche DIM ON ou DIM OFF Appuyez sur up ou down à gradateur ON ou OFF Montrer DIM Affichage ON l écran est éclairé pendant 10 secondes quand n importe quelle touche a été enfoncée OFF DIM Afficher montrer l écran e...

Страница 68: ...uster la valeur de 1 minute à 23 heures et 59 minutes ou AF de presse pour rappeler la valeur de consigne appuyez sur MODE TIMER ALARM pour démarrer la minuterie de cuisine Lorsque le compte à rebours de presse Mode TIMER ALARM de faire une pause de la minuterie Pour redémarrer la minuterie de presse TIMER ALARM MODE nouveau Lorsque la minuterie reste 30 secondes le ton de rappeler à être se fait ...

Страница 69: ...ctuelle de HH MM et le type d alarme vont clignoter par le correspondant d un jour drapeaux Appuyez sur pour faire avancer le up d 1 minute Appuyez sur down pour replacer le réglage de 1 minute Appuyez et maintenez up ou down pour changer le réglage en mode rapide de 10 minutes par étape Appuyez sur TIMER ALARM Mode de changer le type d alarme entre quotidiens en semaine week end et de façon auton...

Страница 70: ...t actif à 8 00 Comme le SDA active Sound of bascule bip à la présidence pendant 10 minutes en sourdine même la radio de Radio ON The SDA va clignoter sur l affichage LCD Le bip sonore retentit toujours Une heure pendant 10 minutes jusqu à 23 00 Appuyez sur n importe quelle touche pour mettre fin à la SDA lorsque le SDA retentit 3 12 Lorsque l alarme est active Lorsque l horloge temps réel correspo...

Страница 71: ...tion s affiche à la place de la fréquence 3 14 Rappel de préréglage de mémoire radio II exixet 60 stations de présélections pour la radio Lorsque la radio est allumée appuyez une fois sur A 0 9 MEM va solide la fréquence de la mémoire va 0 solide dans le LCD Appuyez sur A 0 9 encore et encore pour sélectionner la mémoire préréglée entre 0 9 Comparable à A 0 9 B 0 9 presse C 0 9 D 0 9 E 0 9 ou F 0 ...

Страница 72: ...ant sur up down ou paramètre de mémoire va chercher jusqu à de recherche vers le bas et balayage de mémoire avec le MEM autorisé Appuyez sur la touche d autres à commencer ses fonction correspondante 3 16 Recherche Up Down Lorsque la radio est allumée appuyez une fois sur up de changer la fréquence de réception par l étape 1 100 kHz Appuyez sur down fois pour changer la fréquence de réception par ...

Страница 73: ...sur la touche va commencer sa fonction correspondante et le processus d examen sera terminé 3 18 AMS aide Quand la radio est allumée appuyez et maintenez MEMOIRE EXAMEN AMS 2 secondes en mode AMS active Dans ce mode la radio enregistre automatiquement la station qui ont été numérisés 3 19 fonction AOT Quand la radio est allumée appuyez sur la touche AOT fois l écran LCD affiche AOT 90 Si la radio ...

Страница 74: ...des enceintes en une seule étape Maintenez la position pendant continuellement Appuyez sur ALARM2 VOL fois pour diminuer le volume des enceintes en une seule étape Maintenez la position pendant continuellement 3 21 serrure à clé Maintenez la touche désactivation Mémoire pendant 2 secondes la clé de verrouillage a été allumé la clé va solides Press and hold the MEMORY SETTING again for 2 seconds to...

Страница 75: ...4 Assembly _____________________________________________________________ 23 FR ...

Страница 76: ... 108MHz Rated Voltage AC 230V 50Hz Backup Battery 3V 2 1 5V UM 4 AAA Output 500mW Operation temperature 5 35 _____________________________________________________________ FR 24 Product of Schmid Electronics GmbH D 66780 Rehlingen Siersburg ...

Страница 77: ...Over View _____________________________________________________________ 1 IT ...

Страница 78: ...ione della memoria 3 Timmer ALLARME 4 Display 5 ALARM 2 VOL 6 UP 7 ALARM 1 VOL 8 POWER ON OFF 9 MODE SETTING 10 Preset tasto A B C D E F 11 DOWN 12 AOT 13 FM antenna 14 AC cord _____________________________________________________________ IT 2 ...

Страница 79: ...Display Radio Data System The indicator of auto update time function Sunday Monday Tuesday Wednesday _____________________________________________________________ 3 IT ...

Страница 80: ...mory FM Band Frequency Alarm 1 Alarm 2 Cooking time Key lock Cooking Volume Select the alarm output format is Beep sounds Select the alarm output format is Radio _____________________________________________________________ IT 4 ...

Страница 81: ... Condensa 8 1 7 Bambini 9 1 8 Batterie 9 1 9 Effetti ambientali 9 1 10 Pulizia 9 1 11 Assistenza 10 1 12 Riparazioni 10 2 Descrizione Generale 11 3 Come usato 12 3 1 Eseguire la modalità Auto OFF Radio 12 3 2 Impostare l orologio manualmente 13 3 3 Impostare la data 14 3 4 Impostare la SDA 14 3 5 Commutazione di aggiornamento automatico ON OFF 15 3 6 Commutazione dimmer ON OFF 15 3 7 Selezionare 1...

Страница 82: ...dio 19 3 14 Richiamo di memoria radio preimpostata 19 3 15 Conservare in memoria 20 3 16 Ricerca Up Down 20 3 17 Memoria recensione 21 3 18 AMS Using AMS Utilizzo 21 3 19 AOT funzione 21 3 20 di controllo di volume elettronico 22 3 21 chiave serratura 22 4 Assembly 23 5 Technical Date 24 _____________________________________________________________ IT 6 ...

Страница 83: ...iverse funzioni del prodotto seguire le istruzioni di questo manuale Nel caso in cui si cedesse il prodotto a terzi consegnare anche questo manuale Leggere attentamente anche tutti I manuali per l utente dei prodotti che si intende collegare al dispositivo 1 3 Collegamento all alimentazione non utilizzare il dispositivo se esso o i suoi cavi presentano danni visibili collegare il dispositivo solo ...

Страница 84: ...iti In caso di qualsiasi emergenza scollegare il dispositivo dall alimentazione e contattare il personale qualificato dell assistenza 1 5 Installazione posizionare il dispositivo su una superficie piana e non inclinata Non coprire mai i fori di ventilazione del dispositivo e assicurarsi che l aria circoli liberamente intorno ad esso tenere almeno 10 cm di spazio libero sul retro e sui lati Il disp...

Страница 85: ...nenti liquidi bicchieri vasi da fiori ecc sopra al dispositivo o nelle sue vicinanze Non posizionare fonti di fiamme come candele sul dispositivo Ciò potrebbe danneggiare il prodotto 1 9 Effetti ambientali Tenere il dispositivo lontano da fonti di calore dispositivi che scaldano forni cucine candele ecc da raggi solari diretti polvere sporco vibrazioni forti campi magnetici umidità e pioggia 1 10 ...

Страница 86: ...12 Riparazioni Non aprire mai il dispositivo Ogni riparazione deve essere eseguita da tecnici autorizzati o personale dell assistenza Aperture o modifiche non autorizzate renderanno nulla la garanzia e potrebbero alterare la sicurezza del dispositivo ATTENZIONE All interno del dispositivo sono presenti alte tensioni Non aprire il case del dispositivo rischio di scosse elettriche __________________...

Страница 87: ...o giorno della settimana week end e ogni giorno in modo indipendente Uscita di allarme può essere impostato per radio o segnale acustico 6 utente impostazione SDA Special Data Alert 6 1 preimpostati in grado di cottura Timer 1 minuto a 23 59 AMS funzione Automatic Memory System 60 memorie di pre impostare la stazione radio Automatico Ricerca manuale Up Down caratteristiche sono forniti Funzione di...

Страница 88: ...tti i giorni ma tipo per disabili La radio è spenta Si passa poi a conduzione modalità automatica 3 1 Eseguire la modalità Auto OFF Radio o Premere modo una volta per passare alla modalità diverse in sequenza Eseguire la modalità Auto Con display Clock impostare l orologio Impostare la data Impostare la SDA aggiornamento automatico ON OFF Dimmer ON OFF selezionare 12 24 ___________________________...

Страница 89: ...ory Storage Ad ogni confine minuto l orologio in tempo reale viene confrontata con l impostazione dell allarme se è stata attivata Per ulteriori informazioni si prega di consultare la sezione di Quando la sveglia è attiva 3 2 Impostare l orologio manualmente Premere MODE una volta quando l apparecchio rimane in modalità di visualizzazione dell orologio L orologio continua a lampeggiare sul display...

Страница 90: ...ndi l impostazione corrente è confermato e si passa alla modalità auto run automaticamente 3 4 Impostare la SDA Premere MODE una volta in modalità di impostazione della data La data e SDA va lampeggiante alternative Premere Up o DOWN per impostare la data speciale Premere TIMER ALLARME MODE di ignorare l anno Premere MODE SETTING una volta per confermare l impostazione corrente e passare per impos...

Страница 91: ... è confermato e si passa alla modalità auto run automaticamente 3 6 Commutazione dimmer ON OFF Premere MODE SETTING una volta l aggiornamento automatico in modalità di impostazione La mostra display attenuata su o DIM OFF Premere Up o DOWN a devioluci ON e OFF Mostra DIM Display ON il display è illuminato per 10 secondi quando un tasto è stato premuto Mostra Visualizzare DIM OFF il display è illum...

Страница 92: ...e Up o DOWN per regolare il valore da 1 minuto a 23 ore e 59 minuti o AF premere per richiamare il valore preimpostato TIMER ALARM premere MODE per avviare il timer di cottura Quando il timer premere Mode TIMER ALARM per mettere in pausa il timer Per riavviare il timer premere MODE TIMER ALARM di nuovo Quando il timer rimangono 30 secondi il tono di ricordare essere si fa sentire è anche suono 25s...

Страница 93: ...te andare dal corrispondente giorno bandiere Premere per far avanzare il Up di 1 minuto Premere DOWN per spostare la fissazione indietro di 1 minuto Tenere premuto Up DOWN o per modificare l impostazione in modalità veloce di 10 minuti al passo Premere TIMER ALARM Mode per cambiare il tipo di allarme tra quotidiani nei giorni feriali fine settimana e ogni giorno in maniera indipendente che si rifl...

Страница 94: ...00 AM Come la SDA attivo Sound of alterna beep il presidente per 10 minuti anche Muto Radio radio ON I SDA va flash su display LCD Il segnale acustico suonerà mai ora per 10 minuti fino alle 23 00 Premere un tasto qualsiasi per terminare l SDA SDA quando suona 3 12 Quando la sveglia è attiva Quando l orologio in tempo reale le partite con l allarme che è stato attivato l allarme si attiva Come l a...

Страница 95: ...a 3 14 Richiamo di memoria radio preimpostata Ci sono 60 stazioni preimpostate memoria per la radio Quando la radio è accesa premere una volta A 0 9 MEM va solido la frequenza della memoria 0 va solido sul display LCD Premere A 0 9 nuovo e di nuovo per selezionare la memoria preset tra 0 9 Simile a A 0 9 B 0 9 stampa C 0 9 D 0 9 E 0 9 o F 0 9 per selezionare il preset di memoria stazione desiderat...

Страница 96: ...o Quando MEM lampeggia premendo Up DOWN o impostazione della memoria cercherà up ricerca verso il basso e la scansione della memoria con il MEM eliminato altri Premere il tasto per avviare la sua funzione corrispondente 3 16 Ricerca Up Down Quando la radio è accesa Up premere una volta per cambiare la frequenza di percepire fino al 1 passo 100KHz Premere DOWN una volta per cambiare la frequenza di...

Страница 97: ...2 secondi per attivare la modalità AMS In questa modalità la radio automaticamente memorizzare la stazione che era stata acquisita 3 19 AOT funzione Quando la radio è accesa premere il tasto AOT una volta il display LCD AOT 90 Se la radio è spenta premere AOT si accende la radio Premere AOT una volta per cambiare il tempo di fermo di 5 minuti tenere premuto AOT per cambiare l impostazione in modal...

Страница 98: ...minuire il volume degli altoparlanti di un passo Hold for continually Mantenete la posizione per sempre 3 21 chiave serratura Tenere premuto il SETTING MEMORIA per 2 secondi chiave serratura è stato acceso la chiave va solido Tenere premuto il impostazione della memoria nuovamente per 2 secondi per liberare la serratura a chiave la chiave scomparirà ________________________________________________...

Страница 99: ...4 Assembly ____________________________________________________________ 23 IT ...

Страница 100: ... 108MHz Rated Voltage AC 230V 50Hz Backup Battery 3V 2 1 5V UM 4 AAA Output 500mW Operation temperature 5 35 _____________________________________________________________ IT 24 Product of Schmid Electronics GmbH D 66780 Rehlingen Siersburg ...

Страница 101: ...ndesrepublik Deutschland 3 Die Garantiedauer beträgt 2 Jahre ab Kaufdatum 4 Während der Garantiedauer umfasst die kostenlose Leistung nach unserer Wahl die Instandsetzung Ihres Gerätes oder den Austausch gegen ein gleichwertiges Gerät die bei uns anfallenden Arbeitslöhne sowie Materialkosten und Transportkosten des Gerätes innerhalb der Bundesrepublik Deutschland 5 Möchten Sie eine Beanstandung ge...

Страница 102: ...rät von Ihnen oder einem nicht von uns auto risierten Dritten geöffnet und oder Veränderungen an dem Gerät vorgenommen worden sind 10 Kein Garantieanspruch besteht bei unsachgemäßer Behandlung bei mechanischer Beschädigung des Gerätes von außen bei Transportschäden bei Bedienungsfehlern bei Aufstellung des Gerätes in Feuchträumen oder im Freien bei Verschleiß z B Batterien Akku u ä bei Schäden die...

Страница 103: ...gewährte Herstellergarantie hat nur Gültigkeit für den privaten Ge brauch des Gerätes und innerhalb der Bundesrepublik Österreich 3 Die Garantiedauer beträgt 2 Jahre ab Kaufdatum 4 Während der Garantiedauer umfasst die kostenlose Leistung nach unserer Wahl die Instandsetzung Ihres Gerätes oder den Austausch gegen ein gleichwertiges Gerät die bei uns anfallenden Arbeitslöhne sowie Materialkosten un...

Страница 104: ...chleiß z B Batterien Akku u ä bei Schäden die auf höhere Gewalt Wasser Blitzschlag Überspannung zurück zuführen sind bei übermäßiger Nutzung insbesondere bei anderer als privater Nutzung bei Missachtung der Bedienungsanleitung wenn das Gerät keinen technischen Defekt aufweist bei Pixelfehlern die innerhalb der in der ISO Norm 13406 2 Pixelfehlerklasse II festgelegten Toleranzen liegen wenn Typensc...

Страница 105: ...ergarantie nicht eingeschränkt 2 Die von uns gewährte Herstellergarantie hat nur Gültigkeit für den privaten Ge brauch des Gerätes und beschränkt sich auf das Gebiet der Schweiz 3 Die Garantiedauer beträgt 2 Jahre ab Kaufdatum 4 Während der Garantiedauer umfasst die kostenlose Leistung nach unserer Wahl die Instandsetzung Ihres Gerätes oder den Austausch gegen ein gleichwertiges Gerät die bei uns ...

Страница 106: ...hleiss z B Batterien Akku u ä bei Schäden die auf höhere Gewalt Wasser Blitzschlag Überspannung zurück zuführen sind bei übermässiger Nutzung insbesondere bei anderer als privater Nutzung bei Missachtung der Bedienungsanleitung wenn das Gerät keinen technischen Defekt aufweist bei Pixelfehlern die innerhalb der in der ISO Norm 13406 2 Pixelfehlerklasse II festgelegten Toleranzen liegen wenn Typens...

Страница 107: ...icant 2 La garantie du fabricant est uniquement valable en cas d utilisation personnelle de l appareil sur le territoire de la Suisse 3 La période de garantie est de 2 ans à compter de la date d achat 4 Pendant cette période nous vous offrons un service gratuit à notre entière discréti on en procédant soit à la réparation de l appareil soit à son remplacement par un appareil de valeur similaire No...

Страница 108: ...s amovibles piles classiques piles rechargeables etc Dommages causés par des événements imprévisibles de force majeure eau foudre surtensions etc Dommages causés par une utilisation abusive notamment par une utilisation autre que personnelle Non respect du manuel d utilisation et des instructions fournies L appareil ne présente aucun défaut technique Erreurs de pixels comprises dans la plage de to...

Страница 109: ...l produttore 2 Questa garanzia del venditore è valida unicamente per un utilizzo privato del dispo sitivo e all interno della Svizzera 3 La durata della garanzia è di 2 anni dalla data d acquisto 4 Durante tale periodo di garanzia offriremo un assistenza gratuita a nostra discre zione sono previsti sia la riparazione del dispositivo sia il cambio con un altro di valore simile Ci faremo carico dei ...

Страница 110: ...erie batterie ricaricabili ecc danni causati da forza maggiore acqua fulmini picchi di tensione danni causati da utilizzo eccessivo soprattutto in caso d impiego diverso da quello privato per disattenzione di quanto scritto nel manuale operativo se il dispositivo non presenta difetti tecnici per errori di pixel compresi nei valori di tolleranza prestabiliti dallo standard ISO 13406 2 errori di pix...

Страница 111: ...Product of Schmid Electronics GmbH D 66780 Rehlingen Siersburg Germany WWW seg tv eu ...

Отзывы: