background image

SilverCrest SMS 5.0 A1 


Deutsch  -  37 

Übersicht 

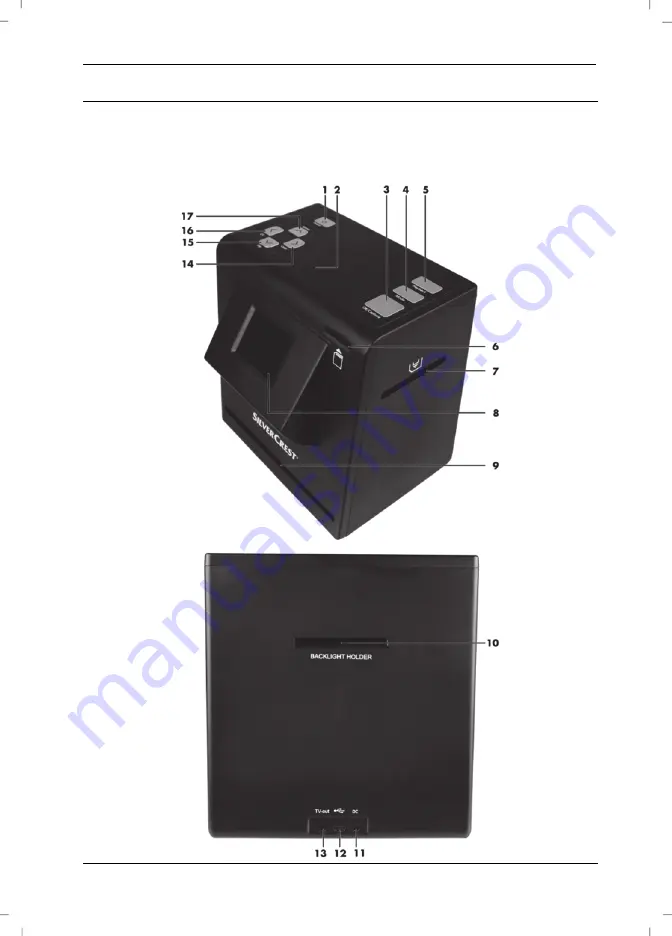
Eine zusätzliche Abbildung der Bedienelemente mit den verwendeten Bezugsnummern finden Sie 
auf der ausklappbaren Innenseite dieser Bedienungsanleitung. Sie können diese Umschlagseite 
ausgeklappt lassen, während Sie weitere Kapitel der Bedienungsanleitung lesen. So haben Sie 
immer eine Referenz zum betreffenden Bedienelement vor Augen. 


Содержание 92308

Страница 1: ......

Страница 2: ......

Страница 3: ...V 2 0 English 2 Deutsch 29 ...

Страница 4: ...lides 13 Inserting negatives 14 Inserting photos 15 Inserting business cards 16 Main menu 17 Selecting recording source 17 Recording 17 Flipping 18 Adjusting brightness 18 Adjusting colour 19 Recording and saving 19 Memory full 20 Memory card protected 20 Playback 21 USB mode 22 Formatting the memory card 23 TV out 24 Storage when not in use 25 Troubleshooting 25 Environmental and disposal informa...

Страница 5: ...eration in a company It can be used to digitize slides negatives paper photos and business cards This device may only be used for private purposes and any other use is not as intended Furthermore the device may not be used outdoors or in tropical climates This device meets the requirements of all relevant norms and standards in conjunction with the Declaration of Conformity In the event of any mod...

Страница 6: ...packaging Remove all packaging material and check that all parts are complete and undamaged In the event of an incomplete or damaged delivery please contact the manufacturer SilverCrest SMS 5 0 A1 multi scanner Power supply adapter 128MB SD card USB cable Video cable Photo business card holder ...

Страница 7: ...SilverCrest SMS 5 0 A1 English 5 Business card fixing Negative holder Slide holder Backlight rail Cleaning brush for slides and negatives Operating instructions symbolic representation ...

Страница 8: ...s storage Power supply Operating temperature 5 C to 35 C Storage temperature 10 C to 50 C Operating air humidity max 85 rel air humidity Dimensions W x H x D approx 190 x 205 x 165 mm Weight approx 900 g Power supply 5V 1 0A Power consumption in standby mode approx 0 6W multi scanner with power supply adapter approx 0 2W only power supply adapter Power supply adapter manufacturer Taiytech type des...

Страница 9: ... This symbol indicates other important information on the topic Only use the supplied power supply adapter manufacturer Taiytech type designation TYTM0500100EU to connect to the multi scanner DANGER Ensure that no direct heat sources e g heating can affect the device no direct sunlight or bright artificial light reaches the device contact with sprayed and dripping water and corrosive liquids is pr...

Страница 10: ... packaging out of reach It poses a suffocation risk DANGER Power supply adapter Only insert the power supply adapter in a suitable mains socket that is always easily accessible Never touch the power supply adapter with wet hands It poses an electric shock risk Always disconnect the power supply adapter from the mains in the following situations If there is a hazardous situation If there are any un...

Страница 11: ... if liquid or objects have penetrated the device or if the product has been exposed to rain or moisture Repair work is also required if the device is not working properly or has been dropped If smoke is produced or there are any unusual sounds or smells the device must be switched off immediately and the power supply adapter must be removed from the mains socket In these cases the device should no...

Страница 12: ...rols with the relevant reference numbers can be found on the fold out inside cover of these operating instructions You can leave this cover page folded out while reading further sections of these operating operations Thus you always keep a reference to the relevant control in sight ...

Страница 13: ... 9 Photo business card slot 10 Backlight slot 11 Power supply connection 12 USB 2 0 port USB mass storage 13 TV out port 3 5 mm jack 14 Right Colour to operate the menu or change the parameters 15 Down Flip to operate the menu or change the parameters 16 Left EV to operate the menu or change the parameters 17 Up Mirror to operate the menu or change the parameters ...

Страница 14: ... before you insert or remove a memory card You must insert a memory card to be able to save pictures Proceed as follows Slide the memory card with the contacts upwards and pointing towards the multi scanner into the memory card slot 6 until it snaps into place To remove the memory card press it lightly The memory card is ejected slightly and can be pulled out Switching the device on and off To swi...

Страница 15: ...ably snaps into place Insert the slide holder with the inscription facing upwards in the direction of the arrow in the negative slide slot 7 Insert the slide holder in until it noticeably snaps into place in the first position For more slides insert the slide holder in further until it noticeably snaps into place in the next position To record the slides please read the section Recording from page...

Страница 16: ... the reflective surface facing upwards in the backlight slot 10 until it noticeably snaps into place Insert the negative holder with the inscription facing upwards in the direction of the arrow in the negative slide slot 7 Insert the negative holder in until it noticeably snaps into place in the first position For more negatives insert the negative holder in further until it noticeably snaps into ...

Страница 17: ...older Remove the backlight rail if it is still inserted by pressing it down lightly on the protruding point and pulling it out Insert the photo business card holder with the photo upwards in the photo business card slot 9 Insert the photo business card holder as far as possible To scan the photos please read the section Recording from page 17 Remove the photo business card holder after you have sc...

Страница 18: ...d place the business card fixing on the business card as shown in the following image Remove the backlight rail if it is still inserted by pressing it down lightly on the protruding point and pulling it out Insert the photo business card holder with the business card upwards in the photo business card slot 9 Insert the photo business card holder as far as possible To scan the business cards please...

Страница 19: ...21 Format memory card 22 TV 23 USB mode 24 Energy saving mode automatic switch off after approx 3 minutes Selecting recording source After you have inserted your slides negatives photos or business cards in the device as described select the recording source The following options are available 25 Negatives colour 26 Slides 27 Negatives black white 28 Photos 29 Business cards Recording After you ha...

Страница 20: ...vertically Vertical flipping Adjusting brightness Press the Left EV 16 button to adjust the brightness A lamp symbol then appears on the screen 8 You can now adjust the brightness in the range from 3 bright to 3 dark with the keys Up Mirror 17 and Down Flip 15 At the same time the current value appears in the lamp symbol To apply the current value press the Mode button 4 ...

Страница 21: ...ip 15 At the same time the current value appears in the symbol When you have adjusted all values as desired press the Mode button 4 to apply the values Recording and saving Press the OK Capture button 3 to record the image You can still rotate the image before saving it The following options are available 30 Save 31 Rotate 90 clockwise 32 Rotate 90 anti clockwise 33 Cancel image is not saved If th...

Страница 22: ...owing message is displayed on the screen 8 for a short time in record mode the write protection is activated for the memory card in use Remove the memory card from the deactivated multi scanner To remove the memory card press it lightly The memory card is ejected slightly and can be pulled out The memory card is equipped with a write protect switch If the write protection is activated see right il...

Страница 23: ...Press the OK Capture button 3 to stop the slide show You can then browse through the recordings manually by pressing the button Right Colour 14 or Left EV 16 Press the OK Capture button 3 to start the slide show again Press the Mode button 4 twice in playback mode during the slide show or press it once if the slide show has finished The following options are available here 36 Rotate 90 clockwise 3...

Страница 24: ...24 Energy saving mode automatic switch off after approx 3 minutes Select the option USB mode 23 using the buttons Right Colour 14 or Left EV 16 and confirm your selection with the OK Capture button 3 The USB icon is then displayed in the centre of the screen 8 The computer sets up a removable storage medium via which you have access to the images After you have transferred the images to your compu...

Страница 25: ...ng source 21 Format memory card 22 TV 23 USB mode 24 Energy saving mode automatic switch off after approx 3 minutes Select the option Format memory card 21 using the buttons Right Colour 14 or Left EV 16 and confirm your selection with the OK Capture button 3 The following options are available 39 Confirm 40 Cancel Select the option Confirm 39 to format the memory card or the option Cancel 40 to c...

Страница 26: ... confirm your selection with the OK Capture button 3 The following options are available 41 PAL 42 NTSC Choose between the TV standards PAL and NTSC NTSC is the standard in the United States and Japan while PAL is used in Europe This choice affects only the playback with the video cable After you have identified the TV standards connect the multi scanner and TV as follows with the video cable Conn...

Страница 27: ...ease read the section USB mode on page 22 Use another USB port if possible Error when saving the scanned images to the memory card Check whether the write protection of the memory card is activated In this case please read the section Memory card protected on page 20 Check whether the memory card is full Replace it if necessary The memory card may be defective Replace it if necessary Stains are vi...

Страница 28: ...ontact your local government office or the retailer where you purchased the device Dispose of the packaging in an environmentally compatible manner Cardboard can be put out for municipal paper collections or brought to public collection points for recycling Films and plastic used for packaging the device are collected by your local disposal services and disposed of in an environmentally compatible...

Страница 29: ... subject to charge Scope of warranty The device was carefully manufactured in compliance with stringent quality guidelines and subjected to thorough testing before it left the works The warranty applies to material and manufacturing faults This warranty does not cover product components which are subject to normal wear and which can therefore be regarded as wearing parts or damage to fragile compo...

Страница 30: ...r if available to hand as proof of purchase If it is not possible to solve the problem on the phone our hotline support staff will initiate further servicing procedures depending on the fault Service Phone 0207 36 50 744 E Mail service GB targa online com Phone 01 242 15 83 E Mail service IE targa online com Phone 800 62 175 E Mail service MT targa online com Phone 800 92 496 E Mail service CY tar...

Страница 31: ...chalten 39 Dias einlegen 40 Negative einlegen 41 Fotos einlegen 42 Visitenkarten einlegen 43 Hauptmenü 44 Aufnahmequelle auswählen 44 Aufnehmen 44 Spiegeln 45 Helligkeit anpassen 45 Farbe anpassen 46 Aufnehmen und Speichern 46 Speicher voll 47 Speicherkarte geschützt 47 Wiedergabe 48 USB Modus 49 Speicherkarte formatieren 50 TV out 51 Lagerung bei Nichtbenutzung 52 Fehlerbehebung 52 Umwelthinweise...

Страница 32: ...den gewerblichen Einsatz vorgesehen Er kann zum Digitalisieren von Dias Negativen Papierfotos und Visitenkarten verwendet werden Verwenden Sie das Gerät ausschließlich für den privaten Gebrauch jede andere Verwendung ist nicht bestimmungsgemäß Außerdem darf das Gerät nicht außerhalb von geschlossenen Räumen und in tropischen Klimaregionen genutzt werden Dieses Gerät erfüllt alle im Zusammenhang mi...

Страница 33: ...tfernen Sie alle Verpackungsmaterialien und überprüfen Sie ob alle Teile vollständig und unbeschädigt sind Im Falle einer unvollständigen oder beschädigten Lieferung wenden Sie sich bitte an den Hersteller SilverCrest SMS 5 0 A1 Multiscanner Netzteil 128MB SD Karte USB Kabel Video Kabel Foto Visitenkarten Halter ...

Страница 34: ...SilverCrest SMS 5 0 A1 32 Deutsch Visitenkarten Fixierung Negativ Halter Dia Halter Hintergrundbeleuchtungs Schiene Reinigungsbürste für Dias und Negative Bedienungsanleitung Symbolbild ...

Страница 35: ...USB Massenspeicher Stromversorgung Betriebstemperatur 5 C bis 35 C Lagertemperatur 10 C bis 50 C Betriebsluftfeuchtigkeit max 85 rel Feuchte Abmessungen B x H x T ca 190 x 205 x 165 mm Gewicht ca 900 g Spannungsversorgung 5V 1 0A Leistungsaufnahme im Standby ca 0 6 W Multiscanner mit Netzteil ca 0 2 W nur Netzteil Netzteil Hersteller Taiytech Typenbezeichnung TYTM0500100UK Eingang 100 240V 50 60Hz...

Страница 36: ...ymbol kennzeichnet weitere informative Hinweise zum Thema Verwenden Sie ausschließlich das mitgelieferte Netzteil Hersteller Taiytech Typenbezeichnung TYTM0500100EU zum Anschluss an den Multiscanner GEFAHR Achten Sie darauf dass keine direkten Wärmequellen z B Heizungen auf das Gerät wirken kein direktes Sonnenlicht oder starkes Kunstlicht auf das Gerät trifft der Kontakt mit Spritz und Tropfwasse...

Страница 37: ...sie mit diesem Gerät nicht spielen Kleinteile können bei Verschlucken lebensgefährlich sein Halten Sie auch die Verpackungsfolien fern Es besteht Erstickungsgefahr GEFAHR Netzteil Stecken Sie das Netzteil nur in eine geeignete und immer leicht erreichbare Netzsteckdose Fassen Sie das Netzteil niemals mit nassen Händen an Es besteht Stromschlaggefahr Trennen Sie das Netzteil in folgenden Fällen vom...

Страница 38: ...d oder wenn es Regen oder Feuchtigkeit ausgesetzt wird Reparaturarbeiten sind auch erforderlich wenn es nicht einwandfrei funktioniert oder heruntergefallen ist Wenn Rauchentwicklung ungewöhnliche Geräusche oder Gerüche festgestellt werden muss das Gerät sofort abgeschaltet und das Netzteil aus der Steckdose gezogen werden In diesen Fällen darf das Gerät nicht weiter verwendet werden bevor eine Üb...

Страница 39: ...te mit den verwendeten Bezugsnummern finden Sie auf der ausklappbaren Innenseite dieser Bedienungsanleitung Sie können diese Umschlagseite ausgeklappt lassen während Sie weitere Kapitel der Bedienungsanleitung lesen So haben Sie immer eine Referenz zum betreffenden Bedienelement vor Augen ...

Страница 40: ...ergrundbeleuchtungs Schacht 11 Stromversorgungs Anschluss 12 USB 2 0 Anschluss USB Massenspeicher 13 TV out Anschluss 3 5 mm Klinke 14 Rechts Color zur Bedienung des Menüs bzw Veränderung der Parameter 15 Ab Flip zur Bedienung des Menüs bzw Veränderung der Parameter 16 Links EV zur Bedienung des Menüs bzw Veränderung der Parameter 17 Auf Mirror zur Bedienung des Menüs bzw Veränderung der Parameter...

Страница 41: ...en Sie müssen eine Speicherkarte einlegen um Aufnahmen speichern zu können Gehen Sie dazu wie folgt vor Schieben Sie die Speicherkarte mit den Kontakten nach oben Richtung Multiscanner zeigend in den Speicherkartenslot 6 bis diese einrastet Um die Speicherkarte wieder zu entnehmen drücken Sie leicht auf die Speicherkarte Die Speicherkarte wird dadurch ein kleines Stück hinaus geschoben sodass Sie ...

Страница 42: ...s diese spürbar einrastet Führen Sie den Dia Halter mit der Aufschrift nach oben in Pfeilrichtung in den Negativ Dia Schacht 7 ein Schieben Sie den Dia Halter so weit ein bis dieser spürbar in der ersten Position einrastet Für weitere Dias schieben Sie den Dia Halter weiter ein bis dieser spürbar in der nächsten Position einrastet Zur Aufnahme der Dias beachten Sie bitte das Kapitel Aufnehmen ab S...

Страница 43: ...erenden Fläche nach oben in den Hintergrundbeleuchtungs Schacht 10 ein bis diese spürbar einrastet Führen Sie den Negativ Halter mit der Aufschrift nach oben in Pfeilrichtung in den Negativ Dia Schacht 7 ein Schieben Sie den Negativ Halter so weit ein bis dieser spürbar in der ersten Position einrastet Für weitere Negative schieben Sie den Negativ Halter weiter ein bis dieser spürbar in der nächst...

Страница 44: ...ntergrundbeleuchtungs Schiene falls diese noch eingelegt ist indem Sie diese an der herausstehenden Stelle leicht nach unten drücken und herausziehen Führen Sie den Foto Visitenkarten Halter mit dem Foto nach oben in den Foto Visitenkarten Schacht 9 ein Schieben Sie den Foto Visitenkarten Halter bis zum Anschlag ein Zur Aufnahme der Fotos beachten Sie bitte das Kapitel Aufnehmen ab Seite 44 Entneh...

Страница 45: ...en Fixierung auf die Visitenkarte wie auf dem folgenden Bild gezeigt Entnehmen Sie die Hintergrundbeleuchtungs Schiene falls diese noch eingelegt ist indem Sie diese an der herausstehenden Stelle leicht nach unten drücken und herausziehen Führen Sie den Foto Visitenkarten Halter mit der Visitenkarte nach oben in den Foto Visitenkarten Schacht 9 ein Schieben Sie den Foto Visitenkarten Halter bis zu...

Страница 46: ...Aufnahmequelle auswählen 21 Speicherkarte formatieren 22 TV 23 USB Modus 24 Energiesparmodus Auto Abschaltung nach ca 3 Minuten Aufnahmequelle auswählen Nachdem Sie Ihre Dias Negative Fotos oder Visitenkarten wie beschrieben in das Gerät eingelegt haben wählen Sie nun die Aufnahmequelle aus Es stehen die folgenden Optionen zur Auswahl 25 Negative Farbe 26 Dias 27 Negative Schwarz Weiß 28 Fotos 29 ...

Страница 47: ...es Spiegeln Helligkeit anpassen Drücken Sie die Taste Links EV 16 um die Helligkeit anzupassen Es erscheint nun ein Lampensymbol auf dem Display 8 Die Helligkeit können Sie nun mit den Tasten Auf Mirror 17 und Ab Flip 15 in dem Bereich von 3 hell bis 3 dunkel anpassen Der aktuell eingestellte Wert wird dabei im Lampensymbol angezeigt Um den aktuell eingestellten Wert zu übernehmen drücken Sie die ...

Страница 48: ...n Sie alle Werte wie gewünscht angepasst haben drücken Sie die Mode Taste 4 um die Werte zu übernehmen Aufnehmen und Speichern Drücken Sie die OK Capture Taste 3 um das Bild aufzunehmen Bevor Sie das Bild speichern können Sie das Bild noch drehen Es stehen Ihnen die folgenden Optionen zur Verfügung 30 Speichern 31 Um 90 im Uhrzeigersinn drehen 32 Um 90 gegen den Uhrzeigersinn drehen 33 Abbrechen B...

Страница 49: ...olgende Hinweis auf dem Display 8 angezeigt wird ist bei der verwendeten Speicherkarte der Schreibschutz aktiviert Entnehmen Sie die Speicherkarte aus dem ausgeschalteten Multiscanner Um die Speicherkarte zu entnehmen drücken Sie leicht auf die Speicherkarte Die Speicherkarte wird dadurch ein kleines Stück hinaus geschoben sodass Sie diese greifen und herausziehen können Die Speicherkarte ist mit ...

Страница 50: ...die Dia Show zu unterbrechen Sie können nun die Aufnahmen manuell durchblättern drücken Sie dazu die Taste Rechts Color 14 oder Links EV 16 Drücken Sie die OK Capture Taste 3 um die Dia Show wieder zu starten Drücken Sie im Wiedergabemodus während der Dia Show zweimal die Mode Taste 4 bzw bei beendeter Dia Show einmal die Mode Taste 4 hier stehen Ihnen die folgenden Optionen zur Verfügung 36 Um 90...

Страница 51: ...dus Auto Abschaltung nach ca 3 Minuten Wählen Sie die Option USB Modus 23 mit Hilfe der Tasten Rechts Color 14 oder Links EV 16 aus und bestätigen Sie Ihre Auswahl mit der OK Capture Taste 3 Im Display 8 wird nun mittig das USB Symbol angezeigt Der Computer richtet nun einen Wechseldatenträger ein über den Sie Zugriff auf die Bilder haben Nachdem Sie die Bilder auf Ihren Computer übertragen haben ...

Страница 52: ...21 Speicherkarte formatieren 22 TV 23 USB Modus 24 Energiesparmodus Auto Abschaltung nach ca 3 Minuten Wählen Sie die Option Speicherkarte formatieren 21 mit Hilfe der Tasten Rechts Color 14 oder Links EV 16 aus und bestätigen Sie Ihre Auswahl mit der OK Capture Taste 3 Es stehen Ihnen die folgenden Optionen zur Verfügung 39 Bestätigen 40 Abbrechen Wählen Sie die Option Bestätigen 39 um die Speich...

Страница 53: ...parmodus Auto Abschaltung nach ca 3 Minuten Wählen Sie die Option TV 22 mit Hilfe der Tasten Rechts Color 14 oder Links EV 16 aus und bestätigen Sie Ihre Auswahl mit der OK Capture Taste 3 Es stehen Ihnen die folgenden Optionen zur Verfügung 41 PAL 42 NTSC Unterscheiden Sie zwischen den Fernsehnormen PAL und NTSC NTSC ist der Standard in Amerika und Japan PAL wird in den Ländern Europas verwendet ...

Страница 54: ...s steckt Verwenden Sie das Netzteil wenn möglich an einer anderen Netzsteckdose Der Multiscanner wird vom Betriebssystem nicht erkannt Überprüfen Sie die USB Verbindung und schalten Sie den USB Modus ein Beachten Sie dazu das Kapitel USB Modus auf Seite 49 Verwenden Sie wenn möglich einen anderen USB Anschluss Fehler beim Abspeichern der gescannten Bilder auf die Speicherkarte Prüfen Sie ob der Sc...

Страница 55: ...ng Ihrer persönlichen Gesundheit Weitere Informationen zur vorschriftsgemäßen Entsorgung des alten Geräts erhalten Sie bei der Stadtverwaltung beim Entsorgungsamt oder in dem Geschäft wo Sie das Gerät erworben haben Führen Sie auch die Verpackung einer umweltgerechten Entsorgung zu Kartonagen können bei Altpapiersammlungen oder an öffentlichen Sammelplätzen zur Wiederverwertung abgegeben werden Fo...

Страница 56: ...h Ablauf der Garantiezeit anfallende Reparaturen sind kostenpflichtig Garantieumfang Das Gerät wurde nach strengen Qualitätsrichtlinien sorgfältig produziert und vor Auslieferung gewissenhaft geprüft Die Garantieleistung gilt für Material oder Fabrikationsfehler Diese Garantie erstreckt sich nicht auf Produktteile die normaler Abnutzung ausgesetzt sind und daher als Verschleißteile angesehen werde...

Страница 57: ...ie Artikelnummer bzw wenn vorhanden die Seriennummer als Nachweis für den Kauf bereit Für den Fall dass eine telefonische Lösung nicht möglich ist wird durch unsere Hotline in Abhängigkeit der Fehlerursache ein weiterführender Service veranlasst Service Telefon 0049 0 211 547 69 93 E Mail service DE targa online com Telefon 0043 0 1 79 57 60 09 E Mail service AT targa online com Telefon 0041 0 44 ...

Страница 58: ......

Отзывы: