Silver Apt Stream Out Скачать руководство пользователя страница 34

Silver Stream-In / Stream-Out - User Manual SR 1.0.4 – 10/2012 


Page 34 

Whiterock Business Park - 729 Springfield Road - Belfast BT12 7FP - Northern Ireland 

Tel.: +44 28 9067 7200 | Fax: +44 28 9067 7201 | www.aptcodecs.com | [email protected] 


Firmware Update Procedure 

(continued) 

The firmware Update Manager scans  each selected  unit and analyses the currently  running 
firmware;  it  compares  these  system  release  versions  with  the  firmware  container  that  was 
selected for the update and presents the results: 


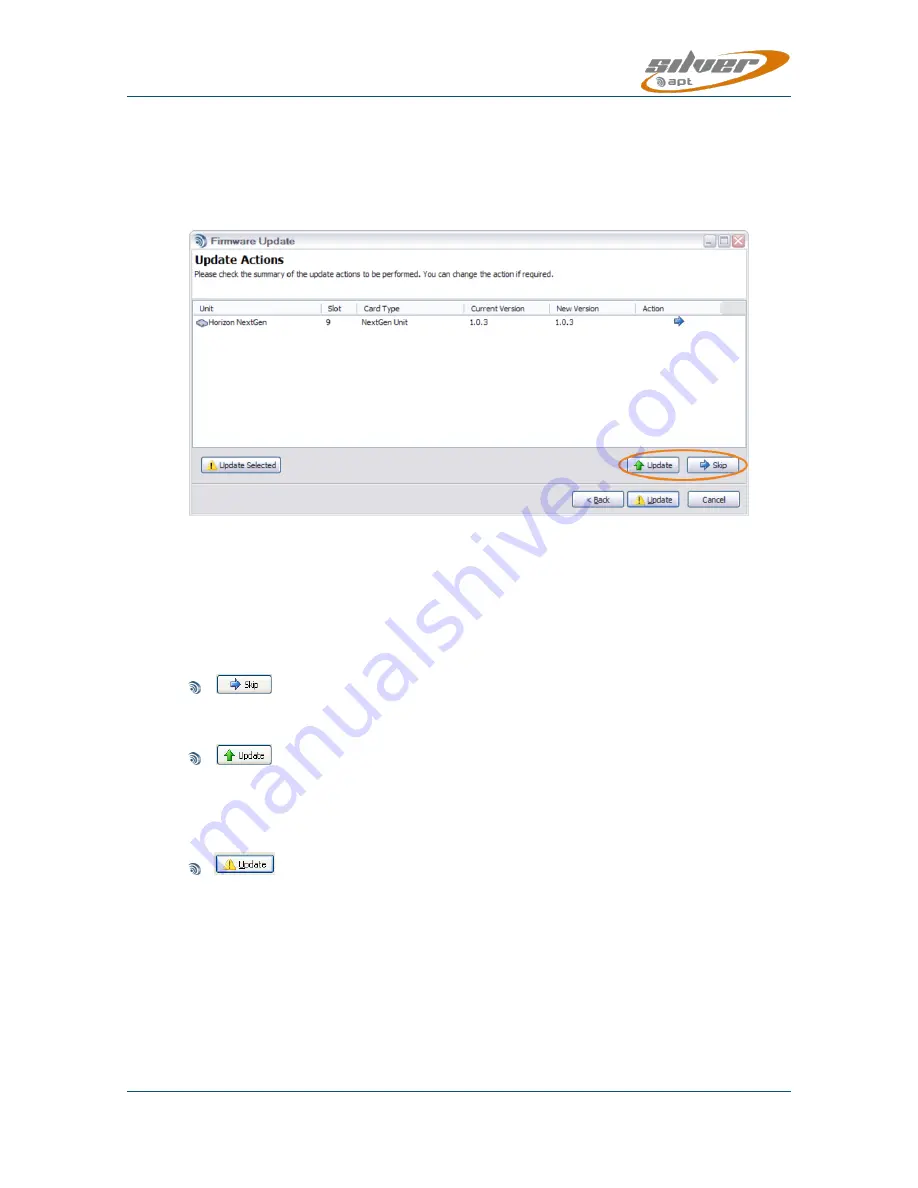
Figure 2-18: Presents the firmware scanning results (this example shows a Horizon NextGen) 


The figure above shows the unit type, the current version of firmware and the new version. 
In this example both, the current and the new version are the same. The blue arrow on the 
“Action” row indicates that an update is not necessary. However, you may make different op-
tions by selecting a card and clicking on one of the following buttons: 


“Skip”  leaves  the  firmware  unchanged  for  the  selected  unit.  In  case  that  the  firmware  
scan result shows the green update arrow clicking on “Skip” will inhibit an update. 


“Update” forces the update to the version contained in the .osr file for the selected unit, 
regardless of the scan result. The Firmware Update Manager will ask for your confirma-
tion  in  case  you  attempt  to  downgrade  a  Codec  (current  release  is  newer  than  the  re-
lease contained in the .osr file). 


Clicking on this “Update” button starts the update process. The firmware will be loaded 
to  the  Codec  unit(s)  simultaneously.  The  Update  Manager  will  process  and  monitor  the 
updates. The process always starts first by uploading all necessary firmware to each Co-
dec concerned. This operation is reported as “Upload” in the Action column (see image 
on next page). 


Содержание Stream Out

Страница 1: ...Silver Stream In Stream Out RCA XLR version User manual System Release 1 0 4 Document Version 0 9 5 release update October 2012 ...

Страница 2: ... Stream In Stream Out User Manual System Release 1 0 4 paired with NMS 1162 October 2012 Copyright 2011 2012 by WorldCast Systems All rights reserved No part of this publication is permitted to be reproduced stored in a retrieval system transmitted by any means electronically mechanically or otherwise without written consent of WorldCast Systems Warranty All information is believed to be true and ...

Страница 3: ...t Systems Head Office 20 avenue Neil Armstrong Parc d Activités J F Kennedy 33700 BORDEAUX MERIGNAC FRANCE Tel 33 5 57 928 928 Fax 33 5 57 928 929 Americas Office 19595 NE 10th Ave Suite A Miami FL 33179 USA Tel 1 305 249 31 10 Fax 1 305 249 31 13 How to get support If you have a technical question or issue with your APT equipment please consult the sup port section of our website at http www aptc...

Страница 4: ...The WorldCast Codec Management System Overview 14 2 5 Installing the Network Management System 16 2 6 Getting Started 18 2 7 Along the Main Tool Bar 20 2 7 1 Connecting a Codec to the Family Tree 20 2 7 2 Deleting a Codec device from the Main Screen 21 2 7 3 The Net Wizard 22 2 7 4 Reset the Codec Hardware IP Address 24 2 7 5 Current Alarms 24 2 7 6 The NMS User Management 26 2 7 7 NMS Settings Ge...

Страница 5: ...Home Page 45 4 3 1 WEB GUI Session Close Session Time Out 45 4 4 WEB GUI Main Menu 46 4 4 1 Current Status Frame 47 4 4 2 Main Menu Status Unit Status 48 4 4 3 Main Menu Status Alarms Page 49 4 4 4 Main Menu Status Performance Page 51 4 4 4 1 About Stream Tables general 52 4 4 4 2 IP Statistics Details 53 4 4 5 Main Menu Connection Connection Page 54 4 4 5 1 Connection Wizard Creating a Profile 55...

Страница 6: ...am Encoder 70 5 1 2 SureStream Decoder 70 5 2 SureStream Encoder Configuration 71 5 2 1 About Diversity Generator Levels 72 5 2 2 Creating a Set of Component Streams 73 5 3 SureStream Decoder Configuration 74 5 3 1 SureStream Decoder Performance 76 System Firmware Update 77 6 0 6 1 About System Firmware 77 6 1 1 Firmware Update Step 1 77 6 1 2 Firmware Update Step 2 78 6 1 3 Firmware Update Step 3...

Страница 7: ...vices are powered by an external switching power adapter If a product defect occurs on the power adapter this adapter must be re placed There are no user serviceable parts inside TO PREVENT THE RISK OF ELECTRIC SHOCK DO NOT OPEN THE COVER OF THE POWER ADAPTER THERE ARE NO USER SERVICEABLE PARTS INSIDE THIS UNIT PLEASE REFER SERVICING TO QUALIFIED APT SERVICE PERSONNEL According to local laws and r...

Страница 8: ...ny possible area of confusion 1 2 Release Notes This manual is the primary reference covering the configuration installation operation and troubleshooting of the Silver Stream In Stream Out As of this publication date this document is the current manual revision We recommend that you check with your distributor or on the APT website for updates to firmware and this manual Notes ___________________...

Страница 9: ... of modern broadcasting APT is part of the WorldCast Systems group of companies which combines the collective ex pertise extensive product portfolio of several major broadcast brands to offer turnkey sys tems in all major analog and digital technologies Other brands within the group include Audemat who designs monitoring equipment for analog and digital radio and TV as well as an extensive range o...

Страница 10: ... the list of contents is complete as follows Silver Stream In Stream Out Serial Number located on the rear panel Stream In RCA I000 Stream Out RCA P000 Stream IN XLR K000 Stream Out XLR R000 please complete External Power Adapter Please confirm that the local power supply voltage matches the required voltage levels of 100 240VAC CD Box A CD box including a Quick Start guide and a CD where you will...

Страница 11: ... enhanced versions of the apt X algorithm real time transmission on the network with data reduction by factor 4 1 and Linear PCM 16 and 24 bit More audio algorithms will be available optionally on coming firmware releases The units are capable of delivering high quality audio used for inter studio networking re mote outside broadcasts and STL TSL monitor applications Enhanced apt X offers 16 and 2...

Страница 12: ...___ ____________________________________________________________ ____________________________________________________________ ____________________________________________________________ ____________________________________________________________ ____________________________________________________________ ____________________________________________________________ ______________________________...

Страница 13: ...to the unit Making a connection and send audio Set up the Silver Stream In Encoder and the transmitting IP stream apply this configuration to the unit Set up the Silver Stream Out Decoder and the receiving IP stream Apply this configuration to the unit The audio connections are made on the rear panel using RCA phone jacks or XLR type con nectors Stream In RCA Figure 2 1 Silver Stream In Encoder RC...

Страница 14: ... an embedded WEB GUI to the Silver IP Streamer when accessed from the NMS family tree view The presentation of the GUI of the Silver units is the same when opened from the family tree view NMS or directly from a WEB browser Figure 2 3 Family Tree of the Network Management System NMS The presentation of the Silver configuration pages is the same whether it is opened from the family tree view NMS or...

Страница 15: ...mpted to be restricted on read only permissions This feature avoids configuration conflicts caused by several seats Whenever a user opens a device on the family tree the NMS sends out a broadcast re quest announcement to the network looking for any other user actually configuring this par ticular unit If the network does not allow broadcasting i e in public domain networks like the internet this p...

Страница 16: ...ace 1024px x 768px Screen Resolution or better CD ROM Drive optional Running any NextGen Codec with the current system release on the NMS software re quires the NMS build version 1162 or higher supplied with the Codec The NMS requires IP port 7777 and 7778 to be opened on your network The NMS software is generally supplied as a self extracting application Run the application and follow the instruc...

Страница 17: ...s com contact aptcodecs com Installing the Codec Management System continued Next Screen Journalist Panel is available for Eclipse Meridian type Codecs only do not select it unless you are also running Eclipse or Meridian units in your network Next Screen You can create a desktop and or a quick launch icon as required Final Screen Now you need to complete the installation by clicking on In stall ...

Страница 18: ...default usually 192 168 100 110 The NMS application will remain inactive until a link is established between the service PC and an active Codec device Release Notes As of this publication date system release 1 0 4 is shipped with the Codec device We rec ommend that you check the APT website for updates Launch the Management System application You will find the program located in the Win dows Start...

Страница 19: ...4 28 9067 7201 www aptcodecs com contact aptcodecs com Getting started continued Once you have logged in successfully the Main Screen of the Network Management System the NMS Family Tree will appear Figure 2 4 The NMS Front Page appears empty when you log in for the first time Note When running the NMS for the first time this main screen will not show any Codec devices ...

Страница 20: ...ed Codec devices not all of the tool bar functions are relevant for the particular codec some features are not supported at all or not yet supported by different Codes 2 7 1 Connecting a Codec to the Family Tree The NMS allows adding Codecs to and removing Codecs from the Family Tree The Main Screen will appear without any Codec attached to the Family Tree for the first time The first option provi...

Страница 21: ... messages Message Warning Figure 2 7 If adding a Co dec by known IP address with AutoDetect selected fails you will receive this warning Message Warning Figure 2 8 If adding a Co dec by known IP address with unit type selected fails again you will receive this message If you still wish to use the chosen IP address click on Yes The NMS will show this unit as unreachable on the Main Page refer to th...

Страница 22: ...d frames to the Main Screen Click on Net Wizard and follow the Wizard s instructions Figure 2 9 Shows results from a network scan of range IP 192 168 115 1 onwards The scan was stopped manually at xxx xxx xxx 116 no further units expected Begin by entering an IP address you wish to start searching from then click on Begin Scan The Net Wizard will scan all IP addresses from the one entered ending w...

Страница 23: ... must disable DHCP and assign an IP address manually which is in the correct range Once the audio Codec has successfully connected to the NMS application you can also change the unit s IP address to the required value of your network using the NMS You must first establish the network connection in order to access the Codec s configu ration menus Figure 2 10 This example shows one WorldNet Oslo fra...

Страница 24: ... the hardware front panel Refer to section 3 1 2 3 of this manual about how to initiate the reset After you have reset the Codec and the Net Wizard has successfully connected it to the NMS you can then set the IP address to the required value of your network The Silver Stream In Stream Out hardware default IP address 192 168 100 110 2 7 5 Current Alarms Clicking on the Current Alarms button opens ...

Страница 25: ... and details Alarm Start Time This column shows when the alarm occurred or if it was pre existing prior the logIn time Alarm Category This column shows the Alarm Categories Critical Major or Minor Alarm Status This column shows the current alarm status Active or Acknowledged Acknowledged Button Selecting an alarm and then clicking on Acknowledged sets the status from Active to Acknowledged When a ...

Страница 26: ... browser window on the NMS application This has effect on several NMS functions and to the NMS user management in particular To add a new user select Add new user Enter the new user details in the dialog box pro vided Decide which type of access this new user should have and select the appropriate us er level Select Save Changes to add the new user to the account list To remove an account highligh...

Страница 27: ... Oslo frames only In consequence a NMS Guest account may have the full access to a Silver Codec if logged in as Silver Codec Administrator NMS Administrator Administrator allows full access to all features and controls of the Management System This includes the full control of WorldNet Oslo frames NMS Normal Allows viewing access to the settings and logs and allows you to set up and clear down IP ...

Страница 28: ...nterval which pulls the Log File information from the connected hardware For the NextGen codecs not all of the setting options are relevant The General Options are related to the NMS appearance and controls Figure 2 13 Shows the General Options page in the NMS settings folder Display Units as racks Checking Display Units as racks will decrease the image size of the units assigned to the Family Tre...

Страница 29: ... a circular placement Row x Col Placement Clicking on this button will force the NMS to reposition the unit icons on the family tree in a row and column structure Circular Placement Clicking on this button will force the NMS to reposition the unit icons on the family tree in a circular structure Check Visibility Clicking on this button will force the NMS to check if all unit icons are visible on t...

Страница 30: ... Shows the configuration options for audible alarms This configuration allows to making alarm categories audible when occurring Clicking on the file browser button opens the file manager Navigate to the desired sound file MP3 or WAV and assign the file to the category Enabling the Loop option forces the NMS to loop the clip The loop mode plays the file as long as the alarm is active or the user ac...

Страница 31: ...n Codec On the NextGen Codecs this operation forces a logout from the WEG GUI as well Notes ____________________________________________________________ ____________________________________________________________ ____________________________________________________________ ____________________________________________________________ ____________________________________________________________ ___...

Страница 32: ... Codecs Clicking on the Firmware Update Manager button opens the following window Figure 2 15 Shows the Firmware Update Manager Window this example shows a Horizon NextGen The Firmware Update Manger detects all currently connected units from the NMS family tree Clicking on an individual unit selects it and allows removing it from the list by clicking on Remove Add a unit opens an entry field for e...

Страница 33: ...eared as described above only the Silver Codecs should be listed Before the update procedure can start the firmware file container must be selected Figure 2 16 Shows the file manager for selecting the desired osr container this example shows a Hori zon NextGen Clicking on the file manger icon opens the file manager and allows navigating to the location on the hard drive where the firmware was stor...

Страница 34: ...on row indicates that an update is not necessary However you may make different op tions by selecting a card and clicking on one of the following buttons Skip leaves the firmware unchanged for the selected unit In case that the firmware scan result shows the green update arrow clicking on Skip will inhibit an update Update forces the update to the version contained in the osr file for the selected...

Страница 35: ... NextGen but the procedure is the same on all APT Codec devices Figure 2 19 Shows the firmware upload process Figure 2 20 Shows Upload completed and Reprogramming processing After the reprogramming is completed the Update Manager reboots the Codecs and prompts you to close the Manager by clicking on Finish Note In case one firmware upload has not been completed there has probably been an ftp conne...

Страница 36: ... About button displays the version number of the NMS and gives access to the data files location by clicking on the related button Figure 2 21 Shows the About box with NMS version number and the link to access data files location This is where are stored the configuration options of the NMS and other application data files Note The NMS data files are shared by all versions of the NMS installed on ...

Страница 37: ...k devices and therefore should not be flooded with background non related network traffic The best way to limit traffic is to have a switch not a hub or a switch that acts like a hub communicating with the unit similar to the diagram below Figure 2 22 This figure shows the recommended network installation Audio Codec connected to a Switch It is recommended that the port settings on the switch are ...

Страница 38: ...ote site Avoid cable interconnection length in excess of 1 meter 3 3 feet in strong RF environments i e on transmitter sites 3 1 1 Tools and Cables Required In addition to the content of the packing list the following items are necessary to complete the installation Network Management connection cables One CAT5 Ethernet cable to connect the Silver to a switch One CAT5 Ethernet cable to connect the...

Страница 39: ...r LED indicates that an alarm condition exists There are a number of alarm conditions which can be enabled on the Silver range The Connected LED shows the presence of a connection The following table shows the dif ferent states of the LED Connected LED Color Off Grey Green Red No Stream enabled X Receiving Transmitting ok X Connection Error X 3 1 2 3 Reset Switch Default IP Addresses 2 Between the...

Страница 40: ...n rear panel components Stream Out XLR Figure 3 3 Silver Stream Out rear panel components 3 2 1 Power Adaptor DC In The Silver units are supplied with an external Mains power adaptor suitable to work between 100VAC and 240VAC This power adaptor applies 12 VDC to the unit and has a self locking connector Do not use another type of AC adaptor than supplied with the unit 3 2 2 Ethernet Interface This...

Страница 41: ...n in crements of 0 1 dBu The input impedance is selectable be tween 600 and 10 k via the Web GUI Standard XLR 3 male socket Audio Output analog Pin Description 1 Screen 2 hot ve 3 cold ve Analog output levels via the Web GUI in increments of 0 1 dBu The output impedance is selectable between 600 and 50 via the Web GUI 3 2 4 Audio Inputs and Outputs on RCA version The audio inputs on the RCA versio...

Страница 42: ...ontinuous data transfer rates from 1 200 to 115 200Baud non embedded on AUX IP Streams An AUX DATA connection on the Silver units can be con figured for duplex operation even that the audio is al ways simplex 3 2 6 Ethernet Interface 10BaseT socket wiring scheme Ethernet Interface Pin Signal Description 1 Tx transmit data ve 2 Tx transmit data ve 3 Rx receive data ve 4 N C Not connected 5 N C Not ...

Страница 43: ...y to understand by both the experienced technician and the casual user All configuration instructions described in this section relate to the WEB GUI This section provides detailed step by step instructions on how to set up the Silver Stream In Stream Out 4 1 1 WEB GUI Technical Requirements The Web GUI can be run from a standard web browser such as Mozilla Firefox from v 6 0 Internet Explorer fro...

Страница 44: ... the Codec you like to config ure and you will be prompted with the LogIn screen Figure 4 1 The WEB GUI LogIn screen 4 2 1 WEB GUI Default LogIn By default the Administrator account is selected The user management allows modifying this account and it also allows setup a read only account Default LogIn User Admin Password admin After you have submitted correctly the web browser starts loading the w...

Страница 45: ...ettings and the Connection Status The color of the stylized LEDs indicates the current status condition either green or red 4 3 1 WEB GUI Session Close Session Time Out The WEB GUI allows connecting to a Silver unit in read write mode only on one instance at once While in Read Only mode many instances can monitor a single Codec simultaneously Each time the browser connects to the hardware in read ...

Страница 46: ...ted menu item The Current Status frame is hidden and indicated by the green bar The screen shot above shows the expanded main menu 1 with related sub menu entries of the current main page This figure also displays the hidden Current Status frame This frame is indicated by the currently green color Clicking on this colored bar pops up this frame Following the selected menu entry and the current mai...

Страница 47: ...Figure 4 5 Two methods to open the Current Status frame re sizable or in read only mode The Current Status bar changes its color in dependence of the current conditions Pos sible colors are GREEN no error Yellow minor error and RED major error Audio Levels 5 These level bars are representing always the digital signal domain reading as dBFS The analog levels can be adjusted on inputs and outputs de...

Страница 48: ...t Info Section This section displays the hardware and release version 1 Serial Number 2 Unit Name name can be entered on the About screen 3 Firmware Revision 4 Hardware Revision Stream In or Stream Out Unit Status Section 1 Unit Temperature This shows the current Engine temperature of the unit and is not the environmental tem perature This value can exceed 40 C without causing a critical situation...

Страница 49: ...ction This section shows the IP address of both Ethernet port ETH The stylized LED also in dicates a physical Loss of Connection i e if a stream is assigned to the interface it is a copy of the Current Status frame item 4 4 3 Main Menu Status Alarms Page The following screen will appear showing the alarm status Note that a Red stylized LED means the alarm has been raised Green means everything is ...

Страница 50: ...ity For Enhanced apt X this alarm corresponds to the AutoSync Alarm AutoSync is a bit pat tern sent embedded in the Enhanced apt X audio stream that allows a very rapid re sumption of decoding after a gap in the bit stream This alarm will be flagged if the fol lowing conditions occur for network faults usually along with other network specific alarms too Mismatch of audio algorithms on Transmit an...

Страница 51: ...The Buffer Level Display is the graphical equivalence of the current receive buffer condition shown on receive routes only Figure 4 9 Main Menu Status Performance Monitor page on the Decoder Stream Out Stream Table 1 The Stream Table shows all active and inactive streams On a Decoder Stream Out it is al ways a single audio stream and a single AUX Data stream while on the Encoder Stream In many str...

Страница 52: ...an be directly accessed for changing values and en tries Figure 4 10 Shows Stream Tables from the Encoder and the Decoder The exposure options of the Stream Table are flexible and can be widely controlled by the user Clicking on the little arrow on each of the columns on mouse over opens a context menu and allows sorting the table ascending or descending Another submenu provides tick boxes for con...

Страница 53: ...transmit stream data IP overhead Rx Tx Packet Count Number of packets received or transmitted Rx Source IP Address IP Address of the transmitting Codec Rx Source IP Port IP Port on which the transmitting Codec is sending the stream Rx Dropped Packets Count Number of dropped packets Duplicated Packets Count Number of duplicated packets arrived on the Rx stream Re Sequenced Packets Count Number of p...

Страница 54: ...parts the audio settings and the IP configuration The table in the middle of this page shows the currently applied Audio setting on the Encoder Stream In or the Decoder Stream Out Figure 4 12 Shows the Connection Page of the Stream In unit The Silver WEB GUI offers three ways to create and apply a configuration 2 Quick Connection applying a profile to the unit 3 Connection Wizard a step by step gu...

Страница 55: ...on Wizard guides to a step by step procedure creating a profile It prompts for audio settings and for IP settings Finally it creates a profile by merging both components Once a profile was created it appears on the Quick Connection drop down list Advanced Configuration 3 The Advanced configuration procedure provides all configuration and management op tions on a single page Other than the Configur...

Страница 56: ...anced apt X and Linear PCM are available Select the desired format then click on the Bit Rate field Bit Rate 2 Corresponding to the chosen audio format this drop down list presents the available bit rates After selecting the bit rate the Mode field entry may be filled automatically in dependence of the audio mode and chosen bit rate Audio Mode 3 Audio Mode means either Mono or Stereo If this field...

Страница 57: ...uration page on the Encoder with the stream setup window Adding a Stream Clicking on the Add button 1 opens the Stream Configuration window 2 This Win dow provides all setting options for the desired IP connection On the Stream In Encod er a second or more streams can be added by clicking on the Add button again Each stream gets a unique ID assigned by the system This ID cannot be modified by user...

Страница 58: ... mode either unicast or multicast Dest IP Address Stream In Enter the destination IP address remote receiver IP address IP Port Stream In Out Enter an IP port number to transmit to or receive from For RTP streams chose even port number only i e 5004 5006 5008 etc Note This is not the local source port number TTL Stream In Time to Live Chose an appropriate value or keep the default QoS Stream In Qu...

Страница 59: ...Table The little red marker on the table fields indicate that the stream was not yet saved in a profile and can be modified Figure 4 16 Shows two streams ready for being merged into a profile Finally the streams should be enabled before they can be merged into a profile The most right column on the stream table presents the Enable checkbox Clicking on the Create button 3 now merges the audio setti...

Страница 60: ...ened directly from the Connection Page or af ter the Configuration Wizard procedure was completed Figure 4 17 Shows the Advanced configuration window The Connection Wizard as described earlier has created the New Profile from the audio set tings and the IP stream configurations The New Profile now appears in the list of profiles on the left hand side Connections This list of profiles is also acces...

Страница 61: ... main page The screen shot shows New Profile Index no 1 on the streams table With the tool bar items Add Remove and Copy the streams can be processed The Encoder Stream In or Decoder Stream Out settings are accessible in the section above the streams ta ble Once a modification was done the changes can be saved to the profile by clicking on the Save button 3 Creating a Profile Clicking the Create b...

Страница 62: ...it is installed NTP Server Allows enabling disabling the NPT client Network Time Protocol as well as entering the NTP server IP address 4 5 2 System Users Web Accounts The user management offers a two level hierarchy The Administrator account allows full access to the entire system while the Read Only Account may be used for monitoring purposes only 4 5 3 System Network Ethernet Mode For the IP in...

Страница 63: ...d applied to the unit will be displayed on this page Clicking on the Add button opens the entry field for the license key Once the key code is entered press apply to upload the key to the Codec hardware For getting an options license the details displayed on this page must be forwarded to the responsible sales office MAC address and serial number This can be done efficiently by email Figure 4 18 S...

Страница 64: ...om contact aptcodecs com 4 5 7 About About shows the unit hard and software versions It also provides a little chat box allows sending short messages to other actually logged in users The entry field Unit Name allows entering an individual name for this particular Silver unit This name appears on the browser tab as well as on the unit s status page Figure 4 19 Shows the About page with the Chat bo...

Страница 65: ...oder Stream In RCA version All settings can be reverted or saved by clicking on either of the buttons as shows above The screenshot above shows the audio configuration page of a Stream In Encoder with RCA connectors The XLR version allows changing the Input or Output impedance in addition The tables below outline the configuration options on both versions Notes ____________________________________...

Страница 66: ...rom 3 dBFS to 42 dBFS in in crements of 3 dB Timeout Stream In Out Value This setting defines the period of time the signal has to be below the threshold level before the audio alarm is flagged Analog Configuration Low Latency Mode This Low Latency Mode effects the analog signal processing and improves the system latency by approx 1 5ms This mode disables and bypasses the input Sample Rate Convert...

Страница 67: ...dBu Adjusts the analog Output level in reference to the digital dBFS in increments of 0 1dB XLR version Input Impedance Stream In High 600Ω Analog Input impedance In 10kΩ Sets the Input impedance to 600 Ω XLR version Input Impedance Stream Out Low 600Ω Analog Output impedance In 50Ω Sets the Output impedance to 600 Ω Audio Alarm settings are equal on RCA and XLR version 4 6 2 Configuration AUX Dat...

Страница 68: ...quality and reliability known from a synchronized TDM based link at a fraction of the associated cost The technology approach of SureStream is based on redundant streaming SureStream repli cates a single program audio stream and passes it through the Statistical Diversity Genera tor Following this process the redundant program streams appear on the network as unique streams generated from differen...

Страница 69: ...s routers treat each SureStream component stream individually by passing it randomly on different paths to the destination IP address On the receiving end the Enhanced Re Sequencer generates from all component streams the single packet stream on a first in first out packet basis All duplicated redundant packets will be dropped The number of component streams is not limited by the SureStream tech n...

Страница 70: ...as possible This generator runs an algorithm that can be set up with three different sets of parameters called levels allowing the use of more than one component stream while keeping each stream divers from each other 5 1 2 SureStream Decoder Once SureStream has generated duplicated streams with the same payload intended to reach the same receiver the Decoder on the receiving end must cope with a ...

Страница 71: ...ng the corresponding streams SureStream group If the packet size is not equal on all component streams the streams will be treated separately and no SureStream group will be generated Figure 5 3 Shows a SureStream configuration on the Encoder A SureStream group i e SureStream 1 will be displayed only if the packet sizes on ALL component streams are equal The figure above shows a working Encoder co...

Страница 72: ...er disabled or set from Level I to Level III A Level does not indicate the level of severity of SureStream A Level is a set of pa rameters used by the Diversity Generator to ensure the stream diversity All three Levels work on the same level of severity but differently from each other Having three sets of parameters allows to configuring more than one redundant stream and keeping all streams proce...

Страница 73: ...Address This must be the same destination address on all component streams allowing the receiver to receive all streams on its ETH port IP Port For each stream the IP port must be different TTL For all streams the TTL value must be equal QoS For all streams the QoS setting must be equal Packet Size For all streams the Packet Size must be equal Rx Latency All received component streams of a SureStr...

Страница 74: ...ant setting and must not be ignored On the Decoder section the Re Sequencer as the complementary part of the Diversity Gen erator MUST be enabled Figure 5 5 Shows a SureStream configuration on the Decoder with two streams received The figure above shows a working Decoder configuration in principal Again two component streams are received on the same ETH port hence they are transmitted on a single ...

Страница 75: ...aptcodecs com SureStream Decoder Configuration continued SureStream does not offer specific configuration option for creating receive streams on the Decoder Figure 5 6 Shows the normal Stream configuration window On the Decoder SureStream needs the Re Sequencer to be enabled whenever more than one stream must be received from the same Encoder regardless of the Diversity Generator level settings of...

Страница 76: ...reStream group consists of two component streams Rx1 Rx2 While Rx1 shows no Dropped Packets no Duplicated Packets and no LOC errors the Rx2 shows a huge amount of duplicated packets This is exactly how the Enhanced Re Sequencer works It re combines the component streams and creates an error free packet streams for decoding and discards all redundant packets In a real world environment the componen...

Страница 77: ...ssed on the Admin Account only 6 1 About System Firmware A Firmware release consists of a set of inter compatible firmware files These are system files for the DSP the system operational system and the WEB GUI A system release will be de livered always as a Zip Archive The firmware zip archive must never be unzipped on a PC The system upload proce dure requests this zipped archive 6 1 1 Firmware U...

Страница 78: ...tcodecs com 6 1 2 Firmware Update Step 2 Clicking on the Browse button opens the PC file browser Navigate to the folder where the firmware file is stored and select the zip archive SLVR_SR_x x x zip Figure 6 2 Shows the file browser on the firmware update page Once the correct firmware file was selected and appears in the File section click on the Up load button on the bottom right corner of the b...

Страница 79: ...6 1 3 Firmware Update Step 3 The system prompts you to confirm the firmware upload Figure 6 3 The system asks for final confirmation for starting the firmware upload After clicking on the Upload button the System prompts you again to confirm the up date process or to cancel Once you have confirmed the upload procedure to start DO NOT DISCONNECT THE UNIT FROM MAINS OR TRY TO RE START THE UNIT UNTIL...

Страница 80: ...rocedure During this process you may be prompted by an authentication window on some brows ers to enter a user and password i e seen with Firefox proceed with Cancel No au thentication is required at this point Do not enter any user name or password Figure 6 4 This page appears after the upload process was confirmed The Firmware Upload process stops any actual process on the unit it discontinue st...

Страница 81: ... update procedure After approximately 20 seconds the browser shows the LogIn page The LogIn page is inactive for another 4 minutes 4 minutes after initializing the upload process the unit will allow to log in again This is the point in time the unit continues to operate in the same way as previously Figure 6 5 This browser switches to the LogIn page after approximately 20 seconds It is not necessa...

Страница 82: ...eland Tel 44 28 9067 7200 Fax 44 28 9067 7201 www aptcodecs com contact aptcodecs com 6 1 6 Firmware Update Step 6 After completing the firmware update the Status Page will present the new firmware suc cessfully loaded Figure 6 7 Shows the Status Page System running and new firmware loaded End of Firmware update procedure End of Document ...

Отзывы: