


. . . . . . . . . . . . . . . . . . . . . . . . . . . . . . . . . . . . . . . . . . . . . . . . . . . . . .Replacing a Failed Disk Drive
33
Replacing a Failed Disk Drive
This procedure describes how to replace a failed disk drive.
Before you begin to replace a disk drive in the drive module, gather antistatic protection
and the replacement disk drive.
C
AUTION
Possible loss of data access
– Never insert disk drives into an drive module
without first confirming the disk drive firmware level is compatible. Inserting
a disk drive with an incorrect firmware level can cause data loss or data
corruption. For information about supported disk drive firmware levels,
contact a Customer and Technical Support representative.
C
AUTION
Possible loss of data access
– Magnetic fields will destroy all data on a disk
drive and cause irreparable damage to the disk drive circuitry. To avoid loss
of data access and damage to disk drives, always keep disk drives away from
magnetic devices.
I
MPORTANT
Install only disk drives specifically designed for your drive module, and
that have been tested and qualified by the factory.
C
AUTION
Possible hardware damage
– To prevent electrostatic discharge damage to
the drive module, use proper antistatic protection when handling
components.
1
Put on antistatic protection.
2
Unpack the new disk drive.
Set the new disk drive on a dry, level surface near the drive module. Save all packing
materials in case you need to return the disk drive.
3
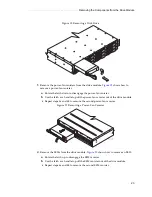
Remove the failed disk drive from the drive module.
shows how to remove
a disk drive.
a
Pull the drive handle to the left.
b
Use the handle to pull the disk drive out of the slot.
c
Put the disk drive on an antistatic, cushioned surface away from magnetic fields.
Содержание InfiniteStorage 120
Страница 1: ...007 4853 001 SGI InfiniteStorage 120 Mass Storage Hardware Topics Edition 001 ...
Страница 4: ......
Страница 8: ......
Страница 12: ...InfiniteStorage 120 Hardware Topics 4 Figure 4 Drive Module Status LED Locations ...
Страница 32: ...InfiniteStorage 120 Hardware Topics 24 Figure 20 Removing an ESM ...