background image

Instrucciones de Operación

31

Para poder alcanzar la capacidad
máxima de almacenamiento de
cincuenta y uno (51) botellas,
será necesario colocar las botel-
las alternativamente en los cinco
estantes superiores, tal como se
indica en la Fig. A. Esto le permi-
tirá guardar nueve (9) botellas de
750ml por estante en cada uno
de los seis estantes superiores, y
seises (6) botellas en el estante
inferior (

Fig. B

) logrando una

capacidad máxima de cincuenta
y uno (51) botellas.

Si las condiciones de humedad
son muy bajas, necesitará usar
el humidor. Llene el humidor a
3/4 de su capacidad con agua
de la canilla y colóquelo en el
estante inferior, como se indica
en la Fig. B. Revise a menudo el
nivel de agua, y llénelo cuando
sea necesario.

NOTA:

El uso de humidor(s)

reducirá la capacidad de alma-
cenamiento del estante(s) en
una botella.

Almacenamiento 
de Vinos

La capacidad máxima* de
la DWC516 es de 51 botel-
las de vino (de 750ml).

*

Cuando se guarden de

acuerdo con las instrucciones
y no se usen los humidores.
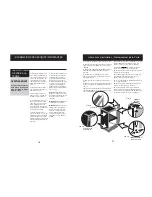
Instrucciones de
los Estantes

Para sacar un estante de su
posición trabada, quite el
tapón ese situado en cada
lado del estante como se
indica en la Fig. C y tire
hacia afuera.

Para volver a trabarlo, veri-
fique que esté apoyado
firmemente en los soportes
de montaje y empújelo hacia

adentro y instale el tapón.

Observación:

El estante

inferior de ambas secciones
del gabinete no está trabado
en su lugar. No intente
extraerlo cuando tenga botel-
las de vino o el humidor
lleno de agua.

¡IMPORTANTE!

No recubra los estantes con
papel de aluminio ni ningún
otro material que evite la 
adecuada circulación de aire
dentro del gabinete.

6

Operating Instructions

1

2

3

4

5

Setting the
Temperature

To switch the display

between the Fahrenheit (

°

F)

and Celsius (

°

C) scale,

depress the ‘Set Upper’ and
‘Set Lower’ control buttons simul-
taneously for approximately five
(5) seconds.

The temperature range can

be set as low as 39

°

F (4

°

C) or

as high as 64

°

F (18

°

C) to suit

your specific wine storage
requirements. Each depres-
sion of the ‘Set Upper’ or ‘Set
Lower’ button will allow you to
adjust the temperature in 1

°

degree increments within the
aforementioned range.

You may view your ‘set’ tem-

perature at any time by briefly
depressing either the ‘Set
Upper’

or

‘Set Lower’ button.

The 

set temperature will flash

in the display area for 5 sec-
onds before the display
resumes showing the 

current

cabinet temperature.

Please note:

In the event of a

power failure or interruption,
all modified settings are lost
and the default settings are
used once power resumes.
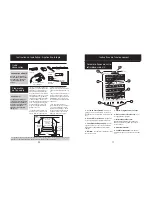
The Controls of
your Wine Cooler

1. Run:

Indicator light illuminates to signify

the cooling mode is currently in opera-
tion.

2. Upper Chamber Display:

Display

screen shows current cabinet tempera-
ture and set temperature of the upper
zone.

3. Lower Chamber Display:

Display

screen shows current cabinet tempera-
ture and set temperature of the lower
zone.

4. C° / F°

Adjacent indicator light denotes which
scale of temperature is displayed.

5. ‘Set Upper’ Button -

Used to set the

temperature in the upper zone (see
‘Setting the Temperature below).

‘Set Lower’ Button - 

Used to set the

temperature in the lower zone (see
‘Setting the Temperature below).

When you plug in your
wine cooler for the first
time, the temperature will
automatically be set to
45°F (7°C) and 54°F (12°C)
in the lower and upper
compartments respective-
ly, and will be displayed in
the Fahrenheit scale (°F).

Fig A

Fig B

Tornillos

Tapón

Fig C

Содержание DWC516BLS

Страница 1: ...SANS FRAIS Pour toute demande de service ou commande de pi ces fournissez toujours l information suivante Type de produit Num ro de mod le Description de la pi ce requise Heladera Integral para Vinos...

Страница 2: ......

Страница 3: ...izado m s cercano donde debe ser reparada por un t cnico calificado Si esta unidad es reparada en otro lugar que no sea un Taller de Servicio Autorizado o si la unidad se utiliza para aplicaciones com...

Страница 4: ...ique que el enchufe de 3 patas del equipo est completamente insertado en el tomacorriente Se han agregado recientemente muchas botellas tibias al gabi nete Verifique que las puertas est n completament...

Страница 5: ...NFORMATION BEFORE USING 3 IMPORTANT SAFETY INFORMATION WARNING SAFETY PRECAUTIONS This appliance is intended for household use only Do not attempt to operate or store this appliance out doors This app...

Страница 6: ...llo que est m s cerca de la bisagra 14 Cierre la puerta y vuelva a colocar la unidad en posici n vertical espere 60 minutos antes de volver a enchufar la heladera para vinos verifique que la puerta ha...

Страница 7: ...superficie nivelada y debe tener por lo menos 24 de profundidad por 12 1 2 de ancho El hueco tambi n deber tener por lo menos 34 1 2 de alto El tomacorriente el ctrico puede colocarse del lado de cua...

Страница 8: ...tro del gabinete 6 Operating Instructions 1 2 3 4 5 Setting the Temperature To switch the display between the Fahrenheit F and Celsius C scale depress the Set Upper and Set Lower control buttons simul...

Страница 9: ...a unidad correcta de temperatura 5 Bot n Set Upper Elevar Se usa para aumentar la temperatura del compar timiento superior en incrementos de 1 grado Vea Ajuste de Temperatura m s abajo Bot n Set Lower...

Страница 10: ...of the shaded area as shown in Fig C Note If the electrical outlet is surface mounted not flush within the enclosure the depth requirment for the installation will be affected If the electrical outle...

Страница 11: ...60 mins before reconnect ing power to the wine cooler verify the door alignment and proper seal against the cabinet FIG 1C Plastic Caps 3 Upper Hinge Assembly FIG 1D Door Plug Lower Hinge Assembly and...

Страница 12: ...da os personales al usar su artefacto siga las precauciones b sicas incluidas en las secciones siguientes CONSERVE ESTAS INSTRUCCIONES PELIGRO LOS NI OS PODR AN QUEDAR ATRAPADOS Una heladera para vino...

Страница 13: ...closed or opened excessively and that the gasket is sealing against the cabinet Open the door only as needed and for short periods of time 26 BIENVENIDO NECESITA AYUDA Bienvenido a la familia Danby E...

Страница 14: ...ur nearest authorized Danby service depot where service must be performed by a qualified service technician If service is performed on the units by anyone other than an authorized service depot or the...

Страница 15: ...e de service la plus proche o les r parations doivent tre effectu es par un technicien qualifi Si les r parations sont effectu es par quiconque autre que la station de service agr e o des fins commerc...

Страница 16: ...t que le joint tanche est ouverte trop souvent est contre le coffret Ouvrez le porte seulement quand n cessaire 14 BIENVENUE EN CAS DE BESOIN D ASSISTANCE Bienvenue dans la famille Danby Nous sommes f...

Страница 17: ...CAUTIONS Pour minimiser le risque d incendie de br lures de chocs lectriques ou de blessures suivez les chapitres suivants en plus d appliquer les pr cautions de base Cet appareirl est con u pour un u...

Страница 18: ...la prise murale faites installer une prise plus rapproch e par un lectricien ou un technicien qualifi INSTRUCTIONS DE MISE LA TERRE INFORMATIONS DE S CURIT IMPORTANTES AVERTISSEMENT Une mauvaise util...

Страница 19: ...ur L ouverture devrait tre une hauteur maximale de 34 1 2 po La prise murale peut tre plac de l un ou l autre c t si la prise murale n est pas dans l ouverture d installation ou de l arri re du secteu...

Страница 20: ...tera dans la fen tre d affichage pendant environ 5 secondes et reviendra alors automatiquement l af fichage de la temp rature ambiante de la pi ce Note En cas de panne de courant les r glage de tem p...

Отзывы: