Silhouette DWC516BLS Скачать руководство пользователя страница 6

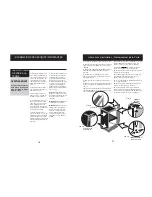
Instrucciones de Instalación - Inversión de Apertura de Puerta 

FIG 1A

33

1.

Desenchufe la unidad del tomacorriente (si está

conectada) y apóyela sobre la parte de atrás.

2.

Abra la puerta hasta que se vean los tornillos

que sujetan el soporte inferior en la parte de abajo
de la puerta (Fig. 1B).

3.

Quite el tornillo que está más cerca de la bis-

agra y cierre cuidadosamente la puerta para poder
quitar el otro tornillo del soporte.
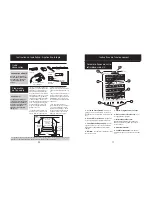
4.

Deslice la puerta un poco hacia la izquierda

para poder quitar el soporte de la puerta y la bis-
agra inferior.

5.

Empuje la puerta hacia abajo para quitarla del

gabinete de la heladera para vinos.

6.

Quite la tapa del orificio del extremo superior

izquierdo de la puerta (Fig. 1D) y colóquela en el
orificio superior derecho.

7.

Quite los tres (3) tornillos que sujetan la bisagra

superior (Fig. 1A) y también los tres (3) tornillos
que sujetan la bisagra inferior.

8.

Quite las tapas plásticas del lado izquierdo del

gabinete (Fig. 1C) y vuelva a instalarlas en el lado
derecho (donde estaba antes la bisagra).

9.

Instale el juego de bisagras para el lado izquier-

do (incluido con la unidad) en el lado izquierdo del
gabinete.

10.

Coloque el soporte inferior de la puerta sobre

la bisagra inferior izquierda.

11.

Con mucho cuidado, vuelva a colocar la puerta

en la bisagra comenzando por el lado superior
izquierdo y luego sobre el soporte inferior de la
puerta.

12.

Con la puerta cerrada, instale el primer tornillo

en el soporte inferior.

13.

Abra la puerta e instale el tornillo que está

más cerca de la bisagra.

14.

Cierre la puerta y vuelva a colocar la unidad

en posición vertical (espere 60 minutos antes de
volver a enchufar la heladera para vinos), verifique
que la puerta haya quedado bien alineada y que
cierre bien contra el gabinete.

FIG 1C

Tapas Plásticas (3)

Bisagra Superior

FIG 1D

Tapa del Orificio

Bisagra Inferior y Soporte

de la Puerta

FIG 1B

4

This appliance must be
grounded. In the event of an
electrical short circuit, ground-
ing reduces the risk of electric
shock by providing an escape
wire for the electric current.

This appliance is equipped
with a power cord having a
grounding wire with a ground-
ing plug. The plug must be
plugged into an outlet that is
properly installed and ground-
ed.

Consult a qualified electrician
or service technician if the
grounding instructions are not
completely understood, or if
doubt exists as to whether the
appliance is properly ground-
ed.

If the outlet is a standard 2-
prong wall outlet, it is your per-
sonal responsibility and obliga-
tion to have it replaced with a
properly grounded 3-prong
wall outlet.

For best operation, plug this
appliance into its own electri-
cal outlet to prevent flickering
of lights, blowing of fuse or
tripping of circuit breaker.

Do not

under any circum-

stances cut or remove the
third (ground) prong from the
power cord.

Do not

use an adapter plug

with this appliance.

Do not

use an extension cord

with this appliance. If the
power cord is too short, have
a qualified electrician or serv-
ice technician install an outlet
near the appliance.

GROUNDING 
INSTRUCTIONS

IMPORTANT SAFETY INFORMATION

WARNING 

Improper use of the   
grounding plug can result  
in a risk of electric shock.

Содержание DWC516BLS

Страница 1: ...SANS FRAIS Pour toute demande de service ou commande de pi ces fournissez toujours l information suivante Type de produit Num ro de mod le Description de la pi ce requise Heladera Integral para Vinos...

Страница 2: ......

Страница 3: ...izado m s cercano donde debe ser reparada por un t cnico calificado Si esta unidad es reparada en otro lugar que no sea un Taller de Servicio Autorizado o si la unidad se utiliza para aplicaciones com...

Страница 4: ...ique que el enchufe de 3 patas del equipo est completamente insertado en el tomacorriente Se han agregado recientemente muchas botellas tibias al gabi nete Verifique que las puertas est n completament...

Страница 5: ...NFORMATION BEFORE USING 3 IMPORTANT SAFETY INFORMATION WARNING SAFETY PRECAUTIONS This appliance is intended for household use only Do not attempt to operate or store this appliance out doors This app...

Страница 6: ...llo que est m s cerca de la bisagra 14 Cierre la puerta y vuelva a colocar la unidad en posici n vertical espere 60 minutos antes de volver a enchufar la heladera para vinos verifique que la puerta ha...

Страница 7: ...superficie nivelada y debe tener por lo menos 24 de profundidad por 12 1 2 de ancho El hueco tambi n deber tener por lo menos 34 1 2 de alto El tomacorriente el ctrico puede colocarse del lado de cua...

Страница 8: ...tro del gabinete 6 Operating Instructions 1 2 3 4 5 Setting the Temperature To switch the display between the Fahrenheit F and Celsius C scale depress the Set Upper and Set Lower control buttons simul...

Страница 9: ...a unidad correcta de temperatura 5 Bot n Set Upper Elevar Se usa para aumentar la temperatura del compar timiento superior en incrementos de 1 grado Vea Ajuste de Temperatura m s abajo Bot n Set Lower...

Страница 10: ...of the shaded area as shown in Fig C Note If the electrical outlet is surface mounted not flush within the enclosure the depth requirment for the installation will be affected If the electrical outle...

Страница 11: ...60 mins before reconnect ing power to the wine cooler verify the door alignment and proper seal against the cabinet FIG 1C Plastic Caps 3 Upper Hinge Assembly FIG 1D Door Plug Lower Hinge Assembly and...

Страница 12: ...da os personales al usar su artefacto siga las precauciones b sicas incluidas en las secciones siguientes CONSERVE ESTAS INSTRUCCIONES PELIGRO LOS NI OS PODR AN QUEDAR ATRAPADOS Una heladera para vino...

Страница 13: ...closed or opened excessively and that the gasket is sealing against the cabinet Open the door only as needed and for short periods of time 26 BIENVENIDO NECESITA AYUDA Bienvenido a la familia Danby E...

Страница 14: ...ur nearest authorized Danby service depot where service must be performed by a qualified service technician If service is performed on the units by anyone other than an authorized service depot or the...

Страница 15: ...e de service la plus proche o les r parations doivent tre effectu es par un technicien qualifi Si les r parations sont effectu es par quiconque autre que la station de service agr e o des fins commerc...

Страница 16: ...t que le joint tanche est ouverte trop souvent est contre le coffret Ouvrez le porte seulement quand n cessaire 14 BIENVENUE EN CAS DE BESOIN D ASSISTANCE Bienvenue dans la famille Danby Nous sommes f...

Страница 17: ...CAUTIONS Pour minimiser le risque d incendie de br lures de chocs lectriques ou de blessures suivez les chapitres suivants en plus d appliquer les pr cautions de base Cet appareirl est con u pour un u...

Страница 18: ...la prise murale faites installer une prise plus rapproch e par un lectricien ou un technicien qualifi INSTRUCTIONS DE MISE LA TERRE INFORMATIONS DE S CURIT IMPORTANTES AVERTISSEMENT Une mauvaise util...

Страница 19: ...ur L ouverture devrait tre une hauteur maximale de 34 1 2 po La prise murale peut tre plac de l un ou l autre c t si la prise murale n est pas dans l ouverture d installation ou de l arri re du secteu...

Страница 20: ...tera dans la fen tre d affichage pendant environ 5 secondes et reviendra alors automatiquement l af fichage de la temp rature ambiante de la pi ce Note En cas de panne de courant les r glage de tem p...

Отзывы: