background image

7

INSTALLATION INSTRUCTIONS

Option C - Drain Pump

Using the drain pump option is encouraged if there 

is no nearby fl oor drain that can be used. Using 

the pump allows the drain hose to be angled in any 

direction.

1.  Use the drain hose provided in the accessory 

bag. 

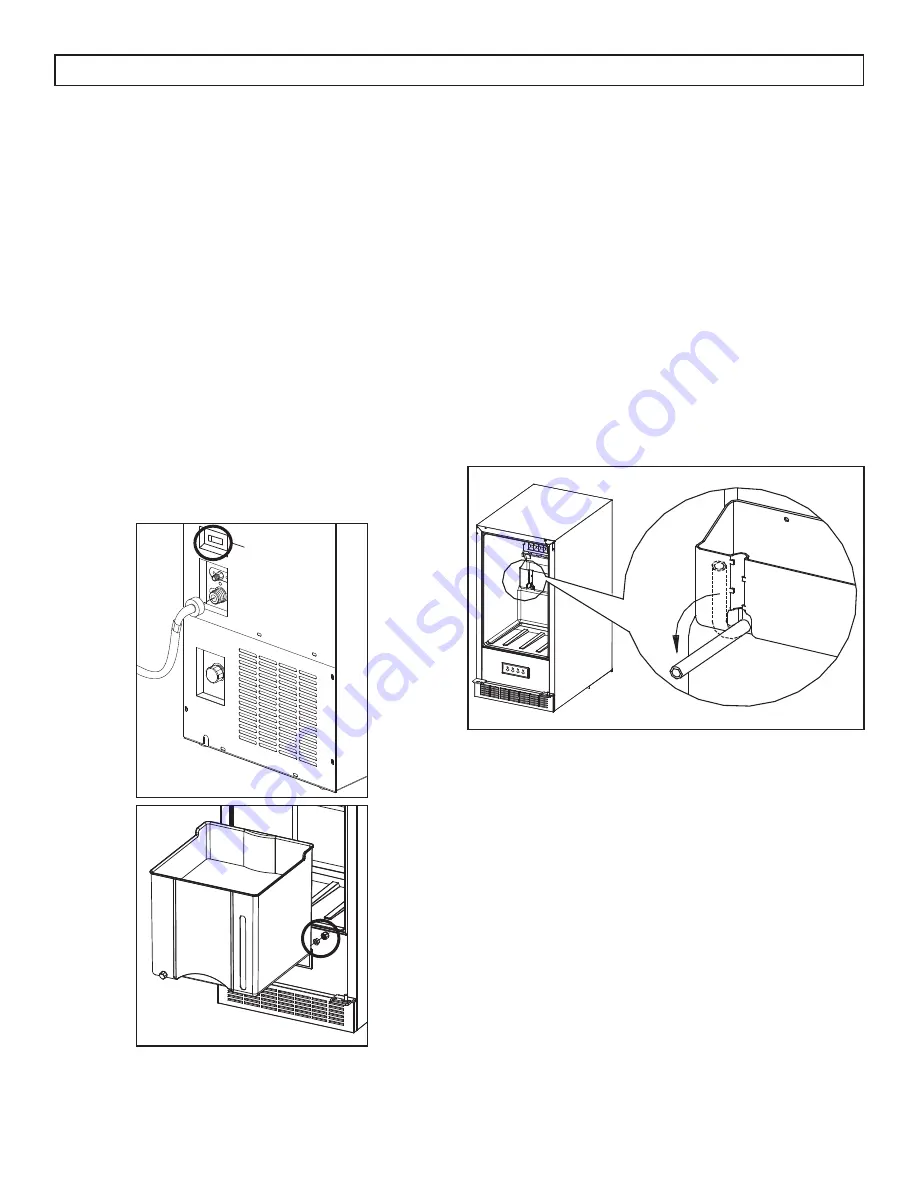
2.  Attach the drain hose to the pump drain outlet 

on the back of the appliance. 

3.  Direct the other end of the drain hose to a drain.

4.  Remove the rear drain seal and the rear drain 

cap from the back of the bucket to allow melted 

water from the bucket to fl ow into the internal 

water tank, which will then drain through the 

hose.

When using the continuous drain option, ensure that 

the drain pump switch on the back of the appliance 

is set to “ON”.

ON

DRAINING THE APPLIANCE

If the appliance will be cleaned or if it will not 

be used for a long period of time, it should be 

completely drained of all water.

Turn off the water supply and remove the ice bucket. 

On the inner back wall of the appliance there is a 

rubber tube connected to the interior water tank. 

Gently unhook the tube and lower it toward the 

drain port at the back of the ice maker cabinet to 

allow the water inside the appliance to drain. 

Note:

 Do not leave the appliance unattended while 

it is draining. Water fl ow can overwhelm the drain 

and may leak from the front of the cabinet. It is 

advisable to slightly raise the front of the cabinet 

while draining to avoid this issue.

CONTINUOUS WATER CIRCULATION

This appliance operates using a continuous water 

cycle that produces very little waste.

When the appliance is operating and the internal 

water container is low, new water is allowed into 

the appliance from the water source. The water 

tank fi lls up and the recirculation pump cycles water 

over the evaporator tray until ice is produced. This 

process is continuous as long as the appliance is 

turned on and the water source is connected.

Any water that enters the drain at the bottom of the 

ice maker is not recycled, it is drained through the 

drain hose or is it collected in the ice bucket if no 

drain hose is connected. This ensures that new ice is 

always created with clean water.

Содержание DIM32D1BSSPR

Страница 1: ...nada N1H 6Z9 Danby Products Inc Findlay Ohio US A 45840 1 844 455 6097 MANUAL DEL PROPIETARIO Model Mod le Modelo 2018 06 04 MODEL MOD LE MODELO DIM32D1BSSPR ICE MAKER Owner s Manual 1 12 MACHINE GLA...

Страница 2: ...manual before calling This section will help you solve common problems that may occur Welcome Welcome to the Silhouette family We are proud of our quality products and we believe in dependable service...

Страница 3: ...ntended for use by persons including children whose physical sensory or mental capabilities may be different or reduced or who lack experience or knowledge unless such persons receive supervision or t...

Страница 4: ...ibility of a malfunction in the cooling system from handling during transportation This appliance is 15 inches 38 cm wide by 34 3 inches 87 cm high by 24 2 inches 61 4 cm deep The ice maker should be...

Страница 5: ...ssuming that the electrical outlet and the water supply are located in the adjacent cabinetry or ush mounted in the rear wall not surface mounted inside the enclosure If the electrical outlet and wate...

Страница 6: ...ng type of shut off valve A compression nut and ferrule sleeve for connecting the water supply line to the ice maker inlet valve A clamp and a number 8 1 2 screw to secure the water line WARNING To av...

Страница 7: ...the drain cap and seal from the front of the bucket and allowing the water to drain into a second receptacle Note The ice maker is refrigerated but it is not a freezer Any ice that is created will eve...

Страница 8: ...there is a rubber tube connected to the interior water tank Gently unhook the tube and lower it toward the drain port at the back of the ice maker cabinet to allow the water inside the appliance to d...

Страница 9: ...ice bucket capacity is 25 lbs When new ice is created remove it from the appliance and place it in a freezer for long term storage WATER FILTER It is highly recommended to use a water lter on the wat...

Страница 10: ...th three screws Block the holes at the top right of the cabinet with the screw hole covers 5 The lower left hinge is pre installed on the cabinet 6 When reinstalling the door it will need to be ipped...

Страница 11: ...supply 1 Turn off the water supply to the appliance 2 Wait for any remaining ice inside the appliance to melt from the evaporator into the bucket then discard 3 Turn the appliance off 4 Completely dra...

Страница 12: ...s leaking The drain hose connection is leaking The drain caps on the ice bucket are not completely closed Excessive noise or vibrations The appliance is not level Ice maker alarm is sounding Internal...

Страница 13: ...depot Any appliance requiring service outside the limited boundaries of In Home Service will be the consumer s responsibility to transport at their own expense to the original point of purchase or a...

Страница 14: ...e la n de ce manuel Cette section vous aidera r soudre les probl mes courants pouvant survenir Bienvenue Bienvenue la famille Silhouette Nous sommes ers de la qualit de nos produits et nous croyons en...

Страница 15: ...appareil n est pas destin tre utilis par des personnes y compris des enfants dont les capacit s physiques sensorielles ou mentales peuvent tre diff rentes ou r duites ou qui n ont pas d exp rience ou...

Страница 16: ...syst me de refroidissement de la manipulation pendant le transport Cet appareil est 15 pouces 38 cm de large par 34 3 pouces 87 cm de haut par 24 2 pouces 61 4 cm de profondeur La machine gla ons doit...

Страница 17: ...e et l alimentation en eau sont situ es dans l armoire adjacente ou encastr es dans la paroi arri re et non en surface l int rieur de l armoire Si la prise lectrique et l alimentation en eau sont situ...

Страница 18: ...robinet d arr t auto per ant Un crou de compression et une virole manchon pour raccorder la conduite d alimentation en eau la soupape d admission de la machine gla ons Une pince et une vis num ro 8 1...

Страница 19: ...joint de l avant du seau et en permettant l eau de s couler dans un deuxi me r ceptacle Note La machine gla ons est r frig r e mais ce n est pas un cong lateur Toute glace qui est cr e nira par fondr...

Страница 20: ...reil un tube en caoutchouc est raccord au r servoir d eau interne D crochez doucement le tube et abaissez le vers l ori ce de vidange l arri re de l armoire de la machine gla ons pour permettre l eau...

Страница 21: ...eau glace est de 25 lb Lorsque de la nouvelle glace est cr e retirez la de l appareil et placez la dans un cong lateur pour un stockage long terme FILTRE EAU Il est fortement recommand d utiliser un l...

Страница 22: ...loquer les trous en haut droite de l armoire avec les couvercles des trous de vis 5 La charni re inf rieure gauche est pr install e sur le meuble 6 Lors de la r installation de la porte elle doit tre...

Страница 23: ...au de l appareil 2 Attendez que la glace restante l int rieur de l appareil fondre de l vaporateur dans le seau puis jetez le 3 teignez l appareil 4 Vider compl tement l appareil de toute l eau en uti...

Страница 24: ...u fuit La connexion du tuyau de vidange fuit Les bouchons de vidange sur le seau glace ne sont pas compl tement ferm s Bruit excessif ou vibrations L appareil n est pas de niveau L alarme de la machin...

Страница 25: ...emiers vingt quatre 24 mois toutes les pi ces fonctionnelles de ce produit qui s av rent d fectueuses seront r par es ou remplac es selon le choix du garant sans frais l acheteur initial Danby se r se...

Страница 26: ...ecci n le ayudar a resolver problemas comunes que pueden ocurrir 1 844 455 6097 Bienvenido Bienvenido a la familia Silhouette Estamos orgullosos de nuestros productos de calidad y creemos en un servic...

Страница 27: ...luyendo ni os cuyas capacidades f sicas sensoriales o mentales pueden ser diferentes o reducir o que carecen de experiencia o conocimiento a menos que dichas personas reciban supervisi n o entrenamien...

Страница 28: ...miento en el sistema de enfriamiento debido a la manipulaci n durante el transporte Esta aparato tiene 15 pulgadas 38 cm de ancho por 34 3 pulgadas 87 cm de alto por 24 2 pulgadas 61 4 cm de profundid...

Страница 29: ...cados en los gabinetes adyacentes o montados empotrados en la pared posterior no montados en la super cie dentro del gabinete Si la toma de corriente y el suministro de agua est n ubicados dentro de l...

Страница 30: ...na tuerca de compresi n y una f rula manguito para conectar la l nea de suministro de agua a la v lvula de entrada de la f brica de hielo Una abrazadera y un tornillo n mero 8 1 2 para asegurar la l n...

Страница 31: ...parte frontal del cuchar n y permitiendo que el agua se drene en un segundo recept culo Nota La f brica de hielo est refrigerada pero no es un congelador Cualquier hielo que se genere nalmente se derr...

Страница 32: ...arato hay un tubo de goma conectado al tanque de agua interior Desenganche suavemente el tubo y b jelo hacia el puerto de drenaje en la parte posterior del gabinete de la f brica de hielo para permiti...

Страница 33: ...d del cubo de hielo es de 25 lbs Cuando se cree hielo nuevo ret relo del electrodom stico y col quelo en un congelador para su almacenamiento a largo plazo FILTRO DE AGUA Se recomienda encarecidamente...

Страница 34: ...gujeros en la parte superior derecha del gabinete con las cubiertas de los ori cios para tornillos 5 La bisagra inferior izquierda est preinstalada en el armario 6 Cuando vuelva a instalar la puerta t...

Страница 35: ...istro de agua 1 Cierre el suministro de agua al aparato 2 Espere a que el hielo restante dentro del aparato se derrita desde el evaporador hacia la cubeta luego des chelo 3 Apague el aparato 4 Vac e p...

Страница 36: ...i n de la manguera de drenaje est goteando Las tapas de drenaje en el cubo de hielo no est n completamente cerradas Ruido excesivo o vibraciones El aparato no est nivelado La alarma del productor de h...

Страница 37: ...del rea limitada de Servicio en Domicilio el cliente ser responsable por transportar dicho artefacto hasta el Taller de Servicio Autorizado mas cercano Si el electrodom stico est instalado en un lugar...

Страница 38: ...___________________ __________________________________________________________________________________________ _________________________________________________________________________________________...

Страница 39: ...___________________ __________________________________________________________________________________________ _________________________________________________________________________________________...

Страница 40: ...Model Mod le Danby Products Limited Guelph Ontario Canada N1H 6Z9 Danby Products Inc Findlay Ohio USA 45840 Printed in China Imprim en Chine Impreso en China Modelo TM MC DIM32D1BSSPR...

Отзывы: