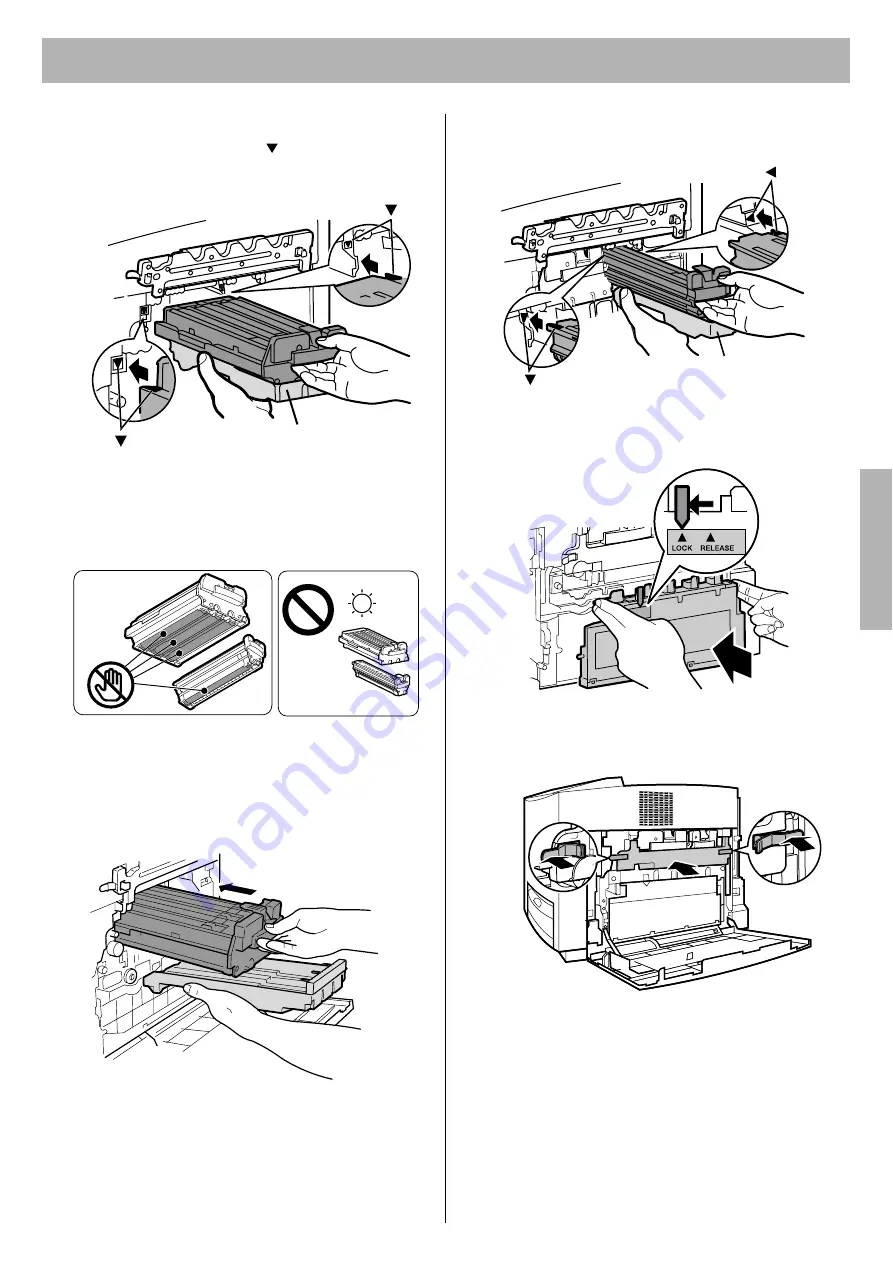
Silex technology KX-CL 600 Скачать руководство пользователя страница 13

Setup

13

5

Holding the color print cartridge with the protective 
tray, match the arrow marks ( ) then insert the color 
print cartridge halfway into the printer.

NOTES:

To prevent damage to the print cartridges,

Do not touch the green drum surface.

Do not expose to light for more than 45 seconds.

Do not expose to direct sunlight.

6

Firmly push the color print cartridge until it snaps into 
place.

Save the protective trays, seal covers, protective 
caps, packing materials and cartons for future 
repacking.

7

Repeat Step 3 - 6 for the Black print cartridge.

8

Install the waste toner cartridge (

1

) and slide the lock 

lever to the left (

2

).

9

Close the print cartridge holder until it clicks (

1

) and 

lock it (

2

).

10

Close the right side door.

Protective tray

(   )

(   )

Green
drum

(   )

(   )

Protective tray

1

2

1

2

2

2

2

2

Se
tup

Содержание KX-CL 600

Страница 1: ...nic Color Laser Printer and necessary precautions for safety and use First read this guide to setup the printer For other detailed information refer to Operating Instructions included in the printer C...

Страница 2: ...logy UFST are trademarks of Agfa Monotype Corporation and may be registered in some jurisdictions Agfa and the Agfa rhombus are registered trademarks of Agfa Gevaert N V registered in the U S Patent a...

Страница 3: ...supplies cleaning the printer clearing jams troubleshooting repacking and specifications of this printer Network pdf Network This section contains information for configuring printer on a network env...

Страница 4: ...nstallation is completely safe For your safety if in any doubt about the effective grounding earthing of the power point consult a qualified electrician If the plug cannot be inserted into the AC outl...

Страница 5: ...is dropped or damaged turn the printer off and unplug the power cord Otherwise it may cause fire or electric shock Be sure to hold the media tray with both hands so that you do not drop it The media...

Страница 6: ...ent into an outlet on a circuit different from that to which the receiver is connected Consult the dealer or an experienced radio TV technician for help The user may find the booklet Something About I...

Страница 7: ...entilation Areas of high dust or chemical fume concentration solvent etc Unstable or uneven surfaces A very large stack of media into the manual feed Directly in front of air conditioning vents Liquid...

Страница 8: ...8 between the printer and a wall Make sure that all accessories shown below were provided and have not been damaged Report damage or shortages to the reseller from which the printer was purchased The...

Страница 9: ...purpose tray Printer panel Front door release Paper support Right side door Front door Toner door Parallel interface connector Network interface connector Rear cover AC inlet Optional paper feeder ca...

Страница 10: ...faster Pressing this button advances to the lower level menu If a lower level menu does not exist the action will be ignored When performing the manual duplex printing function after even pages are p...

Страница 11: ...eferred to as Windows NT 4 0 5 Microsoft Windows 2000 operating system hereafter referred to as Windows 2000 6 Microsoft Windows XP operating system hereafter referred to as Windows XP 7 Microsoft Win...

Страница 12: ...color toner cartridges is Black 1 Cyan 2 Magenta 3 Yellow 4 5 Close the toner door 1 Open the right side door 2 Unlock and open the print cartridge holder 3 Open the plastic bags and take out the prin...

Страница 13: ...o not expose to direct sunlight 6 Firmly push the color print cartridge until it snaps into place Save the protective trays seal covers protective caps packing materials and cartons for future repacki...

Страница 14: ...bel is provided with KX CL400 for referring to how to clear a media jam for when installing an automatic duplex unit option in future Save it carefully for the time If it is difficult to paste the Jam...

Страница 15: ...lide them to the width of the media 3 Slide the length guide unit to adjust it to the media length Slide the length guide unit 2 while pressing the PUSH mark 1 to extend it NOTE When adjusting the len...

Страница 16: ...to hold the media tray with both hands so that you do not drop it The media tray weighs approximately 6 4 kg 14 lbs when it is fully loaded 8 Pull 1 and raise 2 the paper support so that the media do...

Страница 17: ...printer with toner When the process is completed Ready is displayed on the printer LCD panel English is the default language denotes the default setting Select English German French Spanish or Italia...

Страница 18: ...is the model of the PCL printer If you install an Upgrade Kit for PostScript 3 in the printer the model name displayed on the printer driver and utility window becomes KX CL410 or KX CL610 respectivel...

Страница 19: ...ng the USB interface cable Click on Install via the USB port plug and play installation check button 7 Click Next The Installed Options window is displayed 8 Click on the check box of the installed op...

Страница 20: ...lete the installation NOTE If you want to print Classic application documents you are required to install the KX CL410 software for Mac OS 9 2 then set the computer and printer Refer to For Mac OS 8 6...

Страница 21: ...conditions change replacement of accumulator unit and or print cartridge To adjust the color density refer to Adjusting the Color Density Color Calibration of Basics in the Settings and Printing sect...

Страница 22: ...e representative Printer Troubleshooting Trouble Corrective Action The printer is not operating Plug the power cord into an AC outlet firmly and turn the printer on Connect the appropriate interface c...

Страница 23: ...and dark of slightly different density and non uniform color are present The toner is almost depleted Replace the toner cartridge The print cartridge is damaged Replace the print cartridge On the Test...

Страница 24: ...ase in the event of a theft or for future reference MODEL NO NAME OF RESELLER SERIAL NO DATE OF PURCHASE Panasonic Canada Inc 5770 Ambler Drive Mississauga Ontario L4W2T3 http www panasonic ca Matsush...

Отзывы: