24
TIG Welding
1.
Insert earth cable plug into the positive socket on the front of the machine and twist to lock in place.
2.
Plug the welding torch into the negative socket on the front panel and twist to lock.
3.
Connect the gas line of TIG torch to outlet gas connector on the front of the machine.
4.
Connect the control cable of torch switch to 9-pin socket on the front of the machine.
5.
Connect the gas regulator to the gas cylinder and the gas line to the gas regulator.
6.
Connect the gas line to the machine inlet gas connector located on the rear panel.
7.
Connect the power cable of welding machine to the electrical outlet.
8.
Carefully open the valve of the gas cylinder, set the required gas flow rate.
9.
Select TIG function on the front panel.
10.
Set torch operation for 2T, 4T or Spot trigger mode.
11.
Select welding current as required. The selected welding current will show on display. Set down
slope time as required. The down slope time will show on the digital display.
INSTALLATION & OPERATION
1
(5) Strike the electrode against the work piece to create and arc and hold the electrode
steady to maintain the arc.
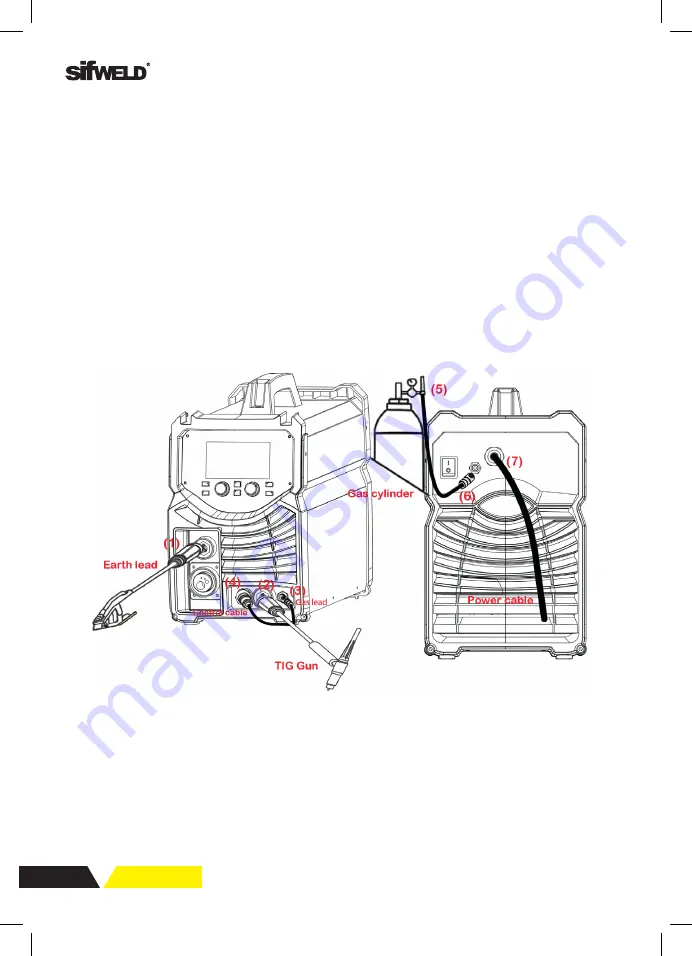
§4.2 Installation & Operation for TIG Welding
§4.2.1 Set-Up for TIG Welding
(1) Insert the earth cable plug into the positive socket on the front of the machine and
twist to lock in place.
(2) Plug the welding torch into the negative socket on the front panel and twist to lock.
(3) Connect the gas line of TIG torch to outlet gas connector on the front of the machine.
(4) Connect the control cable of torch switch to 9-pin socket on the front of the machine.
(5) Connect the gas regulator to the gas cylinder and the gas line to the gas regulator.
(6) Connect the gas line to the machine inlet gas connector located on the rear panel.
(7) Connect the power cable of welding machine to the electrical outlet.
(8) Carefully open the valve of the gas cylinder, set the required gas flow rate.
(9) Select TIG function on the front panel.
(10) Set torch operation for 2T, 4T or Spot trigger mode.
(11) Select welding current as required. The selected welding current will show on


