background image

Programming 


10.6 Tool and tool offset 


Surface grinding 

268


Programming and Operating Manual, 11/2012, 6FC5398-5CP10-3BA0 

Starting the compensation 

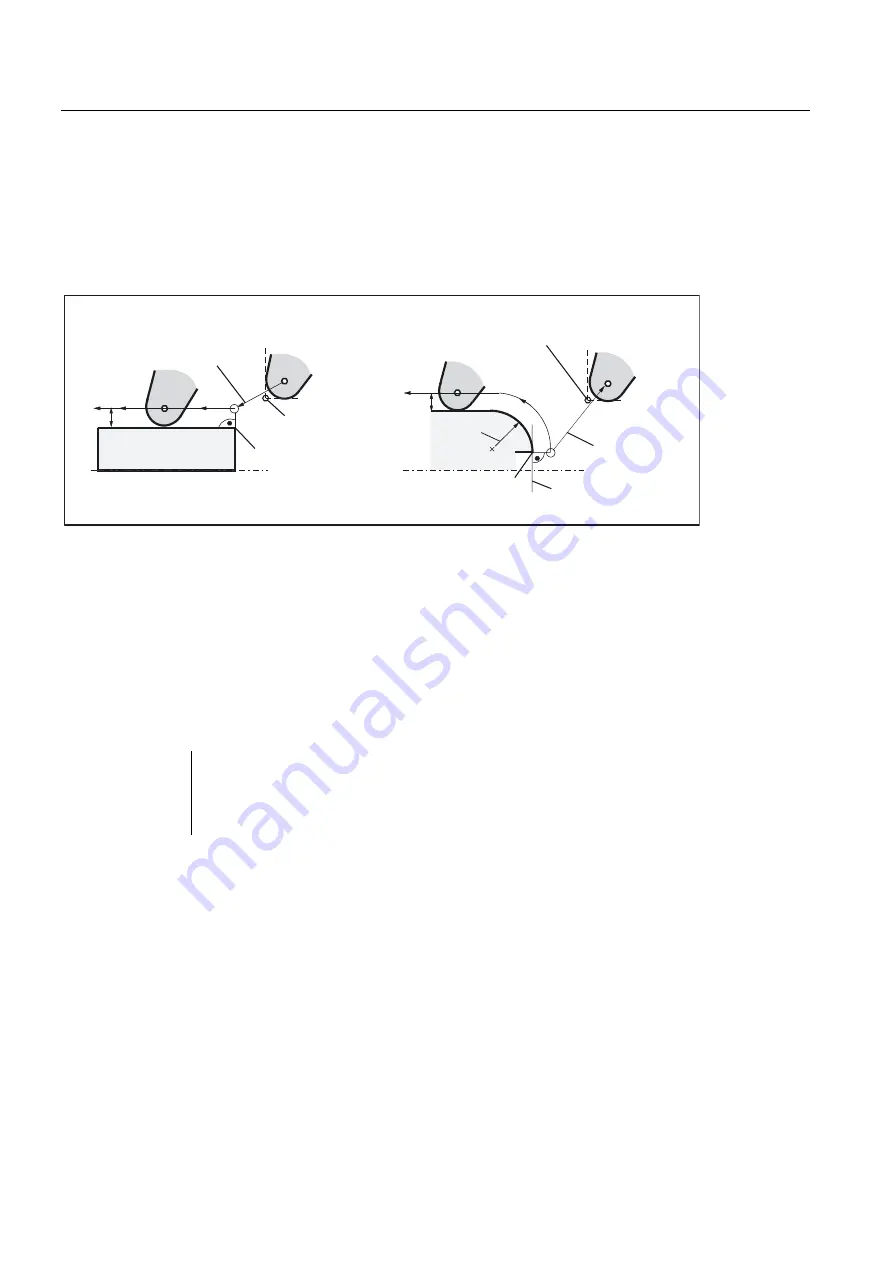
The tool approaches the contour on a straight line and positions itself vertically to the path 

tangent in the starting point of the contour. 

Select the start point so as to ensure collision-free traversing. 
 

6WDUWLQJFRQWRXU6WUDLJKW

&RPSHQVDWHG

7RROSDWK

*

5FXWWLQJHGJHUDGLXV

5

3

3VWDUWLQJSRLQWRIWKHFRQWRXU

6WDUWLQJFRQWRXU&LUFOH

3VWDUWLQJSRLQW

*
&RPSHQVDWHG
7RROSDWK

03

&LUFOHUDGLXV

7DQJHQW

5

3

3VWDUWLQJSRLQW


Figure 10-37  Start of the tool radius compensation with the example G42, tool point direction =3 

Information 

As a rule, the block with G41/G42 is followed by the block with the workpiece contour. 

However, the contour description may be interrupted by an intervening block that does not 

contain information for the contour path, e.g. only M command. 

Programming example 


N10 T... F... 


N15 Y... Z... 

; P0 - starting point 

N20 G1 G42 Y... Z... 

; Selection right of contour, P1 

N30 Y... Z... ; 

; Starting contour, circle or straight line 

Содержание SINUMERIK 802D sl

Страница 1: ...___________ ___________________ ___________________ SINUMERIK SINUMERIK 802D sl Surface grinding Programming and Operating Manual Valid for Controller Software release SINUMERIK 802D sl G N 1 4 SP7 11 2012 6FC5398 5CP10 3BA0 Preface Description 1 Software user interface 2 Turning on reference point approach 3 Setup 4 Manual mode 5 Automatic mode 6 Part programming 7 System 8 Cycles 9 Programming 1...

Страница 2: ...be operated only by personnel qualified for the specific task in accordance with the relevant documentation in particular its warning notices and safety instructions Qualified personnel are those who based on their training and experience are capable of identifying risks and avoiding potential hazards when working with these products systems Proper use of Siemens products Note the following WARNIN...

Страница 3: ...se send any questions about the technical documentation e g suggestions for improvement corrections to the following address docu motioncontrol siemens com My Documentation Manager MDM Under the following link you will find information to individually compile OEM specific machine documentation based on the Siemens content www siemens com mdm Training For information about the range of training cou...

Страница 4: ...e tool manufacturer are documented by the machine tool manufacturer Other functions not described in this documentation might be executable in the control This does not however represent an obligation to supply such functions with a new control or when servicing For the sake of simplicity this documentation does not contain all detailed information about all types of the product and cannot cover e...

Страница 5: ...2 Operating areas 25 2 3 The help system 26 3 Turning on reference point approach 29 4 Setup 31 4 1 Entering tools and tool offsets 31 4 2 Create new tool 33 4 3 Register dresser 41 4 4 Sense workpiece 42 4 5 Shaping dressing 44 4 6 Manual grinding 45 4 7 Program setting data 49 4 8 Arithmetic parameter R 53 4 9 User data 54 5 Manual mode 55 5 1 Manual mode 55 5 2 JOG mode Position operating area ...

Страница 6: ...efine a start point 97 7 4 4 Softkeys and parameters 98 7 4 5 Parameterize contour element 103 7 4 6 Programming example surface grinding 105 8 System 111 8 1 System operating area 111 8 2 SYSTEM Start up softkeys 115 8 3 SYSTEM Machine data softkeys 116 8 4 SYSTEM Service display 122 8 4 1 SYSTEM Service display 122 8 4 2 Action log 124 8 4 3 Servo trace 124 8 4 4 Version HMI details 129 8 4 5 Se...

Страница 7: ...93 10 1 3 Word structure and address 194 10 1 4 Block format 195 10 1 5 Fonts 197 10 1 6 List of instructions 198 10 2 Positional data 209 10 2 1 Programming dimensions 209 10 2 2 Plane selection G17 to G19 211 10 2 3 Absolute incremental dimensioning G90 G91 AC IC 212 10 2 4 Dimensions in metric units and inches G71 G70 G710 G700 213 10 2 5 Polar coordinates pole definition G110 G111 G112 214 10 ...

Страница 8: ...fset number D 265 10 6 4 Selecting the tool radius compensation G41 G42 267 10 6 5 Corner behavior G450 G451 269 10 6 6 Tool radius compensation OFF G40 270 10 6 7 Special cases of the tool radius compensation 271 10 6 8 Example of tool radius compensation 272 10 7 Miscellaneous function M 273 10 8 H function 274 10 9 Arithmetic parameters R variables LUD and PLC variables 275 10 9 1 Arithmetic pa...

Страница 9: ...ional network functions 312 11 9 1 Sharing directories 312 11 9 2 Connecting disconnecting network drives 313 12 Data Backup 317 12 1 Data transfer via RS232 interface 317 12 2 Creating reading in reading out a start up archive 319 12 3 Reading in reading out PLC projects 322 12 4 Copying and pasting files 322 13 PLC diagnostics 323 13 1 PLC diagnosis represented as a ladder diagram 323 13 2 Scree...

Страница 10: ...Table of contents Surface grinding 10 Programming and Operating Manual 11 2012 6FC5398 5CP10 3BA0 ...

Страница 11: ...0 3BA0 11 Description 1 1 1 Control and display elements Operator control elements The defined functions are called up via the horizontal and vertical softkeys For a description please refer to this manual RUL RQWDO VRIWNH V 9HUWLFDO VRIWNH V Figure 1 1 CNC operator panel ...

Страница 12: ...stalled on the CNC operator panel 55 5 1 The individual LEDs and their functions are described in the table below Table 1 1 Status and error displays LED Significance ERR red Serious error remedy through power OFF ON RDY green Ready for operation NC yellow Signoflife monitoring CF yellow Reading from writing to CF card References You can find information on error description in the SINUMERIK 802D ...

Страница 13: ... 3 5 0 RSHUDWLQJ DUHD NH 3DUDPHWHU RSHUDWLQJ DUHD 6 67 0 50 RSHUDWLQJ DUHD NH 6 VWHP ODUP RSHUDWLQJ DUHD 1RW DVVLJQHG XUVRU NH V 6HOHFWLRQ NH WRJJOH NH 1XPHULF NH V RXEOH DVVLJQPHQW RQ WKH VKLIW OHYHO OSKDQXPHULF NH V RXEOH DVVLJQPHQW RQ WKH VKLIW OHYHO OHDU NH QVHUW NH 326 7 21 RSHUDWLQJ DUHD NH 3RVLWLRQ RSHUDWLQJ DUHD 352 5 0 0 1 5 RSHUDWLQJ DUHD NH 3URJUDP 0DQDJHU RSHUDWLQJ DUHD 86720 RSHUDWLQJ...

Страница 14: ...TRL and X Cut selected text CTRL and V Paste copied text CTRL and P Generates a screenshot of the actual screen and saves the image on CompactFlash Card customer CF Card under screen802dsl bmp CTRL and R HMI restart CTRL and S Data backup in case of backlight failure The series start up archive Drive NC PLC HMI is exported with the most recent data onto the CompactFlash card with the name 802Dslib...

Страница 15: ...trol panel 8VHU GHILQHG NH ZLWK 8VHU GHILQHG NH ZLWKRXW 1 5 0 17 QFUHPHQW 2 5 5 1 32 17 5HIHUHQFH SRLQW 8720 7 6 1 2 6LQJOH EORFN 0 18 7 0DQXDO LQSXW 63 1 67 57 RXQWHUFORFNZLVH 63 1 6723 63 1 67 57 ORFNZLVH 5 3 75 9 56 29 5 5DSLG WUDYHUVH RYHUULGH D LV D LV HHGUDWH RYHUULGH HHGUDWH RYHUULGH 6SLQGOH 6SHHG 2YHUULGH 6SLQGOH RYHUULGH 5 6 7 6723 1 6723 67 57 1 67 57 0 5 1 6723 D LV ...

Страница 16: ...piece and programming takes place independently of whether the tool or the workpiece is being traversed When programming it is always assumed that the tool traverses relative to the coordinate system of the workpiece which is intended to be stationary 90 90 90 Figure 1 2 Determination of the axis directions to one another coordinate system for programming Machine coordinate system MCS The orientat...

Страница 17: ...ding cylindrical grinding machine surface grinding machine Figure 1 4 Machine coordinate system The origin of this coordinate system is the machine zero This point is only a reference point which is defined by the machine manufacturer It does not have to be approachable The traversing range of the machine axes can be in the negative range ...

Страница 18: ...enter ZRUNSLHFH HUR Figure 1 5 Workpiece Coordinate System Relative coordinate system REL In addition to the machine and workpiece coordinate systems the control system provides a relative coordinate system This coordinate system is used for setting reference points that can be freely selected and have no influence on the active workpiece coordinate system All axis movements are displayed relative...

Страница 19: ... entered in a data area intended for the settable work offset In the NC program this offset is activated during program execution e g using a programmed G54 ZRUNSLHFH HUR 0 PDFKLQH HUR ZRUNSLHFH PDFKLQH PDFKLQH PDFKLQH H J 0 Figure 1 6 Workpiece on the machine Current workpiece coordinate system The programmed work offset TRANS can be used to generate an offset with reference to the workpiece coor...

Страница 20: ...Description 1 5 Coordinate systems Surface grinding 20 Programming and Operating Manual 11 2012 6FC5398 5CP10 3BA0 ...

Страница 21: ...5CP10 3BA0 21 Software user interface 2 2 1 Screen layout 6WDWXV DUHD SSOLFDWLRQ DUHD 7LS DQG VRIWNH DUHD Figure 2 1 Screen layout The screen is divided into the following main areas Status area Application area Note and softkey area Status area Figure 2 2 Status area ...

Страница 22: ... Icon Significance Position operating area key POSITION System operating area key SYSTEM Program operating area key PROGRAM Program Manager operating area key PROGRAM MANAGER Parameter operating area key OFFSET PARAM Active operating area Alarm operating area key ALARM Approaching a reference point JOG JOG INC 1 INC 10 INC 100 INC 1000 INC VAR INC incremental evaluation in the JOG mode Active mode...

Страница 23: ...sage text Selected part program main program RESET Program canceled default state RUN Program is running Program state STOP Program stopped SKP Skip Skip block DRY Dry Run Dry run feedrate ROV Rapid Override Rapid traverse override M01 Conditional stop PRT Program test Program control in automatic mode SBL Single Block Single block Date and time From version 1 4 SP 6 and higher the date and the ti...

Страница 24: ...e operator and fault states HMI status information ETC is possible pressing this key displays the horizontal softkey bar providing further functions ಯ ಯ Mixed notation active uppercase lowercase letters RS232 connection active Connection to commissioning and diagnostic tools e g Programming Tool 802 active RCS network connection active Softkey bar vertical and horizontal Display of the softkeys in...

Страница 25: ... Part program directory 50 6 67 0 SYSTEM Diagnostics commissioning 50 6 67 0 ALARM Alarm and message lists CUSTOM Users can call their own application To change to another operating area press the relevant key on the CNC full keyboard hard key Protection levels The SINUMERIK 802D sl provides a concept of protection levels for enabling data areas The control system is delivered with default passwor...

Страница 26: ...gram creation program correction 2 3 The help system Comprehensive online help is stored in the control system Some help topics are Product brief of all important operating functions Overview and product brief of the NC commands Explanation of the drive parameters Explanation of the drive alarms Operating sequence You can call the help system from any operating area either by pressing the Info key...

Страница 27: ...f a cross reference is displayed in the application area If you select a cross reference the Back to topic softkey will also be displayed Select this function to go back to the previous screen Use this function to search for a term in the table of contents Type the term you are looking for and start the search process Help in the Program editor area The help system offers an explanation for each N...

Страница 28: ...Software user interface 2 3 The help system Surface grinding 28 Programming and Operating Manual 11 2012 6FC5398 5CP10 3BA0 ...

Страница 29: ...rence point approach are machine dependent functions Operating sequence First switch on the power supply for the CNC and the machine After the control system has booted you are in the Position operating area in the Reference point approach mode The Reference point window is active Figure 3 1 Reference point approach start screen The Reference point window displays whether the axes are referenced L...

Страница 30: ...CP10 3BA0 Press the arrow keys If you select the wrong approach direction no motion is carried out One after the other move each axis to the reference point You can exit the function by selecting another operating mode MDA AUTOMATIC or JOG To access the functions described below you need to select Jog mode ...

Страница 31: ...ing area allows you to store the parameters required for machine operation Operating sequences This function opens the Tool offset data window which contains a list of the tools created Use the cursor keys and the Page Up Page Down keys to navigate in this list Figure 4 1 Tool list To input the offsets position the cursor bar on the tool to be changed and press the Tool data softkey ...

Страница 32: ...wheel This function is used the enter the wheel geometry for the wheel type selected This function is used the enter the dressing technology for dressing the wheel type selected This function is used to enter verify the dresser data of the 1st dresser For dressers 2 and 3 it is selected through the respective softkeys This function is used to enter verify all tool data D1 through D9 Use this funct...

Страница 33: ...Each tool contains a defined number of parameters depending on the tool type Tools are identified by a number T number Operating sequences general Press the OFFSET PARAM key This function opens the Tool list window which contains a list of the tools created Use the cursor keys and the Page Up Page Down keys to navigate in this list Figure 4 2 Tool list The offsets are entered by placing the cursor...

Страница 34: ...3 New tool Confirm your input using OK Figure 4 4 New tool inserted A data record loaded with zero will be included in the tool list This data block consists of 9 cutting edges D fields The first 6 cutting edges have a cutting edge type and are used as cutting edge geometry points The tool is assigned to a grinding spindle by an entry in the S No field For values 0 an externally controlled grindin...

Страница 35: ...D1 D3 D5 are on the left hand side and the even cutting edges D2 D4 D6 on the right hand side taking into account the entire wheel width The default setting for inclined wheels is arranged so that always all reference points are identical There is no distinction between left hand and right hand sides The user has the option of redefining the cutting edges in a dressing subroutine For this the NC s...

Страница 36: ...HO LGWK QJOH H Q J W K LGWK 5DGLXV HQJWK HQJWK H Q J W K HQJWK Figure 4 5 Corrective values Cutting edges 7 9 are the three available dressing tools have a fixed allocation to the standard contour cutting edge Table 4 1 Allocation of dressers D field Dresser Assignment D7 Dresser 1 Left hand front cutting edge D8 Dresser 2 Right hand rear cutting edge D9 Dresser 3 Optional for wheel diameter ...

Страница 37: ... Geometry data Technological data Data for the dressers Nominal dimensions and monitoring This function opens in input screen into which grinding wheel nominal dimensions and monitoring data are entered Figure 4 6 Grinding wheel nominal dimensions and monitoring data Geometry data This function is used the enter the wheel geometry for the wheel type selected Figure 4 7 Geometry example data for a ...

Страница 38: ...ack slopes type 2 Left hand side inclined wheel type 3 Right hand side inclined wheel type 4 Free contour type 0 The input screen is self explaining Note A red dot shown in the diagrammatic sketch indicates the geometry value just being entered Technological data By means of the technological data the wheel type dependent dressing technology is defined Figure 4 8 Technology example data for a vert...

Страница 39: ... 1st dresser 2nd dresser or 3rd dresser softkeys to access the dialog box for entering or verifying the dresser data Figure 4 9 Fixed dresser Use the Type toggle field to select the dresser type Fixed dresser Tile Diamond Form roll 1 to 3 Diamond roll 1 to 3 Enter the parameters depending on the selection made Figure 4 10 Form roll ...

Страница 40: ...HG Figure 4 11 Diamond roll Parameter tables The function opens a summary of all cutting edge parameters Note This function is available only with a password set Customer Figure 4 12 The following table contains all cutting edge data Tool offset data See Chapter Parameter tables of tool offset data in the annex ...

Страница 41: ...nsed in JOG mode The input screen is opened Figure 4 13 Register dresser Use the Dresser no toggle field to select the dresser whose position you wish to register e g 1 The order is irrelevant Each axis can be registered independently of the others The steps required are shown in a text line The axis line to be processed is indicated by an arrow Note For swiveling wheels the wheel must already be ...

Страница 42: ...active wheel as it is not automatically recognized Exit the Register dresser function 4 4 Sense workpiece Functionality This function is used to detect the workpiece position in the machine with respect to the particular axis The HMI transmits both axis name and setpoint to the cycle Operation The workpiece is sensed in JOG mode by scratching the respective axes The input screen is opened Figure 4...

Страница 43: ...Page 45 with the PLC key Handwheel during manual grinding then the last position of the infeed axis can be calculated following Measure workpiece Calculate position Above the HMI the following text appears Accept setting value from manual grinding continue with NC start Figure 4 15 Measure workpiece after manual grinding Measuring is possible only for the infeed axis from manual grinding and only ...

Страница 44: ...efers to the currently active tool Operation Shaping is done in JOG mode The input screen is opened Figure 4 16 Shaping The required shaper values that are machined in dressing strokes are entered using the input fields For a new wheel no wear the shaper allowance is suggested by the control system The number of dressing strokes can be freely selected When you press the Start prof softkey the foll...

Страница 45: ...grinding Functionality This function is for grinding precision grinding with the handwheel This function does not require a workpiece program Operation Manual grinding is done in Jog mode The input screen is opened Entry of parameters into the input screen for manual grinding see figure below T or D number Select oscillating motion via toggle field The following oscillating motions are possible No...

Страница 46: ...ng no oscillation The figure below shows an input screen with parameters for manual grinding without oscillation Figure 4 18 Manual grinding without oscillation This function starts manual grinding with the handwheel A prompt appears Figure 4 19 Prompt Execution of manual grinding with handwheel without oscillation Exit manual grinding ...

Страница 47: ...grinding oscillation The figure below shows an input screen with parameters for manual grinding with oscillation Figure 4 20 Manual grinding with oscillation If you have selected oscillation then you should use this function to enter the oscillation data see figure below Figure 4 21 Manual grinding with oscillation data in X and Z ...

Страница 48: ...nding with the handwheel The following prompt is displayed Figure 4 22 Prompt Execution of manual grinding with handwheel oscillation Exiting manual grinding Exit manual grinding Special features in connection with Measure workpiece In order to be able to intervene in the grinding process during manual grinding the PLC keys for Interruption and Dressing are active during manual grinding The PLC ke...

Страница 49: ...ey The start screen Setting data is opened Other softkey functions are available here with which you can set various control system options Figure 4 23 Setting data start screen JOG feedrate Feedrate value in JOG mode If the feedrate value is zero the control system will use the value stored in the machine data Spindle Spindle speed Minimum maximum A limitation of the spindle speed in the Max G26 ...

Страница 50: ...indle is displayed as the start angle A multiple thread can be cut by changing the angle when the thread cutting operation is repeated Place the cursor bar on the input field to be modified and enter the value Either press the Input key or move the cursor to confirm Softkeys The working area limitation is active with geometry and additional axes If you want to use a working area limitation its val...

Страница 51: ...kpiece counting with user defined M command Total runtime Total runtime of NC programs in AUTOMATIC mode In the AUTOMATIC mode the runtimes of all programs between NC START and end of program RESET are summed up The timer is zeroed with each power up of the control system Program runtime Active tool operating times The runtime between NC Start and End of program Reset is measured in the selected N...

Страница 52: ...3BA0 0LVF Use this function to display all setting data for the control system in the form of a list The setting data are divided up into general axis specific and channel specific data They can be selected using the following softkey functions General Axis spec Channel spec Figure 4 26 General setting data ...

Страница 53: ...e global parameters can be set or queried by the programmer of the part program for any purpose in the program and can be changed as required Operating sequence These can be found in the OFFSET PARAM operating area Press the R variable softkey The R variables start screen appears Figure 4 27 R parameters start screen Place the cursor bar on the input field to be modified and enter the values Eithe...

Страница 54: ...ta can be changed as necessary Operating sequences These can be found in the OFFSET PARAM operating area Press the User data softkey This will open the User data start screen for the cycles Figure 4 28 User data Place the cursor bar on the input field to be modified and enter the values Either press the Input key or move the cursor to confirm the entry Use this function to search for the user data...

Страница 55: ... LQJV 5HJLVWHU GUHVVHU 5HJLVWHU ZRUNSLHFH DOFXODWH SRVLWLRQ 3UH SURI ZKHHO 6WDUW SURI DOFXODWH SRVLWLRQ DFN DFN DFN 3URI LOLQJ 0DQXDO JULQG DFN 6WDUW JULQGLQJ 6ZLWFK PP LQFK DFN Figure 5 1 JOG menu tree Position operating area 6HWW LQJV LW 7HDFK Q 7HDFK Q 7HFKQROR GDWD 5DSLG WUDYHUVH QG EORFN LQHDU LUFXODU 6ZLWFK PP LQFK DFN Figure 5 2 MDA menu tree Position operating area ...

Страница 56: ...ata until the key is released If the value of the setting data is zero the value stored in the machine data is used If necessary set the velocity using the override switch If you press the Rapid traverse override key at the same time the selected axis will be traversed at rapid traverse speed while both keys are being held down In the Increment mode you can traverse by adjustable increments using ...

Страница 57: ... a plus or minus sign will appear in the relevant field If the axis is already in the required position no sign is displayed Position mm These fields display the current position of the axes in the MCS or WCS Repos offset If the axes are traversed in the Program interrupted condition in the Jog mode the distance traversed by each axis is displayed referred to the interruption point G function Disp...

Страница 58: ...power bar applies to the spindle currently active With both master spindle and workspindle active the master spindle performance bar is displayed Softkeys Note The vertical softkeys are explained in the the section titled MDA mode Page 60 This function is for grinding precision grinding with the handwheel This function does not require a workpiece program This function is used to determine the dre...

Страница 59: ...indow has been opened all axis identifiers are displayed in the Axis column which simultaneously appear in the softkey bar Select the desired handwheel using the cursor Following this assign or deselect as appropriate by pressing the relevant axis softkey for the desired axis The symbol appears in the window Figure 5 4 Handwheel menu screen Use the MCS softkey to select the axes from the machine o...

Страница 60: ...to the same safety interlocks as the fully automatic mode Furthermore the same prerequisites are required as in the fully automatic mode Operating sequences Use the machine control panel to select MDA mode Figure 5 5 MDA mode start screen Enter one or several blocks using the keyboard By pressing NC START machining is started During machining editing of the blocks is no longer possible After machi...

Страница 61: ...e MCS or WCS G function Displays important G functions Spindle S r p m Displays the actual value and the setpoint of the spindle speed Feedrate F Displays the path feedrate actual value and setpoint in mm min or mm rev Tool Displays the currently active tool with the current edge number T D Editing window In the Stop or Reset program state an editing window serves to input a part program block Not...

Страница 62: ...l close the window This window displays the auxiliary and M functions currently active Selecting the softkey repeatedly will close the window All the G functions are displayed Use this softkey to display the Axis feedrate window Pressing the softkey repeatedly will close the window Use this function to delete blocks from the program window Enter a name in the input field for saving the MDA program...

Страница 63: ...enerated or changed part program record The axis positions are reached by traversing with the axis direction keys and transferred into the part program Operating sequence In the POSITION operating area use the machine control panel to select MDA mode Press the Teach In softkey In the Teach In submode assume the following start screen Figure 5 7 Teach In start screen General sequence Use the arrow ...

Страница 64: ...oftkey for the traversing block Technological data Figure 5 8 Technological data Enter the appropriate technological data e g feedrate 1000 Click Insert transfer to add a new part program block The new part program block will be added in front of the block selected with the cursor Click Change transfer to change the selected part program block Use Back to return to the Teach In start screen Rapid ...

Страница 65: ...FC5398 5CP10 3BA0 65 LQHDU LUFXODU You traverse the axes and teach in a rapid traverse block with the approached positions Linear Figure 5 10 Linear You traverse the axes and teach in a linear block with the approached positions Circular Figure 5 11 Circular You teach in an intermediate point and an end point for a circle ...

Страница 66: ... dialogs Use the axis keys to traverse the axes to the required position that you want to add change in the part program Click Insert transfer to add a new part program block The new part program block will be added in front of the block selected with the cursor Click Change transfer to change the selected part program block Use Back to return to the Teach In start screen Use Exit Teach In see Sta...

Страница 67: ...HIIHFWLYH DFN DFN DFN 0DFKLQLQJ RIIVHW 5H JULQGLQJ DFN 6LPXOW UHFRUGLQJ LVSOD DUHDV 6KRZ RRP XWR RRP HOHWLQJ D VFUHHQ RRP XUVRU Figure 6 1 Automatic menu tree Preconditions The machine is set up for the AUTOMATIC mode according to the specifications of the machine manufacturer Operating sequence Select Automatic mode by pressing the Automatic key on the machine control panel The Automatic start sc...

Страница 68: ...the axes in the MCS or WCS Distance to go These fields display the current position of the axes in the MCS or WCS G function Displays important G functions Spindle S r p m Displays the actual value and the setpoint of the spindle speed Feed F mm min or mm rev Displays the path feedrate actual value and setpoint Tool Displays the currently active tool with the current edge number T D Current block ...

Страница 69: ...isplayed Idle at spindle start with both spindles active The workspindle is displayed when starting the workspindle The power bar applies to the spindle currently active With both master spindle and workspindle active the master spindle performance bar is displayed Softkeys Opens the G functions window to display all G functions currently active The G functions window displays all the G functions ...

Страница 70: ...p SKP Program blocks that are identified with a slash in front of the block number are skipped when the program starts e g N100 Dry run feedrate DRY If you select this softkey all traversing motions will be performed with the feedrate setpoint specified via the Dry run feed setting data Instead of the programmed motion commands the dry run feedrate is active ROV effective ROV The feedrate override...

Страница 71: ...k end point During the block search the same calculations are carried out as during normal program operation but the axes do not move Block search without calculation During the block search no calculation is carried out The cursor is placed on the main program block of the interrupt point The Find softkey provides the functions Find line Find text etc Use this softkey to display the Regrinding wi...

Страница 72: ...g applies for the offsets The entered offsets are included in the grinding cycles if the offset is executed during the Program interruption In this case the machining allowances are adapted to the offsets Operating sequence The Automatic start screen will display a window for the machining offsets Figure 6 4 Machining offsets Examples Offset of Y by 0 1 mm Y is the infeed axis at the allowance poi...

Страница 73: ... mm This value is no longer reduced if a correction is again made in the positive direction This means that negative offsets always temporarily increase the absolute allowance of the grinding operation The temporary increase of the absolute allowance is necessary in order to retract to the same maximum start point 6 3 Selection and start of a part program Functionality Before starting the program ...

Страница 74: ...Program name screen line If desired here you can specify how you want the program to be executed Figure 6 6 Program control Press NC START to start executing the part program 6 4 Block search Operating sequence Prerequisite The desired program has already been selected and the control system is in the RESET state The block search function provides advance of the program to the required block in th...

Страница 75: ...FRQWRXU 7R HQG SRLQW LWKRXW FDOFXODW QWHUU SRLQW LQG Figure 6 7 Block search Block search to block start Block search to block end Block search without calculation The interruption location is loaded Use this softkey to perform the block search by entering a term you are looking for Figure 6 8 Entering a search term ...

Страница 76: ...h for the term Block no The cursor is positioned at the line with the Line number Search result The required part program block is displayed in the Block display window Note For Execute externally no block search is possible Regrinding Regrinding enables you to remachine the seat of a workpiece that has already been machined either with or without an offset but always with the same technological v...

Страница 77: ...l be inserted in the program after the selected block The block search starts 6 5 Simultaneous recording Operating sequence You have selected a part program to be executed and have pressed NC START Execution of the part program is simultaneously recorded on the HMI using the Simultaneous recording function Figure 6 10 Simultaneous recording start screen You can influence how the simultaneous recor...

Страница 78: ...Delete window Cursor Set cursor Cursor fine Cursor coarse Cursor very coarse When the cursor keys are pressed the cross hair moves in small average or large steps Exit the Simultaneous recording function Display areas Using the Display areas function you have the possibility of saving a previously selected area from the simulation display The menu for the display area can be selected using the Win...

Страница 79: ...You have selected an area in the simulation view 2 Press the Display areas function 3 Press the Window min max so that a maximum display can be see according to the screen Display areas Window max 4 In the Comment field you can assign a name to the area 5 Complete the entry with Input 6 Press Save area Activating or deleting an area You have selected a display area Using the cursor keys select the...

Страница 80: ...urrently running By pressing NC START once again the aborted program is restarted and executed from the beginning 6 7 Reapproach after cancellation After a program cancellation RESET you can retract the tool from the contour in manual mode JOG Operating sequence Select mode AUTOMATIC mode Opening the Block search window for loading the interruption point The interruption point is loaded The block ...

Страница 81: ...terruption The distances traversed are displayed Operating sequence Select AUTOMATIC mode Press NC START to continue machining CAUTION When reapproaching the interruption point all axes will traverse at the same time Make sure that the traversing area is not obstructed 6 9 Execute from external Functionality In AUTOMATIC mode PROGRAM MANAGER operating area the following interfaces are available fo...

Страница 82: ...ing processed the blocks are reloaded automatically Operating sequence execution from customer CompactFlash Card or USB FlashDrive Requirement The control system is in the Reset state Select the AUTOMATIC mode key Press the PROGRAM MANAGER key on the machine control panel Press the Customer CF card or USB drive You can then access the directories of the Customer CF Card USB FlashDrive Place the cu...

Страница 83: ... the following dialog Operating area SYSTEM Service Display Service Control Service Network Authorization Create 2 Control see User log in RCS log in Log in for the RCS connection using the following dialog Operating area SYSTEM vertical softkey RCS log in Log in 3 PC Start the RCS tool 4 PC Activate the drive directory for network operation 5 PC Establish an Ethernet connection to the control 6 C...

Страница 84: ...CS connect You go to the directories of the PC Place the cursor bar on the desired program Press Ext execution The program is transferred into the buffer memory and selected and displayed in the program selection automatically Press the NC START key Machining starts The program is reloaded continuously At the end of the program or in case of RESET the program is automatically removed from the cont...

Страница 85: ...S 3DVWH HOHWH 1H W 6HOHFW DOO 6HQG 5HFHLYH UURU ORJ 1H W 0DQX GULYH 86 GULYH 2QO 6 180 5 VO SUR HFXWLRQ IURP H WHUQDO RS 3DVWH HOHWH 1H W HFXWLRQ IURP H WHUQDO RS 3DVWH HOHWH 1H W 6HOHFW DOO 2SHQ 6HOHFW DOO 1HZ GLUHFWRU 1HZ GLUHFWRU 1HZ GLUHFWRU 2SHQ 2SHQ 2SHQ Figure 7 1 Program Manager menu tree Functionality The PROGRAM MANAGER operating area is the management area for workpiece programs in the ...

Страница 86: ...r of the program name The control system will automatically position the cursor on a program with matching characters Softkeys Use this softkey to display the directories of the NC Use this softkey to select the program on which the cursor is placed for execution The control system will switch to the position display Use NC START to start this program Use the New softkey to create a new program Us...

Страница 87: ...the deletion request and Abort to discard Use this softkey to branch to further functions A window opens where you can rename the program you have selected beforehand using the cursor After you have entered the new name either press OK to confirm or Abort to cancel This function opens a window displaying the first seven lines of a file if the cursor has been positioned on the program name for a ce...

Страница 88: ...ded in connection with the work in the network Additional information is provided in Chapter network operation only for SINUMERIK 802D sl pro The functions required for reading out reading in files are provided via the RS232 interface Use this function to transmit files from the clipboard to a PC connected to the RS232 Load files via the RS232 interface For the settings of the interface please ref...

Страница 89: ...r presssing the softkey New directory a dialog window will open up for setting up a new file Enter a name and confirm with OK After presssing the softkey New file a dialog window will open up for setting up a new program file in which you can enter the names of the new main programs and subprograms The MPF extension for main programs is entered automatically The SPF extension for subprograms must ...

Страница 90: ...they are currently not being executed Any modifications to the part program are stored immediately With the Editor it is also possible to edit process part programs and text files ini etc on other drives Customer CF card USB drive see main screen Program Manager In this case the channel status of the control system does not play a role The changes are only saved when you close the program editor S...

Страница 91: ...QWRXU 6HH KDSWHU UHH FRQWRXU SURJUDPPLQJ Figure 7 5 Program menu tree Operating sequence In the PROGRAM MANAGER operating area select the program to be edited Press the Open softkey The selected program will open Softkeys Use this softkey to edit a file Use this softkey to execute the selected file Use this softkey to select a text segment up to the current cursor position alternatively CTRL B Use...

Страница 92: ...ion the cycle screen form is called again This function decodes the cycle name and prepares the screenform with the relevant parameters If there are any parameters beyond the range of validity the function will automatically use the default values After closing the screen form the original parameter block is replaced by the corrected block Recompiling a Free contour programmed using the Contour fu...

Страница 93: ...s soon as they can be obtained from other parameters You can link together contour elements Additional contour transition elements are also available The programmed contours are transferred to the edited part program Note The display MD 290 MA CTM_POS_COORDINATE_SYSTEM defines the display of the coordinate system A value of 7 means Ordinate Y axis Abscissa Z axis Technology The contour calculator ...

Страница 94: ... point Initially you define a contour start point see Chapter Defining a start point Page 97 The contour is then programmed step by step see chapter Programming example surface grinding Page 105 Figure 7 7 Edit contour elements Softkeys for the contour elements The following are contour elements Start point Straight line in the vertical direction transverse ...

Страница 95: ...ar coordinates in reference to a pole 7 4 2 Program a contour Operating sequences The sequence of operations for programming the contour for a turned part in a part program are as follows 1 Select softkey NC directory in the Program Manager operating area 2 Select a directory with the cursor keys e g MPF Main programs see screenshot below Figure 7 8 The Program Manager start screen 3 Press the Inp...

Страница 96: ... in a command line of the contour program Figure 7 9 Recompile 2 Press the Recompile softkey The user interface switches from the start screen of the part program editor into the start screen of the free contour programming The programmed contour is displayed and can be edited Note The contour that was parameterized using the Contour softkey function is called again using the Recompile function Th...

Страница 97: ...dicated by the dark background color Once the input is acknowledged with Accept element or Abort you can navigate around the contour chain left of the screen using the cursor keys The actual position in the chain is color coded 1 Select programming plane G17 for the milled part using softkey Alternative or the Select key in the Selected plane input field The default tool axis or programming plane ...

Страница 98: ...rpolation Note If you have not yet programmed a feedrate in the part program you can enter a specific feedrate in the Free text input field e g F100 3 Press the Accept element softkey The start point is saved You can add the next element using softkey commands see next section Define a contour element 7 4 4 Softkeys and parameters Functionality Once you have defined the contour start point you can...

Страница 99: ...ntour so that the first contour element can be entered in polar coordinates The contour is closed by a straight line between the last entered contour point and the starting point By selecting the Abort softkey you can return to the main screen without transferring the last edited values to the system When you click the Accept softkey you close the contour input screen and return to the ASCII edito...

Страница 100: ... a vertical straight line see screenshot below Figure 7 13 Straight line in vertical direction Select the All parameters softkey to display a selection list of all the parameters for the contour element If you leave any parameter input fields blank the control assumes that you do not know the right values and attempts to calculate these from the settings of the other parameters The contour is alwa...

Страница 101: ...d of a turning contour In simple turning contours a chamfer or radius must often be appended at the start and end of the contour A chamfer or radius terminates an axis parallel contour section on the blank Figure 7 14 Contour with radius or chamfer You select the direction of transition for the contour start in the starting point screen You can choose between chamfer and radius The value is define...

Страница 102: ... color coded The elements of the contour and pole if applicable are displayed in the sequence in which they were programmed Figure 7 15 Edit a contour element You can select an existing contour element with the Input key and reassign its parameters A new contour element is inserted after the cursor when you select one of the contour elements on the vertical softkey bar the input focus is then swit...

Страница 103: ... extend the range of input options for the element The Alternative softkey is displayed only in cases where the cursor is positioned on an input field with several switchover settings Select dialog Some parameter configurations can produce several different contour characteristics In such cases you will be asked to select a dialog By clicking the Select dialog softkey you can display the available...

Страница 104: ...nt in the contour chain and select it using the Input key The parameters for the selected element will then be displayed The name of the element appears at the top of the parameterization window If the contour element can be represented geometrically it is highlighted accordingly in the graphic display area i e the color of the contour element changes from white to black Modifying contour element ...

Страница 105: ... black on a light yellow background Element is not defined geometrically Not selected Symbol color black on a gray background Element is defined geometrically Symbol color white on a gray background Element is not defined geometrically 7 4 6 Programming example surface grinding Introduction When programming free contours for surface grinding it usually involves dressing contours In this case under...

Страница 106: ...ORDINATE_SYSTEM is set to 0 Operating sequences for the contour in the diagram Programming example see the diagram on the previous page You have opened a part program in the PROGRAM MANAGER operating area Part program editor Enter the following commands into the part program editor N10 T5D1 N15 CYCLE446 40 000000 Selection of grinding wheel peripheral speed N20 CYCLE407 500 000000 1 1 safe positio...

Страница 107: ... BEGINS N35 TGST N40 G64 continuous path mode N45 G42 tool nose radius compensation You can now start programming the Free contour Free contour programming using the Contour softkey Note When a contour is programmed in the input screens the input field with the input focus is highlighted by a dark background color Once the input is acknowledged with Accept element or Cancel you can navigate around...

Страница 108: ...line element X 0 abs Transition to following element RND 20 3 Accept element Enter parameters for Straight line in any direction element X 100 abs Y 50 abs Transition to following element RND 30 3 Accept element Enter parameters for Straight line in any direction element X 200 abs Y 0 abs Transition to following element RND 20 4 Accept element Enter parameters for Straight horizontal line element ...

Страница 109: ... contour programming Surface grinding Programming and Operating Manual 11 2012 6FC5398 5CP10 3BA0 109 Part program editor You are again in the part program editor Still add the following commands N75 TSGS_E CONTOUR END N80 M17 ...

Страница 110: ...Part programming 7 4 Free contour programming Surface grinding 110 Programming and Operating Manual 11 2012 6FC5398 5CP10 3BA0 ...

Страница 111: ...ertical softkey bars change The menu tree shown below only includes the horizontal softkeys Menu tree XVWRPHUV FDUG GDWD RPPLVVLR QLQJ LOHV 0DFKLQLQJ 3 ODUP W W 3URJUDP LVW 3 3URJUDP 6WDWXV LVW 3 6WDWXV 67 3 FRQQHFW 6HUYLFH RQWURO 6HUYLFH ULYHV 6HUYLFH HV 6HUYLFH LVSOD LVSOD 0 ULYHV 0 KDQQHO 0 LV 0 HQHUDO 0 0DFK GDWD RPPLV VLRQLQJ 0DQXIDFWX UHUV GULYH 86 ULYH 6HUYLFH RYHUYLHZ 5 6 FRQQHFW 0DQXI DUF...

Страница 112: ...een is displayed Figure 8 2 Main screen SYSTEM operating area Softkeys The start screen vertical softkeys are described below Set password Three password levels are distinguished in the control system which provide different access rights System password Manufacturer password User password It is possible to change certain data corresponding to the access levels If you do not know the password acce...

Страница 113: ...SYSTEM main screen Change Password Figure 8 4 Change password Depending on the access right various possibilities are offered in the softkey bar to change the password Select the password level using the appropriate softkeys Enter the new password and press Accept to complete your input You will be prompted to enter the new password once more for confirmation Press Accept to complete the password ...

Страница 114: ...guage and confirm it by pressing OK Note The HMI is automatically restarted when a new language is selected Use Service language to always select English as the user interface language Press the Service language softkey again to restore the previously active language e g Simpl Chinese Note An asterisk marks the languages you have used Save data This function will save the contents of the volatile ...

Страница 115: ...perating area SYSTEM Start up Power up with backed up data 8 2 SYSTEM Start up softkeys Commissioning Use this softkey to select the NC power up mode Select the desired mode using the cursor Normal power up The system is restarted Power up with default data The display machine data are reset to their standard values restores the initial state when originally supplied Power up with backed up data T...

Страница 116: ... mode selected Use the RECALL key to return to the system start screen without performing any action 8 3 SYSTEM Machine data softkeys References You will find a description of the machine data in the following manufacturers documents SINUMERIK 802D sl List Manual SINUMERIK 802D sl Function Manual for turning milling nibbling Machine data Any changes in the machine data have a substantial influence...

Страница 117: ...a are divided into the groups described in the following General machine data Open the General machine data window Use the Page Up Page Down keys to browse forward backward Figure 8 7 General machine data Executes a warm restart at the control Find Type the number or the name or a part of the name of the machine data you are looking for and press OK The cursor will jump to the data searched Use th...

Страница 118: ...for display Filter active Use this softkey to activate all data groups selected After you have quit the window you will only see the selected data on the machine data display Select all Use this softkey to select all data groups of the Expert mode for display Deselect all Selecting this softkey deselects all data groups Figure 8 8 Display filter Axis specific machine data Open the Axis specific ma...

Страница 119: ...e next or previous axis The contents of the machine data are updated Channel specific machine data Open the Channel specific machine data window Use the PageUp PageDown keys to browse forward backward Figure 8 10 Channel specific machine data SINAMICS drive machine data Open the Drive machine data dialog box The first dialog box displays the current configuration as well as the states of the contr...

Страница 120: ... display the parameters position the cursor on the appropriate unit and press the Parameter display softkey For a description of the parameters please refer to the documentation of SINAMICS drives Figure 8 12 Parameter list Switch to the respective drive objects In the note line the selected value is displayed in hexadecimal and binary values Use these functions to search in the parameter list for...

Страница 121: ...d color consists of the components red green and blue The Change color window displays the values currently set in the input fields The desired color can be produced by changing these values In addition the brightness can be changed The next mixing ratio is displayed temporarily upon completion of an input Use the cursor keys to switch between the input fields With OK the settings are accepted and...

Страница 122: ...xes The Active window softkey function will assign your settings to the focus window and the Inactive window function to the non active window Figure 8 15 Edit frame color 8 4 SYSTEM Service display 8 4 1 SYSTEM Service display The Service display window appears on the screen The start screen for the Service control function is shown in the following diagram Figure 8 16 The Service control start s...

Страница 123: ...he following functions Service network see chapter Network operation Action log see chapter Action log Service Firewall see chapter Network operation Service MSG see chapter Service MSG Date time see Chapter Date Time This window contains information about Assignment Machine axis Channel axis Drive number The enable status of the NC and drive Drive state regarding ready faults and alarms An oscill...

Страница 124: ...he hotline see the Technical Support Section in the preface for contacting the hotline 8 4 3 Servo trace An oscilloscope function is provided for the purpose of optimizing the drives This enables graphical representation of the velocity setpoint of the contour violation of the following error of the actual position value of the position setpoint of exact stop coarse fine The start of tracing can b...

Страница 125: ...xport the file using either RCS802 or the CF card and to process the data in MS Excel Figure 8 18 Servo trace start screen The header of the diagram contains the current scaling of the abscissa and the difference value of the markers The diagram shown above can be moved within the visible screen area using the cursor keys 1 Time Base 2 Marker position time 3 Difference in time between marker 1 and...

Страница 126: ...nal type Following error Controller difference Contour deviation Position actual value Speed actual value Speed setpoint Compensation value Parameter block Position setpoint controller input Speed setpoint controller input Acceleration setpoint controller input Speed feedforward control value Exact stop fine signal Exact stop coarse signal Status On Tracing is performed in this channel Off Channel...

Страница 127: ...d The V mark ON V mark OFF softkeys are used to hide show the vertical gridlines Using the Select signal function you can determine the signal to be displayed in the vertical axis The T mark ON T mark OFF softkeys are used to hide show the horizontal gridlines of the time axis Use the markers to determine the differences in the horizontal or vertical directions To do this place the marker on the s...

Страница 128: ...er must be moved per SHIFT cursor movement When a marker reaches the margin of the diagram the grid automatically appears in the horizontal or vertical direction Use this softkey to save or load trace data Figure 8 22 Trace data Type the desired file name without extension in the File name field Use the Save softkey to save the data with the specified name in the part program directory Thereafter ...

Страница 129: ...Figure 8 23 Version Note The version releases shown in the version screen shot are for example only Saves the contents of the Version window in a text file The target e g customer CF card can be selected The HMI details menu is intended for servicing and can only be accessed via the user password level All programs provided by the operator unit are displayed with their version numbers By reloading...

Страница 130: ...r PROGRAM program PROGRAM MANAGER progman for the programs to be started in the form of a list For the meanings of the individual columns please refer to the table below Figure 8 25 Registry details Note After the system has booted the control system automatically starts the POSITION operating area If a start behavior is required the Change ready to start function allows defining another starting ...

Страница 131: ...31 RQW HWDLOV OLFHQVH NH The Font details function displays the data of the loaded character sets in the form of a list Figure 8 26 Font details Entering the license key Figure 8 27 License key References SINUMERIK 802D sl Operating Instructions for Turning Milling Grinding Nibbling Licensing in SINUMERIK 802D sl ...

Страница 132: ...nces SINUMERIK 802D sl Operating Instructions for Turning Milling Grinding Nibbling Licensing in SINUMERIK 802D sl Executes a warm restart at the control 8 4 5 Service MSG The Service MSG function allows message texts messages to be output via the following interfaces Output via the RS 232 C as data stream without protocol Output in a file Message texts messages include Alarms Texts of MSG command...

Страница 133: ...a file using the tool of a third party supplier e g Microsoft Hyper Terminal MSG V24 Message text in a file MSG File Message text Alarm line at the HMI MSG Alarm text The MSG text output is defined using the MSG command as well as by appropriately parameterizing the output interface For the alarm output only the output interface has to be taken into consideration If the information line Processing...

Страница 134: ...ated Note When transferring a file via a serial interface RS232 please note the end of transmission character for RS232 communication analog to the communication setting RS232 on HMI Further when sending via RS232 it can be defined as to which messages are sent for which events Programmed messages from the part program An alarm has occurred The settings are saved and the dialog box exited by press...

Страница 135: ...rameters of the RS232 interface Note When using the MSG service via RS232 the RS232 interface must not be active for another application The means e g the RS232 interface must not be active from the operating area SYSTEM PLC Step7 connect Settings to output in a file Settings for the file storage location Figure 8 32 Dialog box file settings ...

Страница 136: ...d 1MByte can be selected as max file size When the max size is reached the file is written as ring buffer i e at the beginning as many lines are deleted line by line as is required by the new message at the end of the file Here when sending to a file it can be defined as to which messages are sent for which events Programmed messages from the part program An alarm has occurred The settings are sav...

Страница 137: ...G Roughing the contour The text Roughing the contour is displayed in the alarm display N20 X Y N N N90 MSG Delete message from the alarm display Table 8 4 Message text contains a variable N10 R12 AA_IW X Actual position of the X axis in R12 N20 MSG Check position of X axis R12 Activate message N20 X Y N N N90 MSG Delete message from the alarm display To output messages to other interfaces an addit...

Страница 138: ...me must be programmed between the commands e g N10 N20 MSG interface sample text1 N30 G4 F2 5 N40 MSG interface sample text2 N50 G4 F2 5 N60 MSG interface sample text3 N70 G4 F2 5 N80 MSG interface sample text4 N90 Note If in the part program the text for the messages is repeated unchanged then after each output a command for an empty text must be entered e g N10 N20 MSG interface sample text N30 ...

Страница 139: ...log box Date and time Input options in the dialog window Date and time Setting the time Enter the time in the time fields You can select whether the time is shown in the 24 hours or 12h format Setting the date In the fields under Date select the display format and enter the date Using the time zones Set the check mark in the field Used time zones and select the country specific time zone Changing ...

Страница 140: ... If the RS232 interface is already occupied by the data transfer you can only connect the control system to the PLC802 programming tool on the programming device PC once data transfer has been completed The RS232 interface is initialized with activation of the connection Figure 8 35 Communication settings The baud rate is set using the toggle field The following values are possible 9600 19200 3840...

Страница 141: ...ia modem start with the following initialization option Figure 8 36 Initialize the modem The following initializations are possible via toggle fields Baud rate 9600 19200 38400 57600 115200 Parity without for 10 bit odd for 11 bit Using the Modem settings softkey you can make the following additional settings for a connection that does not yet exist Figure 8 37 Modem settings ...

Страница 142: ...stem and the PC The program waits for the call of Programming Tool PLC802 No modifications to the settings are possible in this state The softkey label changes to Connection inactive By pressing Connection inactive the transfer from the control system can be terminated at any point Now it is possible again to make changes in the settings The active or inactive state is kept even after Power On exc...

Страница 143: ...gure 8 38 PLC status display The operand address displays the value incremented by 1 The operand address displays the value respectively decremented by 1 Use this softkey to delete all operands Cyclic updating of the values is interrupted Then you can change the values of the operands Use the Status list function to display and modify PLC signals There are 3 lists to choose from Inputs default set...

Страница 144: ...gn the active column a new area To this end the interactive screenform offers four areas to choose from For each column a start address can be assigned which must be entered in the relevant input field When you quit the interactive screenform the control system will save your settings Figure 8 40 The Data type selection screen Use the cursor keys and the Page Up Page Down keys to navigate in and b...

Страница 145: ...ssignment in the reference list PLCPROG LST in the form of a list You can use the TAB key to switch between the two columns The Copy Insert and Delete softkey functions are displayed with reference to a specific context If the cursor is placed on the left hand side only the Copy function is available On the right hand side the Insert and Delete functions are provided to modify the reference list L...

Страница 146: ...er line which must be separated from each other by TAB space or the character In the first column the PLC reference number must be specified and in the second column the file name Example 1 shaft mpf 2 taper mpf This function can be used to insert or modify PLC user alarm texts Select the desired alarm number using the cursor At the same time the text currently valid is displayed in the input line...

Страница 147: ...possible for the drive in question There are the following permanently set drive assignments 802D data Commissioning data Customer CF card Customer data on the CF card RCS connection Data of a drive shared on PC using the the RCS tool only for SINUMERIK 802D sl pro RS232 Serial Interface Manufacturer drive Data that the manufacturer specifically stored USB drive Customer data on a USB FlashDrive M...

Страница 148: ...hine data NC data NC directories Display machine data Leadscrew error compensation Sag compensation PLC project HMI data and applications PLC project PTE A direct exchange between the control system and programming tool is possible without conversion with the support of PLC project handling in the programming tool export format File for license key Reading in and reading out data on a CompactFlash...

Страница 149: ...eters Any changes in the settings come into effect immediately Selecting the Save softkey will save the selected settings even beyond switching off The Default settings softkey will reset all settings to their default settings Figure 8 44 Parameters of the RS232 interface Interface parameters Table 8 8 Interface parameters Parameter Description Device type RTS CTS The signal RTS Request to Send co...

Страница 150: ...nvert the number of digits set to 1 into an odd or even number Input No parity default setting Even parity Odd parity Data bits Number of data bits with asynchronous transmission Input 7 data bits 8 data bits default Overwriting with confirmation Y When reading in it is checked whether the file already exists in the NC N The files are overwritten without confirmation warning Reading in and reading...

Страница 151: ...se this softkey to copy one or more files to the clipboard Paste Use this softkey to paste files or directories from the clipboard to the current directory Delete Deletes the selected file name from the assignment list Select all Use this softkey to select all files for subsequent operations Properties Display memory capacity Job list Displays a list with active file jobs and provides the option t...

Страница 152: ...ocedure See the SINUMERIK 802D sl operating instructions for turning milling grinding nibbling Chapter Create commissioning dialogs or on the toolbox the example shown under Special Commissioning wizard If an example has been saved on the CF card of the control then the Commissioning wizard function is active in the SYSTEM operating area Figure 8 46 Main screen system with active Commissioning wiz...

Страница 153: ...he activation an available symbol is displayed Deactivating This function deactivates the selected function The deactivation procedure is symbolized using a wait symbol Commissioning The function branches to another menu level where it is possible to restore a previously backed up archive or test the function Test An event dialog box shows the test result Additional parameters The function opens a...

Страница 154: ...nning of the list Use this softkey to display the alarms sorted by the time of their occurrence The most recent alarm stands at the beginning of the list Use this softkey to display the alarms sorted by the time of their occurrence The oldest alarm stands at the beginning of the list Updating of pending alarms is stopped started All alarms are logged Figure 8 49 Alarm log The log is deleted using ...

Страница 155: ...ir original profile Dressing of a wheel pursues two objectives Profiling is aimed at achieving the required wheel shape Sharpening is aimed at restoring the wheel s ability to cut The workpiece grinding cycles enable surface grinding with the Y Z infeed axes right angled Grinding cycles The SINUMERIK 802D sl controller supports the following cycles for surface grinding CYCLE406 Z positioning with ...

Страница 156: ...nd forcing intermediate dressing Note The possible operations e g intermediate dressing are assigned to the keys of the CNC machine control panel by the machine manufacturer Further processing then takes place on the basis of a preliminary dimensional value If a cycle is parameterized then the icons above the parameter sketch will indicate the corresponding possible operations that are available s...

Страница 157: ...re the cycle is called 3 The grinding wheel peripheral speed is calculated from the parameters that contain the peripheral speeds in CYCLE446 4 The file called SGUD_MA DEF contains default values for all the machine specific M commands such as those that relate to the direction of spindle rotation coolant and measuring device switching These values can be changed by the machine manufacturer 5 In a...

Страница 158: ...rior to the cycle call and the programmable offsets remain active beyond the cycle The machining level G17 G18 G19 must be defined before calling the cycle A cycle operates in the current plane with the following axes 1st axis of the plane abscissa 2nd axis of the plane ordinate Tool axis infeed axis 3rd axis standing vertically to the plane applicate SSOLFDWH EVFLVVD 2UGLQDWH Level and axis alloc...

Страница 159: ... on errors and required responses as well as messages output in the controller s dialog line please refer to the SINUMERIK 802D sl Diagnostics Manual 9 3 2 2 Error handling within cycles Alarms with numbers between 61000 and 62999 generated in the cycles This range of numbers in turn is divided again with regard to alarm responses and cancel criteria The error text that is displayed together with ...

Страница 160: ... parameters Constants If R parameters are used in the parameter list they must first be assigned values in the calling program Proceed as follows to call the cycles With an incomplete parameter list or By leaving out parameters If you want to exclude the last transfer parameters that have to be written in a call you can prematurely terminate the parameter list with If any parameters are to be omit...

Страница 161: ...done in the higher level program before the cycle is called The required values for spindle speed and direction of spindle rotation must be programmed in the part program if there are no defining parameters in the grinding cycle The G functions active prior to the cycle call remain active beyond the cycle Coordinate systems for grinding In general CNC grinding machines have separate coordinate sys...

Страница 162: ...he wheel feeds only in the Y or Z direction The use of measuring devices and sensors When grinding the following measuring devices sensors can be used Measuring probe Measurement control Acoustic emission sensor Using a swiveling measuring probe a longitudinal position in Z is detected This axis position is stored on a parameter and aids in calculating the errors that occur in the compensation for...

Страница 163: ...able program code is generated from the individual screens Summary of required files The following files constitute the basis for cycle support sc com cov com Note These files are loaded during the start up of the control system and must always remain loaded Operating the cycle support HFXWH LQG 0DFKLQLQJ ULQGLQJ F FOHV 6HW UHFRPSLOH 6HOHFW EORFN RS EORFN GG EORFN HOHWH EORFN 1XPEHU 36 WRRO 6DIHW ...

Страница 164: ... values are selected using the toggle key Press OK to complete your input or Abort in case of error Recompiling Recompiling of program codes serves to make modifications to an existing program using the cycle support Position the cursor on the line to be modified and select the Recompile softkey This will reopen the corresponding input screen from which the program piece has been created and you c...

Страница 165: ... feedrate XSTART REAL X axis starting position XENDE REAL X axis end position Function This cycle is used for approaching and setting a Z position with the grinding wheel Sequence The cycle moves to the Z preliminary position and commences the approach either with an optional acoustic emission sensor or just with the handwheel Once contact has been detected grinding is performed either in accordan...

Страница 166: ...ected it will be implemented on a per stroke basis The start position is at 110 000 mm The table feedrate is 30 000 mm min between points 350 and 100 450 oscillating path Sparking out strokes are performed when infeed is aborted In the example below which illustrates the next step the sequence continues with a 3 stage oscillating plunge cutting cycle This will always grind away 50 micrometers beca...

Страница 167: ...y 0 1 KOORD INT Position in WCS 1 and in MCS 0 Function This cycle is used for approaching a safety position during the grinding process or during interruptions such as intermediate dressing Sequence The cycle checks the current position and approaches it if the infeed axis is smaller than the value entered The position is approached in accordance with the KOORD parameter in the workpiece or machi...

Страница 168: ...U REAL Air grinding allowance incr Y_A_SR REAL Roughing allowance incr Y_A_SL REAL Finishing allowance incr Y_A_FS REAL Fine finishing allowance incr Z_A_LU REAL Air grinding allowance incr Z_A_SR REAL Roughing allowance incr Z_A_SL REAL Finishing allowance incr Z_A_FS REAL Fine finishing allowance incr LUZ REAL Air grinding feedrate per stroke SRZ REAL Roughing feedrate per stroke SLZ REAL Finish...

Страница 169: ... emission sensor the tool will retract by the acoustic emission sensor infeed amount minus the grinding infeed amount If no acoustic emission sensor input has been configured the cycle will immediately switch to the handwheel at the start of the operation The cycle automatically divides cutting into roughing finishing and fine finishing Sparking out strokes can be programmed for the end of each st...

Страница 170: ... emission sensor and 0 02 mm infeed for roughing 0 01 mm infeed for finishing and 0 002 mm infeed for fine finishing 1 sparking out stroke following roughing 2 strokes following finishing and 3 strokes following fine finishing Single stroke dressing for finishing and fine finishing respectively Off loading value of 0 03 mm following roughing and 0 015 mm following finishing N10 T1D1 N20 CYCLE446 2...

Страница 171: ... CYCLE408 0 100 100 0 0 0 0 1 0 0 05 0 01 0 1 0 1 0 05 0 01 0 03 0 02 0 01 0 002 1 2 3 0 1 1 0 03 0 015 30000 29000 28000 3000 N40 M30 9 8 3 stage surface grinding roughing finishing and fine finishing CYCLE409 Programming CYCLE409 N_SITZ XSTART XENDE ZSTART ZEND YEND B_SR B_SL B_FS KS Y_A_LU Y_A_SR Y_A_SL Y_A_FS LUZ SRZ SLZ FSZ N_SR N_SL N_FS D_SR D_SL D_FS ESL EFS FX_SR FX_SL FX_FS FZ_SR FZ_SL F...

Страница 172: ...elief after finishing FX_SR REAL X feedrate roughing FX_SL REAL X feedrate finishing FX_FS REAL X feedrate fine finishing FZ_SR REAL Z feedrate roughing FZ_SL REAL Z feedrate finishing FZ_S REAL Z feedrate fine finishing FY REAL Feedrate at reversal point Function The 3 stage surface grinding cycle allows you to machine a surface that is wider than the wheel itself The surface concerned is ground ...

Страница 173: ...ting motion infeed at reversal points The first infeed once oscillating motion has commenced is adjusted to ensure that all additional infeed operations correspond to the infeed amount This process is also performed following interruptions intermediate dressing and deselection of the handwheel override function The oscillating motion is not performed with the oscillation function as this would cau...

Страница 174: ...eed for roughing 0 01 mm infeed for finishing and 0 001 mm infeed for fine finishing 1 sparking out stroke following roughing 2 strokes following finishing and 3 strokes following fine finishing Single stroke dressing for finishing and fine finishing respectively 2 strokes prior to finishing 1 stroke prior to fine finishing Off loading value of 0 03 mm following roughing and 0 015 mm following fin...

Страница 175: ...r incr F_DL_AB REAL Feedrate in the diameter direction left F_BL_AB REAL Path feedrate left F_DR_AB REAL Feedrate in the diameter direction right F_BR_AB REAL Path feedrate right F_Z_AB REAL Dressing feedrate in Z N_ABR INT Number of dressing strokes GWPS REAL GWPS N_AWST INT Number of workpieces before dressing Function This cycle is used for dressing wheels with a path dresser Following each dre...

Страница 176: ...and profiling CYCLE416 Programming example Machining sequence Single stroke dressing with dressing amounts of 0 02 mm left and 0 01 mm right after every 5 workpieces The number of idle strokes is stored in the tool data along with the peripheral speed ratios of the spindles in the case of a rotating dresser N10 T1D1 N20 CYCLE416 0 02 0 01 0 01 0 2 0 2 0 2 0 2 0 2 1 35 5 N30 M30 ...

Страница 177: ...U REAL Air grinding allowance incr Z_A_SR REAL Allowance incr LUZ REAL Air grinding feedrate per stroke SRZ REAL Infeed per stroke N_FR REAL Number of sparking out strokes A_HEB REAL Retraction amount incr FR REAL Feedrate at reversal point FX REAL Table feedrate Function The oscillating plunge cutting cycle is called for the purpose of machining a slot or surface that is smaller than the wheel wi...

Страница 178: ... points The first infeed once oscillating motion has commenced is adjusted to ensure that all additional infeed operations correspond to the infeed amount This process is also performed following interruptions intermediate dressing and deselection of the handwheel override function Following interruption dressing an off loading value is applied as the tool approaches the machining start point At t...

Страница 179: ...0 1000 30000 N40 CYCLE426 0 350 100 10 480000 95 0 0 0 0 020000 0 0 0 005000 0 002000 2 1 1000 30000 M30 Programming example 2 Machining sequence Plunge cut in Z direction at a grinding wheel peripheral speed of 20 m s with two infeed blocks In part program block N30 allowance of 0 01 mm acoustic emission sensor and standard infeed of 0 01 mm and infeed of 0 005 mm per stroke with acoustic emissio...

Страница 180: ...A_SR REAL Allowance incr LUZ REAL Air grinding feedrate per stroke SRZ REAL Infeed per stroke N_FR REAL Number of sparking out strokes A_HEB REAL Retraction amount incr FY REAL Feedrate at reversal point FX REAL Table feedrate FZ REAL Feedrate of the Z axis Function The surface grinding cycle with continuous infeed is called for the purpose of machining a surface that is wider than the wheel itsel...

Страница 181: ...onal infeed operations correspond to the infeed amount This process is also performed following interruptions intermediate dressing and deselection of the handwheel override function The oscillating motion is not performed with the oscillation function as this would cause problems in terms of residual path deletion and would overload the PLC Following interruption dressing an off loading value is ...

Страница 182: ...an allowance of 0 02 mm and infeed of 0 002 mm per stroke Both operations involve 2 sparking out strokes These are performed with the same geometry positions The per stroke feedrate in X is 40 mm for the 1st operation and 10 mm for the 2nd The fact that the start point of the second machining operation is precisely matched to an end point of the first machining operation means that infeed can take...

Страница 183: ...ition YEND REAL Y end position ZU_ART INT Infeed left right both sides ZZU_ART INT Intermittent infeed left right both sides KS INT with structure borne noise 0 no 1 yes A_LU REAL Air grinding allowance incr A_SR REAL Allowance incr LUZ REAL Air grinding feedrate per stroke SRZ REAL Infeed per stroke N_FR REAL Number of sparking out strokes A_HEB REAL Retraction amount incr FY REAL Feedrate at rev...

Страница 184: ...determine whether the X values should be used for the start or the end of the circular motion If the values used are negative then the X positions will not be overtraveled even with circular interpolation Sequence Traverse to allowance position Approach X starting position and Z starting position Start oscillating motion infeed at reversal points The first infeed once oscillating motion has commen...

Страница 185: ...ly continues in part program block N40 with an allowance of 0 02 mm and infeed of 0 002 mm per stroke Both operations involve 2 sparking out strokes These are performed with the same geometry positions The per stroke feedrate in X is 40 mm for the 1st operation and 10 mm for the 2nd The fact that the start point of the second machining operation is precisely matched to an end point of the first ma...

Страница 186: ...L Table feedrate KONTUR String Contour name Function The profile grinding cycle is called for the purpose of machining a surface with a free contour The entire contour is contained within the contour subroutine The cycle merely handles the infeed process and the interrupt keys which do not have any effect until the end of the contour is reached Both intermediate dressing and interruption are suppo...

Страница 187: ... Figure 9 12 Profile grinding CYCLE429 Programming example Machining sequence Profile grinding with an allowance of 0 02 mm and an infeed of 0 005 mm per stroke The surface offset is used for the infeed The contour is always programmed to the finished dimension 2 sparking out strokes are then performed at the end Retraction should be programmed as follows It should be possible to perform a return ...

Страница 188: ...nual 11 2012 6FC5398 5CP10 3BA0 N10 T1D1 N20 CYCLE446 20 CYCLE429 0 100 0 0 0 0 0 02 0 0 005 2 20 10000 K123 N30 Y0 N40 CYCLE429 1 100 0 0 0 0 02 0 0 005 2 20 10000 K123 N50 M30 Example contour program _N_K123_SPF G17 G42 G64 G90 X100 Y0 G64 X0 Y0 G64 X 100 Y10 G64 X 210 Y0 G64 X 260 RET ...

Страница 189: ...r dressing wheels using a profile roller Following dressing each stroke the dressed amount is taken into account in the wear parameters of the current tool offset Dressing is performed in accordance with workpiece counter GC_WKS Sequence If a profiling allowance is specified this is processed first This value can also be used to search for a dresser if no sensor system is installed When processing...

Страница 190: ...ameters Figure 9 13 Dressing with profile roller CYCLE430 Programming example Machining sequence 2 stroke dressing with a dressing amount of 0 02 mm and 2 sparking out revolutions every 5 workpieces The number of idle strokes is stored in the tool data along with the peripheral speed ratios of the spindles N10 T1D1 N20 CYCLE430 0 02 20 0 2 2 2 35 5 N30 M30 ...

Страница 191: ...d on the spindle wheels of a set A setup menu is also required in order to obtain an overview of the wheels used Checking and calculation is performed on the currently largest diameter of the wheels This is a purely calculated monitoring function Internally no limitations are set that implement reliable monitoring This must be ensured by the user For machines without NC spindles it is possible to ...

Страница 192: ...Cycles 9 15 Selection of the grinding wheel peripheral speed CYCLE446 Surface grinding 192 Programming and Operating Manual 11 2012 6FC5398 5CP10 3BA0 ...

Страница 193: ...see Section Character set The decimal point must only be used for separation of the file extension Do not use more than 27 characters Example WORKPIECE 10 1 2 Program structure Structure and content The NC program consists of a sequence of blocks see Table below Each block represents a machining step Instructions are written in the blocks in the form of words The last block in the execution sequen...

Страница 194: ...QWHUSRODWLRQ SODQDWLRQ 9DOXH GGUHVV RUG 9DOXH GGUHVV RUG DPSOH 9DOXH GGUHVV RUG Figure 10 1 Word structure example Several address characters A word can also contain several address letters In this case however the numerical value must be assigned via the intermediate character Example CR 5 23 Additionally it is also possible to call G functions using a symbolic name see also Section List of instr...

Страница 195: ... WKH UHPDLQLQJ SDUW RI WKH EORFN E 7RWDO QXPEHU RI FKDUDFWHUV LQ D EORFN FKDUDFWHUV Figure 10 2 Block structure diagram Word order If there are several instructions in a block the following order is recommended N G X Z F S T D M H Note regarding block numbers First select the block numbers in steps of 5 or 10 Thus you can later insert blocks and nevertheless observe the ascending order of block nu...

Страница 196: ...rate block A message is displayed in a special field and remains active until a block with a new message is executed or until the end of the program is reached Max 65 characters can be displayed in message texts A message without message text cancels a previous message MSG THIS IS THE MESSAGE TEXT See also chapter Service MSG Programming example N10 G S company order no 12A71 N20 Pump part 17 draw...

Страница 197: ...Printable special characters Open parenthesis Inverted commas Close parenthesis _ Underscore belongs to letters Open square bracket Decimal point Close square bracket Comma separator less than Comment start greater than Reserved do not use Main block end of label Reserved do not use Assignment part of equation Reserved do not use Division block suppression System variable identifiers Multiplicatio...

Страница 198: ...re divided into G groups Only one G function of a group can be programmed in a block A G function can be either modal until it is canceled by another function of the same group or only effective for the block in which it is programmed non modal G or symbolic name e g CIP G group G0 Linear interpolation at rapid traverse rate 1 Motion commands G0 X Z G1 Linear interpolation at feedrate type of inte...

Страница 199: ...mable ROT RPL rotation in the current plane G17 to G19 separate block MIRROR Programmable mirroring MIRROR X0 coordinate axis whose direction is changed separate block ATRANS additive translation programming ATRANS X Z separate block ASCALE Additive programmable scaling factor ASCALE X Z scaling factor in the direction of the specified axis separate block AROT additive programmable rotation AROT R...

Страница 200: ...9 G602 Exact stop window coarse with G60 G9 12 Exact stop window modally effective G70 Inch dimension input G71 Metric dimension data input 13 Inch metr dimension input modally effective G700 Inch dimension data input also for feedrate F G710 Metric dimension data input also for feedrate F G90 Absolute dimension data input G91 Incremental dimension 14 Absolute incremental dimension modally effecti...

Страница 201: ...ameters 0 001 99 999 999 Thread 0 001 2000 000 Belongs to the Z axis otherwise as with I See G2 G3 and G33 G34 G35 I1 Intermediate point for circular interpolation 0 001 99 999 999 Belongs to the X axis specification for circular interpolation with CIP See CIP K1 Intermediate point for circular interpolation 0 001 99 999 999 Belongs to the Z axis specification for circular interpolation with CIP S...

Страница 202: ...ster spindle Mn 40 Automatic gear stage switching for spindle n n 1 or 2 M1 40 automatic gear stage for spindle 1 M41 to M45 Gear stage 1 to gear stage 5 for master spindle Mn 41 to Mn 45 Gear stage 1 to gear stage 5 for spindle n n 1 or 2 M2 41 1st gear stage for spindle 2 M70 M19 Reserved do not use M Remaining M functions Functionality is not defined by the control system and can therefore be u...

Страница 203: ...cally one on another The 2nd vector specified is always used for angle reference Result in the range 180 to 180 degrees R40 ATAN2 30 5 80 1 R40 20 8455 degrees SQRT Square root R6 SQRT R7 POT Square R12 POT R13 ABS Absolute value R8 ABS R9 TRUNC Truncate to integer R10 TRUNC R2 LN Natural logarithm R12 LN R9 EXP Exponential function R13 EXP R1 RET Subroutine end Used instead of M2 to maintain the ...

Страница 204: ... the A axis in the positive direction N20 SPOS ACP 33 1 Position spindle ACN Absolute coordinate approach position in the negative direction for rotary axis spindle It is also possible to specify the dimensions for the end point of a rotary axis with ACN irrespective of G90 G91 also applies to spindle positioning N10 A ACN 45 3 Approach absolute position of the A axis in the negative direction N20...

Страница 205: ...nishing N10 CYCLE408 separate block CYCLE409 3 stage surface grinding workshop cycle roughing finishing and fine finishing N10 CYCLE409 separate block CYCLE426 Oscillating plunge cutting N10 CYCLE426 separate block CYCLE427 Surface grinding with continuous infeed N10 CYCLE427 separate block CYCLE428 Surface grinding with intermittent infeed N10 CYCLE428 separate block CYCLE429 Profile grinding N10...

Страница 206: ...f the program start N10 LABEL1 N100 GOTOB LABEL1 GOTOF GoForward instruction A GoTo operation is performed to a block marked by a label the jump destination is in the direction of the end of the program N10 GOTOF LABEL2 N130 LABEL2 IC Coordinate specified using incremental dimensions The dimension can be specified for the end or center point of a certain axis irrespective of G90 N10 G90 X10 Z IC 2...

Страница 207: ... workpiece coordinate system Axis Identifier of an axis X Z traversing when measuring N10 R2 AA_MW X AC_MEA 1 Measuring job status Default condition 0 Default condition probe did not switch 1 Probe switched N10 IF AC_MEAS 1 1 GOTOF Continue program when probe has switched A _ _ TIME Timer for run time AN_SETUP_TIME AN_POWERON_TI ME AC_OPERATING_T IME AC_CYCLE_TIME AC_CUTTING_TIM E 0 0 10 300 min r...

Страница 208: ...ge RND Rounding 0 010 99 999 999 Inserts a rounding with the specified radius value tangentially between two contour blocks N10 X Z RND N11 X Z RNDM Modal rounding 0 010 99 999 999 0 Inserts roundings with the specified radius value tangentially at the following contour corners special feedrate possible FRCM Modal rounding OFF N10 X Y RNDM 7 3 modal rounding ON N11 X Y N100 RNDM 0 modal rounding O...

Страница 209: ...ng N10 X N20 X STARTFIFO Start of fast machining step Special function the buffer memory is filled at the same time N30 X STARTFIFO separate block end of filling STOPRE Preprocessing stop Special function the next block is only decoded if the block before STOPRE is completed STOPRE separate block G05 Activates oblique plunge cutting Can only be set with inclined axis TRAANG G05 X G07 Approach star...

Страница 210: ...nings Absolute dimension X ACP value approaching the position in positive direction only this value is set only for the rotary axis the range of which is set to 0 360 degrees in the machine data Absolute dimension X ACN value approaching the position in negative direction only this value is set only for the rotary axis the range of which is set to 0 360 degrees in the machine data Incremental dime...

Страница 211: ...propriate functions e g Section Support for the contour definition programming The individual planes are also used to define the direction of rotation of the circle for the circular interpolation CW or CCW In the plane in which the circle is traversed the abscissa and the ordinate are designed and thus also the direction of rotation of the circle Circles can also be traversed in a plane other than...

Страница 212: ...a X AC Absolute dimensioning for a certain axis here X axis non modal X IC Absolute dimensioning for a certain axis here X axis non modal 3 3 3 3 3 3 QFUHPHQWDO GLPHQVLRQ EVROXWH GLPHQVLRQV Figure 10 4 Different dimensioning types in the drawing Absolute dimensioning G90 With absolute dimensioning the dimensioning data refers to the zero of the coordinate system currently active workpiece or curre...

Страница 213: ...imensions remain absolute incremental Z dimension N180 G91 X40 Z20 Switch over to incremental dimensioning N190 X 12 Z AC 17 X remains incremental dimensioning Z absolute 10 2 4 Dimensions in metric units and inches G71 G70 G710 G700 Functionality If workpiece dimensions that deviate from the base system settings of the control are present inch or mm the dimensions can be entered directly in the p...

Страница 214: ...us RP All remaining geometric parameters that are not direct workpiece parameters such as feedrates tool offsets and settable work offsets are not affected by G70 G71 G700 G710 however also affects the feedrate F inch min inch rev or mm min mm rev 10 2 5 Polar coordinates pole definition G110 G111 G112 Functionality In addition to the common specification in Cartesian coordinates X Y Z the points ...

Страница 215: ...RLQW GHILQHG E 53 3 3ROH 3 53 Figure 10 5 Polar radius and polar angle with definition of the positive direction in different planes Pole definition programming G110 Pole specification relative to the setpoint position last programmed in the plane e g with G17 X Y G111 Pole specification relative to the origin of the current workpiece coordinate system in the plane e g with G17 X Y G112 Pole speci...

Страница 216: ...sing polar coordinates can also be traversed as positions specified with Cartesian coordinates as follows G0 linear interpolation with rapid traverse G1 linear interpolation with feedrate G2 circular interpolation CW G3 circular interpolation CCW see also Section Axis movements 10 2 6 Programmable work offset TRANS ATRANS Functionality The programmable work offset can be used for recurring shapes ...

Страница 217: ...le offset additive to existing instructions TRANS without values clears old instructions for offset rotation scaling factor mirroring The instructions that contain TRANS or ATRANS each require a separate block WUDQV WUDQV Figure 10 6 Programmable offset example Programming example N20 TRANS X20 Y15 Programmable translation N30 L10 Subroutine call contains the geometry to be offset N70 TRANS Offset...

Страница 218: ...able rotation deletes old instructions for offsetting rotation scaling factor mirroring AROT RPL Programmable rotation additive to existing instructions ROT without values Clears old instructions for offset rotation scaling factor mirroring The instructions that contain ROT or AROT each require a separate block 5RWDWHG V VWHP 53 53 53 Figure 10 7 Definition of the positive direction of the angle o...

Страница 219: ...ctor can be programmed for all axes with SCALE ASCALE The path is enlarged or reduced by this factor in the axis specified The currently set coordinate system is used as the reference for the scale change Programming SCALE X Y Z Programmable scaling factor clears old instructions for offset rotation scaling factor mirroring ASCALE X Y Z Programmable scaling factor additive to existing instructions...

Страница 220: ...xes All traversing motions of axes for which mirroring is programmed are reversed in their direction Programming MIRROR X0 Y0 Z0 Programmable mirroring clears old instructions for offset rotation scaling factor mirroring AMIRROR X0 Y0 Z0 Programmable mirroring additive to existing instructions MIRROR Without values clears old instructions for offset rotation scaling factor mirroring The instructio...

Страница 221: ...amming example Mirroring in different coordinate axes with influence on an active tool radius compensation and G2 G3 N10 G17 X Y plane Z standing vertically on it N20 L10 Programmed contour with G41 N30 MIRROR X0 Direction changed in X N40 L10 Mirrored contour N50 MIRROR Y0 Direction changed in Y N60 L10 N70 AMIRROR X0 Mirroring once more but now in X N80 L10 Twice mirrored contour N90 MIRROR Mirr...

Страница 222: ...tor The value is activated by the program by selection from six possible groupings G54 to G59 Note Workpiece clamping at an angle is possible by entering the angles of rotation around the machine axes These rotation portions are activated with the offset G54 to G59 For information on operation see Section Setting changing the work offset Programming G54 1st Settable zero offset G55 2nd Settable ze...

Страница 223: ... 11 Various workpiece clamping positions when drilling milling Programming example N10 G54 Call first settable zero offset N20 L47 Machining of workpiece 1 here using L47 N30 G55 Call second settable zero offset N40 L47 Machining of workpiece 2 here using L47 N50 G56 Call third settable zero offset N60 L47 Machining of workpiece 3 here using L47 N70 G57 Call fourth settable zero offset N80 L47 Mac...

Страница 224: ...e two options for defining the working area Entering values via the input screen of the control system under Offset param Setting data Working area limit This makes the working area limitation effective in JOG mode as well Programing with G25 G26 The values for the individual axes can be changed in the part program The values that were input in the input screen Offset param Setting data Working ar...

Страница 225: ... N20 G26 X100 Y110 Z300 Values of the upper working area limitation N30 T1 M6 N40 G0 X90 Y100 Z180 N50 WALIMON Working area limitation ON Work only within working range limits N90 WALIMOF Working area limitation OFF 10 3 Axis movements 10 3 1 Linear interpolation with rapid traverse G0 Functionality The rapid traverse movement G0 is used for rapid positioning of the tool but not for direct workpie...

Страница 226: ...3 3 Figure 10 13 Linear interpolation with rapid traverse from point P1 to P2 Programming example N10 G0 X100 Y150 Z65 Cartesian coordinate N50 G0 RP 16 78 AP 45 Polar coordinate Information Another group of G functions exists for movement to the position see Section Exact stop continuous path control mode G9 G60 G64 For G60 exact stop a window with various precision values can be selected with an...

Страница 227: ...ined by the programmed F word All axes can be traversed simultaneously G1 remains active until canceled by another instruction from this G group G0 G2 G3 Programming G1 X Y Z F Cartesian coordinates G1 AP RP F Polar coordinates G1 AP RP Z F cylindrical coordinates 3dimensional Note Another option for linear programming is available with the angle specification ANG see Section Blueprint programming...

Страница 228: ...ol travels on a straight line in space on P2 N20 G0 Z100 Retraction in rapid traverse N25 X 20 Y80 N30 M2 End of program To machine a workpiece spindle speed S and direction M3 M4 are required see Section Spindle movement 10 3 3 Circular interpolation G2 G3 Functionality The tool moves from the starting point to the end point along a circular path The direction is determined by the G function G2 c...

Страница 229: ...FHQWHU SRLQW SDUDPHWHU HQG SRLQW QJOH 5 Figure 10 16 Possibilities of circle programming with G2 G3 using the example of the axes X Y and G2 G2 G3 remains active until canceled by another instruction from this G group G0 G1 The path velocity is determined by the programmed F word Programming G2 G3 X Y I J Center and end point G2 G3 CR X Y Circle radius and end point G2 G3 AR I J Opening angle and ...

Страница 230: ...center point and the end point are specified For circles with radius specification the arithmetic sign of CR is used to select the correct circle It is possible to program two circles with the same starting and end points as well as with the same radius and the same direction The negative sign in front of CR determines the circle whose circle segment is greater than a semi circle otherwise the cir...

Страница 231: ...LQJ SRLQW QG SRLQW Figure 10 18 Example for center point and end point specification N5 G90 X30 Y40 Starting point circle for N10 N10 G2 X50 Y40 I10 J 7 End point and center point Note Center point values refer to the circle starting point Programming example End point and radius specification HQWHU SRLQW 6WDUWLQJ SRLQW QG SRLQW 5 Figure 10 19 Example for end point and radius specification ...

Страница 232: ...nt and radius Note With a negative leading sign for the value with CR a circular segment larger than a semi circle is selected Programming example Definition of end point and aperture angle HQWHU SRLQW 6WDUWLQJ SRLQW r QG SRLQW Figure 10 20 Example for end point and aperture angle specification N5 G90 X30 Y40 Starting point circle for N10 N10 G2 X50 Y40 AR 105 End point and aperture angle ...

Страница 233: ...LQW 6WDUWLQJ SRLQW r QG SRLQW Figure 10 21 Example for center point and aperture angle specification N5 G90 X30 Y40 Starting point circle for N10 N10 G2 I10 J 7 AR 105 Center point and aperture angle Note Center point values refer to the circle starting point Programming example Polar coordinates HQWHU SRLQW SROH 6WDUWLQJ SRLQW 3 53 Figure 10 22 Example for circle with polar coordinates ...

Страница 234: ...angle then it is advantageous to use the CIP function The direction of the circle results here from the position of the intermediate point between starting and end points The intermediate point is written according to the following axis assignment I1 for the X axis J1 for the Y axis K1 for the Z axis CIP remains active until canceled by another instruction from this G group G0 G1 G2 Note The confi...

Страница 235: ... end point in the current plane G17 through G19 a circle is generated which is connected tangentially to the previous path segment circle or straight line in this plane This defines the radius and center point of the circle from the geometric relationships of the previous path section and the programmed circle end point QG SRLQW RI WKH FLUFOH H J 1 7 1 Figure 10 24 Circle with tangential transitio...

Страница 236: ...active again Programming G75 FP n X1 0 Y1 0 Z1 0 Note FPn references with axis machine date MD30600 MA_FIX_POINT_POS n 1 If no FP has been programmed then the first fixed point will be selected Table 10 3 Explanation Command Significance G75 Fixed point approach FP n Fixed point that is to be approached The fixed point number is specified n Value range of n 1 2 3 4 If no fixed point is specified f...

Страница 237: ...se index zero 40 is approached new MD30600 MA_ FIX_POINT_POS 0 example value 40 N10 G75 FP 2 X1 0 in this case index one 60 is approached new MD30600 MA_ FIX_POINT_POS 1 example value 60 N15 G75 FP 3 X1 0 in this case index two 70 is approached new MD30600 MA_ FIX_POINT_POS 2 example value 70 N20 G75 FP 4 X1 0 in this case index three 80 is approached new MD30600 MA_ FIX_POINT_POS 3 example value ...

Страница 238: ... Y1 Z1 any value here 0 are ignored but must still be written 10 3 8 Measuring with touch trigger probe MEAS MEAW Functionality The function is available for SINUMERIK 802D sl plus and pro If the instruction MEAS or MEAW is in a block with traversing movements of axes the positions of the traversed axes for the switching edge of a connected measuring probe are registered and stored The measurement...

Страница 239: ...ck has the value 1 otherwise value 0 At the start of a measuring block the variable is set to the value 0 Measuring result When the probe is successfully activated the result of the measurement is available for the axes traversed in the measuring block with the following variables after the measuring block in the machine coordinate system AA_MM axis in the workpiece coordinate system AA_MW axis Pr...

Страница 240: ...CT and is retained until a new F word is written Programming F Note For integer values the decimal point is not required e g F300 Unit of measure for F with G94 G95 The dimension unit for the F word is determined by G functions G94 F as the feedrate in mm min G95 Feedrate F in mm spindle revolutions only meaningful when the spindle is running Note This unit of measure applies to metric dimensions ...

Страница 241: ...ndow fine G602 Exact stop window coarse Exact stop G60 G9 If the exact stop function G60 or G9 is active the velocity for reaching the exact end position at the end of a block is decelerated to zero Another modal G group can be used here to set when the traversing movement of this block is considered ended and the next block is started G601 Exact stop window fine Block advance takes place when all...

Страница 242: ...act stop window fine N80 G64 Z Switching over to continuous path mode N100 G0 G9 Z Exact stop acts only in this block N111 Again continuous path mode Note The G9 command only generates exact stop for the block in which it is programmed G60 however is effective until it is canceled by G64 Continuous path control mode G64 The objective of the continuous path control mode is to avoid deceleration at ...

Страница 243: ...nuous path control mode continues to be active N180 G60 Switching over to exact stop Look ahead velocity control In the continuous path control mode with G64 the control system automatically determines the velocity control for several NC blocks in advance This enables acceleration and deceleration across multiple blocks with approximately tangential transitions For paths that consist of short trav...

Страница 244: ...ttern SOFT The axes of the machine accelerate along a non linear constant characteristic until reaching the final velocity With this jerk free acceleration SOFT allows for reduced machine load The same behavior can also be applied to braking procedures 6HWSRLQW 62 7 VSDUHV WKH PHFKDQLFDO SDUWV 5 6 WLPH RSWLPL HG W W VSHHG SDWK 7LPH Figure 10 27 Basic course of the path velocity when using BRISK SO...

Страница 245: ...he gear stage and whether it is in positioning mode or speed mode Programming ACC axis name percentage for axis ACC S percentage for spindle Programming example N10 ACC X 80 80 acceleration for the x axis N20 ACC S 50 50 acceleration for the spindle N100 ACC X 100 Deactivate the override for the X axis Effectivity The limitation is effective in all interpolation types of the AUTOMATIC and MDA mode...

Страница 246: ...must not be greater than the defined limit value If in one block only this fourth axis is programmed the axis will traverse using the active feedrate F if G1 is active If the axis is a rotary axis the unit for F is degrees min with G94 or degrees rev of the spindle with G95 For this axis it is also possible to specify G54 G59 and program TRANS ATRANS offsets Programming example The fourth axis is ...

Страница 247: ...cified time Any previously programmed feedrate F or a spindle speed S remain valid Programming G4 F Dwell time in seconds G4 S Dwell time in spindle revolutions Programming example N5 G1 F200 Z 50 S300 M3 Feed F spindle speed S N10 G4 F2 5 Dwell time 2 5 seconds N20 Z70 N30 G4 S30 Dwelling 30 revolutions of the spindle corresponds at S 300 rpm and 100 speed override to t 0 1 min N40 X Feed and spi...

Страница 248: ...ecting a probe Programming FXS axis 1 Select travel to fixed stop FXS axis 0 Deselect travel to fixed stop FXST axis Clamping torque specified in of the max torque of the drive FXSW axis Width of the window for fixed stop monitoring in mm degrees Note The machine axis identifier should be used as the axis identifier e g X1 The channel axis identifier e g X is permitted only if e g no coordinate ro...

Страница 249: ...nges are applied before traversing movements in the block 7DUJHW SRVLWLRQ 3URJUDPPHG HQG SRVLWLRQ 6 L HG VWRS L HG VWRS PRQLWRULQJ ZLQGRZ 7DEOH VWDUWLQJ SRVLWLRQ FWXDO SRVLWLRQ IL HG VWRS UHDFKHG Figure 10 28 Referencing to stop Other programming examples N10 G1 G94 N20 X250 Z100 F100 FXS X1 1 Selected for machine axis X1 FXS clamping torque and window width from SDs N20 X250 Z100 F100 FXS X1 1 FX...

Страница 250: ... stop or to the machine may result The block change takes place when the retraction position has been reached If no retraction position is specified the block change takes place immediately once the torque limit has been deactivated Note Measuring with deletion of distance to go MEAS command and Travel to fixed stop cannot be programmed in the same block Contour monitoring is not performed while T...

Страница 251: ...xed stop has failed axis is not at fixed stop 3 Travel to fixed stop activated 4 Fixed stop detected 5 Travel to fixed stop is deselected The deselection is not yet completed Query of the system variable in the part program initiates a preprocessing stop For SINUMERIK 802D sl only the static states can be detected before and after selection deselection Alarm suppression The issuing of the followin...

Страница 252: ...he decimal point can be omitted e g S270 Information If you write M3 or M4 in a block with axis movements the M commands become active before the axis movements Default setting The axis movements will only start once the spindle has accelerated to speed M3 M4 M5 is also issued before the axis movement However there is no waiting for spindle standstill The axis movements begin before spindle stands...

Страница 253: ...e same time G25 and G26 each require a separate block A previously programmed speed S is maintained Programming G25 S Lower spindle speed limitation G26 S Upper spindle speed limitation Information The outmost limits of the spindle speed are set in machine data Appropriate inputs via the operator panel can activate various setting data for further limiting Programming example N10 G25 S12 Lower spi...

Страница 254: ...asuring system is not yet synchronized In this case the direction is specified in machine data Other movement specifications for the spindle are possible with SPOS ACP SPOS ACN as for rotary axes see Section 4 Axis The spindle movement takes place parallel to any other axis movements in the same block This block is ended when both movements are finished Programming SPOS Absolute position 0 360 deg...

Страница 255: ...dle is operated as a rotary axis in these functions Master spindle A series of functions is associated with the master spindle that can only be used with this spindle G95 Rev feedrate G96 G97 Constant cutting rate LIMS upper speed limit for G96 G97 M3 M4 M5 S simple specifications for direction of rotation stop and speed The master spindle is defined via configuration machine data Generally it is ...

Страница 256: ...5 gear stages for spindle 2 if available SPOS n Position spindle n SPI n Converts spindle number n to axis identifier e g SP1 or CC n must be a valid spindle number 1 or 2 The functions of spindle identifiers SPI n and Sn are identical P_S n Last programmed speed of spindle n AA_S n Actual speed of spindle n P_SDIR n Last programmed direction of rotation of spindle n AC_SDIR n Current direction of...

Страница 257: ...rate as of the block with G96 G96 is modally effective until cancellation by another G function of the group G94 G95 G97 Programming G96 S LIMS F Constant cutting speed ON G97 Constant cutting speed OFF S Cutting rate in m min LIMS Upper limit speed of the spindle with G96 G97 effective F feedrate in mm revolution as for G95 Remark If G94 instead of G95 was active before a new appropriate F value ...

Страница 258: ... turns at the last defined speed with G96 function active Programming example N10 M3 Spindle s direction of rotation N20 G96 S120 LIMS 2500 Activate constant cutting speed 120 m min speed limit 2 500 r p m N30 G0 X150 no change in speed because block N31 with G0 N31 X50 Z no change in speed because block N32 with G0 N32 X40 Approach on contour new speed is automatically set as is required for the ...

Страница 259: ...FRC Non modal feedrate for chamfer rounding Value 0 feedrate in mm min G94 or mm rev G95 FRCM Modal feedrate for chamfer rounding value 0 Feedrate in mm min G94 or mm rev G95 modal feedrate for chamfer rounding ON value 0 Modal feedrate for chamfer rounding OFF The feedrate F applies for the chamfer rounding Information The appropriate instruction CHF or CHR or RND or RNDM is written in the block ...

Страница 260: ...1 1 QJOH ELVHFWRU Figure 10 29 Inserting a chamfer with CHF using the example Between two straight lines KDPIHU 1 1 5 QJOH ELVHFWRU 5 Figure 10 30 Inserting a chamfer with CHR using the example Between two straight lines Programming examples of chamfer N5 F N10 G1 X CHF 5 Insert chamfer with chamfer length of 5 mm N20 X Z N100 G1 X CHR 2 Insert chamfer with leg length of 2 mm N110 X Z N200 G1 FRC ...

Страница 261: ... special feedrate FRCM modal N60 G3 X Z continue inserting this rounding to N70 N70 G1 X Z RNDM 0 Modal rounding OFF 10 5 3 Contour definition programming Functionality If the end points for the contour are not directly specified in the machining drawing it is also possible to use an angle specification ANG to determine the straight line In a contour corner you can insert the elements chamfer or r...

Страница 262: ...ed in one block only the radius is inserted regardless of the programming sequence Angle ANG If only one end point coordinate of the plane is known for a straight line or for contours across multiple blocks the cumulative end point an angle parameter can be used for uniquely definiting the straight line path The angle is always referred to the abscissa of the current plane G17 to G19 e g for G17 o...

Страница 263: ... FKDPIHU 1 1 1 5 1 1 1 5 1 1 1 1 1 1 QG SRLQW LQ 1 NQRZQ QVHUWLQJ D URXQGLQJ 1 1 51 1 DQDORJ QVHUWLQJ D FKDPIHU 1 1 5 1 1 1 1 QG SRLQW LQ 1 XQNQRZQ LQVHUW URXQGLQJ 1 1 1 51 1 1 DQDORJ QVHUWLQJ D FKDPIHU 1 1 1 5 1 1 QG SRLQW LQ 1 XQNQRZQ 1 1 1 1 1 7KH YDOXHV DUH RQO H DPSOHV 3URJUDPPLQJ RQWRXU 1 1 1 1 1 1 1 1 1 1 51 51 51 Figure 10 33 Multiple block contours using the example of the G17 plane ...

Страница 264: ...metry of the wheel is always entered at under 0 degrees This also applies to fixed inclined wheels The maximum diameter and the wheel width are input into the wheel data image here 10 6 2 Tool T Functionality The tool selection takes place when the T word is programmed Whether this is a tool change or only a preselection is defined in the machine data For grinding the tool change tool call takes p...

Страница 265: ...2 4 and 6 describe the right wheel edge for standard contours The same applies for all contours including free contours when compensating the dressing amount which means that the odd numbers are left negative wear value and the even numbers are right positive wear value The wear in direction X diameter is the same for all points negative for grinding direction in negative direction Cutting edges 7...

Страница 266: ...otal radius The respective overall dimension becomes active when the offset memory is activated The way in which these values are computed in the axes is determined by the tool type and the current plane G17 G18 G19 The tool type The tool type determines which geometry data are required and how they will be computed wheel types Cutting edge position For dressers you must also enter the cutting edg...

Страница 267: ...ates the required equidistant tool paths for the programmed contour for the respective current tool radius G18 must be active Figure 10 35 Tool radius compensation cutter radius compensation Programming G41 Y Z Tool radius compensation left of contour G42 Y Z Tool radius compensation right of contour Remark The selection can only be made for linear interpolation G0 G1 Program both axes If you only...

Страница 268: ... VWDUWLQJ SRLQW RI WKH FRQWRXU 6WDUWLQJ FRQWRXU LUFOH 3 VWDUWLQJ SRLQW RPSHQVDWHG 7RRO SDWK 03 LUFOH UDGLXV 7DQJHQW 5 3 3 VWDUWLQJ SRLQW Figure 10 37 Start of the tool radius compensation with the example G42 tool point direction 3 Information As a rule the block with G41 G42 is followed by the block with the workpiece contour However the contour description may be interrupted by an intervening bl...

Страница 269: ...on circle G451 Point of intersection WHUQDO FRUQHU WHUQDO FRUQHU I I 7UDQVLWLRQ FLUFOH UDGLXV WRRO UDGLXV 3RLQW RI LQWHUVHFWLRQ Figure 10 38 Corner behavior at an external corner S S QWHUQDO FRUQHU 3RLQW RI LQWHUVHFWLRQ Figure 10 39 Corner behavior at an internal corner Transition circle G450 The tool center point travels around the workpiece external corner in an arc with the tool radius In view ...

Страница 270: ...eselection Always select the end point of the G40 block such that collision free traversing is guaranteed Programming G40 Y Z Tool radius compensation OFF Remark The compensation mode can only be deselected with linear interpolation G0 G1 Program both axes If you only specify one axis the second axis is automatically completed with the last programmed value S S LQDO FRQWRXU 6WUDLJKW 3 3 3 3 5 5 03...

Страница 271: ...e in compensation direction Changing the offset number D The offset number D can be changed in the compensation mode A modified tool radius is active with effect from the block in which the new D number is programmed Its complete modification is only achieved at the end of the block In other words The modification is traversed continuously over the entire block also for circular interpolation Canc...

Страница 272: ...he figure Dressing takes place from left to right using MIRROR and G41 Caution The workpiece zero XWP in wheel data must be 110 to be able to program the contour in workpiece coordinates S S S S r 5 5 5 5 5 Figure 10 41 Example for contour dressing N1 Contour cut N10 F S M Radius dimension technological values N15 G500 Work offset OFF N20 MIRROR X0 Z0 Begin compensation mode N30 G90 G0 X 90 N40 Z ...

Страница 273: ...he control system can be found in section Overview of instructions Programming M Max 5 M functions per block Effect Activation in blocks with axis movements If the functions M0 M1 M2 are contained in a block with traversing movements of the axes these M functions become effective after the traversing movements The functions M3 M4 M5 are output to the internal interface PLC before the traversing mo...

Страница 274: ...lus and 802D sl pro two spindles are possible This results in an expanded programming capability for the M commands only for the spindles M1 3 M1 4 M1 5 M1 40 M3 M4 M5 M40 for spindle 1 M2 3 M2 4 M2 5 M2 40 M3 M4 M5 M40 for spindle 2 10 8 H function Functionality With H functions floating point data REAL data type as with arithmetic parameters see Section Arithmetic Parameters R can be transferred...

Страница 275: ...tem during program execution Another possibility consists of setting the arithmetic parameter values by operator inputs If values have been assigned to the arithmetic parameters they can be assigned to other variable setting NC addresses in the program Programming R0 to R299 Assign values to the arithmetic parameters R R0 Indirect programming Assign a value to the arithmetic parameter R whose numb...

Страница 276: ...on addresses N G and L When assigning write the sign after the address character It is also possible to have an assignment with a minus sign A separate block is required for assignments to axis addresses traversing instructions Example N10 G0 X R2 Assignment to X axis Arithmetic operations arithmetic functions When operators arithmetic functions are used it is imperative to use conventional mathem...

Страница 277: ... 123 10 9 2 Local User Data LUD Functionality The operator programmer user can define his her own variable in the program from various data types LUD Local User Data These variables are only available in the program in which they were defined The definition takes place immediately at the start of the program and can also be associated with a value assignment at the same time Otherwise the starting...

Страница 278: ...RING type string length Maximum number of characters Each data type requires its own program line However several variables of the same type can be defined in one line Example DEF INT PVAR1 PVAR2 PVAR3 12 PVAR4 4 type INT variables Example for STRING type with assignment DEF STRING 12 PVAR Hello Define variable PVAR with a maximum of 12 characters and assign string Hello Fields In addition to the ...

Страница 279: ... variables Functionality To allow rapid data exchange between NC and PLC a special data area exists in the PLC user interface with a length of 512 bytes In this area PLC data are compatible in data type and position offset In the NC program these compatible PLC variables can be read or written To this end special system variables are provided A_DBB n Data byte 8 bit value A_DBW n Data word 16 bit ...

Страница 280: ...umps Functionality A label or a block number serve to mark blocks as jump destinations for program jumps Program jumps can be used to branch to the program sequence Labels can be freely selected but must contain a minimum of 2 and a maximum of 8 letters or numbers of which the first two characters must be letters or underscore characters Labels that are in the block that serves as the jump destina...

Страница 281: ...tion can be a block with a label or with a block number This block must be located within the program The unconditional jump instruction requires a separate block Programming GOTOF label Jump forward in the direction of the last block of the program GOTOB label Jump backwards in the direction of the first block of the program Label Selected string for the label jump label or block number 3URJUDP H...

Страница 282: ...he program if necessary Programming IF condition GOTOF label Jump forward IF condition GOTOB label Jump backwards GOTOF Jump direction forward in the direction of the last block of the program GOTOB Jump direction backwards in the direction of the first block of the program Label Selected string for the label jump label or block number IF Introduction of the jump condition Condition Arithmetic par...

Страница 283: ...N R7 squared Programming example N10 IF R1 GOTOF LABEL1 If R1 is not null then go to the block having LABEL1 N90 LABEL1 N100 IF R1 1 GOTOF LABEL2 If R1 is greater than 1 then go to the block having LABEL2 N150 LABEL2 N800 LABEL3 N1000 IF R45 R7 1 GOTOB LABEL3 If R45 is equal to R7 plus 1 then go to the block having LABEL3 Several conditional jumps in the block N10 MA1 N20 IF R1 1 GOTOB MA1 IF R1 2...

Страница 284: ...PEHU RI SRLQWV 5 5 Figure 10 43 Linear approach of points on a circle segment Programming example N10 R1 30 R2 32 R3 10 R4 11 R5 50 R6 20 Assignment of initial values N20 MA1 G0 Z R2 COS R1 R5 X R2 SIN R1 R6 Calculation and assignment to axis addresses N30 R1 R1 R3 R4 R4 1 N40 IF R4 0 GOTOB MA1 N50 M2 Explanation In block N10 the starting conditions are assigned to the corresponding arithmetic par...

Страница 285: ...rsally valid machining scenarios By assigning values via included transfer parameters you can adapt the subroutine to your specific application Layout The structure of a subroutine is identical to that of a main program see Section Program structure Like main programs subroutines contain M2 end of program in the last block of the program sequence This means a return to the program level where the ...

Страница 286: ... may be freely selected provided the following conventions are observed The same rules apply as for the names of main programs Example BUCHSE7 It is also possible to use the address word L in subroutines The value can have 7 decimal places integers only Please observe With address L leading zeros are meaningful for differentiation Example L128 ist nicht L0128 oder L00128 Dies sind 3 verschiedene U...

Страница 287: ...a subroutine not only from a main program In total up to 8 program levels are available for this type of nested call including the main program level 6XESURJUDP 6XESURJUDP 0DLQ SURJUDP WK OHYHO UG OHYHO QG OHYHO VW OHYHO 6XESURJUDP Figure 10 45 Execution with 8 program levels Information Modal G functions can be changed in the subroutine e g G90 G91 When returning to the calling program ensure tha...

Страница 288: ...ycle 82 separate block 10 11 3 Execute external subroutine EXTCALL Function With SINUMERIK 802D sl pro it is possible to reload and execute programs with the EXTCALL command via the following external data carriers Customer CompactFlash card drive D USB FlashDrive drive G Ethernet to the PC from drive H Machine data The following machine data is used for the EXTCALL command MD10132 MN_MMC_CMD_TIME...

Страница 289: ...t path specification in SD42700 EXT_PROGRAM_PATH EXTCALL path program name Parameter EXTCALL Keyword for subroutine call Path program name Constant variable of STRING type Example EXTCALL D EXTERNE_UP RECHTECKTASCHE MPF Note External subroutines must not contain jump statements such as GOTOF GOTOB CASE FOR LOOP WHILE or REPEAT IF ELSE ENDIF constructions are possible Subroutine calls and nested EX...

Страница 290: ...e Main mpf main program is stored in NC memory and is selected for execution N010 PROC MAIN N020 N030 EXTCALL D EXTERNE_UP BOHRUNG N040 N050 M30 The BOHRUNG SPF subprogram to be reloaded is located on the customer CompactFlash Card N010 PROC MAIN N020 N030 EXTCALL G EXTERNE_UP BOHRUNG N040 N050 M30 The BOHRUNG SPF subprogram to be reloaded is located on the USB Flash Drive 010 PROC BORING N020 G1 ...

Страница 291: ... is reset to zero automatically with each power up of the control system Timers that can be deactivated The following timers are activated via machine data default setting The start is timer specific Each active run time measurement is automatically interrupted in the stopped program state or for feedrate override zero The behavior of the activated timers for active dry run feedrate and program te...

Страница 292: ...ically set to zero with each power up of the control system Programming example N10 IF AC_CUTTING_TIME R10 GOTOF WZZEIT Tool operation time limit value N80 WZZEIT N90 MSG Tool action time Limit value reached N100 M0 Display The contents of the active system variables are visible on the screen under OFFSET PARAM Setting data Times counters Total run time AC_OPERATING_TIME Program run time AC_CYCLE_...

Страница 293: ... setpoint reached can be activated via machine data AC_TOTAL_PARTS Total number of workpieces produced total actual The counter specifies the total number of all workpieces produced since the start time The counter is automatically set to zero upon every booting of the control system AC_ACTUAL_PARTS Number of actual workpieces actual This counter registers the number of all workpieces produced sin...

Страница 294: ...erent feedrates of an NC block dwell time and Retraction in synchronism with the movement The hardware input signals are combined in one input byte Programming F2 F3 In addition to the path feed you can program up to 2 further feedrates in the block non modal ST Dwell time for grinding technology sparking out time non modal SR Return path non modal The unit for the retraction path refers to the cu...

Страница 295: ...t 3 F2 5 2 corresponds to input bit 2 ST 1 Dwell time s input bit 1 SR 0 5 Return path mm input bit 0 Example of programming axial motion The axial path feed is programmed under the address FA and remains valid until an input signal is present FMA 3 x to FMA 2 x can be used to program up to 2 further feeds per axis in the block The first expression in the square brackets indicates the bit number o...

Страница 296: ...cillating movement and the infeed movement Properties of asynchronized oscillation Asynchronous oscillation is active on an axis specific basis beyond block limits Block oriented activation of the oscillation movement is ensured by the parts program Combined interpolation of several axes and superimposing of oscillation paths are not possible Programming The following addresses allow asynchronized...

Страница 297: ...oscillate between 10 and 100 Approach reversal point 1 with exact stop fine reversal point 2 with exact stop coarse Machining is performed with feedrate 250 for the oscillating axis Three sparking out strokes must be executed at the end of the machining operation followed by approach by oscillation axis to end position 200 The feedrate for the infeed axis is 1 end of the infeed in X direction is a...

Страница 298: ...ned motion axes be traversed without jerk limitation BRISK or with jerk limitation SOFT or with acceleration curve with a knee as positioning axes Oscillation reversal points The current offsets must be taken into account when oscillation positions are defined Absolute specification OSP1 Z value 1 Position of reversal point sum of offsets programmed value Relative specification OSP1 Z IC value Pos...

Страница 299: ...e Meaning 0 When the oscillation is deactivated stop at the next reversal point default only possible by resetting values 1 and 2 1 When the oscillation is deactivated stop at reversal point 1 2 When the oscillation is deactivated stop at reversal point 2 3 When the oscillation is deactivated do not approach reversal point if no spark out strokes are programmed 4 Approach end position after spark ...

Страница 300: ...Several options are appended with plus characters Example The oscillating motion for the Z axis should stop at the reversal point 1 when switched off Where an end position is approached a changed feed acts immediately and should immediately stop the axis after the deletion of distance to go OSCTRL Z 1 4 16 32 64 ...

Страница 301: ...integrated network adapter the control system is network capable The following connections are possible Peer to peer Ethernet Direct connection between control system and PC using a cross over cable Ethernet network Integrating the control system into an existing Ethernet network using a patch cable Note The Ethernet network function is only available for SINUMERIK 802D sl pro Screened network ope...

Страница 302: ... sl RCS802 on PC RS232 Is available for all product versions Are available Peer to peer Ethernet Is available for all product versions Are available Ethernet network Only available for SINUMERIK 802D sl pro Function that requires a license Functions of the RCS802 tool with license key Note You will only obtain the full functionality of the RCS802 tool after importing the license key RCS802 Table 1...

Страница 303: ...ns Commissioning functions Data transfer transfer of part programs Remote control for the control system To grant access to a part of the file system first share the relevant directories with other users Note If you share directories with other users the authorized network nodes are granted access to the shared files in the control system Depending on the sharing option the user can modify or dele...

Страница 304: ...02 tool on the PC For this purpose the user has to enter this password on the HMI during RCS log in seeUser log in RCS log in Page 305 via the network This password is required also if the user want to communicate with the control system from the RCS tool Use the Create softkey to insert a new user into the user management When Creating a new account enter the user name and the log in password in ...

Страница 305: ... in input screen will appear Figure 11 2 User log in Logon Type user name and password into the appropriate input fields and select the Log in softkey to confirm your input After successful log in the user name is displayed in the Current user line Select the Back softkey to close the dialog box Note This log in simultaneously serves for user identification for remote connections Logoff Press the ...

Страница 306: ...ur PC In the ONLINE mode the directory Control 802 is also available This directory makes data exchange with the control system possible In addition a remote control function is provided for process monitoring The ONLINE connections from the PC to the control are parameterized activated via the Setting Connection menu items in the Connection Settings dialog box Figure 11 4 Connection Settings Note...

Страница 307: ...50 6 67 0 3 RQQHFW WR 67 3 RQQHFW RQ 11 6 Establishing an RS232 connection to the control You are now in the SYSTEM operating area Press the PLC softkey Figure 11 5 Communication settings RS232 Set the parameters for communication in the STEP 7 Connect dialog Activate the RS232 connection with the Connect ON softkey Figure 11 6 RS232 connection active ...

Страница 308: ...No modifications to the settings are possible in this state The softkey label changes to Connect OFF In the lower right corner of the screen the icon shows that the connection to PC via the RS232 interface is active 11 7 Establishing a peer to peer Ethernet connection to the control You are now in the SYSTEM operating area Press the softkeys Service display Service control Figure 11 7 Service cont...

Страница 309: ...HHU Figure 11 8 Network configuration main screen Press the Peer to peer softkey Figure 11 9 Peer to peer The following message is shown on the HMI Connection is set up IP Address 169 254 11 22 Subnet mask 255 255 0 0 Note The IP address and subnet mask shown are fixed values These values cannot be changed Using the Peer to peer softkey you can cancel the Ethernet peer to peer connection ...

Страница 310: ...UMERIK 802D sl pro Prerequisite The control system is connected to the PC or the local network via the X5 interface Entering network parameters Switch to the the SYSTEM operating area Press the Service display Service control system softkeys Select the Service network softkey to display the network configuration window Figure 11 10 Network configuration main screen Note See also User management Pa...

Страница 311: ...eps are necessary to activate the fields for the computer name IP address and Subnet mask 1 Press the vertical softkey Save 2 Switch the control system off and on again Computer name Name of the control system in the network IP address Network address of the control system e g 192 168 1 1 Subnet mask Network identification e g 255 255 252 0 Enabling the communication ports Use the Service Firewall...

Страница 312: ...tem Use the Program manager to select the directory you want to share Use the Next Share softkeys to open the input screen for sharing the selected directory Figure 11 12 Sharing status Select the sharing status for the selected directory Do not share this directory Directory will not be shared Share this directory The directory will be shared and a share name must be entered Type an identifier in...

Страница 313: ...ield Define the user rights Authorizations Full access User has full access Change User may modify files Read User may read files Delete User may delete files By pressing the OK softkey the set properties are confirmed As in Windows shared directories are marked with a hand 11 9 2 Connecting disconnecting network drives Press the Service display Service control system Service network softkeys in t...

Страница 314: ...d online help function The procedure for using this help function is described in Chapter RCS802 share drive Figure 11 14 Connecting network drives Sequences of operation for connecting network drives 1 Place the cursor on a free drive 2 Change to the Path input field using the TAB key Specify the IP address of the server and the sharing name Example 157 163 240 241 Press Connect The server connec...

Страница 315: ...2012 6FC5398 5CP10 3BA0 315 LV FRQQHFW Disconnecting network drives By selecting the Back softkey and the Disconnect function you can disconnect an existing network connection 1 Place the cursor on the relevant drive 2 Press the Disconnect softkey The selected network drive is disconnected from the control ...

Страница 316: ...Network operation 11 9 Additional network functions Surface grinding 316 Programming and Operating Manual 11 2012 6FC5398 5CP10 3BA0 ...

Страница 317: ... RS232 interface and your data backup device must be matched with each other Operating sequence You have selected the PROGRAM MANAGER operating area and you are in the overview of the NC programs already created Select the data to be transmitted using either the cursor or the Select all softkey and copy the data to the clipboard Press the RS232 softkey and select the desired transfer mode Figure 1...

Страница 318: ...es to be input name of file and path error log Table 12 1 Transmission messages OK Transmission completed successfully ERR EOF End of text character received but archive file incomplete Time Out The time monitoring is reporting an interruption of the data transfer User Abort Data transfer aborted by the Stop softkey Error Com Error at the COM 1 port NC PLC Error Error message from the NC Error Dat...

Страница 319: ...equence Press the Start up files softkey in the SYSTEM operating area Creating a start up archive A start up archive can be created either with all components or with some selected components To create an archive with selected components the following operator actions are required Press 802D data Please select the line Start up archive drive NC PLC HMI using the direction keys Press the Input key ...

Страница 320: ... start up archive Writing the start up archive to a customer CompactFlash card USB FlashDrive Requirement The CompactFlash Card USB FlashDrive is inserted and the start up archive has been copied to the clipboard Operating sequence or Press the Customer CF card or USB drive softkey In the directory select the saving location directory Use the Insert softkey to start writing of the start up archive...

Страница 321: ...mport a start up archive perform the following operator actions 1 CompactFlash card USB FlashDrive are inserted 2 Press the Customer CF card USB drive softkey and select the line with the desired archive file 3 Press Copy to copy the file to the clipboard 4 Press the 802D data softkey and position the cursor on the start up archive drive NC PLC HMI line 5 Press the Paste softkey commissioning star...

Страница 322: ...1 CompactFlash card USB FlashDrive are inserted 2 Select the 802D data softkey and position the direction keys on the PLC project PT802D PTE line 3 Press Copy to copy the file to the clipboard 4 Press the Customer CF card USB drive softkey and select the saving location for the file 5 Press the Paste softkey the writing process starts 12 4 Copying and pasting files In the PROGRAM MANAGER operating...

Страница 323: ...s and to support process sequences These logical operations include the linking of various contacts and relays As a rule the failure of a single contact or relay results in a failure of the whole system installation To locate causes of faults failures or of a program error various diagnostic functions are offered in the System operating area Operating sequence Press the PLC softkey in the SYSTEM o...

Страница 324: ...he PLC diagnostics are shown in the following screen Figure 13 1 Screen layout Table 13 1 Key to screen layout Screen item Display Meaning Application area Supported PLC program language Name of the active program block Representation Symbolic name absolute name Program status RUN Program is running STOP Program stopped Status of the application area Sym Symbolic representation abs Absolute repres...

Страница 325: ...vigation keys this area provides still further key combinations Hotkeys The cursor keys move the focus over the PLC user program When reaching the window borders it is scrolled automatically Table 13 2 Hotkeys Keystroke combination Action or To the first line of the row or To the last line of the row Up a screen Down a screen One field to the left One field to the right Up a field ...

Страница 326: ...and Operating Manual 11 2012 6FC5398 5CP10 3BA0 Keystroke combination Action Down a field or to the first field of the first network or to the last field of the last network Opens the next program block in the same window Opens the previous program block in the same window ...

Страница 327: ...complete text line Network title Displays the network comment Command Displays the complete operands If the input focus is positioned on a command all operands including the comments are displayed Softkeys The following PLC properties are shown with this softkey Mode Name of the PLC project PLC system version Cycle time Machining time of the PLC user program Figure 13 2 PLC info By pressing the Re...

Страница 328: ...dow Figure 13 3 PLC status display Use the Status list softkey to display and modify PLC signals Figure 13 4 Status list Using the Window 1 and Window 2 softkeys you can display any logical and graphical information of a program block The program block is one of the components of the PLC user program The program block can be selected in the Program list using the Open softkey The name of the progr...

Страница 329: ...9 3URJUDP EORFN The logics in the ladder diagram LAD display the following Networks with program parts and current paths Electrical current flow through a number of logical operations Figure 13 5 Window 1 OB1 This softkey can be used to select the list of the PLC program blocks Figure 13 6 Select the PLC program block ...

Страница 330: ...c name Author Comments Figure 13 7 Properties of the selected PLC program block Selecting this softkey displays the table of local variables of the selected program block There are two types of program blocks OB1 only temporary local variable SBRxx temporary local variable Figure 13 8 Table of local variables for the selected PLC program block The text of the current cursor position is additionall...

Страница 331: ...ing creation of a program block in Programming Tool PLC802 The selected program block is opened The name absolute of the program block will then be displayed on Window 1 softkey for e g Window 1 OB1 Selecting this softkey activates or deactivates the program status display You can monitor the current status of the networks from the PLC cycle end The states of all operands are displayed in the Prog...

Страница 332: ...ion area can be zoomed in or zoomed out step by step The following zoom stages are provided 20 default 60 100 and 300 Can be used to search for operands in the symbolic or absolute representation see following screen A dialog box is displayed from which various search criteria can be selected Use the Absolute symbol address softkey to search for a certain operand matching this criterion in both PL...

Страница 333: ...n search for symbolic or absolute operands OK starts the search The found search element is highlighted by the focus If nothing is found an appropriate error message will appear in the notes line Use the Abort softkey to exit the dialog box no search is carried out Figure 13 11 Search for symbolic operands Figure 13 12 Search for absolute operands If the search object is found use the Continue sea...

Страница 334: ... this softkey displays all symbolic identifiers used in the highlighted network Figure 13 13 Network symbol information table Use this softkey to display the list of cross references All operands used in the PLC project are displayed This list indicates in which networks an input output flag etc is used Figure 13 14 Cross references main menu absolute ...

Страница 335: ...ges accordingly Depending on the selected type of representation the components are displayed either with absolute or symbolic identifiers If no symbol exists for an identifier the description is automatically absolute The type of representation is displayed in the status line at the top right of the window e g Abs The absolute representation is set by default Example You want to view the logic in...

Страница 336: ...G Figure 13 16 Cursor M251 0 in OB1 network 2 Figure 13 17 M251 0 in OB1 network 2 in window 1 Searching operands in the cross reference list see following screen You can search for the operands as whole words identifiers When searching uppercase and lowercase letters are ignored Search options Search for absolute and symbolic operands Go to line ...

Страница 337: ...A0 337 Search criteria Down from the current cursor position Whole program block from the beginning Figure 13 18 Searching for operands in cross references The text you are looking for is displayed in the notes line If the text is not found a corresponding error message is displayed which must be confirmed with OK ...

Страница 338: ...PLC diagnostics 13 3 Operating options Surface grinding 338 Programming and Operating Manual 11 2012 6FC5398 5CP10 3BA0 ...

Страница 339: ...0 1 Selection of the type of plunging feedrate in mm min specific cutting volumes _GC_PAR 1 INT 0 1 Selection of the longitudinal grinding feedrate in mm min or mm rev _GC_PARI 20 INT INTEGER type parameters for inter cycle as well as cycle HMI communication _GC_SYNC INT 0 HMI synchronisation parameters _GC_SYNC INIRE INT 0 Delete synchronisation parameters on reset _GC_WPC INT 0 Workpiece counter...

Страница 340: ... 10 Time measurement control _GC_IN_MZ2 INT 11 Switch over fine finishing measurement control _GC_IN_MZ3 INT 12 Switch over finishing measurement control _GC_IN_MZ4 INT 13 Reserved for inputs outputs _GC_IN_ABR INT 14 Intermediate dressing upon key _GC_IN_HAND INT 15 Handwheel key _GC_IN_BREAK INT 13 Program interrupt key _GC_IN_HUB INT 12 Stroke reversal key _GC_IN_FEEDSTOP INT 11 Infeed stop key...

Страница 341: ...m s 1 GWPS in feed min _GC_MF 18 Enable program level abort of CYCLE448 _GC_MF 19 Blocking and resetting of last program level abort Note The values stored as the default must be checked by the machine manufacturer and adapted to the realities of the machine A 2 Parameter tables of the tool data The following parameters operated from the HMI are available for the tool offsets Table A 1 Grinding wh...

Страница 342: ...ge in diameter dressing amount X Tx Dy DP13 REAL dL Change in distance dressing amount Z Tx Dy DP14 REAL Length 3 Tx Dy DP15 REAL dR Change in tool nose radius radius wear Tx Dy DP16 REAL Diameter dressing amount µm Tx Dy DP17 REAL Dresser wear X µm diameter Tx Dy DP18 REAL Dresser wear Z µm diameter Tx Dy DP19 REAL Dressing direction drawing plunging diameter Tx Dy DP20 REAL Path feedrate mm rev ...

Страница 343: ...1 REAL Profile roller GWPS ratio wheel types 5 and 6 Tx Dy DP12 REAL dD Change in diameter dressing amount X Tx Dy DP13 REAL dL Change in distance dressing amount Z Tx Dy DP14 REAL Length 3 Tx Dy DP15 REAL dR Change in tool nose radius radius wear Tx Dy DP16 REAL Profile roller dressing number wheel types 5 and 6 Tx Dy DP17 REAL Reserved Tx Dy DP18 REAL Reserved Tx Dy DP19 REAL Reserved Tx Dy DP20...

Страница 344: ... in diameter dressing amount X Tx Dy DP13 REAL dL Change in distance dressing amount Z Tx Dy DP14 REAL Length 3 Tx Dy DP15 REAL dR Change in tool nose radius radius wear Tx Dy DP16 REAL Reserved Tx Dy DP17 REAL Reserved Tx Dy DP18 REAL Reserved Tx Dy DP19 REAL Reserved Tx Dy DP20 REAL Reserved Tx Dy DP21 REAL Additional compens in X diameter basic dimension Tx Dy DP22 REAL Additional compens in Z ...

Страница 345: ...Tx Dy DP15 REAL dR Change in tool nose radius radius wear Tx Dy DP16 REAL Roller circumference speed Tx Dy DP17 REAL Maximum length 1 wear Tx Dy DP18 REAL Maximum length 2 wear Tx Dy DP19 REAL Maximum length 3 wear Tx Dy DP20 REAL Roller direction of rotation optional Tx Dy DP21 REAL Additional compens in X diameter basic dimension Tx Dy DP22 REAL Additional compens in Z length in Z basic dimensio...

Страница 346: ...inclined left 4 Standard contour inclined right 5 Standard contour straight profile roller with geo axes Encoding Dressing mode at the diameter TC_DP19 T 1 0 neither drawing nor plunging 3rd dresser 1 drawing last active dresser 2 plunging last active dresser 11 drawing 1st dresser 12 plunging 1st dresser 21 drawing 2nd dresser 22 plunging 2nd dresser Encoding Dresser type TC_DPC6 T _GC_DNUM dress...

Страница 347: ...n is provided to calculate nested terms The bracket depth is unlimited If the input field is already occupied by a value the function will accept this value into the input line of the pocket calculator Input starts the calculation The result is displayed in the pocket calculator Selecting the Accept softkey enters the result in the input field at the current cursor position of the part program edi...

Страница 348: ...ask Input Result 100 67 3 100 67 3 301 sin 45 degrees 45 S 0 707107 cos 45 degrees 45 O 0 707107 42 4 Q 16 4 4 R 2 34 3 2 10 34 3 2 10 400 To calculate auxiliary points on a contour the pocket calculator offers the following functions Calculating the tangential transition between a circle sector and a straight line Moving a point in the plane Converting polar coordinates to Cartesian coordinates A...

Страница 349: ...Pinyin method which involves combining letters of the Roman alphabet in order to reproduce the sound of the character The editor will then show a list of characters that correspond to that particular sound If the field for the sound is green and if black triangles are displayed to the left then it is possible to select additional characters by using the down up cursor keys The required character i...

Страница 350: ... Figure A 3 Simplified Chinese learning function In the above screen the phonetic language RENCAI has been entered The integrated dictionary finds as the first sound ren A character can be selected for this sound numbers 0 to 9 or cursor keys right or left After a character has been selected the next sound cai is displayed Figure A 4 Simplified Chinese Learning function 2 The characters are shown ...

Страница 351: ...P10 3BA0 351 After being completely compiled the word is saved with the Input key and simultaneously inserted in the program editor Figure A 6 Simplified Chinese Learning function 4 Note The learning function can be opened closed using the plus minus key See also Importing the dictionary Page 355 ...

Страница 352: ...in and Pinyin input methods using the tabulator If the Pinyin input field tab has been selected then the following functions can be selected with the Select key Pinyin input method Entering Latin characters Zhuyin input method After opening the editor the Zhuyin input method is active see the previous diagram A syllable is selected using a phonetic language Zhuyin method whose sound can be formed ...

Страница 353: ... should be selected using the cursor keys left or right and the selection confirmed using the Input key Figure A 9 Zhuyin input method selected syllable in the program editor Pinyin input method Using the tabulator you selected the Pinyin input field Characters can be selected according to the phonetic language whose sound can be formed by compiling letters from the Roman alphabet The editor will ...

Страница 354: ...d using the Input key Entering Latin characters When switching over to enter Latin characters the entries are directly transferred to the input field in the program editor that had the input focus prior to opening the Chinese editor Learning function Figure A 11 Chinese traditional learning function See Chapter Simplified Chinese Page 349 Section Learning function Note The learning function can be...

Страница 355: ...any additional match If there are several matches for one phonetic spelling then these must be specified in the dictionary line by line Otherwise several characters can be specified for each line The generated file should be saved in the UTF8 format under the name chs_user txt simplified Chinese or cht_user txt traditional Chinese Example Line structure PinYin phonetic spelling TAB Chinese charact...

Страница 356: ...the equivalent of an English QWERTY keyboard and individual characters must be grouped together to form syllabic blocks Figure A 13 Korean keyboard assignment The Korean alphabet Hangeul consists of 24 letters 14 consonants and 10 vowels The syllable blocks are created by combining consonants and vowels Figure A 14 Korean editor with standard keyboard assignment 6HOHF WLRQ NH ERDUG PDWUL QSXW VHOH...

Страница 357: ...s an alternative to the keyboard assignment shown above All you will need for this is the numeric keypad Figure A 16 Korean editor with selection matrix To select characters proceed as follows Select a row the row will be color highlighted Select a column the character will briefly be color highlighted and then transferred to the Character field Press the input key to transfer the character into t...

Страница 358: ...180 5 VO 3URJUDPPLQJ DQG 2SHUDWLQJ 0DQXDO ದ 7XUQLQJ ದ 0LOOLQJ ದ OLQGULFDO JULQGLQJ ದ 6XUIDFH JULQGLQJ ದ 1LEEOLQJ ದ 0DQXDO PDFKLQH SOXV 6 180 5 VO LDJQRVWLFV 0DQXDO OHFWURQLF GRFXPHQWDWLRQ 6 180 5 6 1 0 6 0RWRUV 2 21 2 21 0DQXIDFWXUHU VHUYLFH GRFXPHQWDWLRQ 6 180 5 VO 2SHUDWLQJ LQVWUXFWLRQV 6 180 5 VO XQFWLRQ 0DQXDO 8VHU GRFXPHQWDWLRQ 6 180 5 VO VO XQFWLRQ 0DQXDO 62 GLDOHFWV 6 180 5 VO 3DUDPHWHU 0DQ...

Страница 359: ... structure borne noise air grinding Bridging the air gap between the workpiece and grinding wheel with a structure borne noise microphone which is built into the machine GWPS Grinding wheel peripheral speed in m s MCPA Input card for rapid I O to the control system MD Machine data machine data are predefined variables system variables with which the NCK as per the requirements of the machine manuf...

Страница 360: ...t side of the grinding wheel or of the tool TPS Workpiece peripheral speed in m min XWP ZWP when dressing a free contour Workpiece offset for offsetting the programmed contour to the current cutting edge of the grinding wheel which is necessary so that workpiece coordinates can be programmed in the free contour ...

Страница 361: ...tems Machine coordinate system MCS 16 Relative coordinate system 18 Workpiece coordinate system WCS 18 Cycle call 160 Cycle support in the program editor 163 D Data transfer 317 Disconnecting network drives Display of machine data 121 Drive machine data 119 E Enabling the communication ports 311 Enter tools 33 Error displays 12 Ethernet network 302 Execution from external 81 EXTCALL F FA 299 Feedr...

Страница 362: ...ating axis 298 Oscillation Activate deactivate oscillation 296 Asynchronous oscillation Defining the sequence of motions 299 Oscillation reversal points 298 OSCTRL 299 OSE 299 OSNSC 297 OSP 298 OSP1 296 OSP2 296 OST 297 OST1 296 OST2 296 Overview of cycles 155 P Parameter list 160 Part program 96 selection and start 73 Stopping canceling 80 Password 304 Peer to peer Ethernet 302 Plane definition 1...

Страница 363: ... 2012 6FC5398 5CP10 3BA0 363 Start 158 Start point 102 Status displays 12 T Tangent to preceding element 103 Transmission messages 318 Transmission protocol 318 U User accounts 303 User log in 305 User management 303 Password 304 Users 303 W Word structure 194 ...

Страница 364: ...Index Surface grinding 364 Programming and Operating Manual 11 2012 6FC5398 5CP10 3BA0 ...

Отзывы: