background image

Commissioning 


6.1 Removing the transport lock for the hard disk 


SIMATIC Panel PC 577 

6-2


Operating Instructions, Release 04/2006, A5E00798484-01 

Removing the transport lock for the hard disk  


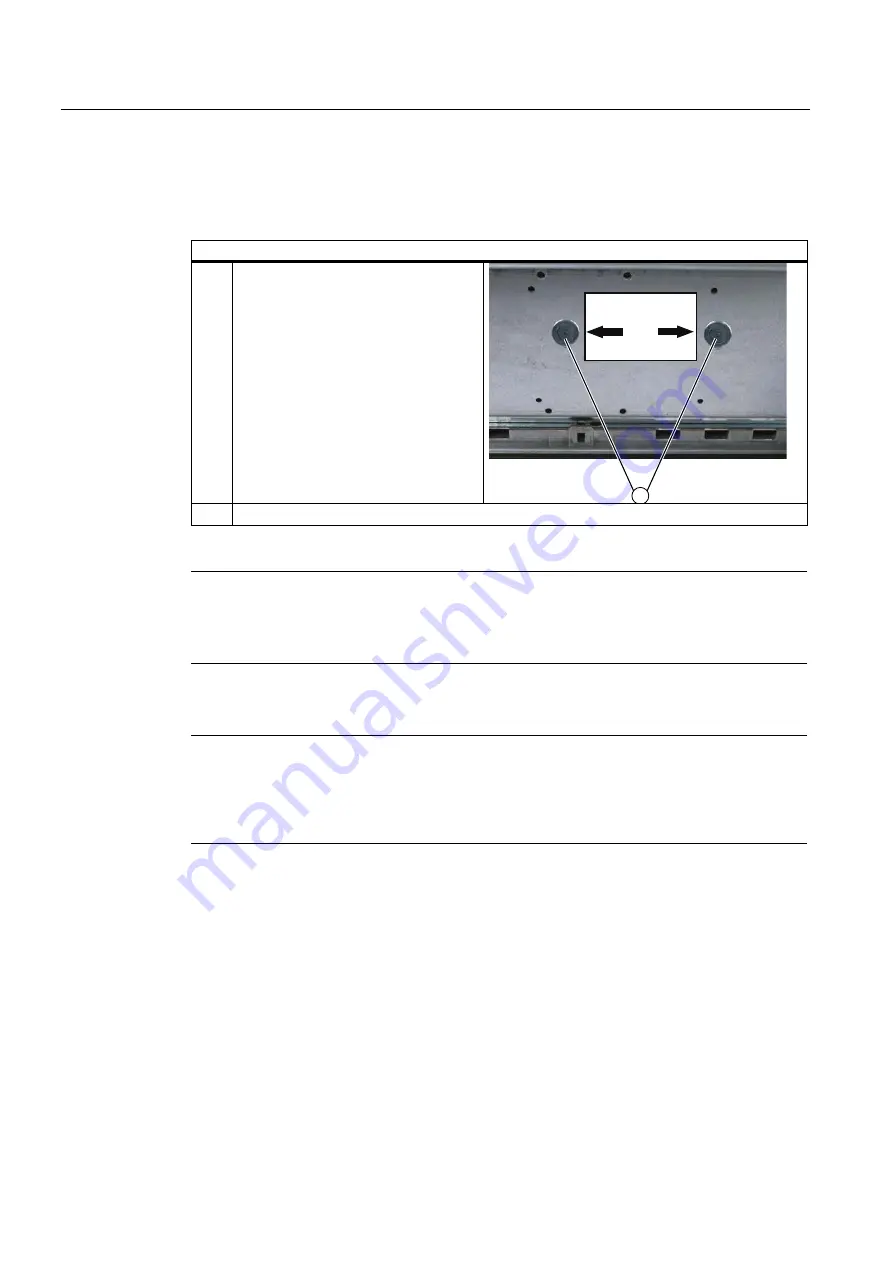
Procedure for removing the transport lock for the hard disk 
(1) 

Unscrew 2 knurled screws (1) by hand 

+DUG'LVN7UDQVSRUWVLFKHUXQJ
ELWWHYRUGHU,QEHWULHEQDKPH
HQWIHUQHQ[5

¦

QGHOVFKUDXEHQ

3OHDVHUHPRYHWKHKDUGGLVN
WUDQVSRUWORFNEHIRUHRSHUDWLQJ


(2) 

Screw the knurled screws into the nuts on the rear of the device for safe-keeping. 


Notice 
Risk of damage 
If you do not remove the hard disk transport lock before starting up the device, the SIMATIC 

Panel PC 577 may suffer damage. 


Notice 
Fitting the hard disk transport lock again 
Transport the device only in the original packaging. Fit the hard disk transport lock again for 

this purpose: Switch off the device and place it in the operating position. Screw in the knurled 

screws as far as the stop. 


Содержание simatic PC 577

Страница 1: ...SIMATIC Industrial PC SIMATIC Panel PC 577 DOCUMENTATION DOCUMENTATION Panel PC 577 simatic Industrial PC Operating Instructions Edition 04 2006 ...

Страница 2: ......

Страница 3: ...g 6 Operation and configuration 7 Operating 8 Integration in TIA 9 Servicing and maintenance 10 Alarm error and system messages 11 Troubleshooting and FAQs 12 Technical specifications 13 Detailed descriptions 14 Appendix A SIMATIC Industrial PC SIMATIC Panel PC 577 Operating Instructions Release 04 2006 A5E00798484 01 ...

Страница 4: ...sioning and operation of a device system may only be performed by qualified personnel Within the context of the safety notes in this documentation qualified persons are defined as persons who are authorized to commission ground and label devices systems and circuits in accordance with established safety practices and standards Prescribed Usage Note the following Warning This device may only be use...

Страница 5: ...stallation use and maintenance This manual is intended for the following target groups Users Commissioning engineers Service technicians Maintenance technicians Please read the section Safety instructions and general notes carefully Knowledge required A solid background in personal computers and Microsoft operating systems is required to understand this manual General knowledge in the field of aut...

Страница 6: ...for SIMATIC products and systems in the languages German English French Italian and Spanish SIMATIC Guide Technische Dokumentation in Deutsch http www ad siemens de simatic portal html_00 techdoku htm SIMATIC guide to technical documentation in English http www ad siemens de simatic portal html_76 techdoku htm Conventions The following text notation will facilitate reading this manual Representati...

Страница 7: ...ons concerning the use of the described product which are not answered in this manual please contact the Siemens representative in your area Find your contact partner at http www siemens com automation partner A guide to the technical documentation for the various SIMATIC products and systems is available at http www siemens com simatic tech doku portal The online catalog and the online ordering s...

Страница 8: ...automation service Service support on the Internet In addition to our documentation we offer our complete knowledge base on the Internet at http www siemens com automation service support There you will find The newsletter which provides the latest information on your products Relevant documentation for your application which you can access via the search function in our service support database A...

Страница 9: ... 3 3 Planning use 3 1 3 1 Overview 3 1 3 2 Unpacking and checking the delivery 3 2 3 3 Make note of identification data 3 4 3 4 EMC directive 3 5 3 5 Mounting positions and fastening 3 6 3 5 1 Installation instructions 3 6 3 5 2 Permitted mounting positions 3 8 3 5 3 Mounting type 3 8 3 5 4 Degree of protection 3 9 3 6 Mounting cut out 3 10 3 6 1 Selecting and creating the mounting cut out 3 10 3 ...

Страница 10: ...ing system 6 7 6 5 Installing applications and drivers Touch Base 6 8 6 6 Notes about new installation of Windows 2000 6 13 7 Operation and configuration 7 1 7 1 Normal operation 7 1 7 1 1 Switching the device on and off 7 1 7 2 Additional drivers and applications 7 4 7 2 1 Overview 7 4 7 2 2 Setting the touch screen 7 5 7 2 3 KeyTools 7 7 7 2 4 SystemGuard 7 8 7 2 5 TouchInput 7 9 7 2 6 CheckLang...

Страница 11: ...10 26 10 2 9 Removing installing the power supply 10 28 10 2 10 Separating the control unit from the computer unit 10 30 10 2 11 Connecting an external monitor 10 37 10 3 Installing software 10 38 10 3 1 Overview 10 38 10 3 2 Supplied software CDs DVDs 10 40 10 3 3 Restoring the factory state of the software using the Restore DVD 10 41 10 3 4 Factory state without operating system 10 43 10 3 5 Ins...

Страница 12: ...errupt assignment 14 6 14 5 BIOS setup 14 7 14 5 1 Starting BIOS setup 14 7 14 5 2 BIOS setup default settings 14 8 A Appendix A 1 A 1 Certificates and guidelines A 1 A 1 1 Guidelines and declarations A 1 A 1 2 Certificates and approvals A 3 A 1 3 ESD guideline A 5 A 1 4 Electrostatic charging of individuals A 7 A 2 Abbreviations A 8 A 3 Glossary Definitions CU A 9 Index Index 1 Tables Table 3 1 D...

Страница 13: ...etrate the device Caution Please observe the safety instructions on the back of the cover sheet of this documentation You should not expand your device unless you have read the relevant safety instructions This device is compliant with the relevant safety measures to IEC EN VDE UL and CSA If you have questions about the validity of the installation in the planned environment please contact your se...

Страница 14: ... damage your device the warranty becomes void Battery This device is equipped with a Lithium battery Batteries may only be replaced by qualified personnel Caution There is the risk of an explosion if the battery is not replaced as directed Replace only with the same type or with an equivalent type recommended by the manufacturer Dispose of used batteries in accordance with local regulations Warnin...

Страница 15: ...ve modules which are sensitive to ESD Handle modules fitted with ESDs by their edges only Do not touch any wiring posts or conductors on modules containing ESDs Warning Following the results of a risk analysis additional protection equipment on the machine or the system is necessary to avoid endangering persons With this especially the programming configuration and wiring of the inserted I O modul...

Страница 16: ...e mains before every intervention Do not touch power cables or data transmission cables during electrical storms and do not connect any cables High frequency radiation Caution Unintentional operating situations High frequency radiation e g from cell phones can cause unintentional operating situations under some circumstances For more details consult the technical data in the EMC requirements chapt...

Страница 17: ...ons Protect your device against dust moisture and heat For additional information refer to the Technical data Do not place the device in direct sunlight Transport Unpack the device at its installation location Notice Fitting the hard disk transport lock again Transport the device only in the original packaging Fit the hard disk transport lock again for this purpose Switch off the device and place ...

Страница 18: ...n DVD drives are sensitive to vibration Prohibited vibration during operation may result in loss of data or damage to the drive or data medium Before transporting the device wait at least 20 seconds to allow the drive to stop completely Tools downloads Please check regularly whether updates and hotfixes are available for download to your device Downloads are available on the Internet at http www s...

Страница 19: ...t site for more information Enter Chemical resistance as the search term The available articles are displayed Sources of light Notice Position the screen so that it is not subject to direct sunlight or other strong sources of light Defective pixels in the display At present the manufacturing process of modern displays does not guarantee that all pixels of the display will be perfect A small number...

Страница 20: ...e observe the following The liquid crystals in screen savers which actuate active black when the backlighting is on e g flying stars starfield simulation renew themselves Pay attention to the length of time the backlighting is activated The following applies to screen savers which turn off the backlighting Each time the backlighting is turned on its life is reduced by 50 minutes Consider the follo...

Страница 21: ...information is available in the section Ambient and environmental conditions of the Technical data chapter The Panel PC 577 is scalable beginning with the processor type and the memory modules all the way to the operating system Interfaces The integrated Ethernet interface ensures communication with the office world and the management level PC peripherals can be connected via the integrated USB in...

Страница 22: ...sed HMI devices the Panel PCs The Panel PC 577 fulfills the basic requirements for industrial compatibility and provides high performance at a low price The device consists of the control unit with a key or touch panel and the computer unit The control unit is screwed to the back of the computer unit Figure 2 1 Panel PC 577 1 Control unit 2 Computer unit ...

Страница 23: ...board with alphanumeric keys numeric keys cursor keys and control keys Function keys and softkeys Integrated mouse Softkeys Shift und ACK Front mounted USB 2 0 interface for connecting external I O modules Touch screen variants 12 15 19 TFT technology Color display with backlighting Front mounted USB 2 0 interface for connecting external I O modules Graphics On board graphics 865G chipset 12 800 x...

Страница 24: ...terfaces LPT1 Keyboard PS 2 Mouse PS 2 Accessories not supplied with the device package SIMATIC PC Image Creator SW Software for local data backup Film for protecting the touch screen panel against dirt and scratches for the 12 touch screen variant for the 15 touch screen variant for the 19 touch screen variant 6AV7671 2BA00 0AA0 6AV7671 4BA00 0AA0 6AV7672 1CE00 0AA0 Labeling strips for 12 keyboar...

Страница 25: ...Description 2 3 Technical features SIMATIC Panel PC 577 Operating Instructions Release 04 2006 A5E00798484 01 2 5 ...

Страница 26: ...Description 2 3 Technical features SIMATIC Panel PC 577 2 6 Operating Instructions Release 04 2006 A5E00798484 01 ...

Страница 27: ...necessary considerations for EMC Field of application The Panel PC is an industry standard PC platform for demanding tasks in the field of PC based automation The Panel PC is designed for on site use on the machine installed for example in Control cabinets Swivel arms In consoles Note In the following the term control cabinet also refers to rack mounting rack switchboard operator panel and console...

Страница 28: ...ront panel USB interface 4 Keep the packaging material in case you have to transport the unit again Notice The packaging protects the device during transport and storage Therefore never dispose of the original packaging material 5 Please keep the enclosed documentation in a safe place You will need the documentation when you start up the device for the first time 6 Check the package contents for c...

Страница 29: ...ows 2000 Professional Multi Language SP4 and higher German English French Italian Spanish Japanese Korean Chinese Simplified and Chinese Traditional Windows XP Professional Multi Language German English French Italian Spanish Japanese Korean Chinese Simplified and Chinese Traditional Windows XP Professional is only approved as of Service Pack 2 The operating system is provided with the Windows fun...

Страница 30: ... operating system 2 Write down the manufacturer s number SVP and the order number e g 6AV782 in the table If repairs are necessary the device can be identified by the service center on the basis of the SVP number and order number Both numbers can be found on the rating plate attached to the side of the device where the power unit is located Figure 3 1 Rating plate 3 Enter the Ethernet address of t...

Страница 31: ... by installing the device in grounded metal cabinets e g 8 MC cabinets Siemens catalog NV21 Note For additional information about EMC requirements refer to the Technical data section Installing the device according to EMC directive Basics for interference free operation Install the controller according to EMC directive Use interference immune cable Note The instructions Guidelines for the assembly...

Страница 32: ...susceptible to shock Shocks during operation can lead to the loss of data or damage to the drive or data carrier Burners and DVDs are not suitable for continous operation Applies to devices which are installed in swivel arm housings Avoid rapid or jerky movements of the swivel arm during operation The ensuing forces could lead to possible irreversible damage of the hard disk Provide adequate volum...

Страница 33: ...EN 60950 the device must be mounted in a permitted position For additional information refer to the dimensional drawings in the appendix Warning Function test while installing the device in machines or execute systems Following the results of a risk analysis additional protection equipment on the machine or the system is necessary to avoid endangering persons With this especially the programming c...

Страница 34: ...device can be mounted in a vertical position with deviations between 5 and 5 in the given directions 3 5 3 Mounting type The control unit is secured in the mounting cut out either with clamps or screws Notice Securing with screws is not possible with the 12 touch screen variant For securing the 19 touch screen variant with screws you will need the accessory with MLFB No 6AV7672 8KE00 0AA0 Select t...

Страница 35: ...re only guaranteed when the following is observed The material strength at the mounting cut out is at least 2 mm The surface plane deviation of the mounting cut out in relation to the external dimensions of the control unit amounts to 0 5 mm when the control unit is mounted IP65 degree of protection and NEMA4 The IP65 degree of protection and NEMA4 is only provided for clamp mounting together with...

Страница 36: ...ation instructions 2 Select a location suitable for installation taking into account the installation instructions and the chosen mounting position 3 On the basis of the dimensional drawings check whether the required screw and pressure points on the rear and the hatched seal area are easily accessible after the completion of the mounting cut out Otherwise the mounting cut out is useless 4 Complet...

Страница 37: ...tion shows the dimensions for the mounting cut out You can also obtain these dimensions from the mounting template supplied with the device 6 6 6 6 6 6 6 PP Figure 3 3 Drill holes for the screws and pressure points for the clamp screws 1 Drill hole for screw attachment 4 Clamp 2 Pressure points for clamp 5 RZ 120 in the seal area 3 Setscrews 6 Seal area ...

Страница 38: ...235 279 112 112 186 135 25 165 16 16 10 17 78 51 78 51 78 51 78 51 56 56 Touch screen panels 12 TFT 15 TFT 19 TFT 368 450 450 290 290 380 465 465 235 235 112 112 112 16 16 16 10 10 10 19 81 46 35 81 46 35 81 46 35 81 46 56 56 33 33 1 M6 thread or drill holes with a diameter of 7 mm 2 Cut outs for the shafts of the insert strips are only necessary for 15 key panels 3 Only for 19 touch panels are tw...

Страница 39: ...e mounting cut out has been completed Clamps are readily available in the accessories Clamps and setscrews are included in the contents of delivery Figure 4 1 Clamp assembly Procedure 1 Follow the installation instructions 2 Working from the front insert the device into the mounting cut out 3 Secure the control unit in the mounting cut out from behind with the clamps as shown in the mounting cut o...

Страница 40: ...4 2 Securing with screws Scope Skip this step if you have selected clamp mounting Notice Securing with screws is not possible with the 12 touch screen variant For securing the 19 touch screen variant with screws you will need the accessory with MLFB No 6AV7672 8KE00 0AA0 Requirement The mounting cut out has been completed ...

Страница 41: ...n accordance with the specifications for L4 and L5 as shown in the mounting cut out in the dimensions 3 Carefully drill the respective holes in the control unit at the designated location 1 from the rear Figure 4 2 Designated location for holes on the control unit 4 Working from the front insert the device into the mounting cut out 5 Secure the control unit by inserting suitable screws through the...

Страница 42: ...erating Instructions Release 04 2006 A5E00798484 01 4 3 4 3 Dimensions The mounting depth increases by 28 mm when a DVD ROM drive is installed in the device Refer to the dimensional drawings in the Technical specifications section for the exact measurements ...

Страница 43: ...nce when connecting the device to avoid damaging it Commissioning Allow the device to adjust to the room temperature before connecting the device Do no place the device near direct heat radiation If moisture condensation occurs wait at least about 12 hours before you switch on the device Risk of data loss Do not disconnect the power supply when the device is in operation Disconnect the power only ...

Страница 44: ...se 04 2006 A5E00798484 01 Procedure 1 Connect the equipotential bonding 2 Connect peripherals Connect an external monitor if desired Connect the PS 2 mouse Connect the PS 2 keyboard Connect a USB device such as a USB mouse if desired Connect a printer 3 Connect the power supply ...

Страница 45: ...articular to touch control in control units with touch screen panels Notice When the cover over the USB interface is opened in order to connect a USB component the degree of protection for the device is no longer guaranteed When using standard USB peripherals please bear in mind that their EMC immunity level is frequently designed for office applications only These devices are adequate for commiss...

Страница 46: ...he interfaces Item Name Description 1 KEYBOARD Connection for a PS 2 keyboard 2 Mouse Connection for a PS 2 mouse 3 USB 2 0 Connection for USB devices 4 COM 1 Serial interface 9 pin Sub D connector 5 LPT 1 Parallel interface 25 pin sub D socket 6 VGA VGA connection 7 USB 2 0 Connection for USB devices 8 Ethernet RJ 45 Ethernet connection 10 100 1000 Mbps ...

Страница 47: ...ply Position of the IEC power connector Description IEC power connector 2 for the AC power supply to the device The maximum permitted power supply range is 120 V AC to 230 V AC On Off switch 1 Note You can also switch on the device using the soft power key Refer to the Operator controls chapter for more information ...

Страница 48: ...strial applications according to EN 61000 6 2 2001 Use shielded cables and metal connectors to connect peripherals Otherwise the specified standards and specifications declared by Siemens AG are no longer valid Secure the plugs of the interface cables to the device housing with screws This improves the electrical shielding Mouse Connect a PS 2 or USB mouse 5 3 2 Connecting a monitor The front pane...

Страница 49: ...ripherals Low power devices maximum 100 mA power consumption e g mouse and keyboard High power devices maximum 500 mA power consumption e g hard disk and floppy drive Note The general USB specifications apply to the USB interfaces on the computer unit The USB interface on the front panel has been approved for a maximum of one additional USB hub Using USB peripherals Notice When installing a USB de...

Страница 50: ... These devices are adequate for commissioning and servicing purposes However only industry standard devices are allowed for industrial operation The peripherals are developed and marketed by individual vendors The respective manufacturers offer support for the peripherals Moreover the terms of liability of the individual vendors or suppliers apply here More information about connecting USB devices...

Страница 51: ...wer cable Connect the device only to a grounding outlet Operate the device only on grounded power cables and not on impedance grounding systems such as IT systems Make sure that the local supply voltage complies with the permissible rated voltage for the device Warning Select an adequately large cable diameter so that the device is not damaged by the cable during a short circuit Localized informat...

Страница 52: ... AWG conductor cross section Maximum 4 5 m length Parallel grounding plug 15 A min 125 V 230V power supply Use a flexible cable with the following characteristics UL approval Type SJT with three conductors At least 18 AWG conductor cross section Maximum 4 5 m length Tandem grounding plug 15 A min 250 V Procedure 1 Insert the supplied power cable into the AC DC power socket of the device 2 Lock the...

Страница 53: ...fect sinusoidal input voltage Caution Uninterruptible AC power supplies AC UPS with non sinusoidal wave form damage the power supply unit of Panel PCs with active PFC Make that the AC UPS supplies a sinusoidal output voltage in normal and battery mode for use on a Panel PC with active PFC Selection criteria for an uninterruptible power supply Uninterruptible power supplies with sinusoidal output v...

Страница 54: ... equipotential bonding connection of the device is located at the connection elements of the computer unit and is identified by the following symbol Figure 5 1 Equipotential bonding Connecting the equipotential bonding Required tool for equipotential bonding terminal TORX T20 screwdriver Steps for connecting the equipotential bonding 1 Connect the equipotential bonding connection M4 thread on the ...

Страница 55: ... equipotential bonding When two system parts are connected by means of a shielded signal cable and their shields are both connected to the ground or protective conductor the following must be observed The impedance of the additional equipotential bonding cable amounts to 10 of the shield impedance at the most Ensure that the equipotential bonding cable cross section is selected to accommodate the ...

Страница 56: ...Connecting 5 6 Connecting the equipotential bonding SIMATIC Panel PC 577 5 14 Operating Instructions Release 04 2006 A5E00798484 01 ...

Страница 57: ...Connecting 5 6 Connecting the equipotential bonding SIMATIC Panel PC 577 Operating Instructions Release 04 2006 A5E00798484 01 5 15 ...

Страница 58: ......

Страница 59: ...Panel PC 577 during shipping the device is fitted with a transport lock for the hard disk This comprises two knurled screws that clamp the hard disk to prevent undesirable vibrations The hard disk transport lock is located on the top of the SIMATIC Panel PC 577 and is marked with an adhesive label When shipped the transport lock is locked Before you switch on the device for the first time you must...

Страница 60: ...UDXEHQ 3OHDVH UHPRYH WKH KDUG GLVN WUDQVSRUW ORFN EHIRUH RSHUDWLQJ 2 Screw the knurled screws into the nuts on the rear of the device for safe keeping Notice Risk of damage If you do not remove the hard disk transport lock before starting up the device the SIMATIC Panel PC 577 may suffer damage Notice Fitting the hard disk transport lock again Transport the device only in the original packaging Fi...

Страница 61: ...s subjected to extreme changes in temperature Wait 12 hours before switching the device on Allow the device to slowly adjust to room temperature before commissioning the device Do not subject the device to direct heat radiation from devices such as heaters Peripheral devices Use shielded cables and metal connectors to connect peripherals Otherwise the specified standards and specifications declare...

Страница 62: ...ing 6 2 Overview SIMATIC Panel PC 577 6 4 Operating Instructions Release 04 2006 A5E00798484 01 Procedure 1 Switch on the device 2 Install Microsoft Windows operating system 3 Install the applications and drivers ...

Страница 63: ...on the lock for the mains connector 1 Figure 6 1 Lock mains connector 3 Lock the mains connector in place as shown in the illustration 4 Plug the power supply cable into a socket with a grounded protective conductor 5 Switch on the power switch of the device The device starts up and boots If it does not use a pointed object to press the soft power key Note Soft power key For further instructions o...

Страница 64: ...erating Instructions Release 04 2006 A5E00798484 01 Self test After connection to the power supply the device performs a self test During the self test the message Press F2 to enter SETUP appears briefly When the self test is finished the operating system will be loaded ...

Страница 65: ...fessional operating systems In order to change to the next dialog click on the button In order to change the entry in the previous dialog click on the button Procedure 1 Accept the Microsoft licensing agreement 2 Leave the regional settings of the operating system unchanged If required adjust the regional settings of the operating system only after commissioning 3 Enter the company names and user ...

Страница 66: ...omponents You can install and configure additional hardware and software components such as a network For additional information refer to the documentation of the hardware and software Note The directory c i386 contains special Windows components for subsequent installation Energy saving mode The Suspend timeout option is disabled by default in the Power menu of the BIOS setup Caution Do not activ...

Страница 67: ...2006 A5E00798484 01 6 9 Procedure 1 In the Panel Wizard dialog click the type of panel that corresponds to your device Figure 6 2 Panel Wizard selection of the panel type 2 In the Panel Wizard Touch dialog click on the screen size that corresponds to your device The screen resolution is set correspondingly for the device ...

Страница 68: ... 01 Figure 6 3 Panel Wizard Touch selection of the screen size The next step only applies to control units with touch screen panels Once the screen size is selected the wizard will search for new hardware the touch controller The Panel Wizard closes and the Touch Base 25 point touch calibration appears Carry out the following steps carefully ...

Страница 69: ...rs and applications section of the Operation and configuration chapter The following applies when the Security features of KeyTools is deactivated When the additional function keys and softkeys F13 to S16 are used or when using your own key code table serious malfunctions of the user software can occur because the key codes behind the function keys can also be activated by pressing keys other than...

Страница 70: ...e Operation and configuration chapter of the operating instructions under the section Additional drivers and applications Notice After starting up your device find out more about the particulars of the operating system in the chapter Start up in the device s operating instructions under the section Microsoft Windows operating systems Further information is available in the chapter Service and main...

Страница 71: ...or additional information refer to the SIMATIC WinCC and SIMATIC WinCC flexible documentation Automatic updates The Automatic updates function is installed with Service Pack 3 or later for Windows 2000 Call Start menu Start command Settings Control panel Automatic Updates You can deactivate this function in the dialog Automatic Updates Keep my computer up to date With this setting enabled Updates ...

Страница 72: ...Commissioning 6 6 Notes about new installation of Windows 2000 SIMATIC Panel PC 577 6 14 Operating Instructions Release 04 2006 A5E00798484 01 ...

Страница 73: ... cables to the device housing with screws This improves the electrical shielding Follow the guidelines in the Interfaces section of the chapter Connecting The operating system and the service packs have been installed and set up on the hard disk of the device For additional information please refer to the chapter Start up in the computer unit operating instructions The pre installed drivers and ap...

Страница 74: ...on occurs wait at least about 12 hours before you switch on the device 1 Connect the device to the power mains 2 Plug the power supply cable of the device into a socket with a grounded protective conductor 3 Switch on the power switch of the device The device is now in operation and booting Caution Risk of data loss Do not switch off the power supply when the device is in operation Disconnect the ...

Страница 75: ...elease 04 2006 A5E00798484 01 7 3 Switching off the device Shut down the operating system correctly before switching off the device Caution Wait for the display to go dark Then switch off the power switch of the device Warning Always pull out the power cable to isolate the device from the mains ...

Страница 76: ...l drivers and applications 7 2 1 Overview The necessary drivers and applications are contained in the supplied Documentation and Drivers CD Note The supplied drivers and applications have been system tested and are approved for this device No warranty can be provided for other software Press the Help button to obtain information concerning the buttons of a dialog ...

Страница 77: ...touch screen Call Start menu Start command Programs UPDD Settings Function Recalibrates the touch screen If the touch screen does not react as expected when touched repeat the calibration To do this first activate the 25 point calibration and then calibrate the touch screen Figure 7 1 Touch defaults Calibration tab Note For further information press the Help button ...

Страница 78: ...e touch screen and not several points at one time You may otherwise trigger unintended reactions Do not touch the screen in the following situations When the device is booting until the boot process is completed When plugging or unplugging USB components While Scandisk is running During calibration of the touch screen USB keyboard controller The USB keyboard controller supports the following addit...

Страница 79: ...code tables WinCC hotkey function previously KeyHook WinCC hotkey function activation und deactivation Security features prevents two function keys from being activated simultaneously This prevents incorrect operations and undefined states of the user program Warning For security reasons always use Security features Do not deactivate Security features The following applies when the Security featur...

Страница 80: ...nd voltages Notice SystemGuard is a freeware tool for which Siemens AG offers no technical support Observe the notes in the online help of the application Example In the Temperatures tab you can see the current temperature of the CPU for the first and a second processor and the internal temperature of the device The motherboard s on board sensor supplies this information An optional AUX sensor is ...

Страница 81: ...C 577 Operating Instructions Release 04 2006 A5E00798484 01 7 9 7 2 5 TouchInput Call TouchInput symbol on the desktop Function TouchInput provides a screen keyboard On the screen keyboard the characters are entered directly on the touch screen or with the mouse Figure 7 3 TouchInput ...

Страница 82: ...ti Language and Windows XP Professional Multi Language Call c drivers checklang checklangid exe or reinstallation from the Documentation and Drivers CD Function CheckLanguageID displays the currently installed languages Figure 7 4 CheckLanguageID SystemDefaultLangID System language UserDefaultLangID Standard language UserDefaultUILangID User interface language Notice All three languages displayed ...

Страница 83: ...system field and the Keyboard layout field in the Input locales tab In addition to the menu and dialog language settings you also need to set the default language by selecting Set Default from the Regional Options dialog box The default language setting of your Windows 2000 Professional installation is English and a US keyboard layout To change to another language and keyboard layout open the Cont...

Страница 84: ...Operation and configuration 7 2 Additional drivers and applications SIMATIC Panel PC 577 7 12 Operating Instructions Release 04 2006 A5E00798484 01 ...

Страница 85: ...01 8 1 Operating 8 8 1 8 1 Operator controls On Off switch On Off switch Description The device is on when the power switch 1 is in position 0 Voltage is supplied to the device even when it is switched off Warning The On Off switch does not disconnect the device from mains ...

Страница 86: ...he operating system This function is used to shut down the device when it no longer responds Press the key for approximately 4 seconds with a pointed object Caution Data loss Although this function does not trigger a hardware reset loss of data cannot be ruled out as a result Then you can start the device again in one of two ways 1 Restart via soft power key If you wait at least 7 s after shutdown...

Страница 87: ...keypads with function keys F1 F20 The number of keys their labeling and function is the same on all key panels The various panel types differ only in the arrangement of the keys and in the size and type of the display The following figure is therefore only an example using the front view of the 12 variant Figure 8 1 Example of a 12 control unit with key panel 1 Display 2 Function keys softkeys 3 A...

Страница 88: ...ivers and applications Applies after the deactivation of the security features of Key Tools or after the deinstallation of KeyHook When the additional function keys and softkeys F13 to S16 are used or when using your own key code table serious malfunctions of the user software can occur because the key codes behind the function keys can also be activated by pressing keys other than the configured ...

Страница 89: ... the display Figure 8 2 Function keys and softkeys Control keys The control keys activate editing functions and control functions in different applications 1 Backspace 2 Open Help 3 Toggling between the pre defined key assignment and special characters arithmetic symbols and signs 3 7 1 6 7 75 7 35 17 16 17 5 6 4 Acknowledge Alphanumeric keys Enter letters special characters blank spaces and under...

Страница 90: ...of the alphanumeric and numeric keys These signs are indicated by white symbols on the top left of the keys To enter such a sign proceed as follows 1 Hold down the FN key 2 Activate the desired alphanumeric or numeric key at the same time The displayed special character arithmetic sign or signs will be entered 3 To enter the signs of the pre defined assignment again release the FN key Cursor keys ...

Страница 91: ...m is available for the production and insertion of the labelling strips as described under Service and Maintenance in the options You will find printer templates for the labeling strips on the Documentation and Drivers CD Warning Labeling Label the function keys and softkeys to conform with the project Labeling without reference to a project leads to incorrect operations on the system to be observ...

Страница 92: ...ctions Release 04 2006 A5E00798484 01 3DUW 3DUW 3DUW 3DUW 3DUW 3DUW Figure 8 4 12 device Rear of the control unit with connectors and slots for the labeling strips 3DUW 3DUW 3DUW 3DUW 3DUW 3DUW Figure 8 5 15 device Rear of the control unit with connectors and slots for the labeling strips ...

Страница 93: ...or controls of the touch screen panels 8 3 1 Overview The 12 15 and 19 variants differ in their dimensions and the size of the display The 12 and 19 variants do not have side drill hole covers The following figure is therefore only an example using the front view of the 15 variant Figure 8 6 Example of a 15 touch screen panel 1 Display 2 USB interface ...

Страница 94: ...ction assigned to the button is activated Caution Only touch one point on the touch screen and not several points at one time You may otherwise trigger unintended reactions Do not touch the screen in the following situations When the device is booting until the boot process is completed When plugging or unplugging USB components While Scandisk is running The following types of pressure are permiss...

Страница 95: ...mergency removal involves removing a CD when the tray is blocked or there is no power for the drive In this case the tray can be moved manually instead of motor driven Procedure 1 Ensure that the power to the drive is really interrupted Switch off the device 2 Insert a long thin prong such as a bent paper clip maximum 1 3 mm thick and at least 55 mm long into the emergency removal aperture 3 Caref...

Страница 96: ...erring authorizations Note The device has no floppy disk drive Therefore transfer the authorizations for SIMATIC HMI software from a USB floppy disk drive The following devices have been tested SINUMERIK FLOPPY DISK DRIVE order number 6FC5235 0AA05 1AA2 Caution The USB floppy disk drive is only suitable when mounted in a control cabinet ...

Страница 97: ...ata exchange with automation devices such as SIMATIC S7 You need a suitable software package for this STEP7 WinCC ProTool WinCC flexible WinAC SIMATIC NET PROFIBUS MPI The potentially isolated Profibus interface can be used to connect distributed field devices or to couple with SIMATIC S7 You require suitable software for this STEP7 WinCC ProTool WinCC flexible WinAC SIMATIC NET Profinet Additiona...

Страница 98: ...ace and WinAC card Note You can use a CP 5613 communication module for the PROFIBUS MPI interface A PROFIBUS MPI interface is also provided on WinAC cards You can find further information in the documentation for the CP 5613 communication module and in the Servicing and maintenance chapter under the section Installing and removing hardware components PCI WinAC cards ...

Страница 99: ...erated in a control cabinet with a heat exchanger or with suitable supply air Note The dust deposits must be removed at appropriate time intervals Maximum dust content in the air circulating in the cabinet Suspended component 0 2 mg m3 Deposits 1 5 mg m3 h Cleaning agents Use dish soap or foaming screen cleaner only as cleaning agents Caution Do not clean the device with aggresive solvents or scru...

Страница 100: ... front Please refer to the Tools Demosoftware Internet site for more information Enter Chemical resistance as the search term The available articles are displayed Procedure 1 Switch off the device This prevents the accidental triggering of functions when the screen is touched 2 Dampen the cleaning cloth 3 Spray the cleaning agent on the cloth and not directly on the device 4 Clean the device with ...

Страница 101: ...ent or endanger the user Before you open the device always disconnect the mains plug Install only system expansions designated for this computer The installation of other expansions can damage the system and violate the radio interference suppression regulations Contact your technical support team or your sales outlet to find out which system expansions are suitable for installation If you install...

Страница 102: ... installing hardware components SIMATIC Panel PC 577 10 4 Operating Instructions Release 04 2006 A5E00798484 01 Tools You can perform all installation tasks on the device using Torx T6 Torx T10 and Torx T20 screwdrivers and a Philips screwdriver ...

Страница 103: ...nsmission lines during electrical storms and do not connect any cables Caution Warranty period Within the warranty time you are only allowed to install expansions for memory and expansion card modules Requirement If the fastening screws are not accessible due to the mounting The device is removed from the control cabinet Disconnect the device from mains Unplug the cables and plugs including the ke...

Страница 104: ...and installing hardware components SIMATIC Panel PC 577 10 6 Operating Instructions Release 04 2006 A5E00798484 01 Opening the device Accessing expansion modules 1 Remove the four screws 1 Remove the 2 screws 2 2 Lift the lid up and remove it ...

Страница 105: ...onents SIMATIC Panel PC 577 Operating Instructions Release 04 2006 A5E00798484 01 10 7 Access to memory modules processor heat sinks back up battery and power supply 1 Remove the 3 screws 1 Remove 2 screws 2 from the CD ROM drive 3 Tilt the cover 1 CD ROM drive 2 upward ...

Страница 106: ...Operating Instructions Release 04 2006 A5E00798484 01 Closing the device Caution Avoid crimping the cables When closing the housing cover make sure you do not crimp a cable between the fan and heat sink and that no cable is in contact with the heat sink Figure 10 1 Closing the device cable arrangement ...

Страница 107: ...se 04 2006 A5E00798484 01 10 9 10 2 3 View of internal components with open device The following components can be seen when the device is open Figure 10 2 Components 1 Power supply 2 Processor with fan 3 Slots for memory modules 4 Hard disk 5 Back up battery under the ribbon cable 6 Motherboard 7 Slots for expansion boards ...

Страница 108: ...ation may include 2 X 128 MB SDRAM or 2 X 256 MB DDR400 Caution Read the information in the manual of the motherboard on the Documentation and Drivers CD Installing the memory module Steps for installing a memory module 1 Open the device 2 Insert the memory module in the socket Pay attention to the notch of the locking element 3 Lightly and carefully press the memory module 2 into the slot until t...

Страница 109: ...01 10 11 Removing a memory module Steps for removing a memory module 1 Open the device 2 Snap the interlocks 1 to the side 3 Pull the memory module 2 upwards out of the slot 4 Close the device Display of the current memory expansion Changes to the memory expansion are automatically detected The memory allocation is displayed when the device boots ...

Страница 110: ...and 3 3 V supply voltage can be operated Note about long PCI modules Before long PCI modules can be inserted into the guide rails they must be fitted with an extender this should be supplied with the long PCI board Power demand A maximum consumption of 15 W per slot is permitted for PCI cards Notice Ensure that the total consumption does not exceed 25 W on the 3 3 V line and 25 W on the 5 V line N...

Страница 111: ...on module 2 into the relevant slot 4 Secure the frame with the 2 3 card retainers Make sure that the frame is connected to the device from the outside To adapt to different cards the frame can be offset horizontally and secured by 2 of the 4 threaded holes 1 Screw on the frame from the outside using the suitable threaded holes 1 5 Carefully insert the card retainer from the outside 3 until the not...

Страница 112: ...card Further information is available in the section WinAC card of the Integration in TIA chapter Steps for installing a WinAC card 1 Open the device 2 Remove the frame with the card retainer 2 3 remove the 2 retaining screws 1 of the threads from the outside 3 Unscrew the steel slot cover of the upper two slots 1 4 Unscrew the WinAC cover plate from the outside ...

Страница 113: ...e 1 over the WinAC card from the right Ensure that the WinAC card is inserted in the guide rail 2 6 Insert the WinAC card into the upper slot Ensure that the threaded holes 3 are toward the inside Insert the WinAC card squarely Ensure that the WinAC card is aligned correctly Insert the interfaces through the cut outs 4 in the holding plate 7 Screw on the WinAC cover plate 1 from the outside using ...

Страница 114: ...es 1 9 Carefully insert the card retainer from the outside 3 until the notch 2 securely grips the card 10 Saw off the projecting end 3 Otherwise you cannot close the device 11 Close the device Notes on the allocation of resources The upper two slots provide non shared interrupts for WinAC cards If the new expansion module requires exclusive resources disable functions on the motherboard as require...

Страница 115: ...2 6 Drives 10 2 6 1 Removing and installing a DVD ROM drive Procedure 1 Loosen the 4 screws 1 Figure 10 3 Drive with housing 2 To remove the housing of the drive hold down the base plate 2 of the drive securely and slide the housing 3 to the right until the eyes 4 are free 3 Lift the housing 3 from the drive 4 Detach the IDE plug 1 and the power supply plug 2 ...

Страница 116: ...Servicing and maintenance 10 2 Removing and installing hardware components SIMATIC Panel PC 577 10 18 Operating Instructions Release 04 2006 A5E00798484 01 Figure 10 4 Drive without housing ...

Страница 117: ... Operating Instructions Release 04 2006 A5E00798484 01 10 19 5 Loosen the 4 screws 3 that secure the drive to the base plate 6 Lift the drive out 7 To remove the terminal pcb loosen the 2 screws 4 The drive is now fully removed Figure 10 5 Removed drive Reverse the procedure to install the drive ...

Страница 118: ...rdware components SIMATIC Panel PC 577 10 20 Operating Instructions Release 04 2006 A5E00798484 01 10 2 6 2 Replacing the hard disk Procedure 1 Open the device 2 Detach the plug 1 from the motherboard Figure 10 6 Ribbon cable and IDE cable on the motherboard ...

Страница 119: ...2 Removing and installing hardware components SIMATIC Panel PC 577 Operating Instructions Release 04 2006 A5E00798484 01 10 21 3 Remove the 4 screws 1 while securely holding the retaining frame 2 Figure 10 7 Removing the hard disk ...

Страница 120: ...lling hardware components SIMATIC Panel PC 577 10 22 Operating Instructions Release 04 2006 A5E00798484 01 4 Remove the drive from the retaining frame 5 Loosen the 4 screws 1 that secure the drive 2 to the retaining frame Figure 10 8 Removed hard disk ...

Страница 121: ...ive 2 from the bracket 2 Detach the plug 1 from the drive Figure 10 9 Hard disk connection Reverse the procedure to install the drive Caution Pin connection The plug 1 is connected to the drive Ensure that the pins of the circuit board are correctly aligned to the left when inserted into the drive 2 The two pins on the right 3 are open The drive may otherwise malfunction ...

Страница 122: ...ks Introduction To exchange the processor first remove the heat sink Procedure 1 Open the device 2 Open the clips 1 of the heat sink retainer 2 Figure 10 10 Removing the heat sink 3 The heat sink retainer is hooked into the base frame from below Unhook the heat sink retainer and lift it out 4 Lift out the heat sink 3 The processor is now accessible 5 Lift the lever 1 and press it until it stops ...

Страница 123: ...etected by the BIOS Caution Insert the new processor into the slot so that the notch on the processor matches the marking on the processor slot 3 Swing the lever 1 downwards until it clicks into position Ensure that the processor 2 is covered with a thin transparent layer of heat conductive paste Clean the hear sink if necessary and apply new heat conductive paste before installing it If the heat ...

Страница 124: ...of damage The lithium battery may only be replaced with an identical battery or with a type recommended by the manufacturer Warning Risk of explosion and release of harmful substances Therefore do not throw Lithium batteries into an open fire do not solder or open the cell body do not short circuit or reverse polarity do not heat up above 100 C dispose of in accordance with regulations and protect...

Страница 125: ...cedure Steps for replacing the battery 1 Open the device 2 Open the terminal clamp 1 The back up battery will pop slightly out of the holder 3 Lift out the back up battery 2 4 Insert the new back up battery at an angle and push it under the terminal strip 3 5 Press the back up battery down until the terminal clamp clicks 1 6 Close the device Reconfiguring the BIOS setup The configuration data of t...

Страница 126: ...IC Panel PC 577 10 28 Operating Instructions Release 04 2006 A5E00798484 01 10 2 9 Removing installing the power supply Requirement The device is opened All power supply cables are unplugged Procedure Steps for removing and installing the power supply module 1 Remove the 2 screws 1 ...

Страница 127: ...nstructions Release 04 2006 A5E00798484 01 10 29 Steps for removing and installing the power supply module 2 Remove the screw 1 3 Slide the power supply module 2 until the recesses for the screw 1 are free 4 Lift out the power supply module 2 5 Proceed in reverse order to install the new power supply module ...

Страница 128: ...replace the control unit for example Procedure 1 Disconnect the device from mains 2 Open the control cabinet 3 Remove the device from the control cabinet Secure the device against falling out and unscrew it Or remove the clamps which secure the control unit to the installation wall as shown in the mounting cut out in the dimensions 4 Carefully set the unit down with the control unit at the bottom ...

Страница 129: ...stalling hardware components SIMATIC Panel PC 577 Operating Instructions Release 04 2006 A5E00798484 01 10 31 7 Detach the plugs 2 and 3 and also plug 4 when a 19 touch or key panel is used Figure 10 12 Ribbon cable and IDE cable on the motherboard ...

Страница 130: ...ATIC Panel PC 577 10 32 Operating Instructions Release 04 2006 A5E00798484 01 8 The next two steps apply to control units with 12 touch panels Loosen the 2 screws 1 that secure the computer unit to the control unit Figure 10 13 Separating a 12 touch screen from the computer unit ...

Страница 131: ...eads is located on the control unit for screws 1 Its counterpart a fastening rail with hooks 3 is located on the computer unit The control unit latches into these hooks Figure 10 14 Fastening rails on the computer unit and control unit 9 Carefully swing the computer unit down until it releases from the hooks of the control unit Now remove the computer unit entirely and carefully set it down ...

Страница 132: ...anels Loosen all screws 1 which attach the computer unit to the rear of the control unit Figure 10 15 Separating the control unit from the computer unit The control unit and the computer unit are connected to each other by a hinge joint 2 on the left of the illustration 11 Tilt the computer unit slightly upwards from the control unit slide the computer unit as indicated by the arrows out of the hi...

Страница 133: ...e reverse procedure Caution Please note the following Device malfunctions may otherwise occur Ensure that the ribbon cable is plugged into the correct sockets Ensure that the ribbon cable is not kinked or crimped Check the switch settings 1 Ensure that the switch is set to match the settings in the following table Figure 10 16 Separating the control unit from the computer unit switch settings and ...

Страница 134: ... 3 4 5 6 OFF OFF ON ON ON ON 12 touch key panel 800 x 600 X400 OFF OFF ON ON ON OFF 15 touch key panel 1024 x 768 X400 OFF OFF ON ON OFF ON 19 touch panel 1280 x 1024 X400 X410 OFF OFF ON ON OFF OFF OFF OFF ON OFF ON ON Insert the ribbon cable through the aperture underneath the computer unit When rejoining the computer unit and the control unit ensure that the ribbon cable is not pinched Figure 1...

Страница 135: ...onitor off Caution Damage to the device Ensure that the device and the monitor are switched off 2 Plug the monitor cable into the VGA socket 3 Screw the monitor cable plug tight 4 Connect the monitor cable to the monitor 5 Reconnect the device to the electrical power system 6 Switch on the device and the monitor 7 When the operating system starts press the F8 key 8 In the dialog that appears selec...

Страница 136: ...e software as required Caution Do not turn off the device during software installation Otherwise parts of the software which are necessary for trouble free operation will be lost For commissioning use the default BIOS settings described in BIOS setup and BIOS setup default settings in the section on Detailed descriptions Note The supplied drivers and applications have been system tested and are ap...

Страница 137: ... installing Windows XP SP1 on the Panel PC without the Restore CDs Caution Maloperation Install Microsoft update KB822603 Otherwise the USB interfaces and therefore the touch and key operation may not work correctly You can download the update and obtain additional information in the Internet at http support microsoft com 7 Install any other required drivers 8 If you install an operating system yo...

Страница 138: ...th the factory software consisting of the operating system and installed hardware drivers Documentation and Drivers CD Contains the documentation and required system drivers and applications such as Microsoft Internet Explorer and hotfixes Caution Use the supplied Restore DVDs for the device Verify that the order number of the Restore DVD matches that of the device You can find the order number of...

Страница 139: ...d disk of the device Backing up authorizations Check whether you can back up authorizations or license keys If so perform the backup as described below If it is not possible to back up your authorization please contact customer support Customer support can provide you with the necessary information for your software authorization Caution With the option Restore system partition only all data on dr...

Страница 140: ...stem 3 When the BIOS message Press F2 to enter Setup or F12 to show boot menu appears press F12 After initialization a Boot Menu is displayed 4 Select the DVD ROM Drive 5 Now follow the instructions on the screen Caution All existing data such as programs user settings and authorizations will be deleted from the drives For more information on the functions refer to the README TXT file on the Resto...

Страница 141: ...mation available in the Internet at http www siemens com asis Notice You must integrate the required software components yourself if you install an operating system not offered by Siemens AG Note the following in this regard The device has features that a standard PC does not for example a touch screen and front panel function keys Siemens AG can only guarantee the availability of these features f...

Страница 142: ...ividual drivers Introduction The Documentation and Drivers CD contains the required drivers for the device Procedure 1 Start cdstart exe in the root directory of the CD 2 Follow the instructions displayed on the screen Note Further information on reinstalling the drivers is available on the Internet at http www2 automation siemens com hmi under Support ...

Страница 143: ...dule 6AV7672 2HC00 0AA0 Small accessories A5E00365306 USB plugs set of 10 6AV7672 1JA00 0AA0 Computer box 6AV7672 0BA00 0AA0 Motherboard D1562 A5E00294719 HDD 2 5 EIDE 40GB A5E00239956 HD 2 5 40GB module A5E00323795 256 MB DDR SDRAM PC2700 1 x 256 MB 6ES7648 2AD20 0EA0 512 MB DDR SDRAM PC2700 1 x 512 MB 6ES7648 2AD30 0EA0 1 GB DDR SDRAM PC2700 1 x 1 0 GB 6ES7648 2AD40 0EA0 CPU Celeron P4 2GHz A5E0...

Страница 144: ...Servicing and maintenance 10 4 Maintenance and spare parts SIMATIC Panel PC 577 10 46 Operating Instructions Release 04 2006 A5E00798484 01 ...

Страница 145: ... initialized in this phase of booting Any error messages that occur are displayed on the screen Error diagnosing The following describes the error messages from the system BIOS Note For information on error messages from the operating system or programs refer to the corresponding manuals Error Cause Remedy Display remains dark Power supply not connected properly Check the power outlet power cable ...

Страница 146: ...tions Release 04 2006 A5E00798484 01 11 2 11 2 Motherboard error messages Error diagnosing The manual for the motherboard contains information about error messages originating from the motherboard Note For information on error messages from the operating system or programs refer to the corresponding manuals ...

Страница 147: ... the power cable has been properly connected to the monitor and to the system unit or to the grounding outlet Check whether the monitor cable has been properly connected to the system unit and to the monitor The external monitor remains dark The power cable or the monitor cable is not connected If the monitor screen still remains dark after you have performed these checks please contact your techn...

Страница 148: ...is disabled Enable USB 2 0 USB device is not responding Operating system does not support the USB interface Enable USB Legacy Support for the mouse and keyboard For all other devices you need USB drivers for the specific operating system DVD The front loader does not open The device is switched off or the open close button is disabled by a software application Emergency removal of the data medium ...

Страница 149: ...r configuration has changed restore the factory state Remove the third party modules and reboot the computer If the error no longer occurs the third party module was the cause of the fault Replace this module with a Siemens module or contact the module supplier Force a Reset Configuration using the BIOS setup The PC crashes during startup I O addresses are assigned twice Hardware interrupts and or...

Страница 150: ...e notes in the online help of the application Hardware alarms The Silent Fan controller reports hardware alarms such as a fan failure When a hardware alarm occurs an information window opens for the affected object and displays an error message You can reset the alarm Software alarms SystemGuard also monitors specific components such as the battery voltage or voltage fluctuations When a software a...

Страница 151: ...l lines IEC 61000 4 4 IEC 61000 4 4 IEC 61000 4 5 1 kV burst length 3 m 2 kV burst length 3 m 2 kV surge length 30 m Immunity to discharge of static electricity ESD EN 61000 4 2 8 kV with air discharge 6 kV on contact direct indirect Interference criterion B Immunity to RF interference IEC 61000 4 3 IEC 61000 4 3 IEC 61000 4 6 10 V m 80 1000 MHz 80 AM 10 V m 900 MHz und 1 89 GHz 50 ED 10 V 9 KHz 8...

Страница 152: ... 6 7 7 HU 400 x 310 x 167 15 7 x 12 2 x 6 6 7 HU 483 x 310 x 166 19 0 x 12 2 x 6 5 9 HU 483 x 400 x 162 19 0 x 15 7 x 6 4 Total weight Approx 12 9 kg Approx 17 0 kg Approx 13 5 kg Approx 15 5 kg Approx 18 5 kg Safety Control unit Computer unit Protection class In accordance with VDE 0106 T1 1982 IEC 536 Protection class I to IEC 61140 Safety regulations IEC in accordance with DIN VDE 0805 11 93 AC...

Страница 153: ...rd disk 2 5 EIDE UDMA ATA 100 mode See ordering information for hard disk capacity DVD ROM EIDE master on secondary EIDE interface Graphics Display Colors Luminance 262k or greater 200 cd m2 or greater Contrast ratio 12 touch screen 600 1 12 key panel 600 1 15 touch screen 450 1 15 key panel 450 1 19 touch screen 700 1 Luminance 12 device 350 cd m2 15 device 250 cd m2 19 device 200 cd m2 Graphic c...

Страница 154: ...ease 04 2006 A5E00798484 01 Bad pixels Acceptable number Permanently bright and permanently dark pixels 12 Permanently bright green pixels 5 Information concerning resistance to chemicals is located in the section General information 2 Additional mounting depth with DVD ROM drive 28 mm 1 102 inches ...

Страница 155: ...ical conditions Tested according to Vibration load during operation 10 to 58 Hz 0 0185 mm 58 to 200 Hz 0 25 g IEC 60068 2 6 Shock load during operation 1 g 30 ms 3 shocks IEC 60068 2 27 Climatic environmental conditions Temperature limits Operation Storage transport 5 C 45 C 20 C 60 C IEC 60068 2 1 IEC 60068 2 14 Relative humidity limits Operation Storage transport 5 80 at 25 C 5 95 at 25 C IEC 60...

Страница 156: ... A5E00798484 01 13 2 13 2 Dimensional drawing of the device Figure 13 1 Dimensional drawing of the device Control units B H T 1 With key panel 12 TFT 15 TFT 483 483 310 355 147 172 With touch screen panel 12 TFT 15 TFT 19 TFT in mm 400 483 483 310 310 400 162 166 182 1 Additional device depth with CD ROM drive 28 mm 1 102 inches ...

Страница 157: ...ecific key is listed in the Display function column Further information is available in the documentation for SIMATIC KeyTools on the Documentation and Drivers CD Name Code Hex 0x Check box Display function a A 4 a L Shift R Shift A R Alt á R Alt L Shift R Shift Á b B 5 b L Shift R Shift B c C 6 c L Shift R Shift C R Alt R Alt L Shift R Shift L Ctrl R Ctrl Copy d D 7 d L Shift R Shift D R Alt ð R ...

Страница 158: ... J 0D j L Shift R Shift J k K 0E k L Shift R Shift K l L 0F l L Shift R Shift L R Alt ø R Alt L Shift R Shift Ø m M 10 m L Shift R Shift M R Alt µ L Gui R Gui Minimize all windows n N 11 n L Shift R Shift N R Alt ñ R Alt L Shift R Shift Ñ o O 12 o L Shift R Shift O R Alt ó R Alt L Shift R Shift Ó L Ctrl R Ctrl Open p P 13 p L Shift R Shift P R Alt ö R Alt L Shift R Shift Ö L Ctrl R Ctrl Printing q...

Страница 159: ...ift S R Alt ß R Alt L Shift R Shift L Ctrl R Ctrl Save t T 17 t L Shift R Shift T R Alt þ R Alt L Shift R Shift Þ u U 18 u L Shift R Shift U R Alt ú R Alt L Shift R Shift Ú v V 19 v L Shift R Shift V L Ctrl R Ctrl Paste w W 1A w L Shift R Shift W R Alt å R Alt L Shift R Shift Å x X 1B x L Shift R Shift X L Ctrl R Ctrl Cut y Y 1C y L Shift R Shift Y R Alt ü R Alt L Shift R Shift Ü z Z 1D z L Shift ...

Страница 160: ...Shift R Shift 2 1F 2 L Shift R Shift R Alt 3 20 3 L Shift R Shift R Alt 4 21 4 L Shift R Shift R Alt R Alt L Shift R Shift 5 22 5 L Shift R Shift R Alt 6 23 6 L Shift R Shift R Alt 7 24 7 L Shift R Shift R Alt 8 25 8 L Shift R Shift R Alt 9 26 9 L Shift R Shift R Alt 0 27 0 L Shift R Shift R Alt Return 28 Return Escape 29 Escape Backspace 2A Backspace Tab 2B Tab Space 2C Space _ 2D L Shift R Shift...

Страница 161: ... Shift R Alt R Alt L Shift R Shift 2F L Shift R Shift R Alt 30 L Shift R Shift R Alt 31 L Shift R Shift R Alt R Alt L Shift R Shift Europe 1 32 Europe 1 33 L Shift R Shift R Alt R Alt L Shift R Shift 34 L Shift R Shift R Alt R Alt L Shift R Shift 35 L Shift R Shift 36 L Shift R Shift R Alt ç R Alt L Shift R Shift Ç 37 L Shift R Shift 38 L Shift R Shift R Alt Caps Lock 39 Caps Lock ...

Страница 162: ...trl R Ctrl S8 F5 3E F5 L Shift R Shift F17 L Ctrl R Ctrl S9 F6 3F F6 L Shift R Shift F18 L Ctrl R Ctrl S10 F7 40 F7 L Shift R Shift F19 L Ctrl R Ctrl S11 F8 41 F8 L Shift R Shift F20 L Ctrl R Ctrl S12 F9 42 F9 L Shift R Shift S1 L Ctrl R Ctrl S13 F10 43 F10 L Shift R Shift S2 L Ctrl R Ctrl S14 F11 44 F11 L Shift R Shift S3 L Ctrl R Ctrl S15 F12 45 F12 L Shift R Shift S4 L Ctrl R Ctrl S16 Print Scr...

Страница 163: ...7 Keypad Keypad Enter 58 Keypad Enter Keypad 1 End 59 Keypad 1 End Keypad 2 Down 5A Keypad 2 Down Keypad 3 PageDn 5B Keypad 3 PageDn Keypad 4 Left 5C Keypad 4 Left Keypad 5 5D Keypad 5 Keypad 6 Right 5E Keypad 6 Right Keypad 7 Home 5F Keypad 7 Home Keypad 8 Up 60 Keypad 8 Up Keypad 9 PageDn 61 Keypad 9 PageDn Keypad 0 Insert 62 Keypad 0 Insert Keypad Delete 63 Keypad Delete Europe 2 64 Europe 2 Ap...

Страница 164: ...14 Operating Instructions Release 04 2006 A5E00798484 01 Name Code Hex 0x Check box Display function Left Shift E1 Left Shift Left Alt E2 Left Alt Left GUI E3 Left GUI Right Control E4 Right Control Right Shift E5 Right Shift Right Alt E6 Right Alt Right GUI E7 Right GUI ...

Страница 165: ...scriptions 14 14 1 14 1 Overview of the Panel PC 577 motherboard The Panel PC 577 contains the Fujitsu Siemens Premium Motherboard D1562 C Further information is available in the manual for the motherboard on the Documentation and Drivers CD and in the Internet at http www fujitsu siemens de ...

Страница 166: ...into the riser card and the PCI adapter and are not soldered Functional features Three free PCI slots uppermost slot is suitable for for WinAC Slot module two lower slots for PCI 175 mm long The 2 top and middle slots each have a non shared interrupt Specifications The riser card conforms to PCI Local Bus Specification Revision 2 3 and ATX Riser Card Specification 1 0 Allocation of motherboard slo...

Страница 167: ...enerated by electrodes along the edge of the sensor These electrodes are arranged on a specific grid on the active surface OHFWURGHV Figure 14 1 Operating principle of touch sensors Functional restrictions caused by deformation of the field lines A scalloping effect occurs at the edge of the display near the electrodes on all analog resistive touch sensors due to its intrinsic design This leads to...

Страница 168: ... mouse pointer The scalloping effect therefore can make it difficult or almost impossible to select icons on the edge of the display in Windows applications Generally the following applies The scalloping effect is essentially influenced by the size of the touch sensor and margin area outside the active surface The effect is smaller on a 12 touch sensor than on a 19 touch sensor for example Basical...

Страница 169: ...he system resources hardware address memory configuration IRQ DMA channel are assigned dynamically by the Windows OS depending on the hardware configuration drivers and externally connected peripheral devices Dialogs show the current allocation of the system resources or existing conflicts Note For additional information search for the terms System information and Diagnostics in the Windows help ...

Страница 170: ...ailed descriptions 14 4 System resources SIMATIC Panel PC 577 14 6 Operating Instructions Release 04 2006 A5E00798484 01 14 4 2 Interrupt assignment Figure 14 4 Interrupt assignment of the motherboard used ...

Страница 171: ...ollowing screen appears after booting Phoenix cME FirstBIOS Desktop Pro Copyright 1985 2004 Phoenix Technologies Ltd Copyright 2003 2004 Fujitsu Siemens Computers Version 5 00 R2 xx 1562 01 xx depends on version Intel Pentium 4 x xx GHz x xx depends on processor used xxxxxxK Extended RAM passed xx depends on installed memory 512K Cache SRAM Passed 2 On completion of the POST the BIOS gives you the...

Страница 172: ...the default settings of the SIMATIC Panel PC 577 listed below System parameters BIOS setup default settings Default settings SIMATIC Panel PC 577 Main Floppy disk A 1 44 MB 3 1 2 None Boot options POST errors Halt on all errors No halt on any errors Advanced Advanced peripheral configuration Diskette controller Enabled Disabled Advanced peripheral configuration ATA controller config S ATA interfac...

Страница 173: ...uidelines A 1 1 Guidelines and declarations Notes on the CE marking The following applies to the SIMATIC product described in this documentation Notes for Norway Sweden and Finland Caution Forsiktig Apparatet må tilkoples jordet stikkontakt Varo Laite on liitettävä suojamaadoituskoskettimilla varustettuun pistorasiaan ...

Страница 174: ...tage fluctuation and flicker Low Voltage Directive The devices complies with the requirements of the EC directive 73 23 EEC Low Voltage Directive Conformance with this standard has been verified according to EN 60950 Declaration of conformity The EC declaration of conformity and the corresponding documentation are made available to authorities in accordance with the EC directive stated above Your ...

Страница 175: ...ement systems EQ Net certificate no 1323 01 Software license agreement The device is shipped with software Please observe the corresponding license agreements Certification for the USA Canada and Australia Safety One of the following markings on a device is indicative of the corresponding approval Underwriters Laboratories UL to Standard UL 60950 Report E11 5352 and Canadian Standard C22 2 no 6095...

Страница 176: ...en connecting this equipment to any and all optional peripheral or host devices Failure to do so may violate FCC rules Modifications Siemens AG is not responsible for any radio television interference caused by unauthorized modifications of this equipment or the substitution or attachment of connecting cables and equipment other than those specified by Siemens AG The correction of interference cau...

Страница 177: ...c discharge ESD components are destroyed by voltage and energy far below the limits of human perception Voltages of this kind occur as soon as a device or an assembly is touched by a person who is not electrostatically discharged ESD components which were subject to such voltage are usually not recognized immediately as being defective because the malfunction does not occur until after a longer pe...

Страница 178: ...east 10 cm to screens Handle flat components only by their edges Do not touch component connectors or conductors This prevents charges from reaching and damaging sensitive components Measuring and modifying ESD components Measure the ESD component under the following conditions only The measuring device is grounded with a protective conductor for example The probe on the electrically isolated meas...

Страница 179: ...e electrostatically charged The figure below shows the maximum electrostatic voltages that can accumulate in a person who is operating equipment when he she comes into contact with the materials indicated These values comply with the specifications of IEC 801 2 Figure A 1 Electrostatic voltages with which an operator can be charged 1 Voltage in kV 2 Synthetic materials 3 Wool 4 Antistatic material...

Страница 180: ...DP Distributed I O DSN Data Source Name DVD ROM Digital Versatile Disc Read Only Memory ESD Electrostatic Sensitive Devices EMC ElectroMagnetic Compatibility H Height HF High Frequency HMI Human Machine Interface IF Interface Interface LCD Liquid Crystal Display Liquid crystal display LED Light Emitting Diode Light emitting diode Mbps Megabits per second PC Personal Computer PG Programming device ...

Страница 181: ...t and output modules Baud Unit of measurement for the transmission speed The unit of measurement Baud defines the number of transferred signal states per second When only two states occur one baud is equivalent to a transmission rate of 1 bps Module Modules are plug in units for PLCs programming devices or PCs Modules exist for example as central modules power ons or as mass storage Boot diskette ...

Страница 182: ...em Drop down menu Menu bar on the upper edge of the screen The menu items are pre set or can be set as drop down menus or pull down menus Drop down menus roll down as soon as the cursor is moved over the menu title Pull down menus roll down after clicking on the title EPROM EEPROM Plug in module with EPROM EEPROM chips The chips store S5 S7 application programs permanently This programmed module i...

Страница 183: ...erface See Interface Cold restart A start sequence starting when the computer is switched on During a cold restart the operating system carries out basic hardware checks and then boots LPT interface The LPT interface is a parallel centronics interface to which a printer is connected for example Plug and play Through plug and play the computer configures itself automatically to be able to communica...

Страница 184: ...anently stored and are not lost in the event of a power failure Idle state The screen and hard disk are shut off during idle state All data located in the RAM is stored on the hard disk and the PG is shut off Interface The connection of individual hardware elements e g programmable controller PCs programming device printer or screen by means of physical plug connectors Connection between different...

Страница 185: ......

Страница 186: ...Booting A 9 C Cable connector 10 31 Cache A 9 Calibrating 7 5 Touch screen 7 5 Canada 5 10 CD ROM drive 8 11 13 4 CD RW 13 3 Certificates A 3 Certification A 3 CheckLanguageID 7 10 Checklist 6 3 Chipset A 10 Clamp 4 1 Cleaning agents 10 1 Cold restart A 11 COM 1 13 3 COM interface A 10 COM port Interfaces 2 4 5 4 Commissioning 1 6 5 1 5 3 5 8 6 3 10 38 Device 6 3 Compatibility of the Restore CD DV...

Страница 187: ...44 Drives 13 3 Drop down menu A 10 DVD ROM 13 3 E EEPROM A 10 Electromagnetic compatibility 3 5 Electromagnetic compatibility EMC 13 5 Electrostatic charging A 5 A 7 Precautions A 5 Electrostatic sensitive devices 1 3 Electrostatic Sensitive Devices A 5 EMC 3 5 13 5 Directive 3 5 EMC compliant design 3 5 EMC directive A 2 A 4 AC voltage supply A 2 Energy saving mode 6 8 Entering 8 6 Arithmetic sym...

Страница 188: ...hernet 5 4 Serial interface 2 4 USB 2 4 5 4 13 3 VGA 2 3 5 4 Interfaces Serial 13 3 Interrupt 14 6 IT communication 9 1 K Key 8 6 Numeric key 8 6 Key code 13 7 Key panel 8 3 Keyboard 2 4 5 3 8 4 8 7 External keyboard 5 3 8 7 Interfaces 5 4 Keyboard table 13 7 L labeling 8 7 Function key 8 7 Softkey 8 7 Labeling 8 7 Labeling strips 8 7 13 2 Handwritten strips 8 7 Language selection for Windows 2000...

Страница 189: ...ign 8 6 POST 11 1 Power consumption 13 2 Power supply 2 3 5 9 5 10 10 28 120 V 5 10 120 230 V AC 5 9 230 V 5 10 Canada 5 10 Connecting 5 9 IEC power connector 5 5 Installation 10 28 Removing 10 28 USA 5 10 Preface iii Processor 2 3 13 3 Product key 3 4 PROFIBUS 2 4 9 1 Integration 9 1 Interfaces 2 4 Programmable controller A 9 Protection class 13 2 PS 2 port Interfaces 2 4 5 4 Purpose of the manua...

Страница 190: ...6 Interrupt assignment 14 6 SystemGuard 7 8 T Temperature change 13 5 Temperature limit 13 5 Tools 10 4 Touch screen Special features 7 6 Touch screen 7 5 Calibrating 7 5 Maloperation 7 6 Touch screen 7 6 Touch screen 8 10 Touch screen Operating 8 10 Touch screen 13 2 Touch screen front 8 9 Touch software 7 5 7 6 Maloperation 7 6 Setting 7 5 Special features 7 6 TouchInputPC 7 9 Trademark v Traini...

Страница 191: ......

Страница 192: ...Siemens AG Automation and Drives Industrial Automation Systems Postfach 4848 90437 NUERNBERG Federal Republic of Germany www siemens com automation ...

Отзывы: