11
Remove all packaging components, including
foamed padding at the base of the appliance and
the padding and securing tapes used for securing
the ittings inside the appliance.
Check the supplied ittings, accessories and
documentation according to the packaging list.
Place the refrigerator to the proper position
according to the handling and placing.
Clean the interior of the appliance (see chapter
”Cleaning the appliance”).
After switching on the appliance, wait at least 30
minutes to start up.
Preparations before use
Usage
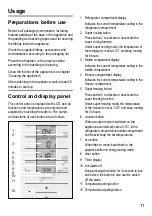
Control and display panel
The control panel is equipped with LCD, and all
functions and temperatures are selected and
adjusted by touching the buttons. The names
and functions of each button are as follows.
1
Refrigerator compartment display
Indicates the current temperature setting in the
refrigerator compartment.
2
Super cooling button
Press button 2 to activate or deactivate the
super cooling function.
Under super cooling mode, the temperature of
the refrigerator is set at 2
℃
and keep running
for 6 hours.
3
Middle compartment display
Indicates the current temperature setting in the
middle compartment.
4
Freezer compartment display
Indicates the current temperature setting in the
freezer compartment.
5
Super freezing button
Press button 5 to activate or deactivate the
super freezing function.
Under super freezing mode, the temperature
of the freezer is set at -30
℃
and keep running
for 54 hours.
6
vacation button
When vacation mode is switched on, the
appliance automatically sets at 14
℃
in the
refrigerator compartment, middle compartment
and freezer keep the set temperatures.
7
eco button
When the eco mode is switched on, the
appliance will run in energy-saving mode.
8
timer button
9
Timer display
10 lock/alarm off
Keep pressing the button for 3 seconds to lock
and unlock; the button is also used to switch
off the alarm.
11 Temperature setting button
12 Temperature adjusting button
6
7
8
9
1
3
4
2
5
10
12
11
Содержание KG28US12EK
Страница 2: ...en Table of Contents 3 zh hk 目錄 24 ...
Страница 9: ...9 Installation dimensions Product Introduction 614 1854 668 90 129 596 1227 367 614 981 ...
Страница 10: ......
Страница 29: ...29 安裝尺寸 產品介紹 614 1854 668 90 129 596 1227 367 614 981 ...
Страница 30: ......


