background image

en

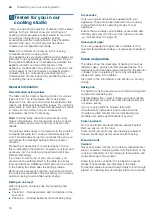
        Tested for you in our cooking studio

26

Test dishes

These tables have been produced for test institutes to 

facilitate appliance testing.
As per EN 60350-1.

Baking

Baked items or cakes that are placed in the oven on 

baking trays or in baking tins/dishes at the same time 

will not necessarily be ready at the same time.

Shelf positions for baking on one level:

Universal pan/baking tray: Position 3

Baking tins/dishes on the wire rack

Wire rack: Position 2

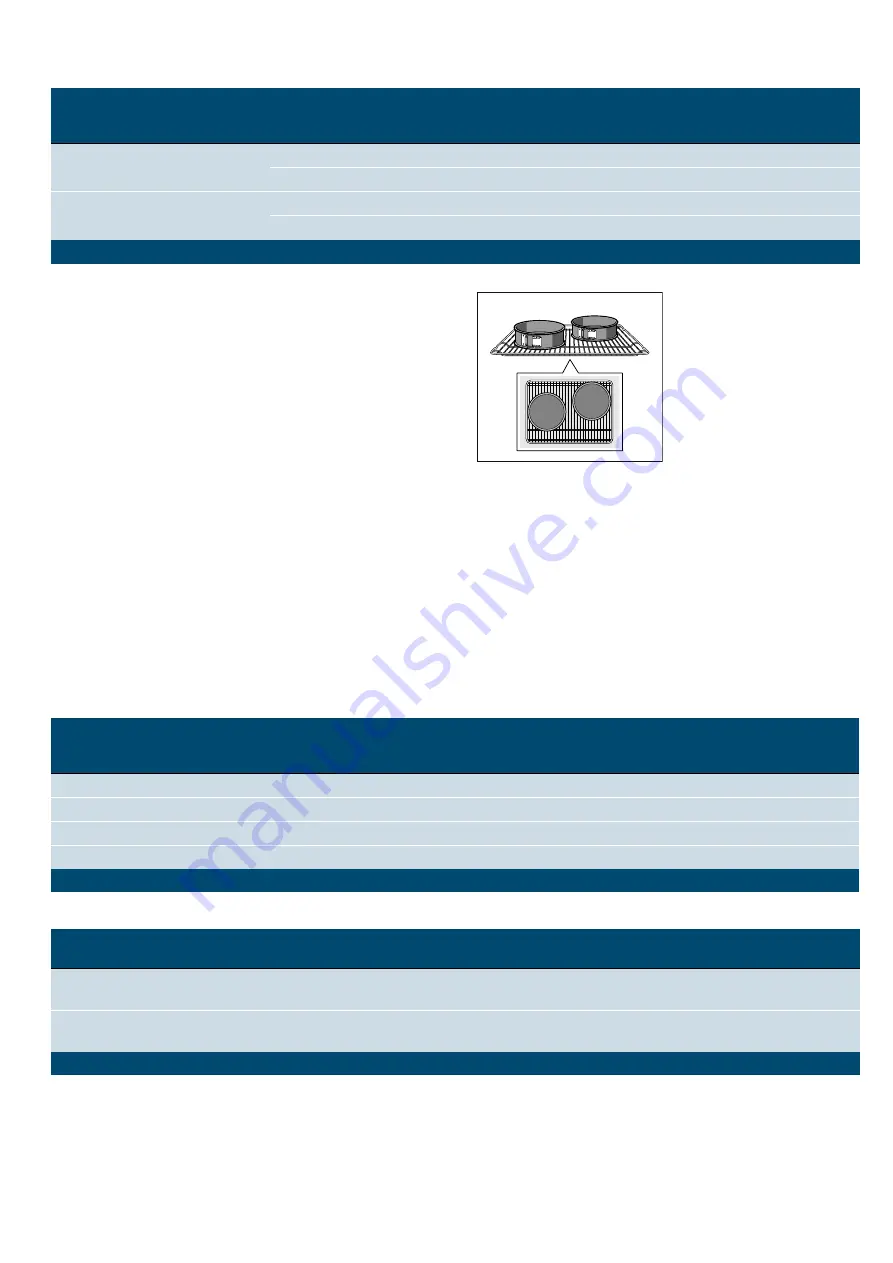
Baking with two springform cake tins:

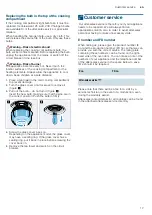
On one level (figure 

!

)

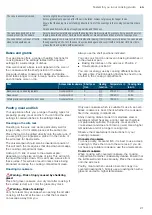
Notes

The setting values apply to dishes placed into a cold 

cooking compartment.

Please note the information in the tables about 

preheating. The setting values are valid without rapid 

heating-up.

For baking, use the lower of the indicated 

temperatures first.

Grilling

Also slide in the universal pan. The liquid will be caught 

and the cooking compartment stays cleaner.

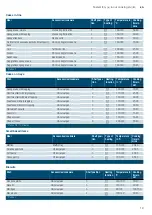
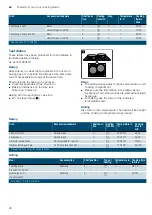
Baking

Grilling

Dish

Accessories/cookware

Shelf posi-

tion

Heating 

function

Step

Temperature 

in °C

Cooking 

time in 

mins

Yeast dough, light

Bowl

2

4

1.

-*

25-30

Universal pan or loaf tin

2

4

2.

-*

10-20

Yeast dough, heavy and rich

Bowl

2

4

1.

-*

60-75

Universal pan or loaf tin

2

4

2.

-*

45-60

* Heat up up to 50 °C with 

%

1

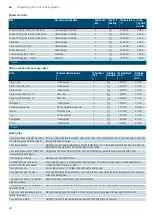
Dish

Accessories/cookware

Shelf posi-

tion

Heating 

function

Temperature in 

°C

Cooking 

time in 

min

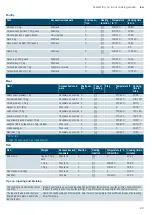
Viennese whirls

Universal pan

3

%

140-150*

25-35

Small cakes

Universal pan

3

%

160-170*

20-35

Hot water sponge cake

26 cm springform cake tin

2

%

160-170*

30-40

Double-crusted apple pie

2 x 20 cm black cake tins

2

%

170-190

80-100

* Preheat; do not use rapid heat-up function

Meal

Accessory/ies

Shelf position

Type of 

heating

Temperature in 

°C

Cooking time 

in mins

Toasting bread
Preheat for 10 mins

Wire rack

4

(

3

0,2-1,5

Beef burgers, x12
Do not preheat

Wire rack

4

(

3

25-30*

* Turn after 2/3 of the total time.

Содержание HA010FBR1M

Страница 1: ...3FHJTUFS ZPVS QSPEVDU POMJOF TJFNFOT IPNF CTI HSPVQ DPN XFMDPNF en Instruction manual Built in oven Built in oven HA010FBR1M ...

Страница 2: ......

Страница 3: ...and off 12 Setting the heating function and temperature 12 D Cleaning 12 Suitable cleaning agents 12 Keeping the appliance clean 13 p Rails 14 Detaching and refitting the rails 14 q Appliance door 15 Detaching and attaching the oven door 15 Removing and refitting the door panels 15 Additional door safety 16 3 Trouble shooting 16 Rectifying faults yourself 16 Replacing the bulb in the top of the co...

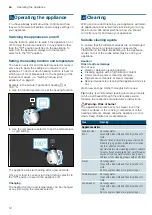
Страница 4: ... safe distance from the appliance and power cable Always slide accessories into the cooking compartment the right way round Accessories on page 10 Important safety information ImportantsafetyinformationGeneral information Warning Risk of fire Combustible items stored in the cooking compartment may catch fire Never store combustible items in the cooking compartment Never open the appliance door if ...

Страница 5: ...are dangerous Repairs may only be carried out and damaged power cables replaced by one of our trained after sales technicians If the appliance is defective unplug the appliance from the mains or switch off the circuit breaker in the fuse box Contact the after sales service Risk of electric shock and serious injury The cable insulation on electrical appliances may melt when touching hot parts of th...

Страница 6: ...liance door Inserting accessories depending on the appliance model accessories can scratch the door panel when closing the appliance door Always insert the accessories into the cooking compartment as far as they will go Carrying the appliance do not carry or hold the appliance by the door handle The door handle cannot support the weight of the appliance and could break 5Installation and connection...

Страница 7: ...ging to guarantee sufficient protection against any transport damage Transport the appliance in an upright position Do not hold the appliance by the door handle or the connections on the rear as these could be damaged Do not place any heavy objects on the appliance 7Environmental protection EnvironmentalprotectionYour new appliance is particularly energy efficient Here you can find tips on how to ...

Страница 8: ...s on the control panel Below you will see an overview of the control panel and the layout of the controls Note On some appliances the control knobs can be pushed in To push the control knob in and engage it or to release it again turn it to the Off position This appliance is labelled in accordance with European Directive 2012 19 EU concerning used electrical and electronic appliances waste electri...

Страница 9: ...l remain lit while the oven is in operation When the function selector is turned to bring operation to an end the lighting will go out By turning the function selector to the interior lighting setting you can switch on the lighting without heating the oven This makes it easier to clean your appliance for example Cooling fan The cooling fan switches on and off as required The hot air escapes above ...

Страница 10: ...t parallel Do not move the baking tray from side to side as you slide it in otherwise it will not go in easily and the enamelled surfaces may be damaged Make sure that you always insert the accessories into the cooking compartment the right way round Always insert the accessories fully into the cooking compartment so that they do not touch the appliance door Take any accessories that you will not ...

Страница 11: ...lean the smooth surfaces with soapy water and a dish cloth Cleaning the accessories Clean the accessories thoroughly using soapy water and a dish cloth or soft brush Professional pan For preparing large quantities of food Also ideal for moussaka for example Lid for the professional pan The lid turns the professional pan into a professional roasting dish Pizza tray For pizzas and large round cakes ...

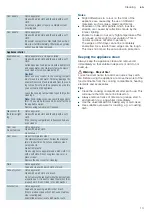
Страница 12: ...gents To ensure that the different surfaces are not damaged by using the wrong cleaning agent observe the information in the table Depending on the appliance model not all of the areas listed may be on in your appliance Caution Risk of surface damage Do not use Harsh or abrasive cleaning agents Cleaning agents with a high alcohol content Hard scouring pads or cleaning sponges High pressure cleaner...

Страница 13: ...ved Appliance interior Enamelled sur faces Hot soapy water or a vinegar solution Clean with a dish cloth and then dry with a soft cloth Soften baked on food remnants with a damp cloth and soapy water Use stainless steel wire wool or oven cleaner to remove stubborn dirt Caution Never use oven cleaner in the cooking compart ment when it is still warm This may damage the enamel Remove all food remnan...

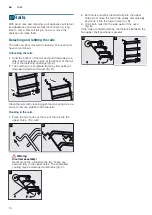
Страница 14: ...lete frame by first pulling it downward and then forward fig B Clean the rails with cleaning agent and a sponge Use a brush to remove stubborn dirt deposits Hooking in the rails 1 Place the two hooks at the top of the rail into the upper holes Fig A B Warning Incorrect assembly Never move the rail before the two hooks are secured fully in the upper holes The enamelled coating may be damaged and br...

Страница 15: ...wo locking levers on the left and right figure A 3 Close the oven door as far as the limit stop With both hands grip the door on the left and right hand sides Close the door a little further and pull it out figure B Attaching the door Reattach the oven door in the reverse sequence to removal 1 When attaching the oven door ensure that both hinges are inserted straight into the opening figure A 2 Th...

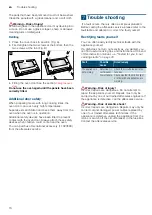
Страница 16: ...a fault occurs there is often a simple explanation Before calling the after sales service please refer to the fault table and attempt to correct the fault yourself Rectifying faults yourself You can often easily rectify technical faults with the appliance yourself If a dish does not turn out exactly as you wanted you can find useful cooking tips and instructions at the end of this instruction manu...

Страница 17: ... the correct position Push the bulb in firmly 4 Screw the glass cover back on Depending on the appliance model the glass cover may have a sealing ring If the glass cover has a sealing ring put it back in place before screwing the cover back on 5 Remove the tea towel and switch on the circuit breaker 4Customer service CustomerserviceOur after sales service is there for you if your appliance needs t...

Страница 18: ...table for similar food as reference Additional information can be found in the baking tips listed after the settings tables Remove any accessories that are not being used from the cooking compartment This will allow you to achieve optimal cooking results while saving energy Baking on one level When baking on one level use the following shelf positions Position 2 tall baked items and tins dishes on...

Страница 19: ...onge cake with topping Universal pan 3 160 180 20 45 Shortcrust tart with dry topping Universal pan 2 170 190 25 35 Shortcrust tart with moist topping Universal pan 2 160 180 60 90 Yeast cake with dry topping Universal pan 3 170 180 25 35 Yeast cake with moist topping Universal pan 3 160 180 30 50 Plaited loaf savarin Universal pan 2 160 170 35 40 Swiss roll Universal pan 2 170 190 15 20 Strudel s...

Страница 20: ...ake is completely cooked in the middle Push a cocktail stick into the highest point on the cake If the cocktail stick comes out clean with no cake mix ture on it the cake is ready The cake collapses Next time use less liquid Alternatively set the temperature 10 C lower and extend the baking time Use the ingredients and preparation instructions given in the recipe The cake has risen in the middle b...

Страница 21: ...cookware which is suitable for use in an oven Glass cookware is best Check whether the cookware fits in the cooking compartment Shiny roasting dishes made from stainless steel or aluminium reflect heat like a mirror and are therefore not particularly suitable The poultry meat and fish cooks slower and does not brown so well Use a higher temperature and or a longer cooking time Observe the manufact...

Страница 22: ...t and fish after approx to Z of the indicated time Poultry When cooking duck or goose pierce the skin on the underside of the wings This allows the fat to run out If using duck breast score the skin Do not turn duck breasts Add some liquid to the poultry in the dish Cover the base of the ovenware with approx 1 2 cm of liquid When you turn poultry ensure that the breast side or the skin side is und...

Страница 23: ...e rack 4 3 25 30 Joint of veal 1 5 kg Cookware uncovered 2 180 200 120 140 Knuckle of veal 1 5 kg Cookware uncovered 2 210 230 130 150 Leg of lamb boned medium 1 5 kg Cookware uncovered 2 200 210 70 80 Saddle of lamb on the bone 1 5 kg medium Wire rack 2 190 200 60 70 Grilled sausages Wire rack 3 3 20 25 Meat loaf 1 kg Cookware uncovered 2 190 200 70 80 Do not turn Slide the universal pan in at sh...

Страница 24: ...urnt Next time use a smaller roasting dish and add more liquid if necessary The roast looks good but the juices are too clear and watery Next time use a larger roasting dish and add less liquid if necessary The meat gets burned during brais ing The roasting dish and lid must fit together well and close properly Reduce the temperature and add more liquid when braising if necessary Dish Accessories ...

Страница 25: ...erving remove the jars from the cooking compartment Caution Do not place the hot jars on a cold or wet surface They could suddenly burst Prove dough Your yeast dough will prove considerably more quickly using this heating function than at room temperature and will not dry out Do not start the appliance if the cooking compartment is not completely cool Always allow yeast dough to prove twice Use th...

Страница 26: ...lide in the universal pan The liquid will be caught and the cooking compartment stays cleaner Baking Grilling Dish Accessories cookware Shelf posi tion Heating function Step Temperature in C Cooking time in mins Yeast dough light Bowl 2 4 1 25 30 Universal pan or loaf tin 2 4 2 10 20 Yeast dough heavy and rich Bowl 2 4 1 60 75 Universal pan or loaf tin 2 4 2 45 60 Heat up up to 50 C with 1 Dish Ac...

Страница 27: ...6 ...

Страница 28: ...0DQXIDFWXUHG E 6 DXVJHUlWH PE XQGHU 7UDGHPDUN LFHQVH RI 6LHPHQV 4 BVTHFSÉUF NC BSM 8FSZ 4US ßODIFO TJFNFOT IPNF CTI HSPVQ DPN 3 9001451645 9001451645 020499 B ...

Отзывы: