29
FLUDEX 4600 en
Operating instructions 10/2017
10.5
Disassembling the FLUDEX coupling
For part designations, see section 11.
Risk of burns after switching off.
Allow the FLUDEX coupling to cool down sufficiently before beginning work.
10.5.1
Disassembling the sizes 222 to 342
After moving the motor away the retaining screw (141) and locking plate (140) are first removed and then
the locking ring (124) demounted. When pulling off the FLUDEX coupling, care must be taken that
pullingoff forces are conducted only through the steel hollow shaft (106).
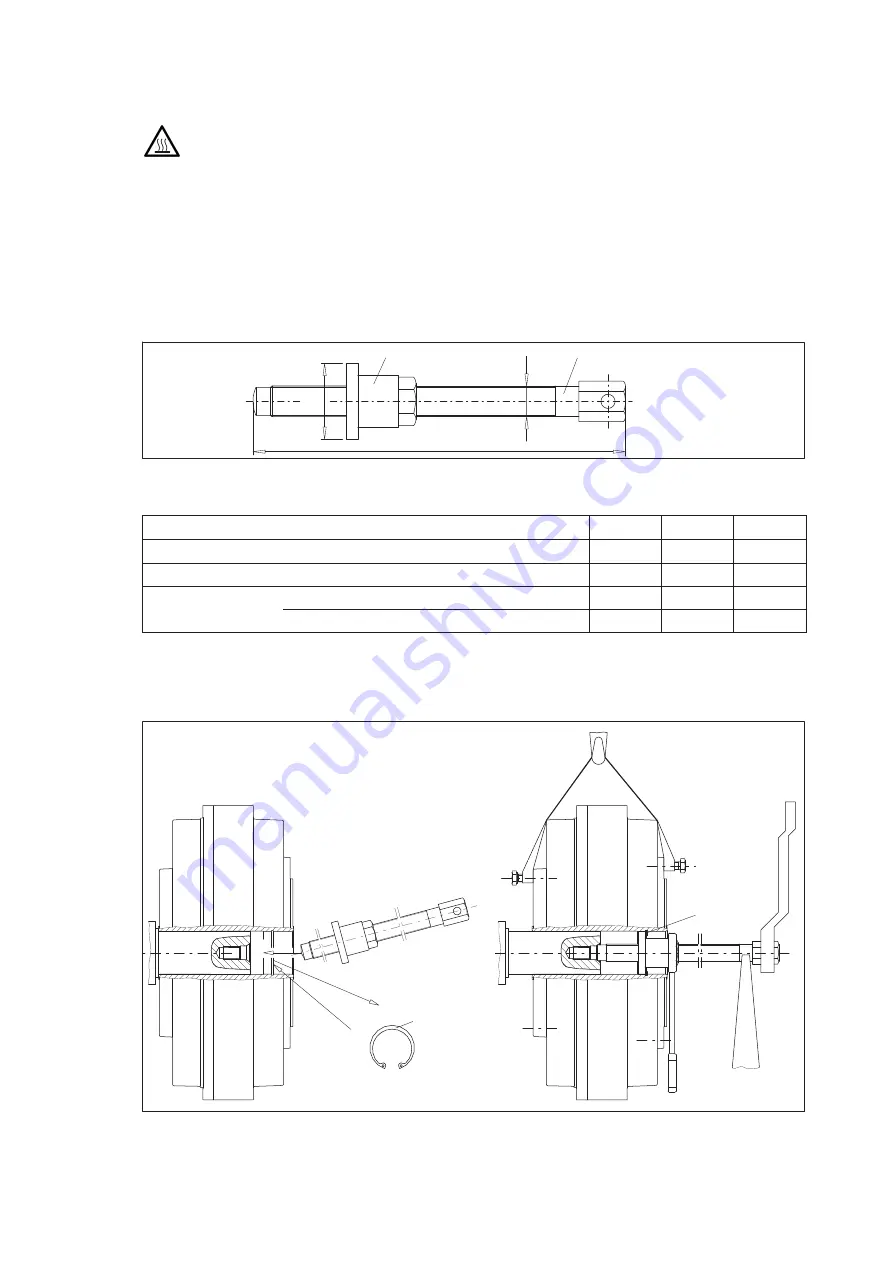
The coupling is best pulled off with the aid of a special detaching device as shown in figure 12. The spindle
with the pullingoff nut is inserted so that the collar (D) of the pullingoff nut is located behind the recess
for the locking ring (124) (Fig. 13). To prevent the spindle seizing, the pressure surface and the thread must
be treated with a lubricant (e.g. Molykote).
Spindle
L
Nut
D
G
Fig. 12:
Disassembling the sizes 222 to 342 -a
Table 11:
Dimensions of the threaded spindle and pullingoff nut, sizes 222 to 342
Size
222
297
342
Spindle thread G
G 1/4
G 1/2
G 3/4
Nut collar D
h8
[mm]
30
45
55
Spindle length L
[mm]
FAO, FAK, FAKB, FAD, FADB, FAE, FAM, FADS
200
305
280
FAR
200
305
420
The locking ring (124) is refitted and the spindle turned forward as far as the shaft stub end face and into
the safety countersink in the centring thread. Care must be taken that the nut collar rests evenly against
the locking ring.
To prevent flexing and canting, the spindle should be supported as shown.
1
3
2
124
124
Fig. 13:
Disassembling the sizes 222 to 342 -b
The coupling is pulled off the shaft stub by turning the spindle further into the forcingoff thread and bracing
the nut. It is recommended that a hydraulic spindle be used, depending on the size of the coupling.
Содержание Flender FLUDEX 4600 FAD Series
Страница 2: ......


