background image

 12

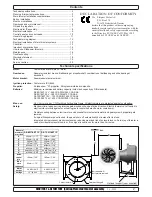
SE80/185T  & SE100/185T  Ignition Protected thruster assembly      

1.0 - 2007

 12

SP75Ti  /  SP95Ti ignition protected thruster assembly


1.2.1 - 2007

SLEIPNER

SIDEPOWER

THRUSTERS

OFF

ON

ON

BOW

STERN

To sternthruster

To bowthruster

gr

ey

bl

ue

bl

ac

k

gr

ey

bl

ue

re

d

ON / OFF

System

Control

light

Joystick

for stern-

thruster

Joystick

for bow-

thruster

Positive lead from

sternthruster have been

removed in panel to

avoid current leakage

between different

battery banks if the

thrusters are powered

by different battery

banks.

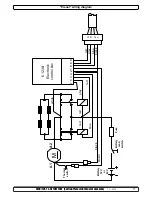
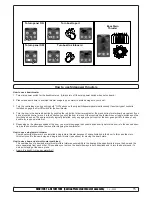
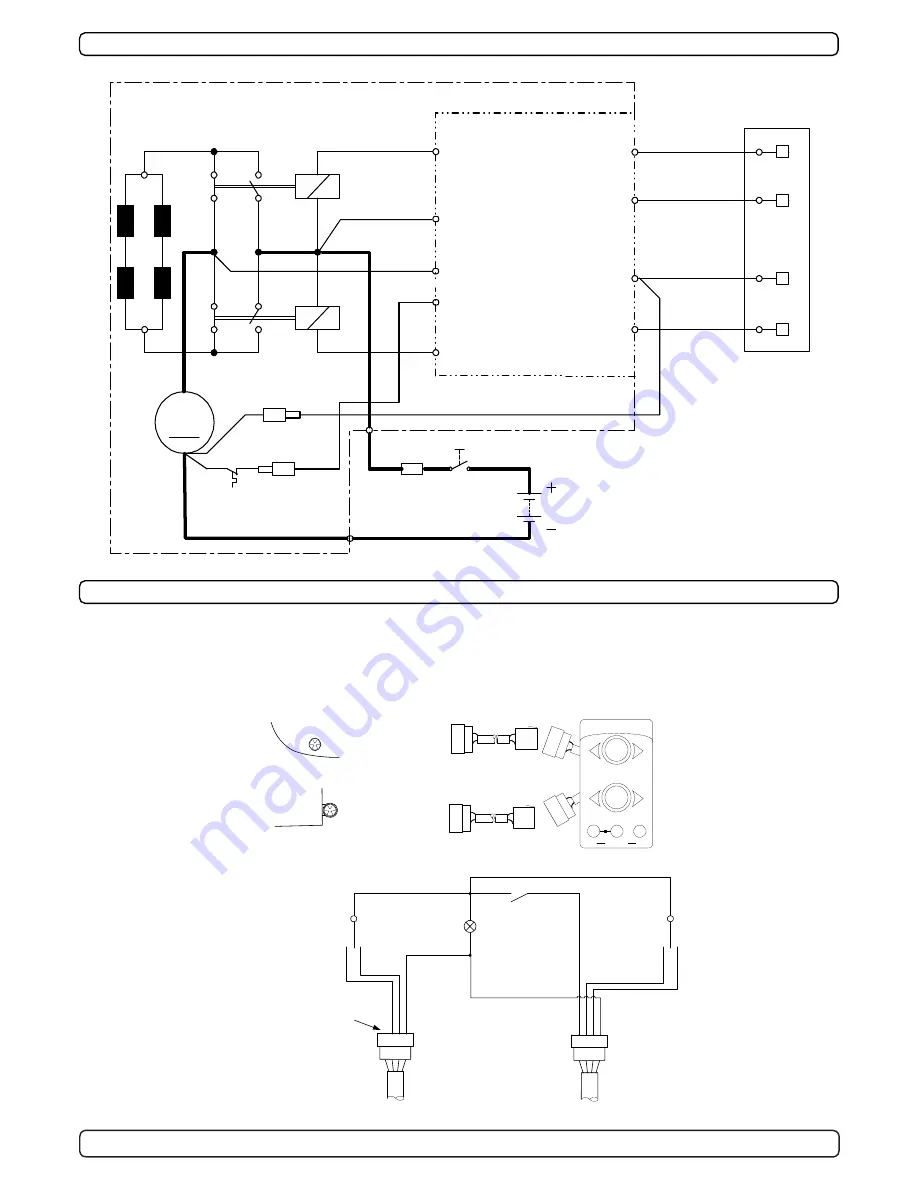
Wiring diagram (simplified) for dual joystick panel

Visual connection diagram for dual joystick panel

y

We advice to use different battery banks for each thruster to ensure

maximum performance when both are used at the same time.

y

When using the original Sidepower control cables just connect them

to the corresponding joystick

y

There are no plus/positive power connected from the bowthruster

yellow

BOW

STERN

bl

ac

k

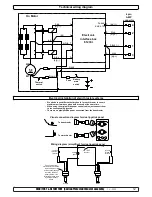
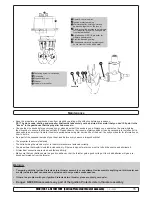
Technical wiring diagram

Electrical installation of stern thruster systems

M

Thermal

switch

Electronic

interface box

6 1230i

A2

A1

4 pin

AMP

connector

On Motor

4

2

1

3

Fuse Battery

main

switch

1

5

4

2

6

8

9

red (+)

grey

(sig +)

blue

(sig +)

black (-)

red

grey

(sig -)

blue

(sig -)

brown

3

red

Fused

inside 1A

black

7

white

Содержание SE100/185T

Страница 1: ...5T Ignition Protected thruster assembly SIDE POWER SLEIPNER MOTOR AS P O Box 519 N 1612 Fredrikstad Norway Tel 47 69 30 00 60 Fax 47 69 30 00 70 Installation and user manual w w w s i d e p o w e r c...

Страница 2: ...ster installation considerations 3 Bolt on installation 4 Mould on installation 5 Gearhouse and motorbracket 6 Oil tank propellers 7 Electromotor IP assembly 8 Electrical installation 9 Control panel...

Страница 3: ...to cut a stiffener stringer support for the hull integrity without checking with the boatbuilder that this can be safely done When installed in boats approved or classified according to international...

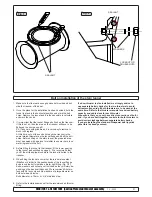
Страница 4: ...escribed on page 6 We recommend that you fit the oil feed pipe also before the tunnel is bolted to the transom 5 When fitting the tunnel ensure that there is ample sealant Sikaflex or similar in the s...

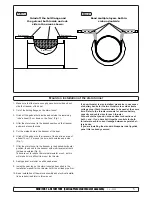
Страница 5: ...nsom with multi layers matt both inside and outside Fig 2 Take care not to reduce the internal diameter much as this will make it more difficult to mount the thruster 8 Apply gelcoat or similar on all...

Страница 6: ...twas Sikaflex o auftragen damit keine undichte Stelle auftritt PS Die Durchg nge f r das l 2 von Dichtmasse freihalten 7 Etwas l oder Fett auf die O ringe der Motorhalterung geben da diese sonst beim...

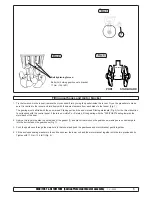
Страница 7: ...in There should be almost no gap between the propeller hub and the gearhouse 3 Place the washer 4 on the prop shaft and then tighten the lock nut 3 on the propeller shaft 4 Place the zinkanode 2 in it...

Страница 8: ...position the electromotor needs a separate additional support See illustration in the measurements drawings 6 Lift the lower part of the flexible coupling together with the rubber plastic ring into t...

Страница 9: ...0 Battery cable recommendations Minimum and recommended cable dimensions can be identical due to safety margins and cable heat considerations for short cable lenghts Minimum or recommended cable cross...

Страница 10: ...rol panel Control panel and control leads 10 SP75Ti SP95Ti ignition protected thruster assembly 1 2 1 2007 You can install as many panels as you wish by using optional Y connectors If two or more pane...

Страница 11: ...11 SP75Ti SP95Ti ignition protected thruster assembly 1 2 1 2007 Visual wiring diagram A2 A1 Fuse 9 6 8 1 2 4 5 red grey blue black grey blue brown red 6 1230i Electronic control box Thermal switch Ba...

Страница 12: ...diagram simplified for dual joystick panel Visual connection diagram for dual joystick panel y We advice to use different battery banks for each thruster to ensure maximum performance when both are u...

Страница 13: ...ed Correct drive direction as per controlpanel All electrical connections are clean dry and tight and the correct cable fuse and main switch sizes have been used The bolts holding the gearhouse and mo...

Страница 14: ...from the propeller can cause serious damage to the electromotor When leaving the boat always turn off the main power switch for the thruster We advice to always keep the main engine s running while u...

Страница 15: ...try in open water first How to use Sidepower thrusters 15 SP75Ti SP95Ti ignition protected thruster assembly 1 2 1 2007 How to use a bowthruster 1 Turn main power switch for the bowthruster on Always...

Страница 16: ...there are signs of water you must try to find the source and eliminate it All electrical connections are clean and fastened firmly Make sure that your batteries are in a good condition so that the thr...

Страница 17: ...oid is ok and measure that there is contact through the magnetising spools of each side of the solenoid measure between the red and blue on one side and red and grey on the other side with an Ohm mete...

Страница 18: ...rice Purchaser must submit a statement in writing from a professional boating equipment supplier that the installation instructions of the Installation and Operation Manual have been complied with and...

Страница 19: ...th gasket 6 1220 6 1220 5 Zinc anode 7 1190 7 1190 4 Locknut 4 1260 4 1260 3 Propeller w asher 7 1181 7 1181 2 Propeller drive pin 6 1241 6 1241 1 Propeller 7 1260 7 1260 Other comments Please provide...

Страница 20: ...215 www imnasa com imnasa imnasa com Sweden Sleipner AB Str mstad Tel 46 526 629 50 Fax 46 526 152 95 www sleipnerab se Switzerland Marine Parts Technics AG Volketswil Tel 41 1 997 40 90 Fax 41 1 997...

Отзывы: