Installation Manual
SIBER
®
WIRELESS MULTICONTROL v.8
Страница 1: ...Installation Manual SIBER WIRELESS MULTICONTROL v 8 ...
Страница 2: ...eived clear instructions on how to use the system safely and know the possible hazards and provided that the system has been positioned and installed in the normal position for use Children between 3 and 8 years old must not insert the plug into the socket clean the system make changes in its settings or carry out any of the maintenance tasks that are usually done by the user Children must not pla...
Страница 3: ...n 6 4 OPERATION AND MENUS 6 4 1 Operation And Menus 6 4 2 Menus 6 4 2 1 Filter Restart Mode 6 4 2 2 Select the correct mode 7 5 INSTALLATION 7 5 1 Preparation for the installation 7 5 2 Installation Procedure 8 5 2 1 Connecting The Wires 8 5 2 2 Install the device 8 5 3 Damage to the device 8 5 4 Start Up 9 6 CONFIGURATION 9 6 1 Establish the LINK 9 6 2 Service Menu And Changing Settings 9 6 2 1 G...
Страница 4: ...INSTRUCTIONS 1 3 KEY SYMBOLS AND WORDS USED The original text of this manual is written in English The versions of this document in other languages are translations of the original text NOTE Is used to highlight additional information IMPORTANT Means that damage to the device or in its vicinity may occur if the instructions are not followed HAZARD Means that death serious injury or damage to the d...
Страница 5: ...e device within its ambient limits Only clean the device with a soft damp cloth Never use abrasives or chemical cleaners Do not paint the device 3 DESCRIPTION OF THE DEVICE 3 1 INTENDED USE The device is a user interface and installation for monitoring and configuring the connected heat recovery unit Any other or additional use is not the intended use 3 2 OPERATING PRINCIPLE The device sets and mo...
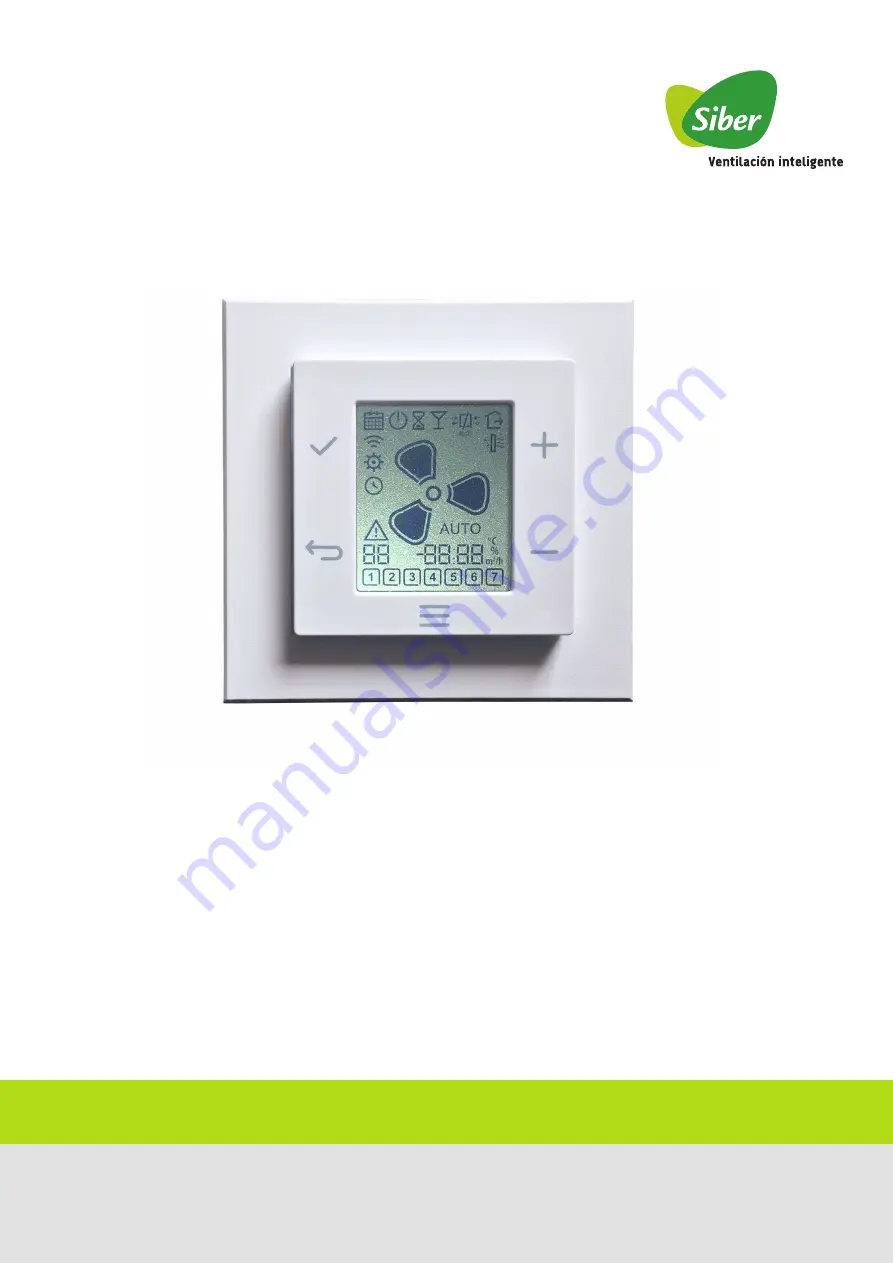
Страница 6: ...d mode BUTTON Tap to increase the number or the element on the screen BUTTON Tap to reduce the number or the element on the screen MENU BUTTON Tap to return to the preset screen AUTO m h C 3 0 0 0 1 2 3 4 5 6 7 J G I H K L A B C D E M N O F P A Time programming menu B On programme enabled Off program disabled C Timer mode D Maximum Mode E Bypass Indicator F Away Mode G Change filter Reset filter H...
Страница 7: ... repeatedly until the AUTO mode icon comes on AUTOMATIC MODE When in AUTO mode use the UP button or the DOWN button to stop the AUTO mode Tap the UP or DOWN button repeatedly to select the correct speed of the fan See 3 3 2 for fan speed settings MANUAL MODE To start the AWAY mode tap the UPbutton or the DOWN button repeatedly until the AWAY mode icon appears AWAY MODE To start the MAXIMUM mode ta...
Страница 8: ...upply wires through the face plate D 3 Insert the wires in the correct connection in the device See 5 2 1 4 Fix the device C with the correct screws B to the wall plate F Ensure that the face plate D is correctly located between the device and the plate F 5 Position and push the cover A on the device C 1 Connect N to the neutral or blue wire from the power supply 2 Connect L to the live or brown w...
Страница 9: ...figured on the Installer menu To start the installer menu tap the MENU button for 10 seconds or more The menus that can be configured will then be available There are two the LINK menu and the SERVICE menu 1 Switch on the device s power supply a All the icons on the screen will be displayed for three seconds b After three seconds the device software version will be displayed on the bottom right ha...
Страница 10: ...ion Gestural movement IR sensor 6 2 2 CHANGING A CONFIGURATION 1 To change a configuration go to the service menu See 6 2 1 2 Select the correct index number 3 Tap the ACCEPT button The 4 digit value display starts to flash 4 Tap the UP button or the DOWN button to change the configuration value 5 Tap the Accept button to maintain the correct configuration The 2 digit value display flashes 6 Repea...