background image


- 29 - 

*

 The product serial number is set as the factory default.


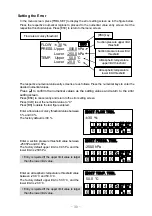
Setting the Screen   

In the menu screen, press [DISPLAY] to display the 
screen setting screen in the figure at right.   
Press [+] and [-] to adjust the brightness. 
Press [ESC] to confirm the settings and return to the 
menu screen. 


Setting the Serial Number 

In the menu screen, press [SERIAL NO.] to display 
the serial number setting screen in the figure at right. 
Press a numerical region to switch to the numerical 
value entry screen. 
When numerical values have been entered, the 
system will return to this screen. 
Press [ESC] to return to the menu screen. 


In the numerical value entry screen, press the 
numerical keys to enter the desired numerical values.   
Press 

 to confirm the numerical values as the 

setting values and return to the serial number setting 
screen. 
Press [ESC] to cancel entry and return to the serial 
number setting screen. 
Press [CLR] to set the numerical value to "0." 


■SET SERIAL NUMBER


9 4 0 0 0 1  

ESC


■SET SERIAL NUMBER


ES 

CL 

9 4 0 0 0 1  

S e t t i n g   M o d e


ESC


Brightness 

-  

◆  

7

+  

Содержание 090130-31

Страница 1: ...important for preventing accidents as well as the procedures used to handle the product To ensure safety read this operation manual and the attached warranty thoroughly before use and use the product correctly After reading this operation manual and the warranty keep them in a safe place where they can be referred to at any time OPERATION MANUAL ...

Страница 2: ...splays 19 Power Outages 20 The internal battery run down icon 21 Mode Display 21 Menu 23 Calibration Methods 33 1 Point and 2 Point Calibration 33 Flow Rate Calibration Method 34 Atmospheric Temperature Calibration Method 34 Atmospheric Pressure Calibration 35 Flow Rate Correction Method 35 Communications 35 Maintenance 36 Troubleshooting 37 Main Specifications 38 Spare Parts 38 Consumables 38 Opt...

Страница 3: ...ement the contents of this operation manual may be changed without notice Every effort has been made to ensure that the information contained in this operation manual is correct If you discover any errors or omissions however please contact your Sibata representative The copyright of this operation manual belongs to Sibata Scientific Technology Ltd The reproduction of all or part of this operation...

Страница 4: ...e assumption that the product will be operated only by users who fully understand the potential dangers of operating the product Warning Labels In this operation manual precautionary information is labeled The degree of damage or injury that may occur if the product is used without consideration of the corresponding item of precautionary information is indicated by one of three labels DANGER WARNI...

Страница 5: ...to be dismantled for repair by non service personnel Doing so might cause malfunction or accidents Do not run this product wrapped in a cloth or bedding or enclosed in a box Doing so might cause heat to build up resulting in fire or malfunction Only use a single phase 220 V power supply 180 V to 264 V can be used Also do not connect the power adapter to a multi plug power strip Doing so might caus...

Страница 6: ...ause fire or electric shock Do not use wires other metallic objects or any other connection method not specified in this manual Doing so might cause malfunction Do not allow water and other liquids and gases other than air to be sucked in Also do not allow corrosive gases e g salt air or chemicals to be sucked in Doing so might cause malfunction or fire Be sure to install a filter before operating...

Страница 7: ...ow rate function to minimize drops in the suction flow rate accompanying increased suction pressure caused by sampling of dust etc A backlit touch panel is adopted to enable even more convenient operation Two timer functions are provided for starting operations a delay timer based on the time and a clock timer based on the calendar date Two types of timer sampling for ending operations are also av...

Страница 8: ...110mm is available for the HV 500R Filter 8 X10 also can be used with attaching the squared filter holder option attachment parts are also needed Dioxin Sampling It can be used to collect Dioxins by attaching the shuttle tube tube for polyurethane foam attachment Particle size selector By using this grading device you may sample SPM PM 2 5 PM4 and PM10 Orifice flow meter A special orifice flow met...

Страница 9: ...tandard accessories The above figure has a filter N type adaptor Miniature knob Touch panel START STOP Switch USB USB B Connector covered by a cap POWER Power switch Outside air temperature sensor protrudes from the body so it can measure a temperature around Suction port precisely Please handle with care not to touch or break the sensor ...

Страница 10: ... 8 Rear Exhaust side Handle Exhaust Power connector Circuit protector ...

Страница 11: ...fix The Filter clip is for one filter Do not rotate the Clip ring to fix filters when you use two filters or the Filter clip may be damaged Rotate a Clip ring to remove it from a main body Set a Filter clip on a N type adaptor make sure filter side faces outward and set a Clip ring and rotate it to fix Caution for the sharp edge of screw cutting of inner side of Clip holder and the screw edge in N...

Страница 12: ...OFF then connect one side of a power cable to a power connector which is on the exhaust side of a main body and connect the other side to an AC concent Touch Panel This product is equipped with a touch panel liquid crystal display Operations can be performed by touching the display directly Press the START STOP button to start sampling Touch keys are arranged at various points on the respective to...

Страница 13: ... currently configured flow rate correction method See page 24 Flow rate settings The flow rate can be set See page 12 Operation start timer The operation start method and start timer can be set See page 13 Operation end timer The operation ending method and end timer can be set See page 15 Mode Displays environmental information See page 21 Key lock Locks keys Locked Lock cancelled Last data Displ...

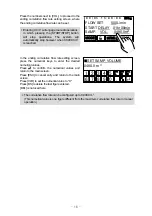
Страница 14: ...red flow rate Press to confirm the numerical value and return to the main screen Press ESC to cancel entry and return to the main screen Press CLR to set the numerical value to 0 Press BS to delete the last figure entered The configurable flow rate range is as follows 100 L min to 800 L min SET FLOW ES C 0 9 5 4 8 7 3 2 6 1 B S CL R 500 L min MODE MENU FLOW SET 500 L min START DELAY 01hr00min SAMP...

Страница 15: ...al values have been entered the system will return to this screen Press ESC to return to the main screen In the numerical value entry screen press the numerical keys to enter the desired numerical values In this screen as well press a region with underlined numbers to change the entry item Press to confirm the numerical values as the setting values and return to the start time setting screen Press...

Страница 16: ...start time setting screen where the starting time can be set From the left the display shows the year last two figures of the western calendar month day hour minute and second Press the respective numerical regions to proceed to the numerical value entry screen When the numerical values have been entered the system will return to this screen Press OK to confirm the setting value and return to the ...

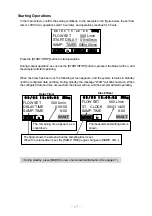
Страница 17: ...roceed to the numerical value entry screen When the numerical values have been entered the system will return to this screen Press ESC to return to the main screen In the numerical value entry screen press the numerical keys to enter the desired numerical values In this screen as well press a region with underlined numbers to change the entry item Press to confirm the numerical values as the setti...

Страница 18: ...ng cumulative flow rate setting screen where the ending cumulative flow rate can be set In the ending cumulative flow rate setting screen press the numerical keys to enter the desired numerical values Press to confirm the numerical values and return to the main screen Press ESC to cancel entry and return to the main screen Press CLR to set the numerical value to 0 Press BS to delete the last figur...

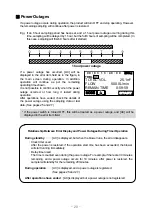
Страница 19: ...mains in standby until the configured date and time During standby the message WAIT will blink onscreen When the configured date and time are reached the blower will run and the sampler will start operating MODE MENU FLOW SET 500 L min START DELAY 01hr00min SAMP TIMER 008hr00min 25deg 0 9 0 3 1 3 4 0 0 0 LASTDATA Delay Timer Clock Timer The remaining time appears as a countdown The figure shows th...

Страница 20: ...ton again During Operation When the blower is running and the sampler starts operating the following screen appears At this point the message START is highlighted Pressing the START STOP button during operation will forcibly stop operation ZERO ERROR 23 2Pa ESC START MODE 0 9 0 3 1 3 4 0 0 0 TOTAL VOL 0 1m3 FLOW 500 0L min ELAPSED TIME 0 00 01 Manual Operation Cumulative flow rate Instantaneous fl...

Страница 21: ...however the blower will not stop and operation will continue If an error occurs it will be indicated onscreen If the error is blinking this indicates that it is occurring right now whereas if the error is lit this indicates that it occurred previously A blower error is always lit The internal battery run down icon blinks when the battery power is low and is lit when the battery is completely dead ...

Страница 22: ...tage occurred or how long it lasted during operation After operations have ended check the details of the power outage using the sampling data or last data See pages 25 and 27 START MODE 25deg 0 9 0 3 1 3 4 0 0 0 TOTAL VOL 25 1m3 FLOW 500 0L min REMAIN TIME 0 59 59 TRBL AC Relationship Between Error Display and Power Outages During Timer Operation During standby AC is displayed but when the blower...

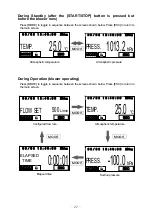
Страница 23: ...isplay In the main screen and other screens press MODE to view environmental information The displayed items will differ before and after blower operation Prior to Operation before the START STOP button is pressed Press MODE to toggle in sequence between the screens shown below Press ESC to return to the main screen 0 0m3 TOTAL ESC MODE 25deg 0 9 0 3 1 3 4 0 0 0 Internal battery is dead See page 3...

Страница 24: ... 3 1 3 4 0 0 0 TR BL P R T E A C B R F L 1013 2hPa PRESS ESC MODE 25deg 0 9 0 3 1 3 4 0 0 0 TR BL P R T E A C B R F L Atmospheric temperature Atmospheric pressure MODE MODE MODE MODE 25 0 TEMP MODE 25deg 0 9 0 3 1 3 4 0 0 0 TR BL P R T E A C B R F L ESC 500L min FLOWSET MODE 25deg 0 9 0 3 1 3 4 0 0 0 TR BL P R T E A C B R F L ESC 0 00 01 ELAPSED TIME MODE 25deg 0 9 0 3 1 3 4 0 0 0 TR BL P R T E A ...

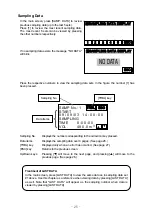
Страница 25: ...9 Toggling flow rate correction method Switches between the flow rate correction methods See page 24 Error setting Sets the threshold for errors warnings See page 30 Calibration mode Calibrates flow rate temperature and pressure See page 31 ESC key Pressing this key will return to the main screen SAMP DATA STD SET 25deg 1atm RTC SET TRBL SET DISPLAY ESC CAL SERIAL No Sampling data ESC key Toggling...

Страница 26: ...0 C 1 atmospheric correction and actual flow rate The toggled flow rate correction method can also be confirmed in the main screen SAMP DATA STD SET 25deg 1atm RTC SET TRBL SET DISPLAY ESC CAL SERIAL No MODE MENU FLOW SET 500 L min START DELAY 01hr00min SAMP TIMER 008hr00min 25deg 0 9 0 3 1 3 4 0 0 0 LAST DATA Flow rate correction method ...

Страница 27: ... over 4 pages See page 26 TRBL key Displayed only when an error has occurred See page 27 ESC key Returns to the previous screen Up Down keys Pressing will move to the next page and pressing will move to the previous page See page 26 Treatment of LAST DATA In the main screen press LAST DATA to view the same data as in sampling data set 1 above Use this chapter as a reference when viewing data by pr...

Страница 28: ...Minimum Average SAMP No 1 TEMPERATURE MAX 30 0 MIN 20 0 Ave 25 0 ESC Atmospheric temperature Maximum Minimum Average SAMP No 1 START 0 9 0 9 0 3 1 4 0 0 0 0 SAMPLING TIME 8 0 0 0 0 VOL 4 8 0 0 m 3 ESC SAMP No 1 FLOW SET 5 0 0 L min AVERAGE FLOW 5 0 0 1 L min T STD 2 5 d e g ESC Sampling start time Integrated flow rate Sampling time Flow rate settings Average flow rate Flow rate Correction method ...

Страница 29: ...re errors 3 times but no power errors have occurred The threshold for each error can be configured in the error setting screen See page 30 A blower error key is only displayed if a blower error has occurred Press the respective numerical keys to display error detail screens as in the figure SAMP No 1 START 0 9 0 9 0 3 1 4 0 0 0 0 SAMPLING TIME 8 00 00 VOL 480 0m3 TRBL ESC FLOW 1 5 5 0 1 L min STAR...

Страница 30: ...ive numerical regions to proceed to the numerical value entry screen When numerical values have been entered the system returns to this screen Press OK to confirm the setting values and return to the menu screen Press CANCEL to cancel the new settings and return to the menu screen In the numerical value entry screen press the numerical keys to enter the desired setting value In this screen as well...

Страница 31: ...n to switch to the numerical value entry screen When numerical values have been entered the system will return to this screen Press ESC to return to the menu screen In the numerical value entry screen press the numerical keys to enter the desired numerical values Press to confirm the numerical values as the setting values and return to the serial number setting screen Press ESC to cancel entry and...

Страница 32: ...g screen Press CLR to set the numerical value to 0 Press BS to delete the last figure entered Enter a flow rate accuracy threshold value between 5 and 30 The factory default is 30 Enter a suction pressure threshold value between 250 hPa and 0 0 hPa The factory default upper limit is 0 0 hPa and the lower limit is 250 hPa Enter an atmospheric temperature threshold value between 20 0 C and 50 0 C Th...

Страница 33: ...creens will be as in the figure at right Press a numerical region to proceed to the numerical value entry screen When numerical values have been entered the date of entry is recorded and the system returns to this screen Press ESC to return to the menu screen In the numerical value entry screen press the numerical keys to enter the desired numerical values Press to confirm the numerical values as ...

Страница 34: ...h to leak check mode For the leak check prepare an HV circular rubber plate sold separately Attach it to the same procedures as for attaching filters and seal off the sampler s suction port Next press the START STOP button and run the blower for 1 minute At this point measure the flow rate If the flow rate exceeds 5 L min there is likely a leak somewhere in the sampling line Check the attachment o...

Страница 35: ...alibration with respect to a particular flow rate accuracy is more easily adjusted by changing the span value If you are performing a 1 point calibration with respect to constantly changing temperature or pressure values then accuracy is more easily adjusted by changing the zero value With 1 point calibration change either the span value or the zero value Never change both values Obtaining the Spa...

Страница 36: ...m step 3 7 Switch to the calibration mode and enter the obtained span value and zero value If you are only adjusting the accuracy of a particular flow rate perform a 1 point calibration If you are using the product at multiple flow rate values perform either a 1 point or 2 point calibration depending on the circumstances For a 1 point calibration only change the span value For a 2 point calibratio...

Страница 37: ... be controlled so as to ensure that the flow rate display matches the configured flow rate The flow rate is calculated from the following flow rate formula and correction is performed in accordance with the selected flow rate correction method Qc Flow rate calculated under standard conditions L min Qa Actual flow rate L min Pa Atmospheric pressure hPa Ps Standard atmospheric pressure 1013 25 hPa T...

Страница 38: ...ped clean with acetone For other parts however wipe clean with dilute ethanol In the following cases repairs or maintenance must be performed by the manufacturer Contact your Sibata agent 1 One year has elapsed since flow rate calibration by the manufacturer 2 The internal battery run down icon is lit 3 The packing or rubber parts have become stiff or cracks have developed If any other problems ar...

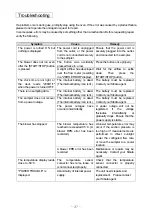
Страница 39: ...ct your Sibata agent There is no sampling data The internal battery is dead The internal battery icon is lit The battery must be replaced Contact your Sibata agent The sampler does not recover from a power outage The internal battery is dead The internal battery icon is lit The battery must be replaced Contact your Sibata agent The power outages have occurred intermittently A power outage will not...

Страница 40: ...nsumption 2 500 L min 1 4 A with glass fiber filter φ 110mm Dimension 425 W 200 D 270 H mm Weight Approx 8 kg Accessories Filter clip for φ 110mm Item Code 080130 0871 Glass fiber filter φ 110mm GB 100R 110A 10pcs Touch panel protection sheet Power cable 1 Operation under 1 atmospheric pressure assumed Performance may be inferior under low atmospheric conditions at high altitudes 2 This is the ini...

Страница 41: ...parts Details 080130 042 Particle size selector round SPM Over 10μm 100 cut 080130 045 Particle size selector round PM10 10μm 50 cut 080130 0874 Particle size selector round PM4 4μm 50 cut 080130 047 Particle size selector round PM2 5 2 5μm 50 cut 080130 033 Sampling plate set Sampling plate φ110mm x 5 Filter case with lid x 6 Grease guide x 1 Grease x 1 Storage box x 1 080130 037 Grease guide φ11...

Страница 42: ...de Name of parts Details 080130 0971 Shuttle tube SUS outer tube x 1 Carrying canopy x 2 Clamp with lock x 2 Urethan holder urethane excluded x 1 080130 0972 Urethane holder Glass urethane holder holder only 080130 0994 Clamp For shuttle tube lock excluded 080130 0872 Shuttle tube fitting set Sanitary flange x 1 Stand for shuttle tube x 1 Teflon ring x1 Screw x 1 Hexagon wrench x 1 080130 0873 Rec...

Страница 43: ... how the unit should be combined depending on purpose of your use 1 When using this product 080130 07511 Round adapter for orifice flow meter or 080130 0551 Rectangular adapter for orifice flow meter are required It is possible to use Round adapter attached Orifice flow meter OF 1C or Rectangular adapter attached Orifice flow meter OF 1S A commercially available USB cable A B type is required for ...

Страница 44: ...y will be voided Such actions may cause unexpected faults or accidents Disclaimer Should some nonconformity occur during use of this product Sibata does not assume any liability whatsoever for compensation of data or content that could not be acquired or logged as a result loss of data or other content and other direct and indirect damages loss of business profit interruption of business etc relat...

Страница 45: ... regulations of your respective local governing body The sampler body is made almost entirely from metals aluminum and stainless steel Inquiries If you have any questions about this product or if there is any other way in which we can be of assistance contact your Sibata agent 2017 08 29H 07 ...

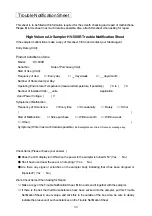
Страница 46: ...oms of Malfunction Frequency of Occurrence Every time Occasionally Rarely Other Start of Malfunction Since purchase Within a month Within a week Other Symptoms Write in as much detail as possible Ex Backlight does not turn ON even by pressing a key Check Items Please choose your answer Does the LCD display turn ON when the power to the sampler is turned ON Yes No Has it been used near the sea or a...

Страница 47: ... ...

Страница 48: ...pe dimensions specifications and other product information are subject to change without notice in the interest of product improvement to the extent that product functions and applications will not be impaired ...

Отзывы:

Похожие инструкции для 090130-31