background image


28(51) 


4.1.3 

Screen operation flow Table 


Picture 4-2: Screen Operation Flow Table 

4.1.4 

Menu Particular 

4.1.4.1 

System Default Screen 

When  the  system  is  connected  with  power  source,  the  initial  default  screen  will 
display as shown below. By touching the button of "English" or "Chinese" to select 
either English or Chinese language in order to login "Drying Process" screen. 


Picture 4-3: System Initial Screen 

Содержание SDD-1200U/700H

Страница 1: ...SDD ES Series Dehumidifying Dryer Date Oct 2018 Version Ver F English ...

Страница 2: ......

Страница 3: ...rage of the Machine 15 1 5 Exemption Clause 17 2 Structure Characteristics and Working Principle 18 2 1 Working Principle 18 2 2 Relative Humidity and Dew point 18 2 3 Why Choose SDD 19 2 4 Options 20 3 Installation Testing 21 3 1 Machine Location 21 3 2 Power Connectors 21 3 3 Air pipe and material pipe connection 22 3 4 Water connections 22 3 4 1 Cooling Water Connection 23 3 4 2 Condensation Dr...

Страница 4: ...e and Repair 41 6 1 The Useful Life of the Key Parts of the Product 42 6 2 Filter 42 6 3 Honeycomb rotor 43 6 3 1 What is Honeycomb rotor 43 6 3 2 Installation of the Rotor 43 6 3 3 Honeycomb Rotor Cleaning Steps 44 6 4 EGO 45 6 5 Cooler Clear Step 45 6 6 Dewpoint Monitor Option 46 6 6 1 Installation for Dewpoint Monitor 46 6 6 2 Dew point monitor setting 48 6 7 Maintenance Schedule 50 6 7 1 Gener...

Страница 5: ...r 24 Picture 3 5 Installation Dia of Oil Filter 25 Picture 3 6 Plate Heat Exchanger Over Figure 26 Picture 4 1 Description of Touch Screen 27 Picture 4 2 Screen Operation Flow Table 28 Picture 4 3 System Initial Screen 28 Picture 4 4 Dehumidifying Process Screen 29 Picture 4 5 Password Input Screen 29 Picture 4 6 Drying Process 30 Picture 4 7 Parameter Setting Menu Screen 30 Picture 4 8 Time Setti...

Страница 6: ...ult Records 37 Picture 6 1 Filter 42 Picture 6 2 Honeycomb Rotor 43 Picture 6 3 Installation of The Rotor 44 Picture 6 4 EGO 45 Picture 6 5 Hole Site 46 Picture 6 6 Parts of Dew point Monitor 46 Picture 6 7 Copper Joint Assembly of Original Machine 47 Picture 6 8 Installation Seat 47 Picture 6 9 Installation for Transmitter 47 Picture 6 10 Connection of Signal Wire 48 Picture 6 11 Connection of De...

Страница 7: ...ryer combine dehumidifying and drying systems into a single unit They have many applications in processing plastic materials such as PA PC PBT PET etc All models feature SD H honeycomb dehumidifiers with built in process heater and insulated drying hopper Under ideal conditions it can provide dehumidified dry air with a dew point lower than 40 SDD 160U 120H LC D SDD 80U 50H ...

Страница 8: ... Each model combines dehumidifying and drying functions into a single unit l Insulated drying hopper features dry air down blowing and cyclone exhaust design This improves drying efficiency and reduces energy consumption while maintain a steady drying effect l The dehumidifying section of the SDD series features two coolers to ensure a low return air temperature and low dew point l Compact in size...

Страница 9: ...Any modifications of the machine must be approved by SHINI in order to avoid personal injury and damage to machine We shall not be liable for any damage caused by unauthorized change of the machine Our company provides excellent after sales service Should you have any problem during using the machine please contact the company or the local vendor Headquarter and Taipei factory Tel 886 2 2680 9119 ...

Страница 10: ...120 160 2070 1061 893 255 160U 120H D 4 0 4 6 0 75 120 160 2070 1060 893 265 230U 120H D 4 0 4 6 0 75 120 230 2052 1210 893 295 300U 200H D 4 0 4 12 1 5 200 300 2040 1450 1050 420 450U 200H D 4 0 4 12 1 5 200 450 2440 1450 1050 550 600U 400H C 7 2 0 75 18 3 75 400 600 2380 1745 1255 620 750U 400H C 7 2 0 75 18 3 75 400 750 2610 1745 1255 650 900U 700H D 10 1 5 24 7 5 700 900 2640 2140 1380 830 120...

Страница 11: ...3 18 21 31 31 41 124 PU 90 2 3 17 19 29 29 38 115 PBT 130 3 4 13 15 23 23 31 93 PE 90 1 47 53 80 80 106 318 PEI 150 3 4 11 13 20 20 27 80 PET 160 4 6 11 13 19 19 25 75 PETG 70 3 4 11 13 20 20 27 80 PEN 170 5 13 15 23 23 30 90 PES 150 4 13 15 23 23 30 90 PPO 110 1 2 19 22 33 33 44 133 PPS 150 3 4 11 13 20 20 27 80 PI 120 2 24 27 40 40 53 160 PP 90 1 39 44 66 66 88 265 PS GP 80 1 39 44 66 66 88 265 ...

Страница 12: ...0 PC 120 2 3 250 413 PU 90 2 3 230 383 PBT 130 3 4 186 310 PE 90 1 637 1062 PEI 150 3 4 160 265 PET 160 4 6 150 250 PETG 70 3 4 160 265 PEN 170 5 180 300 PES 150 4 180 300 PPO 110 1 2 265 440 PPS 150 3 4 160 265 PI 120 2 320 530 PP 90 1 530 885 PS GP 80 1 531 885 PSU 120 3 4 173 290 PVC 70 1 2 265 442 SAN AS 80 1 2 265 442 TPE 110 3 250 413 Note 1 Please refer to above drying capacity of SCD machi...

Страница 13: ...o ensure operating safely under full loading to avoid motor s damage 3 To avoid any block materials dust powder fiber particles and water drops entering the blower and hence cause the deficiency of its performance This machine is well designed with air filters so please clean up the filter with any foreign particles recommended to clean up this filter weekly 4 Clean the blowers both internal and e...

Страница 14: ...wers 1 4 2 Safety Signs and Labels Danger High voltage danger This label is stuck on the electrical boxes Attention This label means that this area should be taken care Warning High temperature take care of hands This label should be stick to the shell of heater Attention No need for regular inspection because all the electrical parts in the control unit are fixed tightly ...

Страница 15: ... be used for ease of movement 3 Do not rotate the machine and avoid collision with other objects during transportation to prevent improper functioning 4 The structure of the machine is well balanced although it should also be handled with care when lifting the machine for fear of falling down 5 The machine and its attached parts can be kept at a temperature from 25 to 55 for long distance transpor...

Страница 16: ... 3 If it has been dropped or damaged until it is checked or fixed by a qualified serviceman 4 This equipment works normally in the environment with altitude within 3000m 5 At least a clearance of 1m surrounding the equipment is required during operation Keep this equipment away from flammable sources at least two meters 6 Avoid vibration magnetic disturbance at the operation area Rejected parts di...

Страница 17: ...s operation and maintenances upon machines without referring to the Manual prior to machine using 2 Any incidents beyond human reasonable controls which include man made vicious or deliberate damages or abnormal power and machine faults caused by irresistible natural disasters including fire flood storm and earthquake 3 Any operational actions that are not authorized by Shini upon machine includin...

Страница 18: ... drying temperature and then is blown into material barrel to closed circle to dry material Picture 2 1 Working Principle 2 2 Relative Humidity and Dew point Relative humidity Relative air humidity means real vapor content to saturated vapor at the same temperature in percentage Dew point it means that temperature when the saturation vapor begins to dew When the relative humidity is 100 the ambien...

Страница 19: ...try such as PC PA PBT PET Nylon etc cannot be dried effectively by conventional hot air drying systems because the moisture enters inside the particles According to suggestion of the manufacturer the plastic materials can be completely dried by drying air with dew point temperature 20 However the SCD sufficiently dehumidifies and dries the air inside the closed loop system and the dry air eliminat...

Страница 20: ...er consumption can save 0 10 l For models with energy saving drying management add ES at model behind standard equipped with HMI touch control which can save up to 41 of total power consumption Volume used per hour is settable between 40 100 as drying capacity to save the totally power consumption of 35 0 Standard equipped with heat regenerative recycler which recycles the regeneration air exhaust...

Страница 21: ... 2 For easy maintenance leaving 1m space around machine is suggested Keep machine 2m away from the inflammable materials 3 The machine must be placed on the ground level to ensure balance state and to remove the accumulated condensing water If machine is need to install on a higher level scaffolding or interlayer it should make sure that the structure and size could withstand the machine 3 2 Power...

Страница 22: ... 6 Power supply requirements Main power voltage 5 Main power frequency 5 7 Refer to the electrical wiring diagram to complete the electrical installation 3 3 Air pipe and material pipe connection Picture 3 2 Air Pipe and Material Pipe Connection Drawing 3 4 Water connections The cooling water pressure is 3 5bar and the cooling water temperature should be 10 30 Water outlet cooling water outlet Wat...

Страница 23: ...diameter of cooling water inlet and outlet 3 For water quality it needs to sediment or filter the water before it gets into the pipe to prevent the deposits accumulated on pipeline of cooler and performance degradation Cooling Water Specifications Model Flowrate of Cooling Water L min Model Flowrate of cooling Water L min 30H 4 400H 50 40H 5 500H 60 50H 6 700H 80 80H 10 1000H 120 120H 15 1500H 180...

Страница 24: ... pipe if there s need to press or bend the hose 3 As condensation water drainage is in terms of gravity make sure the drainage outlet is above the pipe Otherwise the water can t be drained out and will flow back to the machine 3 5 Cyclone Dust Collector Picture 3 4 Installation Dia of Cyclone Dust Collector Cyclone Dust Collector Installation Steps 1 Connect 1 and 5 with a heat resistant duct and ...

Страница 25: ... top plate of the honeycomb dehumidifier 2 Connect 1 and 2 with a heat resistant duct and fixed both the ends with stainless steel tube 3 Connect 3 and 4 with a heat resistant duct and fixed both the ends with stainless steel tube 4 Connect 5 and 6 with a heat resistant duct and fixed both the ends with stainless steel tube ...

Страница 26: ...26 51 3 7 Plate Heat Exchanger Picture 3 6 Plate Heat Exchanger Over Figure Each part is connected by heat resistant air pipes and fixed by stainless steel pipes as shown in the diagram ...

Страница 27: ...to wipe off the pollutants on the screen Other solvent may cause the color of the screen to fade out 4 Do not tear down any parts of the touch screen or take away any PCBs attached to it 4 1 1 Description of touch screen Picture 4 1 Description of Touch Screen A Display B Touch panel 4 1 2 Touch panel appear error Table 4 1 Touch Panel Information LED indicator light State Green light Work well Or...

Страница 28: ...lar 4 1 4 1 System Default Screen When the system is connected with power source the initial default screen will display as shown below By touching the button of English or Chinese to select either English or Chinese language in order to login Drying Process screen Picture 4 3 System Initial Screen ...

Страница 29: ...Screen 4 1 4 3 Password Unlock 1 Input user name shini 2 Input password 3588 3 Press Unlock 4 Press Return finish unlocking Picture 4 5 Password Input Screen Note Administrator password 3333 Name shiniwx Press in dehumidifying control screen to enter drying monitor screen ...

Страница 30: ...etting button in dehumidifying process screen to enter parameter settings menu screen Picture 4 7 Parameter Setting Menu Screen When using weekly timer mode press weekly timer function button to enter weekly timer screen and set one week timer function ...

Страница 31: ...turning off the machine blower s stop will be delayed to cool down the heat inside heater box to prevent the temperature inside the box keeps rising after machine s turning off Factory setting is 3min Overheat alarm Used for protection by preventing the system temperature rise beyond the temperature range Factory setting is 15 Cooling water temperature setting Cooling water is used when the temper...

Страница 32: ...ation Mode Setting Steps 1 Enter parameter setting screen press mode button choose regeneration mode Picture 4 10 Parameter Setting Screen 2 Enter drying control screen set material drying temperature and air volume Picture 4 11 Drying Process Screen 3 Set regeneration temperature 180 ...

Страница 33: ... air volume of the machine are constant Machine will operate under a setting drying temperature air volume and regeneration temperature B Energy saving mode 1 Enter parameter setting screen press choose energy saving mode Picture 4 13 Parameter Setting Screen 2 Enter drying control screen set material drying temperature and air volume ...

Страница 34: ...dew point temperature Picture 4 15 Dehumidify Process Screen 4 Press button machine will start up Note In this mode regeneration temperature dehumidifying temperature will be adjusted according to the change of dew point temperature to saving energy ...

Страница 35: ...4 16 Drying Process Screen Note In this mode only drying temperature and air volume need to be set Machine will dry the material under a set temperature and air volume B Activate Recipe Drying Mode 1 Press button Picture 4 17 Drying Process Screen 2 Set Parameter of The Recipe ...

Страница 36: ...ing Screen 3 Drying Process screen Picture 4 19 Drying Process Screen Note In this mode drying air volume will change according to the throughput set in the recipe C Using return air s temperature control mode 1 Press to make it run ...

Страница 37: ...1 4 6 Alarms Fault Records Touch Alarm Fault Records button on the right of Drying Process screen or Conveying Process screen to enter into Alarm Fault Records screen The screen is shown as below Picture 4 21 Alarm Fault Records 1 When alarm fault records cover more than displaying space touch Up or Down keys to read more records 2 According to the alarm information the operator could get the trou...

Страница 38: ... hopper lacks material suction box problem parameter wrongly set shut off valve damaged Process temperature overheat SDD SCD Dehumidifier does not work and the visible alarm is flickering Temperature control parameter wrongly setup touching pad is malfunction process heating problem Regenerating temp overheat SCD SDD SD H Alarm display on screen 1 Temperature control parameter set envi 2 Contactor...

Страница 39: ...ce thermocouple 3 Contactor failure Process heater 3 Replace the contactor E 04 is shown at PV buzzer sounds and machine stops 1 Heater contactor seized up 1 Check or replace the heater contactor 2 EGO parameter setting wrong 2 Set EGO parameter correctly 3 EGO fault 3 Replace EGO 4 Circuit fault 4 Check circuit E 09 is shown at PV buzzer sounds and machine stops 1 Problems of rotor motor 1 Check ...

Страница 40: ...40 51 Troubles Possible causes Solutions Circuit breaker trips right after system switch on 1 Blower short circuits 4 Please check the blower 2 Problems of the breaker 5 Replace the breaker ...

Страница 41: ...41 51 6 Maintenance and Repair ...

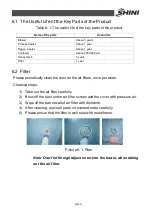
Страница 42: ... 2 Filter Please periodically clean the dust on the air filters once per week Cleaning steps 1 Take out the air filter carefully 2 Blow off the dust on the air filter screen and the cover with pressure air 3 Wipe off the barrel wall of air filter with dishcloth 4 After cleaning place all parts in reversed order carefully 5 Please ensue that the filter is well seal with metal frame Picture 6 1 Filt...

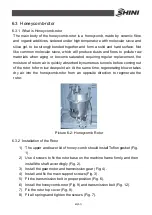
Страница 43: ...ming out of the rotor to form low dew point air At the same time regenerating blower takes dry air into the honeycomb rotor from an opposite direction to regenerate the rotor Picture 6 2 Honeycomb Rotor 6 3 2 Installation of the Rotor 1 The upper and lower lid of honey comb should install Teflon gasket Fig 1 2 Use 4 screws to fix the rotor base on the machine frame firmly and then install the shaf...

Страница 44: ... is dirt sticking to the channel walls inside the rotor cleaning steps are as follows a Saturate the rotor by blowing humid air higher than 60 RH through the rotor without having regeneration circuit on This can be done by just turning the regeneration heater off and still have the process blower running if process air has high humidity If the process air is too dry try to put a humidifier in the ...

Страница 45: ... for some time If a solvent has been used there will be a residual smell for several days 2 For some dirt which is greasy and sticky in the rotor 100 elimination is impossible The only one thing you can do is to replace the rotor for the cleaned rotor performance can only be recovered partly 6 4 EGO The EGO value has been setting before out factory Don t modify it Picture 6 4 EGO 6 5 Cooler Clear ...

Страница 46: ... the chiller and connect all pipes 6 6 Dewpoint Monitor Option 6 6 1 Installation for Dewpoint Monitor 1 Cut off the film on control panel Slightly cut it with the blade as there reserved with the holes Picture 6 5 Hole Site 2 Check if there are complete parts for dewpoint monitor including Dew point monitor Dew point transmitter assembly dew point detector detection cable washer and installation ...

Страница 47: ...connectors on the base Via the copper pipe one connector connects to the honeycomb and another connects to the dew point detector assembly Picture 6 7 Copper Joint Assembly of Original Machine Picture 6 8 Installation Seat 4 Install dew point transmitter assembly to copper joint Picture 6 9 Installation for Transmitter 5 Insert the dew point monitor into the hole on the panel and fasten it ...

Страница 48: ...t contact No 6 and No 7 with the signal of transmitter C Connects contact No 6 C connects contact No 7 Dew point transducer wiring white connect to C blue connect to C Picture 6 11 Connection of Dew point Monitor 6 6 2 Dew point monitor setting 1 Common mode functional setting adjust dew point alarm setting value 1 Press S key to enter setting after entering the displayer flickers 2 Adjust dew poi...

Страница 49: ...de it displays F X in which X means that different number Menu functions F 3 or in unit F 5 it is 20 when input 20 ampere F 6 it s in min temp when signal input is 4 ampere For example if the measuring range of dew point transmitter is 60 20 this range always marks on the transmitter therefore F 6 should be 60 F 5 should be 20 F 7 the upper limit value 99 99 F 8 the lower limit value 99 99 ...

Страница 50: ...atio Voltage V Hz Fuse melt current 1 Phase A 3 Phases A Check the phase frequency of power supply Check rotating direction of regenerating motor Check rotating direction of conveying blower fans Check air supply of compressor Compressed air pressure bar Air flow L nun Check if the compressed air purified or not 6 7 3 Daily Checking Check the switch of the machine Check auto start up of the machin...

Страница 51: ...ck if there are damages of conveying pipe Check the pipe heater Check regenerating conveying blower and fans of the motor Check whether honey comb rotor belt is damaged Clean the cooler 6 7 7 Yearly Checking Check whether the contactor is normal 1 6 7 8 3 year Checking PC board renewal No fuse breaker renewal Note 1 Manufacturer laboratory data for AC contactor is two million times in life we sugg...

Отзывы: