background image

12

Fr

ançais     

AVERTISSEMENT !

Les pièces non 

approuvées risquent de 

ne pas fonctionner correctement et 

de causer des dommages ou des 

blessures.

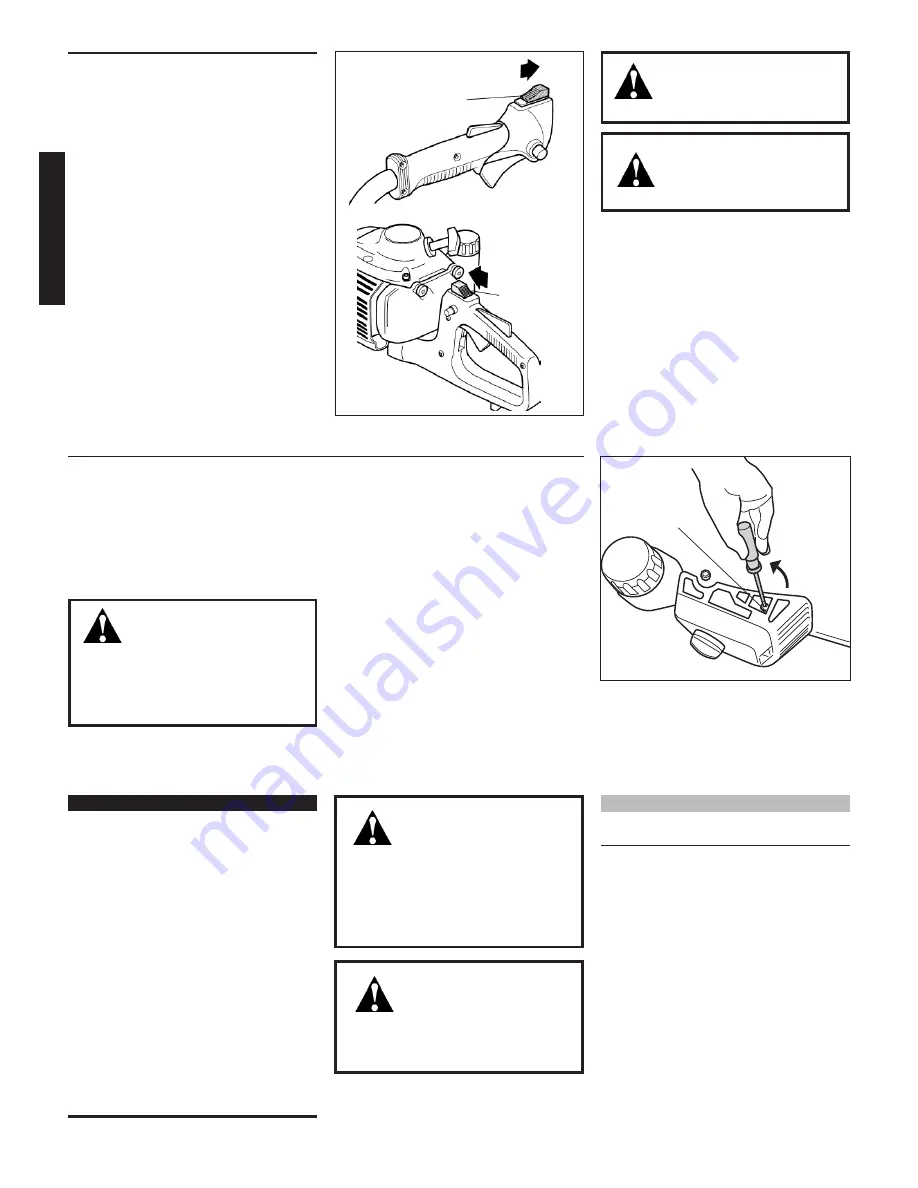
Arrêt du moteur

1.  Après une séance de travail, laisser 

tourner le moteur au ralenti 2 

à


3 minutes afin qu’il retrouve une 

température normale.

2.  Glisser 

 l’interrupteur

 en position  

« O » (ARRÊT).

Réglage du ralenti du moteur


 AVERTISSEMENT !


 Les lames NE doivent 

jAMAIS fonctionner lorsque le moteur 

tourne au ralenti. S’il est impossible 

de régler la vitesse de ralenti en 

suivant la procédure indiquée, 

s’adresser à un agent Shindaiwa.

Le moteur doit retourner au ralenti 

lorsque le levier d’accélération est 

relâché. La vitesse de ralenti est réglable 

et doit être suffisamment basse pour 

permettre à l’embrayage de désengager 

les lames.

Réglage du ralenti

1.  Poser l’appareil sur le sol, puis 

démarrer le moteur et le laisser 

tourner au ralenti pendant 2 à 3 

minutes jusqu’à ce qu’il soit chaud.

2.  Si les lames 

fonctionner

 lorsque le 

moteur tourne au ralenti, réduire 

la vitesse de ralenti en tournant la 

vis de réglage du ralenti en sens 

antihoraire.

3.  Si un tachymètre est disponible, 

régler la vitesse du ralenti à  

3 000 tr / min (min

-1

).

4.  Les réglages de richesse du 

carburateur sont réalisés en usine 

et ne peuvent être modifiés sur  

le terrain.

IMPORTANT !

L’ENTRETIEN, LE REMPLACEMENT OU 

LA RÉPARATION D’UN DISPOSITIF DE 

CONTRÔLE DES ÉCHAPPEMENTS ET 

DES SYSTÈMES PEUT ÊTRE EFFEC

-

TUÉ PAR TOUT ÉTABLISSEMENT DE 

RÉPARATION OU INDIVIDU. CEPEN

-

DANT, LES RÉPARATIONS COUVERTES 

PAR LA GARANTIE DOIVENT ÊTRE 

EFFECTUÉES PAR UN DÉTAILLANT OU 

UN CENTRE DE SERVICES AUTORISÉ 

PAR SHINDAIWA KOGYO CO. LTD. 

L’UTILISATION DE PIÈCES DONT LE 

RENDEMENT ET LA DURABILITÉ NE 

SONT PAS ÉQUIVALENTS AUX PIÈCES 

UTILISÉES PEUT COMPROMETTRE 

L’EFFICACITÉ DU SYSTÈME ANTIPOL

-

LUTION ET L’ACCEPTATION D’UNE 

DEMANDE DE RÉPARATION AU TITRE 

DE LA GARANTIE.

Entretien

AVERTISSEMENT !

Avant tout travail d’entretien, 

de réparation ou de 

nettoyage de l’appareil, 

s’assurer que le moteur et l’outil de 

coupe sont entièrement immobiles. 

Débrancher le fil de la bougie 

avant tout travail d’entretien ou de 

réparation.

REMARQUE :

L’utilisation de pièces de remplacement non 

approuvées peut invalider la garantie Shindaiwa.

AVERTISSEMENT !

Les lames peuvent continuer 

de fonctionner une fois le 

moteur arrêté.


AVERTISSEMENT !


Il est recommandé de se fa


miliariser avec la procédure 

d’arrêt d’urgence de l’appareil.

Interrupteur

Position d’arrêt (O)

HT230

DH230

Position d’arrêt 

(O)

Interrupteur

Réduire la 

vitesse de 

ralenti

Vis de réglage 

du ralenti

Содержание DH230

Страница 1: ...gned for trimming hedges l Do not use this machine for other purposes l Minimize the risk of injury to yourself and others l Do not operate or service this machine unless you clearly understand this manual l Keep this manual accessible so that you can reread it whenever you have a question about its use SHINDAIWA OWNER S OPERATOR S MANUAL HT230 DH230 ...

Страница 2: ...h performance engines represent the leading edge of 2 cycle engine technology delivering exceptionally high power at remarkable low displacement and weight As an owner operator you ll soon discover for yourself why Shindaiwa is simply in a class by itself IMPORTANT The information contained in this manual describes machines available at the time of publication While every attempt has been made to ...

Страница 3: ...CAUSE SERIOUS INJURIES Read the instructions carefully for the correct handling preparation maintenance starting and stopping of the machine Be familiar with all controls and the proper use of the machine WARNING The blades are SHARP Handle with care Keep hands clear of the cutter blades when starting the engine Do not oper ate this machine if you are tired ill or under the influence of alcohol dr...

Страница 4: ...hes Doing so can shorten cutter life and damage the gearcase Before moving to another job site stop the engine and install the blade cover Always operate with both hands firmly gripping the handgrips of the machine Do not allow the cutters to contact buildings or other hard objects during operation Never operate this machine if any safety guards are missing or damaged Avoid long term operation in ...

Страница 5: ...he maximum speed adjustment dial is preset on its maxi mum speed position at the factory Operational Precautions Reduce Speed n Do not overfill the fuel tank Wipe off any spilled fuel immediately After refueling inspect the tank to make sure its cap is threaded on properly Make sure there are no fuel leaks n Stop the engine immediately if thehedge trimmer suddenly be gins to vibrate or shake Inspe...

Страница 6: ...bration Level Front Rear Idling Racing SoundPressureLevel inaccordancewithISO11201 SoundPowerLevel inaccordancewithISO3744 VibrationLevel inaccordancewithEN28662 1 Product Description Prior to Assembly Before assembling this product please make sure you have all the components required for a complete unit n Engine assembly powerhead n Cutter and gearcase assembly n Rear handle n Front handle n Bol...

Страница 7: ...w to the powerhead b Installing the Powerhead on the Gearcase IMPORTANT Improper shoulder bolt adjustment can shorten gearcase life drastically Blade durability and cutting performance are affected by shoulder bolt adjustment c Install the Front Handle The front handle is installed over a 5mm stud on the guide bar as well as a special 6mm x 30mm shoulder bolt assembly that is also used for guide b...

Страница 8: ...hion Before attaching the rear handle make sure the rear handle cushions are located correctly Viewed from the bottom Throttle Cable Ignition and Ground Wires Rear Handle Assembly Cutter Gearcase Assembly 6mm x 35mm Socket Head Capscrews and Washers washers black for identification 2 Install the Front Handle 1 Locate the front handle onto the cutter gearcase assembly as shown 2 Secure the handle u...

Страница 9: ...rate on a 50 1 mixture consisting of un leaded gasoline and 2 cycle mixing oil only n Some motor fuels contain alcohol as an oxygenate Oxygenated fuels may cause increased operating temperatures Under certain condi tions alcohol based fuels may also reduce the lubricating qualities of some mixing oils n Never use any fuel containing more than 10 alcohol by volume When an oxygenated fuel must be us...

Страница 10: ...NS THE CUTTERS MAY MOVE WHEN THE ENGINE IS STARTED n Place the trimmer on the ground during all starting operations n Make sure you have a secure foot ing and keep a firm grip on the machine as well n Keep all bystanders and pets well clear of the trimmer during starting operations a Depress and hold the throttle lockout lever then squeeze the throttle lever b Depress and hold the throttle lock bu...

Страница 11: ...t n Repeattheappropriate startingprocedure for a cold or warm engine n If the engine still fails to start use the pro cedures for Starting a Flooded Engine 1 Disconnect the spark plug lead then use the spark plug wrench to remove the sparkplug counterclockwisetoremove 3 Set the ignition switch to the O or STOP position and open the choke Fully depress the throttle lever with your left hand and pul...

Страница 12: ...TANT MAINTENANCE REPLACEMENT OR REPAIR OF EMISSION CONTROL DEVICES AND SYSTEMS MAY BE PERFORMED BY ANY REPAIR ESTABLISHMENT OR INDIVIDUAL HOWEVER WARRANTY REPAIRS MUST BE PERFORMED BY A DEALER OR SERVICE CENTER AUTHORIZED BY SHINDAIWA KOGYO CO LTD THE USE OF PARTS THAT ARE NOT EQUIVALENT IN PERFORMANCE AND DURABILITY TO AUTHORIZED PARTS MAY IMPAIR THE EFFECTIVENESS OF THE EMISSION CONTROL SYSTEM A...

Страница 13: ...filter element 10 15 Hour Maintenance Every 10 hours of operation more frequently in dusty or dirty conditions Remove the air cleaner element from the air cleaner housing and clean it thoroughly with soap and water Rinse and dry thoroughly Add a few drops of oil and work it in then reassemble Every 10 to 15 hours of operation n Remove and clean the spark plug Adjust the spark plug electrode gap to...

Страница 14: ...nk Inspect the fuel filter element If it shows signs of contamination from debris replace it with a genuine Shindaiwa replacement fuel filter element Before reinstalling the filter inspect the fuel line If you discover damage or deterioration the unit should be removed from service until it can be inspected by a Shindaiwa trained service technician 30 days or longer CAUTION Over lubricating may ca...

Страница 15: ... machine with a damaged or missing muffler or spark arrester Operating with missing or damaged exhaust components is a fire hazard and may also damage your hearing n Hard starting or a gradual loss of performance can be caused by carbon deposits lodged in the muffler s spark arrester screen Remove the spark arrester screw and remove the screen from the muffler with the point of a small pliers Thor...

Страница 16: ...e cylinder The plug may be fouled or improperly gapped The plug may be damaged internally or is the wrong size Consult with an authorized Shindaiwa dealer Tighten and re test Consult with an authorized Shindaiwa dealer Refill with clean fresh unleaded gasoline with a pump octane of 87 or higher mixed with a Premium 2 cycle Engine Oil at a 50 1 gasoline oil ratio Re start Clean or replace filter ve...

Страница 17: ...hindaiwa dealer Refill with clean fresh unleaded gasoline with a pump octane of 87 or higher mixed with a Premium 2 cycle Engine Oil at a 50 1 gasoline oil ratio Clean repair or replace as necessary Consult with an authorized Shindaiwa dealer Clean or replace the air filter Tighten or replace Repair or replace filter and or fuel line Refill with clean fresh unleaded gasoline with a pump octane of ...

Страница 18: ...bar or cutters Damaged gearcase Shoulder bolts cutters worn or out of adjustment Clean the air filter Replace the fuel filter Return trimmer to the dealer Adjust 3000 250 rpm min 1 Reset the switch and re start Refuel Replace filter Drain replace with clean fuel See page 9 Clean and replace spark plug tighten the terminal Replace the ignition unit Consult with an authorized Shindaiwa dealer Test a...

Страница 19: ...2 2002 88 EC as amended Measured sound power level 105dB A Guaranteed sound power level 106dB A Technical documentation is kept by K Maeda DIV Manager Engineering Research and Development DIV Shindaiwa Kogyo Co Ltd Head office 6 2 11 Ozuka Nishi Asaminami Ku Hiroshima 731 3167 Japan TEL 81 82 849 2203 FAX 81 82 849 2482 19th August 2004 Shindaiwa Kogyo Co Ltd T Yoshitomi DIV Manager Head office 6 ...

Страница 20: ...iwa com Shindaiwa Kogyo Co Ltd Head Office 6 2 11 Ozuka Nishi Asaminami Ku Hiroshima 731 3167 Japan Telephone 81 82 849 2220 Fax 81 82 849 2481 2004 Shindaiwa Inc Part Number 62821 94310 Revision 8 04 Printed in Japan Shindaiwa is a registered trademark of Shindaiwa Inc Specifications subject to change without notice ...

Страница 21: ...es haies l Ne pas utiliser cet appareil pour d autres usages l Limiter tout risque de blessures sur soi même ou sur les autres l Ne pas utiliser cet appareil ni procéder à son entretien sans avoir clairement compris le présent manuel l Conserver ce manuel à portée de main pour pouvoir le consulter en cas de question sur son utilisation MANUEL D UTILISATION SHINDAIWA HT230 DH230 ...

Страница 22: ...nel pour une cylindrée remarquablement basse et une conception des plus légères Comme propriétaire ou utilisateur vous comprendrez vite pourquoi Shindaiwa est tout simplement une classe en soi IMPORTANT Les renseignements contenus dans le présent manuel décrivent les appareils disponibles au moment de la publication Malgré tous les efforts déployés pour vous offrir les informations les plus récent...

Страница 23: ...ipuler avec soin Le port de gants de travail épais assure une bonne protection des mains n Prendre garde de ne pas approcher les mains des lames au moment du démarrage du moteur et lorsque le moteur est en marche n CET APPAREIL PEUT CAUSER DES BLESSURES GRAVES Lire attentivement les instructions de manipulation préparation entretien démarrage et arrêt corrects de l appareil Prendre le temps de se ...

Страница 24: ...mains Ne pas s attaquer à de trop grosses branches ou à des matériaux trop durs Cela risque d endommager le boîtier d engrenages et de réduire la durée de vie de l appareil Avant de changer de lieu de coupe arrêter le moteur et installer le protecteur de la lame Toujours garder les deux mains fermement agrippées sur l appareil Éviter que les lames n entrent en contact avec un bâtiment ou tout autr...

Страница 25: ...ennent du monoxyde de carbone toxique n Toujours arrêter le moteur et le laisser refroidir avant de remplir le réservoir à essence n Ne pas trop remplir le réservoir à essence Nettoyer tout déverse ment d essence immédiatement n Après le remplissage contrôler le réservoir pour s assurer que son bouchon est correctement vissé Vérifier qu il n y a pas de fuites d essence n Arrêter immédiatement le t...

Страница 26: ...t arrière Au ralenti A plein régime Niveau de pression acoustique conformément à ISO 11201 Nomenclature Avant l assemblage Avant d assembler le produit s assurer que touts les composants requis pour l unité sont présents n Ensemble moteur n Outil de coupe et boîtier d engrenages n Poignée arrière n Poignée avant n Boulons n Trousse contenant des clés Allen un tournevis une clé mixte à bougie de 13...

Страница 27: ...ation du moteur sur le boîtier d engrenages IMPORTANT Un boulon à épaulement incorrectement réglé peut réduire significativement la durée de vie du boîtier d engrenages La durée de vie de la lame et son rendement sont affectés par le réglage du boulon à épaulement c Installation de la poignée avant La poignée avant est fixée sur un goujon de 5 mm sur le guide chaîne ainsi qu un boulon à épaulement...

Страница 28: ...de de deux vis hexagonales de 6 mm x 35 mm et de rondelles 3 Installation du moteur sur le boîtier d engrenages Centrer le boîtier d engrenages et le moteur tel qu illustré puis fixer à l aide des trois vis de 6 mm x 16 mm vis A B et C 1 Serrer fermement les vis A et B 2 Glisser la vis C dans la borne trouée du fil de mise à la masse de l accélérateur noir puis installer et serrer fermement la vis...

Страница 29: ...emps seulement dans une pro portion de 50 1 n Certaines essences contiennent de l alcool comme oxygénant Les essences oxygénées peu vent élever la température de fonctionnement du moteur Dans certaines conditions les es sences à base d alcool peuvent réduire les propriétés lubrifiantes de certains mélanges d huile n Ne jamais utiliser d essence contenant plus de 10 d alcool par volume Si de l esse...

Страница 30: ...orçage à 4 ou 5 reprises jusqu à ce que l on puisse voir circuler le carburant dans la poire transparente 4 Déplacer le levier de starter vers l avant en position fermée AVERTISSEMENT PRENDRE GARDE À L OUTIL DE COUPE PENDANT LA PROCÉDURE DE DÉMARRAGE LES LAMES PEUVENT SE METTRE EN MOUVEMENT LORSQUE LE MOTEUR EST DÉMARRÉ n Pour le démarrage l appareil doit reposer sur le sol n Adopter une position ...

Страница 31: ...arre pas n Répéter les étapes du démarrage d un moteur froid ou chaud selon le cas n Si le moteur ne démarre toujours pas suivre la procédure Démarrage d un moteur noyé 1 Débrancher le fil de la bougie puis enlever celle ci comme indiqué en sens antihoraire 3 Régler l interrrupteur en position O ARRÊT et ouvrir le starter Appuyer complètement sur le levier d accélération de la main gauche et tirer...

Страница 32: ...min 1 4 Les réglages de richesse du carburateur sont réalisés en usine et ne peuvent être modifiés sur le terrain IMPORTANT L ENTRETIEN LE REMPLACEMENT OU LA RÉPARATION D UN DISPOSITIF DE CONTRÔLE DES ÉCHAPPEMENTS ET DES SYSTÈMES PEUT ÊTRE EFFEC TUÉ PAR TOUT ÉTABLISSEMENT DE RÉPARATION OU INDIVIDU CEPEN DANT LES RÉPARATIONS COUVERTES PAR LA GARANTIE DOIVENT ÊTRE EFFECTUÉES PAR UN DÉTAILLANT OU UN ...

Страница 33: ...neuse Rincer et laisser sécher Ajouter quelques gouttes d huile laisser pénétrer puis réassembler Toutes les 10 à 15 heures d utilisation n Enlever et nettoyer la bougie Ajuster l écartement de l électrode de la bougie à 0 6 mm S il est nécessaire de changer la bougie utiliser uniquement une bougie NGK BMR6A ou une bougie de gamme thermique équivalente Nettoyer la bougie et vérifier l écartement d...

Страница 34: ...heté pour extraire le filtre à essence du réservoir à essence Inspecter l élément du filtre à essence S il montre des signes de contamination par des débris le remplacer par un élément de filtre à essence Shindaiwa Avant de réinstaller le filtre inspecter la conduite d alimentation en carburant Si elle est endommagée ou détériorée ne pas utiliser l appareil tant qu il n a pas été inspecté par un t...

Страница 35: ...ner l appareil sans silencieux ou sans pare étincelles ou s ils sont endommagés Si les composants du dispositif d échappement sont endommagées ou absentes il est dangereux d utiliser l appareil car il pourrait prendre feu ou causer des troubles auditifs n L accumulation de calamine dans le pare étincelles du silencieux peut être à l origine de difficultés de démarrage ou de la perte graduelle du r...

Страница 36: ...ans le cylindre La bougie est peut être encrassée ou son écartement incorrect La bougie peut être brisée ou de catégorie inappropriée Consulter un représentant autorisé Shindaiwa Serrer et revérifier Consulter un représentant autorisé Shindaiwa Faire le plein avec de l essence sans plomb propre dont l indice d octane à la pompe est égal ou supérieur à 87 mélangée avec de l huile pour moteur à deux...

Страница 37: ...sentant autorisé Shindaiwa Faire le plein avec de l essence sans plomb propre dont l indice d octane à la pompe est égal ou supérieur à 87 mélangée avec de l huile pour moteur à deux temps de première qualité Shindaiwa selon un rapport de 50 1 Nettoyer réparer ou remplacer selon le cas Consulter un représentant autorisé Shindaiwa Nettoyer ou remplacer le filtre à air Serrer ou remplacer Réparer ou...

Страница 38: ...mmagés Boîtier d engrenages endommagé Vis de lames déréglées Nettoyer le filtre à air Remplacer le filtre à essence Retourner l appareil au détaillant Régler 3 000 250 tr min min 1 Remettre le contact et redémarrer Faire le plein Remplacer le filtre Vidanger le réservoir et faire le plein avec de l essence propre voir page 9 Nettoyer et remplacer la bougie ajuster la borne Remplacer le système d a...

Страница 39: ... CISPR 12 2002 88 EC modifiée Niveau sonore mesuré 105 dB A Niveau sonore garanti 106 dB A Documentation technique conservée par K Maeda Responsable de division Division Recherche et Développement Shindaiwa Kogyo Co Ltd Siège social 6 2 11 Ozuka Nishi Asaminami Ku Hiroshima 731 3167 Japan TÉL 81 82 849 2203 FAX 81 82 849 2482 19 août 2004 Shindaiwa Kogyo Co Ltd T Yoshitomi Responsable de division ...

Страница 40: ...om Shindaiwa Kogyo Co Ltd Siège Social 6 2 11 Ozuka Nishi Asaminami Ku Hiroshima 731 3167 Japon Téléphone 81 82 849 2220 Télécopieur 81 82 849 2481 2004 Shindaiwa Inc Référence 62821 94310 Révision 8 04 Imprimé au Japon Shindaiwa una marque déposée de Shindaiwa Inc Les caractérisitiques techniques peuvent être modifiées sans préavis ...

Страница 41: ...iare le siepi l Non usare questo attrezzo per altre attività l Evitare con ogni mezzo il rischio di infortuni per se stessi e per gli altri l Non utilizzare o pulire questo attrezzo prima di aver letto e compreso questo manuale l Tenere questo manuale a portata di mano per la consultazione in caso di dubbi sull utilizzo dell attrezzo MANUALE DELL OPERATORE SHINDAIWA HT230 DH230 ...

Страница 42: ...wa dalle elevate prestazioni rappresenta la tecnologia d avanguardia dei motori a 2 tempi garantendo grande potenza a dispetto di peso e ingombro estremamente limitati Un proprietario operatore potrà immediatamente scoprire perché Shindaiwa è leader della classe IMPORTANTE Le informazioni contenute nel presente manuale descrivono gli attrezzi disponibili al momento della pubblicazione Nonostante s...

Страница 43: ...e un senso di stanchezza malessere oppure se si è sotto l effetto di alcool droghe o farmaci n Non consentire ad altre persone di avvicinarsi a meno di 5 metri dall area di lavoro durante l utilizzo dell attrezzo per evitare il rischio di procurare tagli con le lame o essere colpiti dal materiale di risulta Se una persona soprattutto bambini o un animale si avvicinano a meno di 5 metri interromper...

Страница 44: ...e la scatola degli ingranaggi potrebbe venire danneggiata Prima di spostarsi verso un altro luogo di lavoro arrestare il motore e sistemare la copertura per le lame Utilizzare l attrezzo impugnandolo sempre con entrambe le mani Evitare che i coltelli tocchino muri o altri oggetti solidi durante le operazioni Non utilizzare l attrezzo se una delle protezioni di sicurezza manca o è danneggiata Evita...

Страница 45: ...ti specificamente per l utilizzo con questa unità e soddisfano le specifiche per le prestazioni e la sicurezza n Assicurarsi che i coltelli siano correttamente regolati prima di utilizzare il tagliasiepi n Non provare a regolare il coltello a motore acceso n Non utilizzare un coltello danneggiato o spezzato sostituirlo con un nuovo coltello o con un altro coltello utilizzabile n Assicurarsi che il...

Страница 46: ...01 Descrizione del prodotto Prima dell assemblaggio Prima di assemblare questo prodotto assicurarsi di disporre di tutti i componenti necessari per completare l unità n Blocco motore n Coltelli e scatola ingranaggi n Impugnatura posteriore n Impugnatura anteriore n Bulloni n Attrezzi comprendenti chiavi esagonali cacciavite chiave per candele e chiavi da 13 mm 8 mm e 10 mm solo HT230 Verificare ch...

Страница 47: ...re sulla scatola degli ingranaggi IMPORTANTE La regolazione errata della vite ad anello può ridurre notevolmente la durata della scatola degli ingranaggi La durata delle lame e le prestazioni di taglio possono essere influenzate dalla regolazione della vite ad anello c Installazione dell impugnatura anteriore L impugnatura anteriore viene installata su un perno di 5 mm posto sulla barra di guida n...

Страница 48: ...due bulloni con dado a testa concava da 6 mm x 35 mm e le rondelle 3 Installazione del blocco motore sulla scatola degli ingranaggi Orientare la scatola degli ingranaggi e il blocco motore come mostrato e avvitare le tre viti da 6 mm x 16 mm Viti A B e C 1 Avvitare saldamente le viti A e B 2 Inserire la vite C attraverso il terminale nel filo di massa del controllo dell acceleratore nero quindi in...

Страница 49: ...nza piombo e olio per motore a 2 tempi n Alcuni carburanti per motori contengono alcool come ossigenante I carburanti ossigenati possono raggiungere temperature molto elevate durante le operazioni In alcune condizioni i carburanti basati su alcool possono anche ridurre le qualità di lubrificazione di alcuni oli misti n Non utilizzare carburante che contenga più del 10 di alcool per volume Quando è...

Страница 50: ...mpa trasparente dell innesco 4 Spostare la leva della valvola dell aria in avanti nella posizione di chiuso per chiudere il motore AVVERTENZA STARE LONTANI DAI COLTELLI DURANTE LE OPERAZIONI DI AVVIO I COLTELLI POSSONO MUOVERSI ALL AVVIO DEL MOTORE n Poggiare il tagliasiepi a terra durante tutte le operazioni di avvio n Assicurarsi di indossare calzature adatte e di esercitare una presa salda sull...

Страница 51: ... la procedura appropriata di avvio per motore freddo o caldo n Se il motore non si avvia comunque utilizzare le procedure di Avvio di un motore ingolfato 1 Rimuovere il cappuccio della candela e utilizzare l apposita chiave per rimuovere la candela girando in senso antiorario 3 Impostare l interruttore di accensione sulla posizione O o STOP e aprire la valvola dell aria Premere a fondo la leva del...

Страница 52: ...IONI IN GARANZIA DEVONO ESSERE ESEGUITE DA UN RIVENDITORE O CENTRO DI SERVIZI AUTORIZZATI DA SHINDAIWA KOGYO CO LTD L USO DI RICAMBI NON EQUIVALENTI IN PRESTAZIONI E DURATA AI RICAMBI AUTORIZZATI PUÒ DANNEGGIARE L EFFICACIA DEL SISTEMA DI CONTROLLO DELLE EMISSIONI E PUÒ AVERE CONSEGUENZE SULL ESITO DI UNA RICHIESTA DI GARANZIA Manutenzione generale AVVERTENZA Prima di eseguire attività di manutenz...

Страница 53: ... dell aria dal relativo alloggiamento e pulirlo con acqua e sapone Sciacquare e asciugare accuratamente Aggiungere qualche goccia di olio ed espanderlo uniformemente quindi riassemblare Ogni 10 15 ore di funzionamento n Rimuovere e pulire la candela Regolare la distanza dell elettrodo della candela su 0 6 mm Se la candela deve essere sostituita utilizzare solo Candele NGK BMR6A o candele equivalen...

Страница 54: ...to del filtro del carburante Se sono presenti segni di contaminazione da materiali di risulta sostituirlo con un elemento del filtro del carburante originale di Shindaiwa Prima di installare nuovamente il filtro ispezionare il condotto del carburante Se si rilevano danni o deterioramenti l unità non può essere utilizzata se non ispezionata da un tecnico specializzato di Shindaiwa 30 o più giorni A...

Страница 55: ... il soppressore di scintille sono danneggiati o mancanti Componenti mancanti o danneggiati aumentano il rischio di incendi e possono danneggiare l udito dell operatore n Difficoltà di avvio o riduzione graduale delle prestazioni possono essere causati da depositi di carbone nello schermo del soppressore di scintille della marmitta Rimuovere la vite del soppressore di scintille e lo schermo dalla m...

Страница 56: ...amente La candela può essere danneggiata all interno oppure è di dimensioni non appropriate Consultare un rivenditore Shindaiwa autorizzato Riavvitare e riprovare Consultare un rivenditore Shindaiwa autorizzato Rifornire con carburante nuovo e pulito con un numero di ottani di 87 e oltre misto con olio Premium per motore a 2 tempi con un rapporto benzina olio di 50 1 Riavviare Pulire o sostituire ...

Страница 57: ...inore assiduità Consultare un rivenditore Shindaiwa autorizzato Rifornire con carburante nuovo e pulito con un numero di ottani di 87 e oltre misto con olio Premium per motore a 2 tempi con un rapporto benzina olio di 50 1 Pulire riparare o sostituire a seconda dei casi Consultare un rivenditore Shindaiwa autorizzato Pulire o sostituire il filtro dell aria Avvitare o sostituire Riparare o sostitui...

Страница 58: ...degli ingranaggi danneggiata Viti ad anello coltelli deteriorati o non regolati Pulire il filtro dell aria Sostituire il filtro del carburante Riportare il tagliasiepi al rivenditore Regolare 3000 250 rpm min 1 Reimpostare l interruttore e riavviare Fare rifornimento Sostituire il filtro Rimuovere il carburante sostituire con carburante pulito Vedere a pagina 9 Pulire e sostituire la candela avvit...

Страница 59: ...ivi emendamenti Livello di potenza del suono misurato 105 dB A Livello di potenza del suono garantito 106 dB A La documentazione tecnica è stata curata da K Maeda Manager dipartimentale Dipartimento tecnico per la ricerca e lo sviluppo Shindaiwa Kogyo Co Ltd Sede principale 6 2 11 Ozuka Nishi Asaminami Ku Hiroshima 731 3167 Giappone TEL 81 82 849 2203 FAX 81 82 849 2482 19 agosto 2004 Shindaiwa Ko...

Страница 60: ...ede principale 6 2 11 Ozuka Nishi Asaminami Ku Hiroshima 731 3167 Giappone Telefono 81 82 849 2220 Fax 81 82 849 2481 2004 Shindaiwa Inc Numero di parte 62821 94310 Revisione 8 04 Stampato in Giappone Shindaiwa Tornado è un marchio di fabbrica e Shindaiwa è un marchio registrato di Shindaiwa Inc Specifiche soggette a modifiche senza preavviso ...

Отзывы: