background image

E

N

G

L

IS

H

30

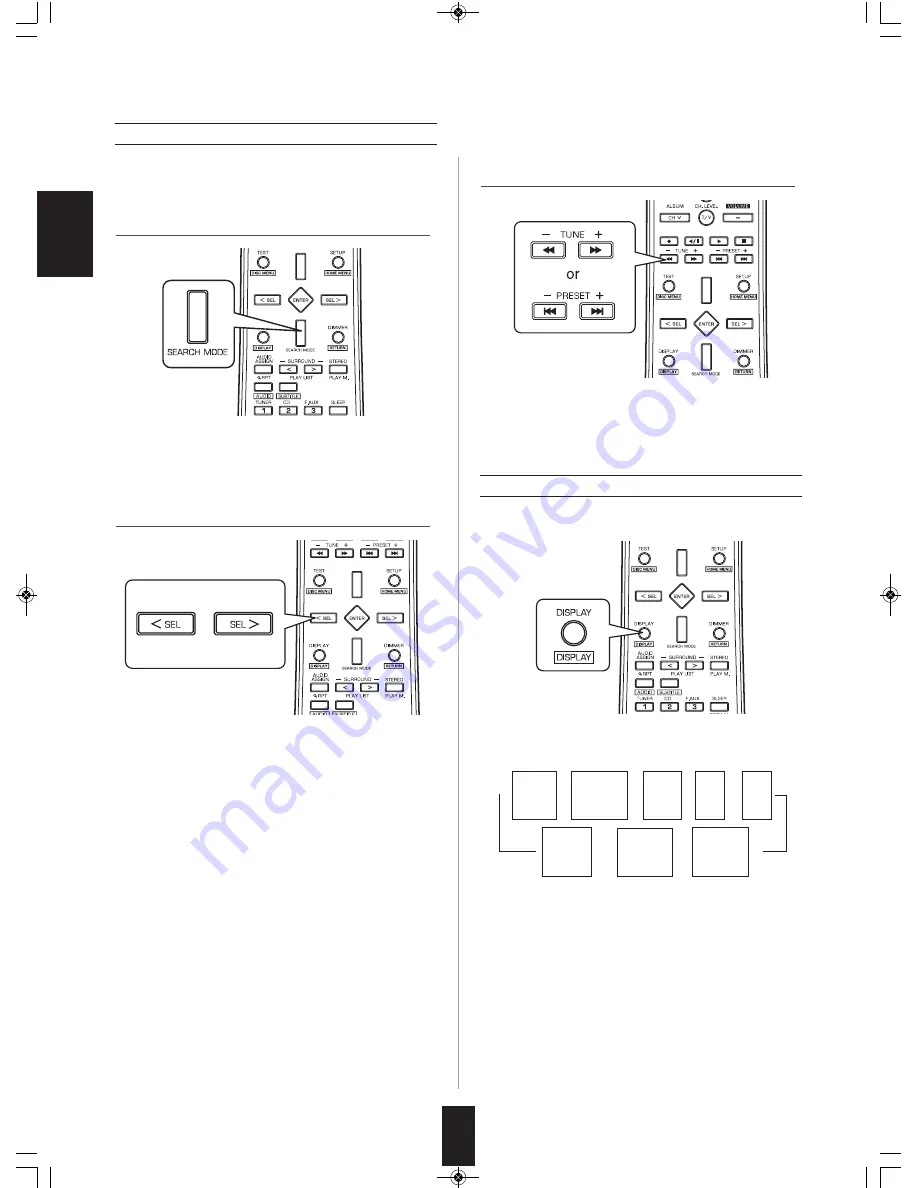
• Each time the DISPLAY button is pressed, the display

mode changes as follows:

• If the signals are too weak or no RDS service is

available, "NO NAME", "NO PTY", "NO TIME" or "NO
TEXT" will be displayed.

• Use this function to automatically search and receive

the stations broadcasting the desired program type.

• "PTY SRCH" is displayed.

• Each time these buttons are pressed, one of 32

different types of programs is selected. 

(NEWS, AFFAIRS, INFO, SPORT, EDUCATE,
DRAMA,  CULTURE, SCIENCE, VARIED, POP M,
ROCK M, EASY M, LIGHT M, CLASSICS, OTHER M,
WEATHER, FINANCE, CHILDREN, SOCIAL,
RELIGION, PHONE IN, TRAVEL, LEISURE, JAZZ,
COUNTRY, NATION M, OLDIES, FOLK M,
DOCUMENT, TEST, ALARM, NONE)

• When "PTY SRCH" is not displayed, repeat again from

the above step 1.

• The tuner automatically searches a station offering PTY

services.

• If no station is found, "NO PROG" is displayed.

PTY search

• In the FM mode,

DISPLAY

Frequency

Program

Service name 

(PS)

Volume

Surround

mode

Signal

input

Program

Type

(PTY)

Clock

Time 

(CT)

Radio

Text
(RT)

1. 

In the FM mode, select the PTY search mode.

3. 

While displaying the desired program type.

2. 

While displaying "PTY SRCH", select the

desired program type.

RD-8504(G)_ENG_091217:RD-8504(G)  2009-12-21  오  11:36  페이지 30

Содержание RD-8504

Страница 1: ...RD 8504 cover_8504 cover_8504 2009 09 21 오 11 28 페이지 1 ...

Страница 2: ...ngs with items such as newspapers table cloths curtains etc No naked flame sources such as lighted candles should be placed on the unit Please be care the environmental aspects of battery disposal The unit shall not be exposed to dripping or splashing for use No objects filled with liquids such as vases shall be placed on the unit Do not let insecticides benzene and thinner come in contact with th...

Страница 3: ...UND 23 LISTENING TO RADIO BROADCASTS 27 LISTENING TO RDS BROADCASTS FM ONLY 29 RDS Tuner Regional Option for some countries in Europe etc RECORDING 31 DIGITAL AUDIO RECORDING WITH MD RECORDER 32 OTHER FUNCTIONS 33 ROOM 2 SOURCE PLAYBACK 34 OSD menu Settings 36 SETTING THE SYSTEM SETUP 40 SETTING THE SPEAKER ROOM EQ SETUP 43 SETTING THE INPUT SETUP 51 SETTING THE MULTI ROOM SETUP 56 SETTING THE SOU...

Страница 4: ...amage to the receiver Change the position of the FM indoor antenna until you get the best reception of your favorite FM stations Place the AM loop antenna as far as possible from the receiv er TV set speaker cords and the AC input cord and set it to a direction for the best reception If the reception is poor with the AM loop antenna an AM out door antenna can be used in place of the AM loop antenn...

Страница 5: ...e type of video jacks that you did connect to video playback components such as DVD player cable TV tuner etc Video conversion Depending on the Video Mode settings this unit converts the video input signal such as component video signal S Video signal and composite video signal and outputs from the HDMI MONITOR OUT For details refer to When selecting the Video Mode on page 52 Notes You can connect...

Страница 6: ... using HDMI cords that are a maximum of 5 meters in length Among the components that support HDMI some components can control other components via the HDMI connector However this unit cannot be controlled by another component via the HDMI connector The audio signals from the HDMI connector including the sampling frequency and bit length may be limited by the component that is connected The video s...

Страница 7: ...e COAXIAL DIGITAL connection be sure to use a 75 Ω COAXIAL cord not a conventional AUDIO cord All of the commercially available optical fiber cords cannot be used for the equipment If there is an optical fiber cord which cannot be connected to your equipment consult your dealer or nearest service organization Notes Be sure to make either a OPTICAL or a COAXIAL DIGITAL connection on each component ...

Страница 8: ...hem For details refer to CONNECTING ROOM 2 OUTS on page 10 and When selecting the AMP Assign on page 41 Front Bi Amp Connections Some speakers are equipped with two sets of input terminals for bi amplification If no other surround back speakers are used you can connect the FRONT and the SURROUND BACK MULTI channels to the bi amp capable speakers For details refer to the operating instructions of y...

Страница 9: ...peakers at the back facing the front at a narrower distance than front speakers When using a single surround back speaker place it at the rear center facing the front at a slightly higher position 0 to 20 cm than the surround speakers We recommend installing the surround back speaker s at a slightly downward facing angle This effectively prevents the surround back channel signals from reflecting o...

Страница 10: ...s simultaneously you should assign their power amplifier correctly depending on how to use them For details refer to When selecting the AMP Assign on page 41 Notes To minimize hum or noise use high quality connection cords You cannot use the digital audio signal for ROOM 2 playback 8 CONNECTING ROOm 2 OUTS 9 CONNECTING FOR SYSTEm CONTROL Connect this jack to the DIGI LINK i jack of Sherwood iPod d...

Страница 11: ...SETUP MIC jack For details see next page 21 FRONT AUX IN jack For details see next page 22 VIDEO 4 IN jacks For details see next page 23 SPEAKER indicator 24 REMOTE SENSOR 25 FLUORESCENT DISPLAY For details see next page FLUORESCENT DISPLAY 1 Input frequency volume level operating information etc 2 Surround mode indicators 3 AUTO indicator 4 DIGITAL input indicator 5 DIRECT indicator 6 Preset numb...

Страница 12: ...ecting the Auto Setup on page 43 Notes Because the microphone for Auto Setup is designed for use with this receiver do not use a microphone other than the one supplied with this receiver After you have completed the auto setup procedure disconnect the microphone SETUP mIC JACk VIDEO 4 IN JACkS The VIDEO 4 IN jacks may be also connected to an additional video component such as a camcorder a video g...

Страница 13: ... NUMBERED BUTTONS on the next page STANDBY button STEREO button SLEEP button EXTERNAL IN button VOLUME UP DOWN buttons CURSOR CONTROL ENTER SEARCH MODE SELECT buttons The function in are regional option for Europe etc DIMMER button DISPLAY button ROOM 2 button PRESET UP DOWN buttons DEVICE buttons To operate the desired component with this remote control first select the corresponding DEVICE butto...

Страница 14: ... SEARCH REVERSE FORWARD SKIP DISC MENU HOME MENU CURSOR UP DOWN ENTER DISPLAY RETURN REPEAT PLAY LIST UP DOWN PLAY MODE AUDIO SUBTITLE NUMERIC for CD player POWER ON STANDBY POWER OFF PAUSE PLAY STOP REVERSE FORWARD SKIP NUMERIC for Tape deck RECORD PAUSE PLAY STOP REWIND FAST FORWARD for VCR POWER ON STANDBY POWER OFF MUTE CHANNEL UP DOWN VOLUME UP DOWN INPUT SELECTOR RECORD PAUSE PLAY STOP REWIN...

Страница 15: ...ger period of time memorized contents will be cleared Should this happen you should memorize them again Remove the batteries when they are not used for a long time Do not use the rechargeable batteries Ni Cd type Be sure to use alkaline batteries 1 Enter the setup code for each component other than this receiver For details refer to Entering a setup code on page 16 2 Turn on the component you want...

Страница 16: ...type and the brand name of your component referring to Setup Code Table on page 61 3 Press and hold down both the ENTER button and the desired one of the DEVICE buttons for more than 1 seconds 4 Enter a 3 digit code aiming the remote control at the remote sensor on the component Example When entering 001 If entering is performed successfully the LED will flicker twice To be sure that the setup cod...

Страница 17: ...n 1 second If programming is performed successfully the SET LED will flicker twice When you want either TV volume or TV channel punch through press and hold down both TV button and either VOLUME or CH button for more than 1 second Note If you use one of AUDIO and TV volume punch through functions you cannot use the other Removing a punch through function When removing the AUDIO volume punch throug...

Страница 18: ...o start playback 2 Press the operation buttons you want to program in order 3 Press ENTER button If the programming is performed successfully the LED will flicker twice To remove a macro program When removing a macro program perform the above steps 1 and 3 but ignore the step 2 To change a macro program When a new macro program is stored into a MACRO button with performing the above steps 1 to 3 t...

Страница 19: ... for the surround back channels and the surround back speaker setting EXT IN is displayed and 8 7 6 separate analog signals from the component connected to this input pass through the volume circuits only and can be heard from your speakers Select the desired input source to cancel the external in function These analog signals can be heard only not recorded Notes Before operating this receiver wit...

Страница 20: ...51 When CD F AUx VIDEO 1 4 ExT IN is selected as an input source 4 Press the AUDIO ASSIGN button 6 Operate the selected component for playback 7 Adjust the overall volume Each time the MULTI CONTROL knob is rotated or the CURSOR LEFT RIGHT buttons are pressed the corresponding input is selected as follows OPT 1 Optical 1 OPT 2 COX 2 COX 1 Coaxial 1 No assignment Notes When the selected digital inp...

Страница 21: ...gital Dolby Digital is the multi channel digital signal format developed by Dolby Laboratories Discs bearing the Dolby Digital logo includes the recording of up to 5 1 channels of digital signals This will put you right in the middle of the action just like being in a movie theater or concert hall Dolby Digital Ex This mode expands 5 1 channel sources for 6 1 7 1 channel playback It s especially s...

Страница 22: ...d back channels create a stereo image that encompasses the entire area When using the EXTERNAL INs to play back the sound from the additional multi channel decoder for surround sound you can enjoy the corresponding surround sound too For details refer to the operating instructions of the component to be connected For your reference the sound from each channel can be reproduced according to the sur...

Страница 23: ... on how to select a surround mode select the auto surround mode or the manual surround mode AUTO lights up AUTO goes off Each time the MULTI CONTROL knob is rotated or the SURROUND MODE UP DOWN buttons are pressed the surround mode changes depending on the input signal format as follows Depending on surround back speaker setting some surround modes can be selected or not as follows Possible only w...

Страница 24: ...onds as follows FL C FR SR Front Left Center Front Right Surround Right SUB SL SB or SBL SBR Subwoofer Surround Left Surround Back Surr Back Left Surr Back Right When the speaker setting is No the test tone of the corresponding channel is not available Possible depending on whether the surround back channel is set to 2 Channel or 1 Channel Left You can select the desired channel with pressing the ...

Страница 25: ...rding to the program sources or to suit your tastes You can adjust the current channel levels as desired These adjusted levels are just memorized into user s memory CAL not into preset memory MOVIE for movieo source MUSIC for music source The LFE level can be adjusted within the range of 10 0 dB and other channel levels within the range of 15 15 dB In general we recommend the LFE level to be adjus...

Страница 26: ...s The MOVIE flickers for several seconds You can memorize the adjusted channel levels into preset memory MOVIE MUSIC and recall the memorized whenever you want The adjusted channel levels have now been memorized into the selected memory If the preset memory disappears perform the above step 1 again 1 After performing the steps 1 4 in Adjusting the current channel level procedure on page 25 press t...

Страница 27: ...ry While listening to FM or AM radio broadcasts press and hold down the MEMORY ENTER button for more than 2 seconds Then AUTO MEM flickers and this receiver starts auto presetting To stop auto presetting press this button again Up to 30 FM stations can be stored Notes FM stations of weak strength cannot be memorized To memorize AM stations or weak stations preform Manual presetting procedure with ...

Страница 28: ...gs Preset stations etc Tuning to preset stations manual presetting You can store up to 30 preferred stations in the memory After selecting the tuner as an input source select the desired preset number 1 Tune in the desired station with auto or manual tuning 3 Select the desired preset number 1 30 and press the MEMORY ENTER button 4 Repeat the above steps 1 to 3 to memorize other stations 2 Press t...

Страница 29: ...ally search and receive the stations broadcasting the traffic program TP SRCH is displayed TP search The tuner automatically searches stations offering RDS services and the station name is displayed If no other RDS station is found NO RDS is displayed When RDS SRCH is not displayed repeat again from the above step 1 The tuner automatically searches stations broadcasting the traffic program NO TRAF...

Страница 30: ... EASY M LIGHT M CLASSICS OTHER M WEATHER FINANCE CHILDREN SOCIAL RELIGION PHONE IN TRAVEL LEISURE JAZZ COUNTRY NATION M OLDIES FOLK M DOCUMENT TEST ALARM NONE When PTY SRCH is not displayed repeat again from the above step 1 The tuner automatically searches a station offering PTY services If no station is found NO PROG is displayed PTY search In the FM mode DISPLAY Frequency Program Service name P...

Страница 31: ... signals from the EXTERNAL INs as well as the digital signals from the HDMI IN the OPTICAL or the COAXIAL DIGITAL IN can be heard but cannot be recorded When recording the analog signals from CD F AUX VIDEO 2 4 be sure to select Analog for the Audio Mode For details refer to When selecting the Audio Mode on page 53 The volume and tone bass treble settings have no effect on the recording signals 1 ...

Страница 32: ...digital audio program sources such as CDs MDs some DVDs etc There are some restrictions on recording digital signals When making digital recordings refer to the operating instructions of your digital recording equipment to know what restrictions are imposed 1 Select the desired of CD F AUX VIDEO 1 4 EXT IN as a recording source 2 For digital recording select the digital input as recording signal i...

Страница 33: ...t the receiver to automatically turn off after the specified period of time Each time this button is pressed the sleep time changes as follows 10 20 30 90 OFF Unit minutes While operating the sleep timer lights up When the sleep time is selected the fluorescent display is dimly lit Each time this button is pressed the display mode changes as follows When RDS tuner function is available in your cou...

Страница 34: ...ode changes as follows ROOM 2 To turn on or off the ROOM 2 function ROOM 2 mode IN To select the desired ROOM 2 source ROOM 2 input VOL To adjust the volume on the power ROOM 2 volume amplifier assigned to Surr Back Room 2 or Room 2 Note When the ROOM 2 mode is set to OFF the ROOM 2 input and the ROOM 2 volume cannot be selected When selecting the ROOm 2 mode ON To turn on the ROOM 2 function R2 l...

Страница 35: ... 2 input can be selected among MAIN source TUNER CD F AUX TAPE VIDEO 1 VIDEO 4 as a ROOM 2 source You can adjust the volume on the power amplifier assigned to Surr Back Room 2 or Room 2 For details refer to When selecting the AMP ASSIGN on page 41 1 Turn on the ROOM 2 function 2 Select the desired input as a ROOM 2 source 3 Adjust the ROOM 2 volume 4 Start play on the component related to the ROOM...

Страница 36: ...Video Scaling on page 53 When performing the OSD menu operation the corresponding operation status is displayed on the unit s fluorescent display too Therefore in such a case that the OSD menu cannot be displayed on your TV perform the setup precedure viewing the corresponding operation status on the fluorescent display For details on setup menu refer to Setup menu flow on page 38 Navigating throu...

Страница 37: ...ght Mode Dolby Dolby TrueHD BACK NEXT ENGLISH 37 For the setting details see page in Adjust the setting s in each setting category to your preference When the SETUP button is pressed on a sub menu the menu screen will be turned off 3 Enter the selected menu using the CURSOR RIGHT button 40 43 51 56 57 58 When selecting the System Setup When selecting the Speaker Room EQ Setup When selecting the So...

Страница 38: ...W Y Yes N No F 80 Hz FULL Full Range 40 250 C 80 Hz FULL 40 250 S 80 Hz FULL 40 250 B M 80 Hz FULL 40 250 AMP ASSG Amp Assign SW MODE Subwoofer Mode HDMI AUD HDMI Audio Output TONE Tone Control BASS TREBLE C EQ Cinema EQ OSD Momentary OSD SAV RECA Save Recall AMP B R2 Surr Back ȧ Room 2 BI A Bi Amp BACK Surround Back R2 Room 2 SW M NORM Normal SW Subwoofer Plus HDMI SPK Speaker PASS HDMI Passthrou...

Страница 39: ... 4 Video1 4 CD TAPE F AUX TUNER VOL 30 dB MIN 0 MAX 80 VID1 CFG VIDEO1 Configuration V2IPDCFG VIDEO2 iPod Configuration VID3 CFG VIDEO3 Configuration VID4 CFG VIDEO4 Configuration CD CFG CD Configuration TAPE CFG TAPE Configuration F AUX CFG F AUX Configuration EXTIN CFG EXTERNAL IN Configuration RE NAME 1 HDMIASSG HDMI Assign CPN ASSG Component Assign AUD ASSG Audio Assign VID MODE Video Mode AUD...

Страница 40: ... to each operation momentarily Save Recall To memorize all the OSD menu setting values into memory or to recall the memorized setting values 1 Press the CURSOR UP DOWN buttons to select the desired item then press the CURSOR RIGHT button to enter its setting menu 2 Press the CURSOR UP DOWN buttons to set the selected item as desired then press the ENTER button Then the setting value is marked with...

Страница 41: ...d the subwoofer channel In this mode the low frequency range expands more uniformly through the room but depending on the size and shape of the room interference may result in a decrease of the actual volume of the low frequency range The HDMI connection can carry uncompressed digital video signals and digital audio signals Depending on whether the digital audio signals input into the HDMI IN are ...

Страница 42: ...DMI MONITOR OUT For details refer to When selecting the Video Scaling on page 53 You can memorize all the OSD menu setting values into memory 1 Save 1 or memory 2 Save 2 and recall the memorized setting values whenever you want Save 1 To memorize all the OSD menu setting values into memory 1 Save 2 To memorize them into memory 2 Recall 1 To recall the setting values memorized into memory 1 Recall ...

Страница 43: ... speakers at main listening position and can adjust the configuration distance sound level crossover frequency and frequency response of each speaker automatically If you want to personalize your speaker setup and channel level setup by making the settings manually perform the When selecting the Speaker Configuration on page 46 When selecting the Speaker Crossover on page 47 When selecting the Spe...

Страница 44: ...uto Setup then press the CURSOR RIGHT button 3 Press the CURSOR RIGHT button to start the auto setup procedure 4 To memorize the results press the CURSOR RIGHT button Then the results are memorized and the Speaker Room EQ Setup menu is displayed When the CURSOR LEFT button is pressed to select CANCEL the results are not memorized Check the results on each setup menu Speaker Configuration menu on p...

Страница 45: ...e To use the room EQ first you should finish measuring the acoustic characteristics of your room performing the auto setup For details refer to When selecting the Auto Setup on page 43 On To adjust the frequency response of all speakers to the flattest response Off To turn off the room EQ When the CURSOR LEFT button is pressed on the setting menu the previous menu will be returned to 1 Press the C...

Страница 46: ... speakers are not set to No you should set their distances from listening position and crossover frequencies according to their frequency characteristics For details refer to When selecting the Speaker Crossover on page 47 and When selecting the Speaker Distance on page 48 When the Surround is set to No Surr back cannot be set to 2 Channel or 1 Channel Left When the surround back channels power am...

Страница 47: ...speaker is 100 Hz 20 kHz the crossover frequency should be set to 100 Hz or slightly higher The low frequencies below the crossover frequency are to output from subwoofer or the speakers which are set to Full Range when not using a subwoofer 1 Press the CURSOR UP DOWN buttons to select the Speaker X over then press the CURSOR RIGHT button to enter the setting menu 2 Press the CURSOR UP DOWN button...

Страница 48: ...listening position as the front speakers By entering the distance between the listening position and each speaker the delay times of center surround and surround back speakers etc are automatically adjusted to create an ideal listening environment virtually as if the center surround and surround back speakers etc were at their ideal locations respectively 1 Press the CURSOR UP DOWN buttons to sele...

Страница 49: ...he setting menu the previous menu will be returned to When selecting the Channel Level 1 Press the CURSOR UP DOWN buttons to select the Channel Level then press the CURSOR RIGHT button to enter the setting menu 4 Repeat the above steps 2 and 3 to adjust each channel level 3 Press the CURSOR UP DOWN buttons to adjust the level of the selected channel or program source s LFE as desired When selectin...

Страница 50: ...he adjusted channel levels into memory 1 Save 2 Music To memorize them into memory 2 Recall 1 Movie To recall the channel levels memorized into memory 1 Recall 2 Music To recall the channel levels memorized into memory 2 1 Press the CURSOR UP DOWN buttons to select the MODE on the Channel Level menu then press the CURSOR RIGHT button to enter the setting menu 2 Press the CURSOR UP DOWN buttons to ...

Страница 51: ...menu 2 Press the CURSOR UP DOWN buttons to select the desired item then press the CURSOR RIGHT button to enter its setting menu 3 Press the CURSOR UP DOWN buttons to set the selected item as desired then press the ENTER button When the CURSOR LEFT button is pressed on the setting menu the previous menu will be returned to When adjusting the AV Sync use the CURSOR UP DOWN buttons only VIDEO 1 V2 iP...

Страница 52: ... DIGITAL INS AND OUT on page 7 You can select the desired of Optical 1 2 and Coaxial 1 2 Note In such a case that a DIGITAL IN is assigned to two input sources or more when these input sources are selected the digital audio signals can be heard from the same DIGITAL IN When selecting the Video mode Depending on the Video Mode settings the video input signal can be converted and output from the HDM...

Страница 53: ... if you set the Video Scaling to Auto this unit outputs the video signals of the optimum resolution acceptable for your TV Notes If the resolutions of the video signals which are output from the HDMI MONITOR OUT and your TV are not matched the picture is not clear natural or displayed When 1080 24p video signals are input into the HDMI IN the Video Scaling is automatically set to HDMI Bypass When ...

Страница 54: ...ting instructions of the source component On To play the audio signals including the HD audio signals Off To play the audio signals other than the HD audio signals ENGLISH When selecting the Re Name 1 Press the CURSOR UP DOWN buttons to select the desired input source then press the CURSOR RIGHT button to enter the setting menu You can give names to the input sources other than tuner Up to 8 chara...

Страница 55: ...You can enter the desired among blank A Z a z 0 9 3 Press the CURSOR LEFT RIGHT buttons to select the desired digit 6 To confirm your entry press the CURSOR RIGHT button to select the Finish then press the ENTER button 4 Press the CURSOR UP DOWN buttons to enter the desired character on the selected digit 5 Repeat the above steps 3 and 4 to enter the desired characters on the rest of the digits Co...

Страница 56: ...igned to Bi AMP or Surround Back When selecting the Input You can select the desired among Main source Video 1 Video 4 CD Tape F AUX Tuner as a ROOM 2 source Note When the EXTERNAL IN is selected as a main input if the Main source is selected as a Room 2 input no audio signal can be heard in the different room ROOM 2 When selecting the Volume On To turn on the Room 2 function Off To turn it off No...

Страница 57: ... Logic II music You can adjust the various surround parameters for optimum surround effect Note The parameter settings are valid only when listening in either Dolby Pro Logic II Music mode or the Dolby Pro Logic IIx Music mode When selecting the Panorama This mode extends the front stereo image to include the surround speakers for an exciting wraparound effect with side wall imaging Select Off or ...

Страница 58: ...selecting the Edge Enhancement The edge enhancement can be adjusted within the range of 10 10 When selecting the Test Patterns You can select the desired among Off no display Frame Geometry Bright Contrast Checker Board Vertical Lines Horizontal Lines Judder Color8 Bars 75 and Color8 Bars 100 Note The Horizontal Lines can be selected only when the progressive video signals 576p 720p or 1080p are o...

Страница 59: ... DVD player etc is different from PAL No antenna is connected The desired station frequency is not tuned in Antenna is in wrong position An incorrect station frequency has been memorized The memorized stations are cleared No antenna is connected The antenna is not positioned for the best reception Weak signals Noise is caused by motors fluorescent lamps or lightning etc Batteries are not loaded or...

Страница 60: ...ECTION Video format PAL Input sensitivity Output level 75 Ω Video Composite normal 1 Vp p S Video luminance signal 1 Vp p chrominance signal 0 286 Vp p Component video R Y signal 0 5 Vp p B Y signal 0 5 Vp p Y signal 1 0 Vp p HDMI connector 19 pin Fm TUNER SECTION Tuning frequency range 87 5 108 mHz Usable sensitivity THD 3 S N 26 dB 12 8 dBf 46 dB quieting sensitivity mono stereo 20 2 45 3 dBf Si...

Страница 61: ...7 073 ELBE 016 116 ELBIT 065 TV ELCIT 046 097 103 050 109 127 132 ELMAN 046 132 ELTA 090 EMERSON 158 098 050 ERRES 049 142 EUROPHON 098 046 097 099 051 115 132 FERGUSON 146 040 041 150 057 061 116 149 FIDELITY 099 149 FINLUX 034 046 053 055 057 109 113 073 074 079 FISHER 015 048 050 052 109 136 FORGESTONE 149 FORMENTI 099 053 109 111 125 FORTRESS 137 FRABA 075 FRONTECH 054 FUJITSU 025 FUNAI 054 05...

Страница 62: ...A 161 140 058 105 109 122 123 128 148 129 130 134 135 083 089 NORDMENDE 028 032 039 043 145 131 091 081 OCEANIC 109 064 123 ONCEAS 099 OPTONICA 137 ORION 158 059 118 068 127 090 OSAKI 060 OSIO 077 OSUME 087 OTTO VERSAND 033 047 049 109 139 P T ACTTRON 065 PAEL 099 053 PANASONIC 030 042 095 104 107 109 121 126 PATHE CINEMA 099 111 116 132 PERDIO 060 PHILCO 016 030 101 050 109 124 079 132 136 PHILIP...

Страница 63: ...7 SAMPO 121 SAMSUNG 015 026 099 054 077 136 090 151 153 SANYO 161 162 005 033 044 048 060 113 118 071 054 136 SBR 049 142 148 149 088 SCHAUB LORENZ 161 058 109 122 123 128 129 130 134 SCHNEIDER 096 099 049 050 052 019 141 109 142 125 149 078 132 SEG 046 SEI 158 059 SELECO 016 096 144 019 141 110 069 134 SHARP 033 087 137 SIAREM 046 097 050 109 115 SICATEL 116 SIEMENS 005 094 036 100 111 114 087 SI...

Страница 64: ...6 050 052 033 038 NORDMENDE 039 042 056 052 053 035 OPTONICA 045 046 ORION 002 010 025 027 OSAKI 011 OTTO VERAND 043 P CINEMA 014 PALLADIUM 041 014 PANASONIC 023 051 040 PATHE MARCONI 042 056 052 PENTAX 006 007 PERDIO 011 PHILIPS 012 014 045 046 018 029 031 PHONOLA 014 045 018 029 031 PIONEER 060 PORTLAND 020 PROLINE 011 PYE 014 045 018 029 031 QUARTZ 005 QUELLE 002 044 054 RADIOLA 045 031 RADIOMA...

Страница 65: ...4 YAMAHA 019 ZENITH 011 010 BD DVD ABC 002 003 009 030 006 008 Allegro 018 021 Archer 018 026 Bell Howell 009 Century 018 Citizen 018 021 Comtronics 014 Contec 011 Easten 001 Emerson 026 Everquest 010 014 Focus 022 Garrard 018 Gemini 010 General Instrument 033 276 006 034 GoldStar 017 040 Goodmind 026 Hamlin 012 020 004 013 Hitachi 006 Jasco 010 018 021 Jerrold 002 007 033 032 009 010 006 034 Movi...

Страница 66: ...UNITED CABLE 038 VTECHNOLOGY 004 VORTEC 003 024 025 ZENDER 022 Stargate 010 014 026 Starquest 010 TV86 015 Teleview 014 Tocom 007 008 Tusa 010 Unika 018 Universal 018 019 Viewstar 015 Zenith 024 Zentek 022 ALBA 030 AMSTRAD 008 019 027 ARCON 021 ARISTONA 016 ASTRA 028 BLAUPUNKT 033 BUSH 016 CH MASTER 030 CITY COM 005 DDC 030 DYNASAT 005 ECHOSTAR 002 009 032 020 EMME ESSE 005 FAIT 005 FERGUSON 014 0...

Страница 67: ...8 041 RCA 007 009 REALISTIC 045 SANSUI 040 SHARP 019 053 SHERWOOD 000 035 023 019 056 057 058 SONY 050 024 025 026 TEAC 055 032 TECHNICS 051 004 052 VICTOR 001 YAMAHA 044 043 016 CD SHERWOOD 000 for USB 015 016 for MD recorder AUX USB MD DAEWOO 002 DENON 012 GOLDSTAR 004 KENWOOD 003 MAGNAVOX 010 OPTIMUS 007 PANASONIC 013 PHILIPS 010 POINNEER 000 009 RCA 006 REALISTIC 007 SAMSUNG 001 005 SHARP 003 ...

Страница 68: ...5707 00000 274 0S RD 8504 cover_8504 cover_8504 2009 09 21 오 11 28 페이지 2 ...

Отзывы: