background image

3

1. 

Read Instructions

- All the safety and operating instructions should

be read before the product is operated.

2. 

Retain instructions

- The safety and operating instructions should

be retained for future reference.

3. 

Heed Warnings

- All warnings on the product and in the operating

instructions should be adhered to.

4. 

Follow Instructions

- All operating and use instructions should be

followed.

5. 

Cleaning

- Unplug this product from the wall outlet before cleaning.

Do not use liquid cleaners or aerosol cleaners. Use a damp cloth for
cleaning.

6. 

Attachments

- Do not use attachments not recommended by the

product manufacturer as they may cause hazards.

7. 

Water and Moisture

- Do not use this product near water - for

example, near a bath tub, wash bowl, kitchen sink, or laundry tub; in
a wet basement, or near a swimming pool; and the like.

8. 

Accessories

- Do not place this product on an unstable cart, stand,

tripod, bracket, or table. The product may fall, causing serious injury
to a child or adult, and serious damage to the product. Use only with
a cart, stand, tripod, bracket, or table recommended by the
manufacturer, or sold with the product. Any mounting of the product
should follow the manufacturer’s instructions, and should use a
mounting accessory recommended by the manufacturer.

9. A product and cart combination should be moved with care. Quick

stops, excessive force, and uneven surfaces
may cause the product and cart combination
to overturn.

10. 

Ventilation

- Slots and openings in the

cabinet are provided for ventilation and to
ensure reliable operation of the product and
to protect it from overheating, and these
openings must not be blocked or covered.
The openings should never be blocked by
placing the product on a bed, sofa, rug, or other similar surface.
This product should not be placed in a built-in installation such as a
bookcase or rack unless proper ventilation is provided or the
manufacturer’s instructions have been adhered to.

11. 

Power Sources

- This product should be operated only from the

type of power source indicated on the marking label. If you are not
sure of the type of power supply to your home, consult your product
dealer or local power company. For products intended to operate
from battery power, or other sources, refer to the operating
instructions.

12. 

Grounding or Polarization

- This product may be equipped with a

polarized alternating-current line plug (a plug having one blade
wider than the other). This plug will fit into the power outlet only one
way. This is a safety feature. If you are unable to insert the plug
fully into the outlet, try reversing the plug. If the plug should still fail
to fit, contact your electrician to replace your obsolete outlet. Do not
defeat the safety purpose of the polarized plug.
Alternate Warnings - This product is equipped with a three-wire
grounding-type plug, a plug having a third(grounding) pin. This plug
will only fit into a grounding-type power outlet. this is a safety
feature. If you are unable to insert the plug into the outlet, contact
your electrician to replace your obsolete outlet. Do not defeat the
safety purpose of the grounding-type plug.

13. 

Power-Cord Protection

- Power-supply cords should be routed so

that they are not likely to be walked on or pinched by items placed
upon or against them, paying particular attention to cords at plugs,
convenience receptacles, and the point where they exit from the
product.

14. 

Outdoor Antenna Grounding

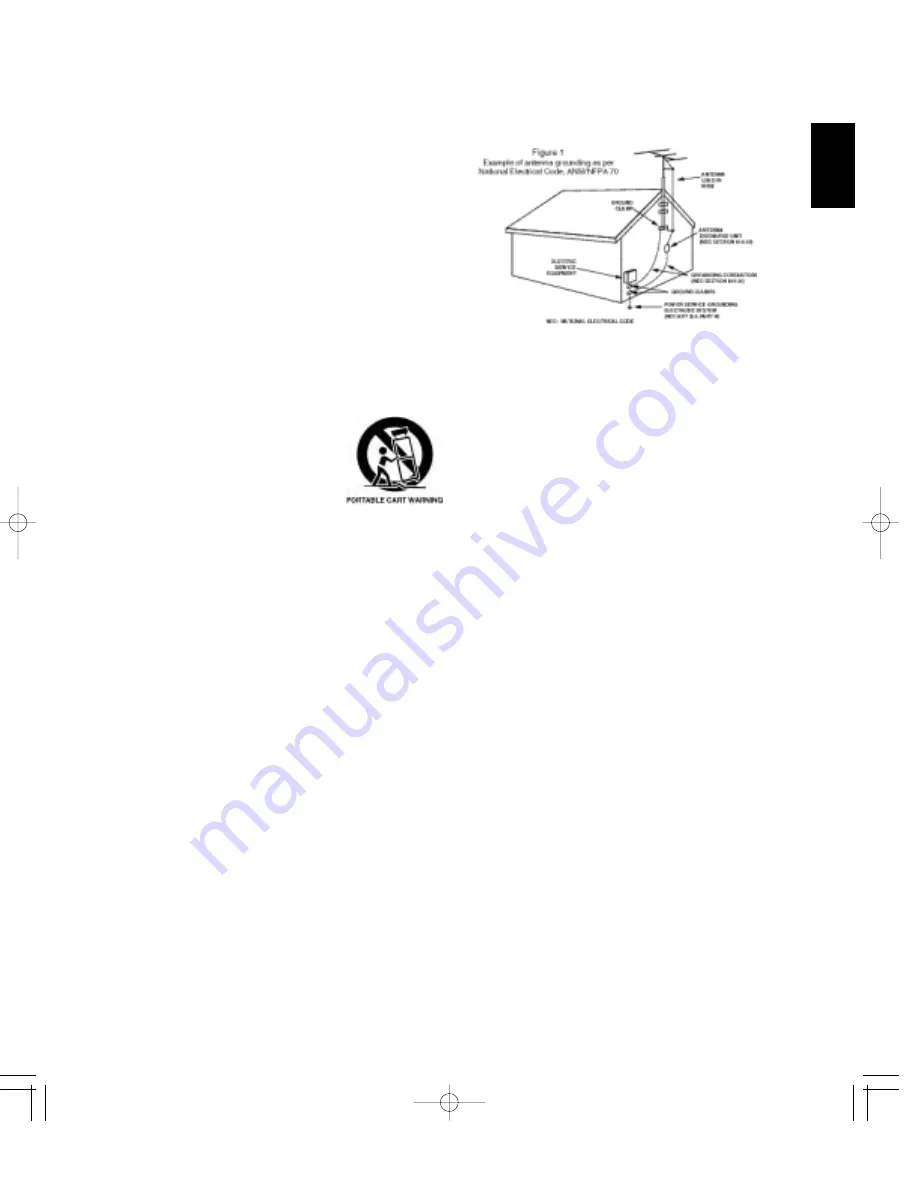
- If an outside antenna or cable

system is connected to the product, be sure the antenna or cable
system is grounded so as to provide some protection against
voltage surges and built-up static charges. Article 810 of the
National Electrical Code, ANSI/NFPA 70, provides information with
regard to proper grounding of the mast and supporting structure,
grounding of the lead-in wire to an antenna discharge unit, size of

grounding conductors, location of antenna-discharge unit,
connection to grounding electrodes, and requirements for the
grounding electrode. See Figure 1.

15. 

Lightning

- For added protection for this product during a lightning

storm, or when it is left unattended and unused for long periods of
time, unplug it from the wall outlet and disconnect the antenna or
cable system. This will prevent damage to the product due to
lightning and power-line surges.

16. 

Power Lines

- An outside antenna system should not be located in

the vicinity of overhead power lines or other electric light or power
circuits, or where it can fall into such power lines or circuits. When
installing an outside antenna system, extreme care should be taken
to keep from touching such power lines or circuits as contact with
them might be fatal.

17. 

Overloading

- Do not overload wall outlets, extension cords, or

integral convenience receptacles as this can result in a risk of fire or
electric shock.

18. 

Object and Liquid Entry

- Never push objects of any kind into this

product through openings as they may touch dangerous voltage
points or short-out parts that could result in a fire or electric shock.
Never spill liquid of any kind on the product.

19. 

Servicing

- Do not attempt to service this product yourself as

opening or removing covers may expose you to dangerous voltage
or other hazards. Refer all servicing to qualified service personnel.

20. 

Damage Requiring Service

- Unplug this product form the wall

outlet and refer servicing to qualified service personnel under the
following conditions:
a) When the power-supply cord or plug is damaged,
b) If liquid has been spilled, or objects have fallen into the product,
c) If the product has been exposed to rain or water,
d) If the product does not operate normally by following the

operating instructions. Adjust only those controls that are
covered by the operating instructions as an improper adjustment
of other controls may result in damage and will often require
extensive work by a qualified technician to restore the product to
its normal operation.

e) If the product has been dropped or damaged in any way, and

f) When the product exhibits a distinct change in performance - this

indicates a need for service.

21. 

Replacement Parts

- When replacement parts are required, be

sure the service technician has used replacement parts specified by
the manufacturer or have the same characteristics as the original
part. Unauthorized substitutions may result in fire, electric shock, or
other hazards.

22. 

Safety Check

- Upon completion of any service or repairs to this

product, ask the service technician to perform safety checks to
determine that the product is in proper operating condition.

23. 

Wall or Ceiling Mounting

- The product should be mounted to a

wall or ceiling only as recommended by the manufacturer.

24. 

Heat 

- The product should be situated away from heat sources

such as radiators, heat registers, stoves, or other products
(including amplifiers) that produce heat.

SAFETY INSTRUCTION

ENGLISH

Содержание ASW-670

Страница 1: ......

Страница 2: ...e and thinner come in contact with the set Never disassemble or modify the set in any way Note to CATV System Installer This reminder is provided to call the CATV system installer s attention to Artic...

Страница 3: ...ience receptacles and the point where they exit from the product 14 Outdoor Antenna Grounding If an outside antenna or cable system is connected to the product be sure the antenna or cable system is g...

Страница 4: ...E AND HANDLING OF DISCS 18 DEFINITION OF TERMS 19 BASIC PLAYBACK 20 DISPLAYING DISC INFORMATION DURING PLAYBACK 23 PLAYING THE DESIRED SECTION OF DISC 24 PLAYING A SPECIFIC ITEM DVD Video only 26 REPE...

Страница 5: ...DIGITAL AUDIO RECORDING WITH MD RECORDER 45 SETTING THE CLOCK 46 OPERATING THE SLEEP TIMER 47 OPERATING THE TIMER 47 ADJUSTING THE BRIGHTNESS OF THE DISPLAY 50 Troubleshooting Guide 51 Specifications...

Страница 6: ...r cords are commercially available cords 1 CONNECTING ANTENNAs Change the position of the FM indoor antenna until you get the best reception of your favorite FM stations Place the AM loop antenna as f...

Страница 7: ...he picture will not be shown When the progressive video signals are input into non progressive COMPONENT VIDEO INs of your TV the picture may not be shown normally too Therefore when the progressive C...

Страница 8: ...e DIGITAL IN of an amplifier which does not contain the Dolby Digital or DTS decoder etc which processes the bitstream digital you should set the SPDIF Output to SPDIF PCM If not loud noise or no soun...

Страница 9: ...NE BALANCE SELECT button 5 PRESET TUNING UP DOWN FORWARD BACKWARD SKIP buttons 6 PLAY PAUSE button FLUORESCENT DISPLAY 7 STOP button 8 OPEN CLOSE button 9 PHONES jack 10 STANDBY indicator 11 DISC TRAY...

Страница 10: ...ton DISPLAY button DIMMER button MENU button TOP MENU button CURSOR CONTROL ENTER buttons TONE BALANCE SELECT button POWER button FUNCTION SELECT buttons NUMERIC 0 9 10 buttons REPEAT button STOP butt...

Страница 11: ...setup code is correct When your component is not turned off repeat the above steps 2 to 4 trying each code for your component until you find one that works Notes If the SET LED did not flicker twice...

Страница 12: ...h component other than this unit you wish to control For details refer to ENTERING A SETUP CODE on page 11 2 Turn on the component you want to operate 3 Press the DEVICE button on the remote control c...

Страница 13: ...alkaline batteries Remove the cover Load two batteries AAA size 1 5V matching the polarity When the remote control does not operate the old batteries should be replaced In this case load new batterie...

Страница 14: ...nt speakers because the frequency range of the front speakers is 140Hz 20kHz adjust the crossover frequency to 140Hz or slightly higher The crossover frequency adjustment determines the highest freque...

Страница 15: ...subwoofer refer to OPERATION OF ACTIVE SUBWOOFER on page 14 Each time the FUNCTION SELECT button on the front panel the input source changes as follows DVD FM AM TAPE AUX frequency display MUTE flick...

Страница 16: ...only when listening via the headphones Listening modes Dolby Virtual Speaker This mode creates a virtual surround sound field as few as two front speakers and subwoofer allowing you to experience list...

Страница 17: ...y discs such as DVD AUDIO SACD CD ROM DVD RW DVD RAM DVD ROM etc other than those listed above Playing them may generate noise and damage speakers CD R CD RW and DVD R discs will play only if they are...

Страница 18: ...UT MP3 DISCS CARE AND HANDLING OF DISCS This unit can play back MP3 files on a private CD R CD RW disc or commercial CD Notes Some discs may not be played back because of the disc characteristics or r...

Страница 19: ...ods of time for instance a whole movie can be recorded DVD Video has a structure consisting of two 0 6 mm thin discs which are adhered to each other Since the thinner the disc the higher the density a...

Страница 20: ...tray by force may damage it s mechanism Open the disc tray to load a disc with the printed side up then close it 2 Note When you play a DVD Video that contains a menu or a MP3 disc the menu display m...

Страница 21: ...to clear the menu display A TV screen may be burned out if a static picture is displayed for a long time in the stop or the pause mode etc To prevent this set the Screen Saver to ON refer to When sele...

Страница 22: ...ss the corresponding NUMERIC buttons 0 9 10 then the selected track will be played Examples For 3 For 10 For 21 In case of MP3 disc press the corresponding NUMERIC buttons 0 9 and press the ENTER butt...

Страница 23: ...1 2 normal playback SF Slow advance playback SR Slow reverse playback To return to normal playback press the PLAY PAUSE button DISPLAYING DISC INFORMATION DURING PLAYBACK The unit features the on scr...

Страница 24: ...e all cleared Note Depending on the disc a search playback will not work or may work differently Then the search menu is displayed on the TV screen for several seconds To cancel the search function pr...

Страница 25: ...clearing the numbers entered before playback Each time the CLEAR button is pressed the numbers entered are cleared one by one in the opposite order In case of CD or MP3 disc 1 During playback press t...

Страница 26: ...he desired title then press the ENTER or PLAY PAUSE button 2 When using a title menu If some DVD Videos which contain more than one title may have the menu like as a list of the titles the TITLE butto...

Страница 27: ...repeat repeat A B etc Note The repeat playback may not work correctly on some DVD Videos and MP3 discs Repeating the desired part 1 During playback at the beginning of the part you want to repeat pres...

Страница 28: ...e Start on the bottom of the program menu then press the ENTER button 4 Play will start in the programmed order After all the programmed tracks have been played it enters the stop mode and the program...

Страница 29: ...acks To clear one by one During programming press the CURSOR buttons to select the tracks to be cleared then press the CLEAR button Then the selected track is cleared To clear all programmed tracks Du...

Страница 30: ...different language from the selected one at the initial settings For details refer to When selecting the Audio Subtitle or Disc Menu on page 38 This operation works only with discs on which multiple s...

Страница 31: ...n works only at scenes recorded from multiple angles CHANGING THE CAMERA ANGLE DVD Video only ZOOMING IN OUT A SCENE DVD Video only During playback or in the still picture mode press the ZOOM button 1...

Страница 32: ...tputting either conventional interlacing video signal or progressively scanned video signal that can reproduce high density pictures with less flicker When the COMPONENT VIDEO OUTs of this unit are co...

Страница 33: ...it Setup to exit from the setup mode press the ENTER button For the setting details see page in Note During setting operation only the buttons required for setting of DVD operation buttons will functi...

Страница 34: ...see or the picture quality may be poor Only in this case change the video signal format to another For details about the video signal format of your TV monitor or the discs refer to the operating inst...

Страница 35: ...er etc You should set the SPDIF Output to SPDIF PCM to convert Dolby Digital or DTS bitstream etc to linear PCM 2 channel of 48 kHz 16bit and to output it If the SPDIF Output is not set correctly loud...

Страница 36: ...ted or the power is turned off during playback of DVD Video When DVD is selected as an input source again or the power is turned on playback will resume from that point 2 Press the CURSOR button to se...

Страница 37: ...o select the item menu 2 Press the CURSOR button to select the setting menu Each time the CURSOR or button is pressed the setting menu or the item menu is selected 3 Press the CURSOR buttons to select...

Страница 38: ...udio 3 Press the CURSOR buttons to select the preferred language then press the ENTER button The selected language is colored You can select one of languages listed in the language menu When you want...

Страница 39: ...ng code which is not listed in DVD Language Code List is input press the ENTER button to return to the previous menu then perform the step 3 again Continued 4 Press the CURSOR button to select the ite...

Страница 40: ...us menu screen is displayed If you input a wrong password it will not return to the previous menu In this case input the password again While displaying the password input screen when the SETUP button...

Страница 41: ...the password If you forgot your password input 3308 that has been set to at factory 1 Press the CURSOR buttons to select the Password 2 Press the CURSOR buttons to select the Change then press the EN...

Страница 42: ...or button is pressed the setting menu or the item menu is selected Then the settings are reset to initial settings and the setup mode is canceled 2 Press the CURSOR button to select the setting menu t...

Страница 43: ...on repeatedly to select FM or AM band Operation of Tuner Auto tuning Manual tuning is useful when you already know the frequency of the desired station After selecting the desired band with pressing t...

Страница 44: ...place After selecting the tuner with pressing the FM AM button or FUNCTION button select the desired preset number Tuning to preset stations 3 Select the desired preset number 1 30 and press the PROGR...

Страница 45: ...DIGITAL OUT of the unit is connected to the DIGITAL IN of an MD recorder or CD recorder you can enjoy high quality sound of digital recording Refer to CONNECTING AUDIO VIDEO COMPONENTs and CONNECTING...

Страница 46: ...d When the time has not been set yet or the time is cleared due to the electricity failure etc the time display flickers To display the current operation status press the TIME ADJUST button again Note...

Страница 47: ...he SLEEP TIMER button for more than 2 seconds to enter the timer setting mode 2 Select the timer on mode and press the SLEEP TIMER button TMR OFF or TMR ON is displayed To cancel the timer setting mod...

Страница 48: ...ff time are the same when the SLEEP TIMER button is pressed ERROR is displayed In this case perform the above steps 3 and 4 to set the time correctly 5 Press the CURSOR buttons to select the desired i...

Страница 49: ...bove steps 2 and 3 Timer function cannot play back MP3 discs To play back a DVD Video set the timer of your TV as desired too When selecting FM or AM Tune in the desired station If you do not specify...

Страница 50: ...mode changes as follows TMR ON Timer on mode lights up TMR OFF Timer off mode goes off Then the timer is deactivated 2 Select the timer off mode 3 To confirm your selection press the SLEEP TIMER butt...

Страница 51: ...No picture Noisy or distorted picture Abnormal or no picture Slight pause of picture Noise or distorted sound The disc is loaded upside down The disc is not playable The disc is dirty The rating leve...

Страница 52: ...connected correctly Check the speaker connections Connect them correctly according to the channel left and right and the polarity and PROBLEM POSSIBLE CAUSE REMEDY No power No sound even though the PO...

Страница 53: ...signal 0 7 Vp p Y signal 1 Vp p DVD PLAYER SECTION Pickup Semiconductor laser wavelength 650 780 nm D A conversion 24 bit Oversampling Sampling frequency 44 1 48 kHz 96 kHz 8 fs 8 fs 4 fs Video forma...

Страница 54: ...woofer 1 1inch soft dome tweeter 1 Frequency response 140 Hz 20 kHz Power handling 25 30 W Impedance 6 Sound pressure level 82 dB W M Dimensions W H D 110 220 100 mm 4 1 4 8 5 8 4 inches Weight Net un...

Страница 55: ...8277 8279 8285 8377 8365 7168 8382 8372 8378 8388 8373 8375 8376 8379 6983 8385 8387 8386 Code Language 8476 8471 8465 8484 8469 8472 6679 8473 8479 8482 8475 8487 8575 8582 8590 8673 8679 6789 8779...

Страница 56: ...Futuretech 027 GE 007 008 030 041 029 025 004 015 038 040 Gibralter 002 005 003 Goldstar 005 025 003 011 T V Gradiente 009 011 Grunpy 027 026 Hallmark 025 Harley Davidson 026 Harman Kardon 010 Havard...

Страница 57: ...wood 014 026 006 V C R Proscan 007 Proton 025 032 Pulsar 002 003 Quasar 008 042 021 RCA 007 008 041 003 013 015 037 038 039 040 Radio Shack 007 019 021 027 005 025 003 011 006 Realistic 019 021 027 00...

Страница 58: ...Samsung 023 010 033 Sanky 027 007 Sansui 000 014 021 026 024 Sanyo 012 023 017 011 Scott 020 010 018 009 Sears 004 005 012 000 008 017 011 Semp 010 Sharp 027 Shintom 015 Shogun 023 Singer 015 Sony 004...

Страница 59: ...31 Paragon 000 Philips 018 Pioneer 017 025 Popular Mechanics 022 Pulsar 000 Quasar 000 RCA 031 Radio Shack 010 021 026 028 Recoton 022 CBL Regal 012 020 Regency 001 Rembrandt 006 Runco 000 SL Marx 014...

Страница 60: ......

Отзывы: