Page 6
6. SECURE BASE FEET:
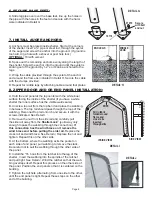
A. Slide leg pipe over over the base feet, line up the holes in
the pipe with the holes in the feet and secure with the hard-
ware indicated in Detail G.
7. INSTALL AUGER ANCHORS:
A. Anchors must be placed inside shelter. Start at the corners
of the shelter. Insert a ¾” pipe or steel rod, through the eyelet
of the auger and screw the anchor into the ground. (If ground is
too hard, dig a hole with a shovel or post hole tool.)
OPTIONAL:
Fill with cement.
B. Space out the remaining anchors evenly along the length of
the shelter. Screw the anchor into the ground until the eyelet is
sticking out of the ground by 1-2” so it can be anchored to the
legs.
C. Wrap the cable provided through the eyelet of the anchor
and around the frame as indicated in Detail H. Secure the cable
with the clamps provided.
D. Repeat for middle legs by attaching cable around foot plates.
8. zIPPER DOOR AND OR END PANEL INSTALLATION:
Secure
with bolt
and nut
detail G
detail H
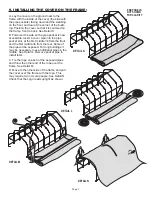
A. Hold the end panel at the top center with the white inner
surface facing the inside of the shelter (if you have a white
shelter the inner surface has the visible weld seams).
B. Unscrew top rail from the top bend and place the webbing
in between. The top rail should pass through the loop of the
webbing. Reconnect top rail onto rib and secure it with the
screws indicated. See Detail I.
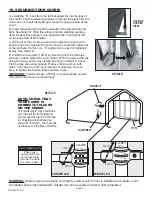
C. Remove the nut from the side rail and carefully pull
the side rail away from the
ShelterLock
™
(pull away only
enough to pass the webbing through the connection).
If
this connection has the wind brace on it remove the
wind brace end before pulling the side rail.
Replace the
cross rail and wind brace. See Detail J. Replace the nut and
tighten. Repeat this on the other side.
D. At the bottom, where the webbing exits the pocket on
each side of end panel, pull webbing to remove the slack.
Be careful not to pull the webbing through the other side of
the panel.
E. Install the “S”- hook from the ratchet into the leg of the
shelter. Insert the webbing into the spindle of the ratchet
and pull tight. See Detail J. Wind the ratchet so that the web-
bing overlaps itself. Repeat this process on the other side of
the panel. Position the end panel so that it is centered on the
building.
F. Tighten the ratchets, alternating from one side to the other,
until the end panel is tight. Repeat these steps on the other
end of the building.
detail i
inSide view
Side view
detail J
10114
01010
Slit in fabric
folded around
frame and
cross rails
inserted
through slits
rOPe
end leGS
middle
leGS


