background image

IP Address Assignment with SmartManager 

The Sharx Security HTNC4300DM can be used with a router, or completely standalone, or with a Sharx 

Security or other brand of ONVIF compatible NVR (network video recorder) supporting 3MP / 30 fps   


When used with a Sharx Security NVR there is no need for any IP configuration

. Simply plug it in one of 

the NVR’s available network jacks, and if the camera is in default settings, the NVR will recognize and 

automatically display and record it. If you already changed the password it will need manual setup. 


Similarly, when used completely standalone without being connected to anything else, the default IP of 

192.168.30.220 could be used directly. 


When used with a router, the camera will need to be configured 

either for a static IP that is within the 

acceptable range for your router, or for DHCP which means to ask your router for an automatically 

assigned IP. In this case, you would then follow up to reserve the automatically assigned IP in your router 

so that it doesn’t change after a power failure or router restart. 


The camera is shipped configured for the unusual IP address 192.168.30.220 that is purposely set to be 

outside the scope of most routers. That way it doesn’t conflict with anything you might already have. 

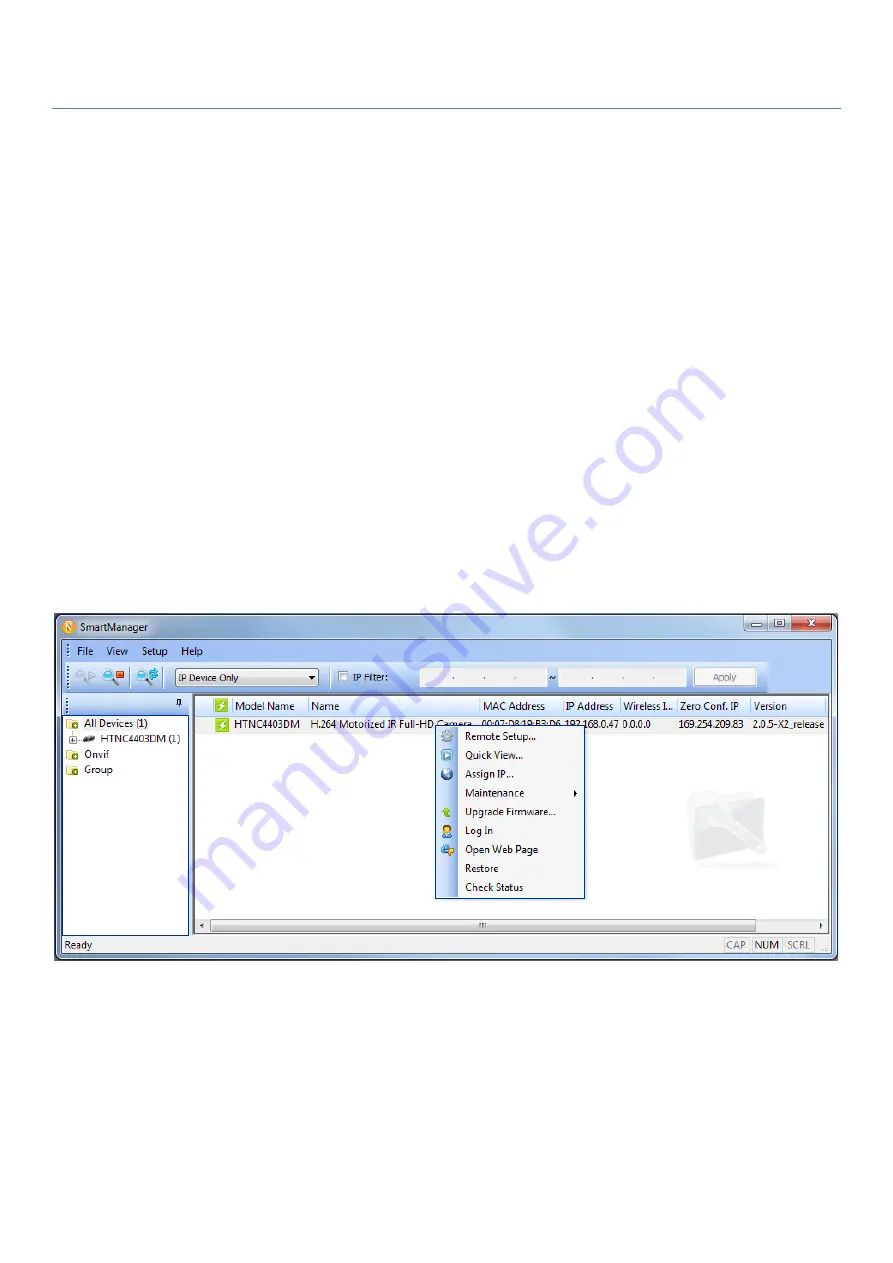
Unlike a browser, SmartManager will be able find it even if your network uses a different subnet. 


You can then right click on the camera and SmartManager will open a menu with a number of choices as 

shown below. 


Select Assign IP Address. The Assign IP window will display. Enter the required IP address.   

 
In the example on  the next page, the camera is being set up for an IP address of 192.168.0.201, with a 
common subnet mask of 255.255.255.0 and a gateway (router address) of 192.168.0.1 
 
Typically the first 3 sets of digits in the camera’s IP address and the router’s IP address will need to be the 
same, and the subnet mask is almost always 255.255.255.0, while your router’s IP is entered into the 
“gateway” field. 
 

Содержание HTNC4300DM

Страница 1: ...MP wide angle indoor IP camera with built in distortion compensation Full setup support is included with your purchase We would be glad to call you to walk you through these steps if you like Just ema...

Страница 2: ...th Chrome Allow downloading of the ActiveX Java and codecs Chrome will have a message at the bottom left corner asking about Java and you would need to click through to allow Chrome to use the Java pl...

Страница 3: ...is available if you log in to the NVR with the attached monitor or with a browser and the NVR s local IP You can find the DVRNS ID if you go to setup then network then the DVRNS menu The initial DVRNS...

Страница 4: ...o the main menu Once the device is added in the app you can click on Live then select your device and click on Connect at the bottom and you will see your first 4 cameras For live viewing you can sele...

Страница 5: ...s When viewing a zoom camera by itself there is a PTZ icon at the bottom right This icon opens a PTZ menu that has options for zoom focus iris and other options including smart focus The playback menu...

Страница 6: ...d from 1 to 64 times if you tap on either the forward button or backward button and then tap on the tiny plus or minus icons that appear above and below the selected speed In the example below a 16 x...

Страница 7: ...d towards the end of this Quickstart guide 2 Login to the camera s full user interface using Internet Explorer Note All browsers allow access to the camera s commonly used setup options Many browsers...

Страница 8: ...ly purchased 12 V DC power supply Optionally you can also connect cables for integration with a burglar alarm or specialized sensors such as flood or freeze sensors or an amplified microphone or speak...

Страница 9: ...a wall or ceiling A spare screw is included For your convenience a drilling template is included with the camera The cable can be routed through a hole in the wall or ceiling or the cable can exit sid...

Страница 10: ...igned IP In this case you would then follow up to reserve the automatically assigned IP in your router so that it doesn t change after a power failure or router restart The camera is shipped configure...

Страница 11: ...IP that starts with 192 168 0 from your router Once you have a valid IP you can proceed to use the camera with Internet Explorer or with the software of your choice Please note that browsers other th...

Отзывы: