background image


29


www.sharp.co.uk/support


ADVANCED OPERATION


REMOTE CONTROL OPERATION OF TV


In addition to operating the VCR the remote control will also operate basic functions on TVs, 
including brands other than SHARP.


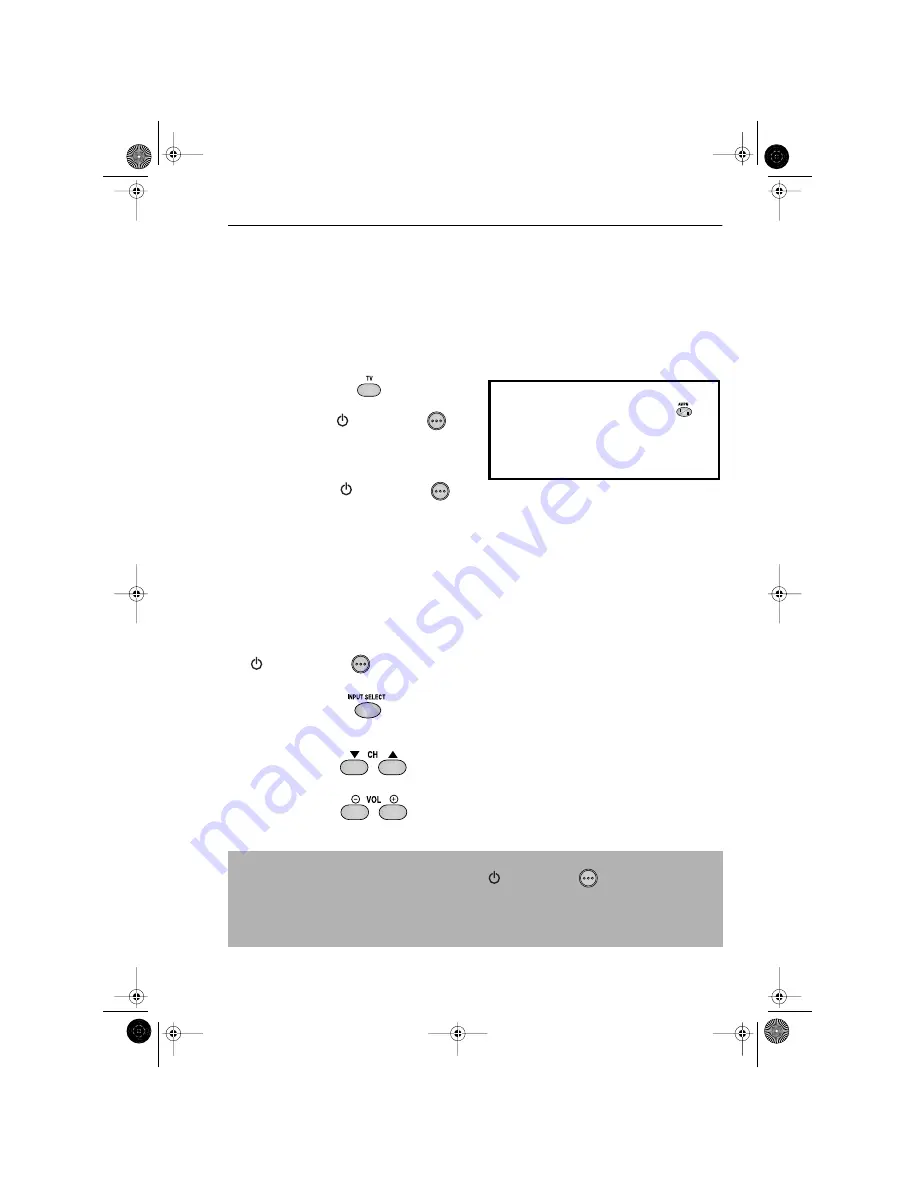
SETTING UP THE VCR REMOTE 
CONTROL TO OPERATE THE TV


1.


Switch on the TV. 


2.


Press the TV button 

 on the VCR 

remote control to place it into TV mode. 

Hold down the 


STANDBY 


button on the VCR remote control then the 

appropriate button for the TV from the list 

shown, for 2 seconds. For example for a 

SHARP TV, press 


STANDBY 


and 


1


.


3.


The TV will enter standby mode to confirm 

the correct code has been entered. 


4.


Turn your TV on from standby mode in the 

usual way, e.g.,by pressing the standby or 

Channel up or down buttons.


CONTROLLING THE TV WITH THE VCR REMOTE CONTROL


STANDBY   


Switches the TV to and from Standby Mode. 

(when the remote is in TV mode)


INPUT SELECT 


Determines which input to the TV is to be 
displayed on the Screen. (when the remote is in TV 
mode)


CHANNEL      


Changes the TV channels. (when the remote is in 

TV mode)


VOLUME         


Increases or decreases the volume.


NOTES: 


Certain models of TV do not use standard codes for their brand. In this case, place the 

remote into TV mode and then hold down 


STANDBY 


. Press each of the 

buttons in the list until the TV enters stand-by mode (You will need to reset when remote 

control batteries are replaced).

SHARP cannot guarantee the VCR remote control will operate your TV.

TV BRAND

BUTTON

TV BRAND

BUTTON

SHARP

1

TOSHIBA

9

PHILIPS

2

PANASONIC

0 or 

THOMSON

3 or 4

HITACHI

INPUT SELECT

GRUNDIG

5

SANYO

MODE OSD

FERGUSON

6

JVC

DISPLAY

ITT NOKIA

7

MITSUBISHI

AUDIO OUT

SONY

8


TINS-A082UMN1.book  Page 29  Monday, November 4, 2002  2:33 PM

Содержание VC-MH835HM

Страница 1: ... PICTURE CHILD LOCK AUTO HEAD CLEANING POST CODE SECURITY SATELLITE CABLE BOX CONTROL NEXTVIEW LINK S VHS PLAYBACK 16 9 PLAYBACK RECORDING PROGRAMME DELIVERY CONTROL VC MH835HM VIDEO CASSETTE RECORDER OPERATION MANUAL TINS A082UMN1Cover 4 11 02 2 38 pm Page 1 ...

Страница 2: ...duced stored or transmitted in any form without prior permission from SHARP Electronics UK Ltd VIDEO Plus and PlusCode are registered trademarks of Gemstar Development Corporation The VIDEO Plus system is manufactured under license from Gemstar Development Corporation VIDEO Plus VIDEO Plus DELUXE Using the codes published with the TV listings VIDEO Plus DELUXE will allow you to programme the VCR t...

Страница 3: ...L buttons Press the FF or REW buttons on the front of the VCR ii 4 EJECT 17 TIMER ON OFF 2 3 1 4 7 5 8 0 6 9 VIDEO Plus 24 ZERO BACK 27 CHILD LOCK 22 MENU SELECT 31 PAUSE STILL 9 AM PM or 30 PLAY X2 25 SKIP SEARCH 18 MODE ON SCREEN DISPLAY 6 MENU 10 REWIND 29 FAST FORWARD 15 SLOW 13 TAPE SPEED 32 DPSS SLOW SPEED 3 AUDIO OUT 8 NUMBER BUTTONS 21 SET 23 CLEAR 11 STOP The STOP button is also used to s...

Страница 4: ...ack 26 Blue mute 27 Colour 27 16 9 playback and recording 27 Searching the video tape 28 Skip searching the video tape 28 Digital programme search system DPSS 28 Remote control operation of TV 29 Recording from other equipment 30 Decoder switching operation 31 OTHER FEATURES ON YOUR VCR Post code security 32 Child lock 33 CUSTOMISED INSTALLATION Manually tuning a channel 34 Connecting a satellite ...

Страница 5: ...e the VCR unplug immediately and contact your SHARP dealer Do not use the VCR insert or drop anything into the tape compartment or through the air vents as this could result in serious damage fire or an electric shock POWER SOCKETS To avoid overheating or even fire insert the plug correctly into the socket DO NOT overload power sockets this may cause a fire or electric shock pull the power cord to...

Страница 6: ...e VCR to the TV Remote Control Remote Control must be pointed towards the VCR to operate Do not expose to liquid or shock May not function if the VCR is in direct sunlight or any other strong light Replace both alkaline batteries type AA R6 UM3 if the remote control fails Remove the batteries and keep in a safe place if you do not plan to use the VCR for several months Remove and dispose of flat b...

Страница 7: ...LE Optional Connect your Satellite receiver or decoder to the VCR using a scart lead to LINE 2 IN DECODER socket on the VCR Connect your existing aerial cable to the AERIAL IN socket on your VCR DECODER UNIT OR SATELLITE SYSTEM 1 2 3 Connect your TV to the VCR using the supplied RF connection cable i e connect the VCR AERIAL OUT socket to the TV AERIAL IN socket Connect the VCR to the mains SCART ...

Страница 8: ...he VCR ideally on the top 3 Ensure the receiver is not in any special mode and switched on 4 Ensure all the channels you wish to be tuned are within channel positions 1 199 on your satellite receiver not applicable to digital The VCR will only tune up to the first 199 channels refer to your satellite receiver operation manual for instructions on moving channels The satellite channels can now be tu...

Страница 9: ...will be between 21 and 69 If you are connected via a scart lead go to step 6 CAUTION 5 Tune the selected channel on your TV Refer to your TV manual for instructions on how to tune in your TV Store this as your VCR channel NOTE 6 Press the SET button to store the RF channel setting and continue with the installation See next page to continue If the clear button is pressed at this point it will not ...

Страница 10: ...are being copied If the VCR is unable to copy the TV preset list the terrestrial channels will be automatically installed Auto install may take a few minutes PLEASE CONTINUE WITH YOUR INSTALLATION ON PAGE 10 SATELLITE RECEIVER INSTALLATION If you do have a satellite receiver connected to the VCR continue from Point 9 on the next page SET P L EASE BE SURE THE AER I AL SCART CABL E I S CONNECT ED TO...

Страница 11: ...ll now need to tune the VCR into the Satellite Receiver iii Press to select CHANNEL on the on screen display iv Press The current channel will be displayed as a background to the on screen display If this is not a satellite channel press again Continue until you see a satellite channel By pressing MODE OSD button the VCR will change to a blue background This may help you see which channel your VCR...

Страница 12: ...compatible TV s only During the copying process the display will show the TV presets that are being copied If the VCR is unable to copy the TV preset list the terrestrial and satellite channels will be automatically installed Auto install may take a few minutes See next page to continue If your satellite receiver has not changed to preset channel 12 enter the next code number on the list Continue ...

Страница 13: ... to be moved 2 Press the SET button to confirm 3 Press to highlight the new position for the channel 4 Press the SET button to confirm 5 If any more channels are to be moved repeat procedure from step 3 6 Press the button to exit if you are happy with the channel order The correct time and date should be displayed on your TV screen for approximately 2 seconds If the clock is not automatically set ...

Страница 14: ...ill need to have the heads cleaned by a SHARP Service Facility Please note if cleaning is necessary it is not covered by the guarantee Use video tapes which carry the mark HOW TO PLAYBACK A VIDEO TAPE PLAYBACK 1 Switch on your TV and select the video channel 2 Carefully push a pre recorded video tape into the tape compartment This will switch the VCR on If the record protection tab has been remove...

Страница 15: ... Manual Tracking Press the VCR CHANNEL UP and DOWN buttons together to start Auto Tracking PAUSING AND SLOW MOTION 1 Press the PLAY X2 button to start the video tape playing 2 To pause the video tape press PAUSE STILL To minimise jitter whilst in pause mode press the VCR CHANNEL buttons up or down Press the PLAY X2 button to resume playback 3 To playback in slow motion without sound press the SLOW...

Страница 16: ...g visual search mode press FAST FORWARD or REWIND again 4 Press the PLAY X2 button NOTE IMMEDIATE RECORDING SELECTION OF A CHANNEL Select the channel you wish to record by using the NUMBER BUTTONS on the VCR remote control or select the next previous channel by pressing the VCR CHANNEL buttons on the remote control or on the VCR front panel To change between single digit and 2 digit channel number...

Страница 17: ...ng recording press PAUSE STILL 5 To continue recording press REC 6 To stop recording press STOP once SIMPLE TIMED RECORDING 1 Press REC 2 To specify a stop time each additional press of REC will delay the stop time by 10 minutes 3 To stop recording at any time press STOP once NOTES If the tape ends before the recording is complete the VCR will stop recording rewind eject the tape and place the VCR...

Страница 18: ...an be selected and used to program the VCR automatically This feature is compatible with NexTView TV s Refer to your TV operation manual for further information After transfer of the timer information to the VCR the timer menu will be displayed for approximately 5 seconds after which press the TIMER ON OFF button once to place the VCR in STANDBY mode will be shown on the display NOTES A fully wire...

Страница 19: ...ET button to confirm NOTE The first time that you use the VIDEO Plus system to make a recording on each channel Preset PR may be highlighted on the On Screen Display 5 Enter the channel number you wish to record using the NUMBER BUTTONS for example if you wish to record channel 2 press 0 2 The VCR will remember this for the future See next page to continue An ERROR message will appear if you have ...

Страница 20: ... option will be highlighted Press the SET button to confirm Continue from step 2 of this procedure VPS PDC is a signal broadcast by some TV stations which adjusts the start and stop time of your VCR recording This ensures that if there is a change in broadcast time for your programme the VCR will still record the whole programme It is essential that the start time as it appears in the TV listing i...

Страница 21: ...Press the SET button again the on screen display will now show today s date If you wish to change the date use the or NUMBER BUTTONS If you use the number buttons enter two digits for the day then two for the month For example for July 9th press 0 9 9th then 0 7 July When the correct date for your recording is shown press the menu select button to move to the next setting 5 If you want to make add...

Страница 22: ...into the VCR then press the TIMER ON OFF button once to place the VCR in TIMER STANDBY mode will be shown on the display NOTES VPS PDC is a signal broadcast by some TV stations which adjusts the start and stop time of your VCR recording This ensures that if there is a change in broadcast time for your programme the VCR will still record the whole programme It is essential that the start time as it...

Страница 23: ...ress to highlight the recording then press the SET button to select 3 Press to highlight the setting to be changed and correct it by using the or the NUMBER BUTTONS 4 When all corrections are complete press the SET button to confirm then press the MENU button to exit CANCELLING A RECORDING 1 Follow steps 1 to 3 of CHECKING A RECORDING above 2 To cancel a delayed recording press to highlight the re...

Страница 24: ...ICAM Hi Fi STEREO SOUND Your VCR can receive and record NICAM sound The VCR is normally set so that NICAM sound is possible if it is present on the receiving signal otherwise the VCR will automatically switch to receive the mono signal NICAM sound can be turned off If you wish to do this follow the procedure below 1 Press the MENU button to display the main menu on the screen 2 Press the menu sele...

Страница 25: ...ereo sound is possible from the speakers LINE1 I IN OUT SON VIDEO L1 I A2230 LINE2 II IN DECODER CANAL PLUS L2 II AUDIO OUT SORTIE SON L G R D AERIAL IN ENTREE ANTENNE AERIAL OUT SORTIE ANTENNE BACK OF EXISTING AERIAL CABLE RF CONNECTION CABLE AERIAL OUT AUDIO OUT AMPLIFIER L and R TELEVISION AERIAL IN AUDIO PHONO LEADS NOT SUPPLIED TINS A082UMN1 book Page 23 Monday November 4 2002 2 33 PM ...

Страница 26: ...ot record NTSC signals or dub NTSC tapes onto other VCR s from this VCR You cannot use Slow speed Still frame Double Speed Frame Advance or Tape Remaining with a pre recorded NTSC tape On some televisions the picture may appear in black and white or there may be no picture This does not indicate a fault with your VCR On some televisions the picture may shrink vertically causing black bands to appe...

Страница 27: ...ard play long play and extended play For example in standard play 1 hour 23 minutes is left on the tape in long play 2 hours 46 minutes is left on the tape in extended play 4 hours 9 minutes is left on the tape NOTES PLAYING BACK A VIDEO TAPE REPEATEDLY You can set your VCR to automatically rewind at the end of playing a video tape and replay the entire tape again REPEAT will appear on the on scre...

Страница 28: ...ton until tape counter appears for example 2 To identify the current position on a video tape press the CLEAR button and the tape counter will appear When you wish to return to this position on the video tape press ZERO BACK button The tape will rewind advance to this point NOTE DISPLAY BRIGHTNESS The LCD display brightness can be changed to suit the ambient lighting in the room Switch on the VCR ...

Страница 29: ...eps 1 to 3 from BLUE MUTE above 2 Press the menu select buttons to select COLOUR 3 Press menu select buttons to select AUTO or PAL 4 Press SET to confirm and then MENU to return to the normal screen 16 9 PLAYBACK AND RECORDING This feature allows the PLAYBACK and RECORDING of wide screen format signals 16 9 which should automatically change the picture size setting on a wide screen TV To allow the...

Страница 30: ...revious programme or the next programme For example 1 Load the video tape into the VCR 2 Press DPSS three times DPSS 3 will appear on the on screen display and the VCR will fast forward to locate the third recording after the current one 3 Press DPSS once DPSS 1 will appear on the on screen display and the VCR will rewind to locate the beginning of the current recording 4 To cancel the search befo...

Страница 31: ...THE TV WITH THE VCR REMOTE CONTROL STANDBY Switches the TV to and from Standby Mode when the remote is in TV mode INPUT SELECT Determines which input to the TV is to be displayed on the Screen when the remote is in TV mode CHANNEL Changes the TV channels when the remote is in TV mode VOLUME Increases or decreases the volume NOTES Certain models of TV do not use standard codes for their brand In th...

Страница 32: ... 4 Press REC to start recording OTHER CONNECTIONS POSSIBLE If you wish to record from a source connected to LINE 1 IN OUT select L1 Press REC to start recording If you wish to record from a source connected with audio phono leads to the sockets on the front of the VCR select L3 Press REC to start recording NOTE There are many different ways of connecting external equipment to your VCR Please refer...

Страница 33: ...VCR outputs the descrambled signal to your TV through the LINE1 terminal and you can watch the descrambled picture When making recordings using a separate decoder connected as shown remember to leave the decoder function ON If you connect a decoder unit to the VCR the decoder unit provides a switching signal which will automatically allow your TV to display the descrambled signal routed through th...

Страница 34: ...tons to scroll through the characters and the buttons to move to the next position Press the SET button to confirm then press the MENU button to return to a normal screen 6 Write your PIN number in the box provided for future reference IMPORTANT Please keep your Operation Manual separate from your VCR If you wish to change your PIN number at any time 1 Follow steps 1 to 3 above 2 Enter your curren...

Страница 35: ...ouched the VCR will continue to operate in its present mode If CHILD LOCK is activated during playback once the tape reaches its end the VCR will automatically rewind the tape eject it and turn the power off TO DISENGAGE CHILD LOCK Press and hold the CHILD LOCK button for about 2 seconds starts flashing and then disappears CHILD LOCK is disengaged NOTES If you attempt to change modes by pressing a...

Страница 36: ...quired VCR preset channel 5 If you have SATELLITE CONTROL set to ON continue from point 6 Otherwise continue from point 7 6 Press to select SOURCE Then choose the required source If you wish to tune a satellite or cable channel press to select SAT Then press to select CHANNEL Enter preset satellite channel using the NUMBER BUTTONS or by using the buttons step through each preset satellite channel ...

Страница 37: ... up If any more channels are to be tuned in repeat this procedure Once all the channels have been tuned in Press MENU to return to the normal screen IMPORTANT NOTE 10 Press to select DECODER This is preset to OFF If you connect a satellite receiver into VCR L2 as shown previously leave decoder OFF If you connect a decoder as shown previously you must use to turn the decoder function ON Refer to DE...

Страница 38: ...e TV AERIAL IN socket 5 Reconnect the VCR plug to the mains socket The VCR is now in STANDBY mode Optional SCART not supplied If you have a scart lead connect it to your TV and LINE 1 IN OUT socket on the VCR The advantage of a Scart connection is improved picture and sound quality during playback LINE1 I IN OUT SON VIDEO L1 I A2230 LINE2 II IN DECODER CANAL PLUS L2 II AUDIO OUT SORTIE SON L G R D...

Страница 39: ... select SET UP Press SET to confirm 3 CHANNEL PRESET will be highlighted Press SET to confirm 4 Press to select SAT RECEIVER Press SET to confirm The satellite receiver screen will appear 5 Follow points 9 13 in AUTO INSTALLATION OF A SATELLITE RECEIVER CABLE BOX at the front of this book 6 Then press to select SAT PROG SEARCH Press SET to confirm The satellite channels will be installed This may ...

Страница 40: ...irm 7 If any more channels are to be moved repeat procedure from step 5 8 When all the channels are in your preferred order either press the CLEAR button to return to the CHANNEL SORT menu or press the MENU button to leave the MENU function NOTES If when moving channels the picture becomes unclear and the on screen display is unreadable the MODE OSD button can be used to toggle between a blue back...

Страница 41: ...ress the CLEAR button to return to the CHANNEL SORT menu or press the MENU button to leave the MENU function NOTES If when deleting channels the picture becomes unclear and the on screen display is unreadable the MODE OSD button can be used to toggle between a blue background and the normal picture The blue background will be shown until either another channel is selected or the MODE OSD button is...

Страница 42: ...confirm 7 If any more channels are to be re named repeat procedure from step 5 8 When all the channels are named correctly either press the CLEAR button to return to the CHANNEL SORT menu or press the MENU button to leave the MENU function NOTES If when re naming channels the picture becomes unclear and the on screen display is unreadable the MODE OSD button can be used to toggle between a blue ba...

Страница 43: ...f using the 12 hour clock enter AM or PM by pressing the AM PM button on the remote control 6 Press to select DATE Enter the date using the NUMBER BUTTONS or the buttons For example for 1st April enter 01 04 7 Press to select YEAR Enter the last two digits of the year using the NUMBER BUTTONS or For example for 2002 enter 02 For the year 2003 enter 03 8 AUTO CLOCK SETTING Press to select Press to ...

Страница 44: ...V broadcast channel will be seen on the TV screen and VCR will disappear from the VCR display Pressing TV VCR again will return the TV picture to the playback picture Some models do not have all the features shown therefore they will not appear on the display 1 TIMER RECORD indicator 2 VCR MODE indicator 3 TAPE MOTION STATUS indicator 4 RECORDING indicator 5 AUDIO OUTPUT indicator 6 CHILD LOCK ind...

Страница 45: ...ow the tape counter and amount of tape remaining 4 DISPLAY OFF this will remove the display from the screen NOTES The default time and date will not be displayed if the clock has not been set The VCR will return to display 1 each time it is switched on If you are recording from this VCR to another make sure you remove the display from the screen otherwise it will be recorded 1 1 CH 5 9 N I CAM S T...

Страница 46: ...1 UK STYLE SKY SPORTS 2 UK DRAMA SKY SPORTS 3 BBC CHOICE EURO SPORTS SKY PREMIER 1 MTV SKY MOVIE MAX BBC NEWS 24 SKY CINEMA BBC PARLIAMENT SKY SPORTS 1 E4 SKY SPORTS 2 UK HORIZON SKY SPORTS 3 BBC KNOWLEDGE EURO SPORT CARTOON NETWORK MTV CARLTON VH1 FILM 4 SKY NEWS BBC NEWS 24 BBC PARLIAMENT NBC CNN ITV NEWS DISCOVERY UK HORIZON DISCOVERY ANIMAL PLANET BBC KNOWLEDGE CARTOON NETWORK NICKELODEON FOX ...

Страница 47: ...ITV DIGITAL PACE 30 PIONEER 37 PHILIPS 38 OTHER DIGITAL SATELLITE SYSTEMS AB SAT 31 TPS SAT SAGEM 33 TPS SAT SAGEM 34 ANALOGUE SATELLITE SYSTEMS AB SAT 31 ALBA 4 AMSTRAD FIDELITY ANKARO HANSEATIC 9 10 11 ARMSTRONG 2 7 11 12 13 CHANNEL MASTER 11 ECHOSTAR TECHNISAT POLYTRON RADEX 2 8 FERGUSON 4 FUBA TRIASAT TRIAX FREECOM 18 GALAXIS NEC FORMAT ALDES PROSAT SKYMASTER ANARKO 15 16 GRUNDIG 2 4 26 HIRSCH...

Страница 48: ...h E 240 video cassette in Extended Play EP mode Tape width 12 7 mm Tape speed 23 39 mm s Standard Play SP 11 70 mm s Long Play LP 7 8mm s Extended Play EP Antenna 75 Ω unbalanced Reception channels UHF channel 21 69 RF output signal UHF channel 21 69 Power requirement AC 230 240V 50 Hz Power consumption 19 W approx Standby power consumption 3W Operating temperature 5 C to 40 C Storage temperature ...

Страница 49: ...switched on OR Auto Installation is not complete Reset the VCR and complete AUTO INSTALLATION again Refer to VCR Reset at the back of the book POWER Display is not working Make sure the power cord is plugged in Make sure the wall socket has power check by plugging another appliance in VCR will not operate appears in VCR display Press the TIMER ON OFF button to disengage timer VCR will not respond ...

Страница 50: ...eiver is not in any special channel setting mode and that the desired channel is below channel 199 for Analogue systems and 999 for Digital Satellite systems OTHER PROBLEMS Picture does not change even though the VCR CHANNEL buttons are pressed Make sure the VCR is not in Timer or Menu mode Desired channel position can not be selected The channel position has been set to be skipped Cancel the SKIP...

Страница 51: ...flashing channel number to appear on the VCR display 4 The channel number can now be changed by using the MENU SELECT buttons 5 Your TV will now require tuning to the new channel The screen opposite should be displayed on the TV 6 Press the SET button to store RF THROUGH ON OFF If you wish to connect your VCR to the TV with only a scart lead the RF Output on your VCR can be turned OFF and ON To do...

Страница 52: ...not cover carriage costs batteries or video tapes 5 In the unlikely event of this product requiring repair please contact the supplier from whom it was purchased Where this is not possible please contact the SHARP Helpline on the telephone number given below 6 This guarantee is offered as an additional benefit to your statutory rights and does not affect these rights in any way 7 No person has any...

Страница 53: ...e cut off plug safely The wires in the mains cable are colour coded as follows blue neutral brown live As the colours of the wires may not correspond with the terminals in your plug connect the wires following plug manufacturer s guide blue wire to the terminal marked N or coloured black or blue brown wire to the terminal marked L or coloured red or brown Severe electric shock may occur if you con...

Страница 54: ...ot remove the cabinet or attempt to service this VCR yourself For service please contact your dealer If this is not possible please call our Customer Information Centre for details of your nearest Sharp Service Centre In the unlikely event of this equipment requiring repair during the guarantee period you will need to provide proof of the date of purchase to the repairing company Please keep your ...

Отзывы: