


43
ENGLISH
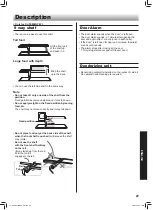
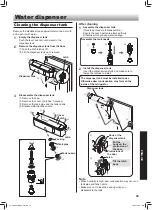
Cleaning the dispenser tank
Remove the dispenser tank approximately once a month
and wash it with water.
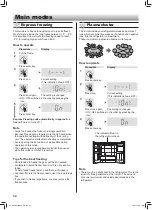
1
Empty the dispenser tank
Push the lever and let out all water in the
dispenser tank.
2
Remove the dispenser tank from the door
1
Take the both latches off .
2
Lift the dispenser tank up to remove.
2
1
1
Dispenser tank
Latch
3
Disassemble the dispenser tank
1
Remove the cap.
2
Remove the cover. (Latches : 5 pieces)
3
Remove the tank pipe and the tank nozzle.
4
Disassemble the tank nozzle.
Cover
2
2
3
4
3
2
2
2
Latch
Latch
Packing
Tank pipe
Tank nozzle
1
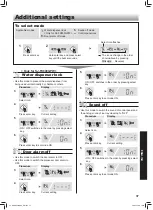
After cleaning
1
Assemble the dispenser tank
(Reverse procedure to disassemble.)
Ensure that each parts are attached
fi
rmly.
Otherwise it may cause water leakage.
Assemble the tank nozzle
1
2
3
2
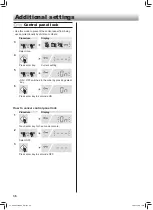
Install the dispenser tank
Insert the dispenser tank fully and make sure to
fasten the latches to install.
The dispenser tank must be installed to use
Otherwise dew condensation may form on the
inside of the refrigerator
Dispenser tank
1
2
2
3
2
3
Hook of the
dispenser tank
Put the
hook on the
protrusion of
the door.
Tilt the latch
back
Protrusions of
the door
Latch
3
Note
• When humidity is high, dew condensation may occur on
tank pipe and tank nozzle.
• Make sure not to lose the packing when you
disassemble the tank.
Water dispenser
02_TINS-B993CBRZ_EN.indd 43
02_TINS-B993CBRZ_EN.indd 43
5/5/2563 BE 16:28
5/5/2563 BE 16:28
Содержание SJ-FX800GPW
Страница 2: ...01_TINS B993CBRZ_TH indd 2 01_TINS B993CBRZ_TH indd 2 26 5 2563 BE 10 50 26 5 2563 BE 10 50 ...
Страница 3: ......
Страница 9: ......
Страница 22: ......
Страница 47: ...02_TINS B993CBRZ_EN indd 47 02_TINS B993CBRZ_EN indd 47 5 5 2563 BE 16 28 5 5 2563 BE 16 28 ...