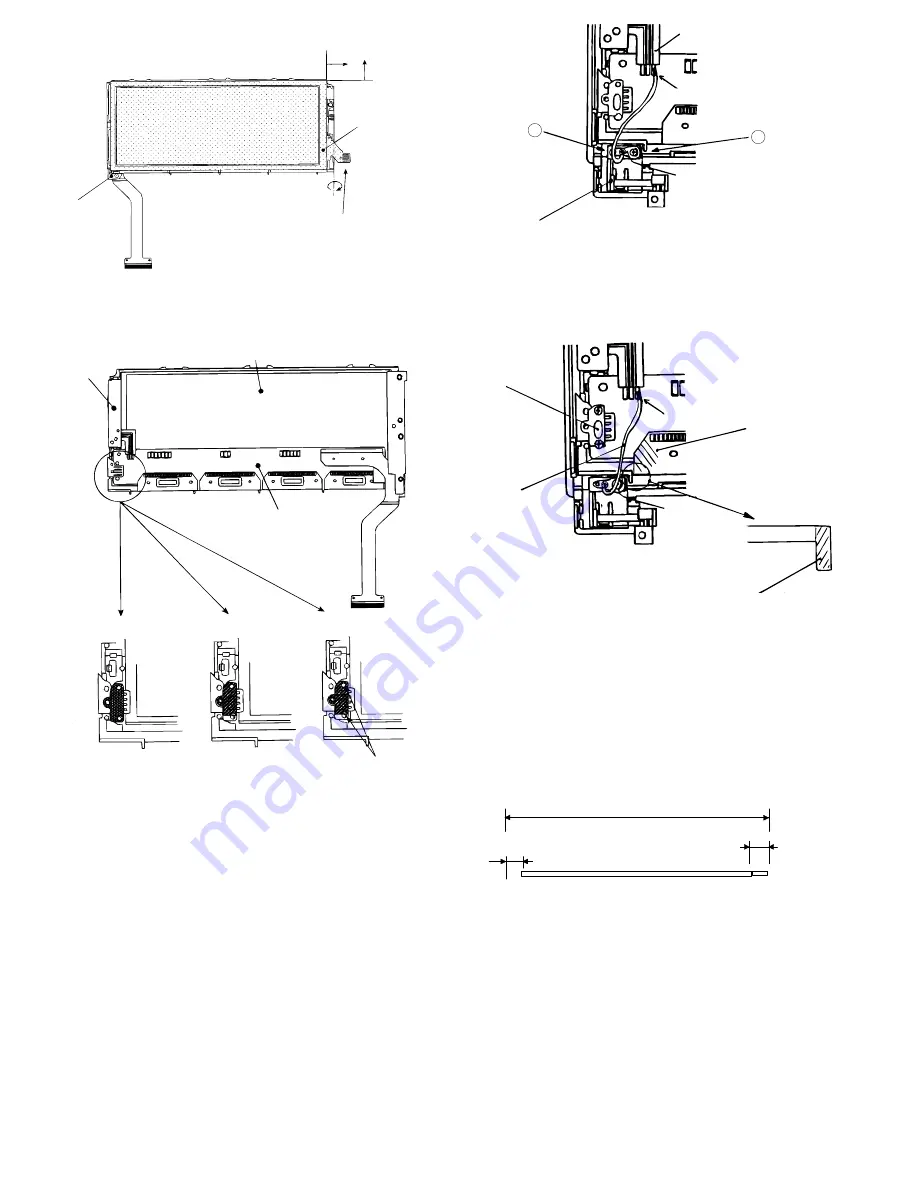
3. Pressing rubber/pressing angle attachment screw
tightening
4. Attachment/soldering of rug terminal with lead wire
(1)
Tighten the hinge unit and the rug terminal together with a
screw.
1) First, fix the hinge unit with a screw on A side as shown in
the Fig. 1.
2) Put the rug terminal over the hinge unit screw tightening
section as shown in Fig. 1, tighten it together with the hinge
unit with a screw on B side as shown in Fig. 1.
(2)
Lead wire wiring process
As shown in Fig. 2, move the lead wire to the right from the state
of Fig. 1 so that the lead wire is between the tablet pressing
angle (including a screw) and the LCD unit segment driver.
(Note)
(1) Keep the lead wire away from the LED holder rib
(shaded section in the figure). (If, not, the lead wire may
be pinched between the display cabinet A (external cabi-
net) rib.)
(2) Keep the lead wire away from the tablet pressing angle
(including a screw). (The space between the display
cabinet A ceiling is insufficient.)
Lead wire work dimensions
(UL style 1571 AWG 28 lead)
LCD unit
Reference
Do
no
t e
x
te
nd
.
Refer
e
n
c
e
Tablet unit
After cleaning the BL PWB pin section (IPA),
fold the tablet unit pin section to the Seg
Do not
extend.
BL PWB
Display side unit
EL panel
Seg PWB
Pressing rubber attachment
Pressing angle attachment
Screw tightening
* Tightening torque: 1.0Kgf.cm 10%
+
-
shape jumper lead
Solder
Rug terminal
Hinge unit
<Fig. 1>
A
B
Tablet pressing
angle
Lead wire
Solder
Segment driver
(TCP)
Rug terminal
<Fig. 2>
LCD holder rib
1.5
+0.5
0
30
+5
0
1.5
+0.5
0
– 45 –


