background image

85

English

Deutsc

h

Fran

ç

ais

Italiano

Espa

ñ

ol

English

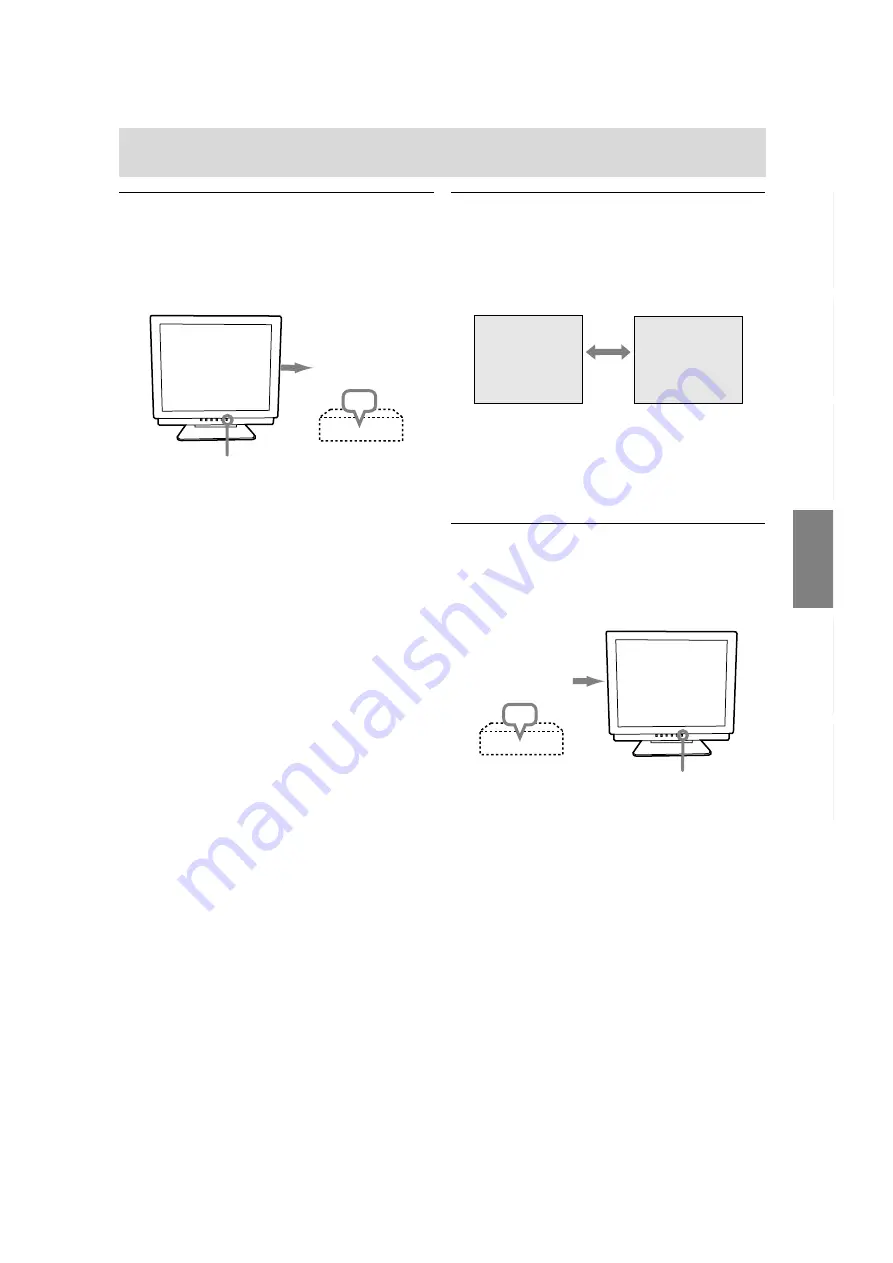
Commutare tra i terminali di ingresso

Utilizzate il pulsante INPUT per commutare tra i
terminali di ingresso del segnale.

Terminale di ingresso

DVI-I terminale

RGB analogico

di ingresso

INPUT-1

<ANALOG>

INPUT-2

<          >

INPUT

Il tipo di segnale d'ingresso (ANALOG/DIGITAL)
viene visualizzato tra due parentesi angolari <  >.

Nota:

- In assenza di segnali di ingresso compare il

messaggio [NO SIGNAL] ("nessun segnale").

Spegnimento

1. Spegnete il computer
2. Premete il tasto di alimentazione del monitor.

Il LED di alimentazione si spegnerà.

OFF

Se il monitor non verrà usato per lungo tempo,
assicuratevi di averlo scollegato dalla presa di
corrente alternata.

Collegamento del monitor ed accensione e spegnimento del monitor

Accensione

1. Premete il tasto di alimentazione del monitor.
2. Accendete il computer.

Il LED di alimentazione si illuminerà in verde, lo
schermo visualizzerà un'immagine.

ON

Note:

- Quando si utilizza un segnale analogico, è

necessario eseguire una regolazione automatica
dello schermo se si verifica una delle seguenti
condizioni:
- Si utilizza il monitor per la prima volta.
- Sono state modificate le impostazioni del

sistema durante l'uso.

- A seconda del computer o del sistema operativo,

potrebbe essere necessario usare il computer per

installare le informazioni di setup del monitor. In
questo caso osservate le istruzioni descritte di
seguito, per installare le informazioni per il setup
del monitor.

- Quando collegate ad un notebook, se lo schermo

del computer del notebook è impostato in modo da
visualizzare contemporaneamente, lo schermo
MS-DOS potrebbe non essere in grado di
visualizzare correttamente. In questo caso
modificate le impostazioni in modo che solo il
monitor visualizzi.

Accendete il

computer

Premete il tasto di alimentazione

Premete il tasto di alimentazione

Spegnete il

computer

Содержание LL-T17D3

Страница 1: ...LCD Monitor LCD Farbmonitor Moniteur LCD Monitor LCD Monitor LCD LL T17D3 OPERATION MANUAL BEDIENUNGSANLEITUNG MODE D EMPLOI MANUALE D USO MANUAL DE FUNCIONAMIENTO ...

Страница 2: ...ichnis Table des matières Indice Índice Notice for Users in Europe 3 Notice for Users in the UK 4 Notice for Users in Australia 4 Notice for Users in the USA 5 TCO 95 TCO 99 6 English 7 Deutsch 31 Français 55 Italiano 79 Español 103 ...

Страница 3: ...ace las exigencias de las Directivas 89 336 CEE y 73 23 CEE modificadas por medio de la 93 68 CEE Denna utrustning uppfyller kraven enligt riktlinjerna 89 336 EEC och 73 23 EEC så som komplette ras av 93 68 EEC Dette produktet oppfyller betingelsene i direktivene 89 336 EEC og 73 23 EEC i endringen 93 68 EEC Tämä laite täyttää direktiivien 89 336 EEC ja 73 23 EEC vaatimukset joita on muutettu dire...

Страница 4: ...letter E or by the safety earth or coloured green or green and yellow The wire which is coloured BLUE must be connected to the terminal which is marked with the letter N or coloured black The wire which is coloured BROWN must be connected to the terminal which is marked with the letter L or coloured red Ensure that your equipment is connected correctly If you are in any doubt consult a qualified e...

Страница 5: ... measures Reorient or relocate the receiving antenna Increase the distance between the equipment and receiver Connect the equipment into an outlet on a circuit different from that to which the receiver is connected Consult the dealer or an experienced radio TV technician for help Use nothing but the included cables and AC cord to insure compliance with FCC regulation for Class B computing equipmen...

Страница 6: ...9 approved and labelled products may also be obtained via the Internet using the address http www tco info com Environmental requirements Flame retardants Flame retardants are present in printed circuit boards cables wires casings and housings Their purpose is to prevent or at least to delay the spread of fire Up to 30 of the plastic in a computer casing can consist of flame retardant substances M...

Страница 7: ...djusting the screen display and speaker volume 14 Adjusting the backlight 14 Adjusting the speaker volume 15 Setting color mode 15 Adjusting the screen display When using an analog signal 16 Automatic screen adjustment 16 Manual screen adjustment 17 Adjusting the screen display When using a digital signal 20 Monitor care and repair 22 Monitor care 22 Storage 22 Troubleshooting 22 Specifications 23...

Страница 8: ...on it stretch it or overly bend it Also do not add extension cords Damage to the cord may result in fire or electric shock Use only the power cord supplied with the monitor Insert the power plug directly into the AC outlet Adding an extension cord may lead to fire as a result of overheating Monitor and accessory checklist Please check that the following items are included in the package LCD monito...

Страница 9: ...terminal Headphones commercially available can be connected here 9 Audio input terminal A computer s audio output terminal can be connected here The audio cable included should be used 10 Power terminal The AC adapter is connected here 11 DVI I input terminal The computer s digital RGB output terminal or analog RGB output terminal can be connected here Separately sold cables are necessary for conn...

Страница 10: ...own on the stand and lift up the top section of the monitor Folding up the monitor 1 Remove the AC adapter and the cables 2 If carrying out adjustments to the monitor place it upright 3 While pressing the rear lock disable button 1 gently fold back the monitor 2 2 1 Angle adjustment Adjust to an easy to view angle Do not use the monitor when tilted back beyond approximately 20º The monitor may fal...

Страница 11: ... RGB output terminal Use a digital signal cable model name NL C01E For digital RGB connection the monitor has an input for connecting to a computer with a DVI compatible output connector DVI D 24 pin or DVI I 29 pin and SXGA output capability Depending on the type of computer to be connected the display may not work correctly When connecting to an analog RGB output terminal Use an analog signal ca...

Страница 12: ...nes commercially available can be connected Notes When the headphones are connected no sound can be heard from the monitor speakers Connecting the monitor and turning the monitor on and off Connecting the monitor to a power source 1 Connect the AC adapter to the monitor s power terminal 2 Attach the power cord to the AC adapter and place the power plug into the AC outlet Audio output terminal Audi...

Страница 13: ...hen connecting to a notebook if the notebook computer s screen is set so that it is displaying at the same time the MS DOS screen may not be able to display properly In this case change the settings so that only the monitor is displaying Turn on the computer Press power button Changing between input terminals Use the INPUT button to switch between signal input terminals Analog RGB input DVI I inpu...

Страница 14: ...riginal ex factory values 1 Turn on the monitor power 2 Press the MENU button and the button simultaneously When RESET appears on the screen the reset is complete Note It is not possible to reset values when the adjustment lock is in place Remove the adjustment lock before attempting to operate control buttons Adjustment lock function By disabling the control buttons i e setting the lock any attem...

Страница 15: ...results from original scheme of liquid crystal panel sRGB sRGB is international standard of color represen tation specified by IEC International Electrotechnical Commission Color conversion is made in taking account of liquid crystal s characteristics and represents color tone close to its original image VIVID Displays an image with dynamic and VIVID primary colors If COLOR MODE is set to sRGB or ...

Страница 16: ... may look colored This is due to the input signal specification and is not a malfunction Adjusting the screen display When using an analog signal Adjusting the screen automatically 1 Press the MENU button The ADJUSTMENT Menu will be displayed ADJ US TMENT MANUAL AUTO CLOCK 127 PHASE 16 H POS 200 V POS 29 I N P U T 1 A N A L O G 1 2 8 0 x 1 0 2 4 V 6 0 H z H 6 4 0 k H z 2 Press the button The scree...

Страница 17: ... next menu is selected ADJUSTMENT GAIN CONTROL WHITE BALANCE MODE SELECT OSD Menu disappears Note The OSD Menu automatically disappears approximately 30 seconds after the last command ADJUSTMENT Menu ADJ US TMENT MANUAL AUTO CLOCK 127 PHASE 16 H POS 200 V POS 29 I N P U T 1 A N A L O G 1 2 8 0 x 1 0 2 4 V 6 0 H z H 6 4 0 k H z MANUAL Individual menu options are manually adjusted AUTO Every menu op...

Страница 18: ... AUTO B L ACK LEVEL 32 CONTRAST 80 I N P U T 1 A N A L O G 1 2 8 0 x 1 0 2 4 V 6 0 H z H 6 4 0 k H z MANUAL Individual menu options are manually adjusted AUTO Every menu option is automatically adjusted using the Auto Gain Control function Notes Press the button to select AUTO To choose a menu option MODE button To go to the next menu MENU button Auto Gain Control function The Auto Gain Control ad...

Страница 19: ...he OSD Menu can be moved up and down buttons SCALING Level of scaling The sharpness of the image can be adjusted buttons Note When the display mode is set to less than 1280 x 1024 pixels the display is enlarged to cover the whole screen i e the side ratio of the display may change INPUT When connecting a Power Macintosh set to MAC buttons 400 LINES degree of resolution You can specify the horizont...

Страница 20: ...u automatically disappears approximately 30 seconds after the last command Adjusting the screen display When using a digital signal WHITE BALANCE Menu WH I TE BALANCE COOL S TD WARM USER R CONTRAST G CONTRAST B CONTRAST I N P U T 2 D I G I T A L 1 2 8 0 x 1 0 2 4 V 6 0 H z H 6 4 0 k H z Notes On settings other than STD not all gradations can be displayed To display all gradations set to STD If COL...

Страница 21: ...an be moved to the left and right buttons OSD V POSITION OSD vertical position The position of the OSD Menu can be moved up and down buttons SCALING Level of scaling The sharpness of the image can be adjusted buttons Note When the display mode is set to less than 1280 x 1024 pixels the display is enlarged to cover the whole screen i e the side ratio of the display may change LANGUAGE You can choos...

Страница 22: ...or or your nearest Sharp authorized Service Center Never attempt this replacement on your own In the initial period of use due to the characteristics of florescent tubes the screen may flicker This is not a malfunction Should this happen check by first turning off the power then turning it on again No image appears on the monitor Power LED is not lit Are the AC adapter and the power cord connected...

Страница 23: ...r management VESA based on DPMS DVI based on DMPM Speaker output 1W 1W Input signal terminal Analog 15 pin mini D sub 3 rows Digital Analog 29 pin DVI I Audio input terminal Mini stereo jack Headphone terminal Mini stereo jack Screen tilt Upward approx 0 20 downward approx 0 5 Screen swivel Approx 90 from left through right Turn table type Power supply AC100 240V 50 60Hz Use special AC adapter typ...

Страница 24: ...llow your computer s instruction manual to set the timing so that it is compatible with the monitor If the monitor is not receiving any signal synch signal NO SIGNAL will appear Power Macin tosh series Vsync Dot frequency Display mode VESA US text Hsync Sun Ultra series Relevant signal timings digital 640x480 800x600 1024x768 1152x864 1280x960 1280x1024 720x400 31 5kHz 37 9kHz 37 5kHz 37 9kHz 48 1...

Страница 25: ... Hot plug detection 2 TMDS data 2 17 TMDS data 0 3 TMDS data 2 4 shield 18 TMDS data 0 4 N C 19 TMDS data 0 5 shield 5 N C 20 N C 6 DDC clock 21 N C 7 DDC data 22 TMDS clock shield 8 23 TMDS clock 9 TMDS data 1 24 TMDS clock 10 TMDS data 1 C1 Analogue red image signal 11 TMDS data 1 3 shield C2 Analogue green image signal 12 N C C3 Analogue blue image signal 13 N C C4 14 5V C5 Analogue GND 15 GND ...

Страница 26: ...ted and click OK 7 Check that the monitor details are displayed then click Apply 8 Click OK and close the window 9 Remove the Utility Disk from the A drive For Windows 98 Installing monitor set up information into Windows 98 and setting the monitor s ICC profile as a predetermined value This explanation assumes that the floppy disk drive is A drive If the Add new Hardware Wizard has appeared 1 Pla...

Страница 27: ...new Hardware Wizard has appeared 1 Place the Utility Disk provided into the computer s A drive 2 Check Specify the location of the driver Advanced and click Next 3 Check Display a list of all the drivers in a specific location so you can select the driver you want then click Next 4 When Models is displayed click on Have disk confirm that Copy manufacturer s files from is A and click OK 5 Select th...

Страница 28: ...name appears on the screen 12 Click on Finish 13 Click on Close 14 Click OK and close the window 15 Remove the Utility Disk from the A drive Installing the ICC profile Installing the monitor s ICC profile If the set up information has already been installed so too has the profile and there is no need to install it This explanation assumes that the floppy disk drive is A drive 1 Place the Utility D...

Страница 29: ...ing an ICC profile set COLOR MODE and WHITE BALANCE to STD Setting up the ColorSync profile Notes A floppy disk drive is necessary In addition it is necessary to have PC Exchange or File Exchange installed in your system Depending on the type of computer or OS command names and methods may differ Please follow the computer s own operation manual while reading this 1 Place the Utility Disk provided...

Страница 30: ... mm x 100 mm between the screw holes on the section to be attached The arm must not fall off or break off after being attached to the monitor 1 Ensure that both the monitor and computer are switched off 2 Unplug the power cord from the AC outlet 3 Remove the signal and audio cables from the computer 4 Fold back the display section 1 If carrying out adjustments to the monitor place it upright 2 Whi...

Страница 31: ...manzeige und der Lautsprecher Lautstärke 38 Einstellen der Hintergrundbeleuchtung 38 Einstellen der Lautsprecher Lautstärke 39 Einstellen des Farbmodus 39 Einstellen der Bildschirmanzeige bei Verwendung eines Analogsignals 40 Automatische Bildschirmeinstellung 40 Manuelle Bildschirmeinstellung 41 Einstellen der Bildschirmanzeige bei Verwendung eines Digitalsignals 44 Pflege des Monitors und Repara...

Страница 32: ...ine schweren Gegenstände darauf und überdehnen oder knicken Sie es nicht Verwenden Sie keine Verlängerungskabel Ein beschädigtes Kabel kann einen Brand oder Stromschlag verursachen Nur das mit dem Monitor mitgelieferte Netzkabel verwenden Stecken Sie den Netzstecker direkt in die Netz steckdose Die Verwendung eines Verlängerungskabels kann aufgrund von Überhitzung zu einem Brand führen Checkliste ...

Страница 33: ...eranschluss Hier können im Handel erhältlich Kopfhörer angeschlossen werden 9 Audioanschluss Hier kann ein Audioausgangsanschluss des Computers angeschlossen werden Das mitgelieferte Audiokabel muss verwendet werden 10 Netzanschluss Hier wird der Netzadapter eingesteckt 11 DVI I Eingangsanschluss Der digitale RGB Ausgangsanschluss oder der analoge RGB Ausgangsanschluss des Computers kann hier ange...

Страница 34: ...tors Drücken Sie auf den Fuß und heben Sie den oberen Teil des Monitors an Zusammenklappen des Monitors 1 Trennen Sie die Netzadapter und Sie die Kabel ab 2 Wenn Sie Einstellungen am Monitor vornehmen stellen Sie ihn aufrecht hin 3 Drücken Sie die hintere Entriegelungstaste 1 und klappen Sie den Monitor dabei vorsichtig zusammen 2 2 1 Winkeleinstellung Auf einen angenehmen Betrachtungswinkel einst...

Страница 35: ...odellbezeichnung NL C01E Für einen digitalen RGB Anschluss ist der Monitor mit einem Eingang für den Anschluss an einen Computer mit einem DVI kompatiblen Ausgangsanschluss DVI D 24 polig oder DVI I 29 polig und SXGA Ausgangsmöglichkeit ausgestattet Abhängig vom anzuschliessenden Computer kann es vorkommen dass das Display nicht richtig funktioniert Anschluss an einen analogen RGB Ausgangsanschlus...

Страница 36: ...h Kopfhörer im Handel erhältlich können angeschlossen werden Hinweis Wenn Kopfhörer angeschlossen sind ertönt aus den Lautsprechern des Monitors kein Klang Audioanschluss Audiokabel Audioausgangsanschluss Anschließen des Monitors und Ein und Ausschalten des Monitors Kopfhörer Kopfhöreranschluss Anschließen des Monitors an eine Stromquelle 1 Schließen Sie den Netzadapter am Netzanschluss des Monito...

Страница 37: ...nen Notebooks so eingestellt ist dass er gleichzeitig angezeigt wird wird der MS DOS Bildschirm möglicherweise nicht einwandfrei angezeigt Ändern Sie in diesem Fall die Einstellungen so dass die Anzeige nur auf dem Monitor erfolgt Schalten Sie den Computer ein Netzschalter betätigen Anschließen des Monitors und Ein und Ausschalten des Monitors Umschalten zwischen Eingangsanschlüssen Mit der Taste ...

Страница 38: ...erden 1 Schalten Sie den Monitor ein 2 Drücken Sie gleichzeitig die Taste MENU und die Taste Wenn RESET auf dem Bildschirm angezeigt wird ist der Reset abgeschlossen Hinweis Falls sich die Werte nicht zurücksetzen lassen wenn die Einstellung gesperrt ist gehen Sie folgendermaßen vor Heben Sie die Einstell sperre auf bevor Sie die Steuertasten betätigen Einstellsperrfunktion Wenn Sie die Steuertast...

Страница 39: ...on stammt vom Originalschema des LCD Bildschirms sRGB sRGB ist ein internationaler Standard für die Farbdarstellung der von der IEC International Electrotechnical Commission festgelegt wurde Es erfolgt eine Farbumwandlung anhand der LCD Eigenschaften so dass ein Farbton dargestellt wird der dem Originalbild nahe kommt VIVID Ergibt ein Bild mit dynamischen und LEBHAFTEN Primärfarben Wenn COLOR MODE...

Страница 40: ...weis Wenn der Anzeigemodus Ihres Computers auf 65K Farben eingestellt ist lassen sich die verschiedenen Farbgrade in den einzelnen Farbmustern darstellen oder die Graustufen sehen farbig aus Dies liegt an der Spezifikation des Eingangssignals und ist keine Funktionsstörung Automatisches Einstellen des Bildschirms 1 Drücken Sie die Taste MENU Das Menü ADJUSTMENT wird angezeigt ADJ USTMENT MANUAL AU...

Страница 41: ...ücken der Taste MENU wird das nächste Menü ausgewählt ADJUSTMENT GAIN CONTROL WHITE BALANCE MODE SELECT OSD Menü wird ausgeblendet Hinweise Das OSD Menü wird ca 30 Sekunden nach dem letzten Befehl automatisch ausgeblendet Einstellen der Bildschirmanzeige bei Verwendung eines Analogsignals Menü ADJUSTMENT ADJ USTMENT MANUAL AUTO CLOCK 127 PHASE 16 H POS 200 V POS 29 I N P U T 1 A N A L O G 1 2 8 0 ...

Страница 42: ...ion Auto Gain Control nicht verwendet werden BLACK LEVEL Die gesamte Bildschirmhelligkeit kann während der Anzeige des Farbmusters eingestellt werden Tas ten CONTRAST Während der Anzeige des Farbmusters können die Einstellungen so erfolgen dass alle Abstufungen angezeigt werden Tasten Farbmuster Menü WHITE BALANCE WH I TE BALANCE COOL S TD WARM USER R CONTRAST G CONTRAST B CONTRAST I N P U T 1 A N...

Страница 43: ...sst sich einstellen Tasten Hinweis Wenn der Anzeigemodus auf weniger als 1280 x 1024 Pixel gesetzt ist wird die Anzeige so vergrößert dass sie den gesamten Bildschirm einnimmt d h das Seitenverhältnis der Anzeige kann sich ändern INPUT Eingangsmodus Beim Anschluß eines Power Macintosh auf MAC einstellen Tasten 400LINES Auflösungsgrad Sie können die horizontale Auflösung eines Bildschirms mit 400 Z...

Страница 44: ... MODE SELECT OSD Menü wird ausgeblendet Hinweise Das OSD Menü wird ca 30 Sekunden nach dem letzten Befehl automatisch ausgeblendet Menü WHITE BALANCE WH I TE BALANCE COOL S TD WARM USER R CONTRAST G CONTRAST B CONTRAST I N P U T 2 D I G I T A L 1 2 8 0 x 1 0 2 4 V 6 0 H z H 6 4 0 k H z Hinweise Bei einer anderen Einstellung als STD können nicht alle Abstufungen angezeigt werden Um alle Abstufungen...

Страница 45: ...N OSD horizontale Position Die Position der Menü OSD kann nach links und rechts verschoben werden Tasten OSD V POSITION OSD vertikale Position Die Position der Menü OSD kann nach oben und unten verschoben werden Tasten SCALING Skalierungsgrad Die Bildschärfe lässt sich einstellen Tasten Hinweis Wenn der Anzeigemodus auf weniger als 1280 x 1024 Pixel gesetzt ist wird die Anzeige so vergrößert dass ...

Страница 46: ...das Geschäft in dem Sie den Monitor gekauft haben oder an das nächste autorisierte Sharp Kundendienst zentrum Nehmen Sie diesen Austausch niemals selber vor Am Anfang kann aufgrund der Eigenschaften der Leuchtstoffröhre Flimmern auftreten Es handelt sich dabei nicht um eine Funktionsstö rung Schalten Sie in diesem Fall probeweise den Monitor aus und wieder ein Auf dem Monitor wird nichts angezeigt...

Страница 47: ... Plug Play VESA DDC1 DDC2B kompatibel Power Management VESA basiert auf DPMS DVI basiert auf DMPM Lautsprecherausgang 1W 1W Eingangssignalanschluss Analog 15poliger Mini D Sub Anschluss 3 Reihen Digital Analog 29polig DVI I Audioanschluss Mini Stereobuchse Kopfhöreranschluss Mini Stereobuchse Bildschirmneigung nach oben ca 0 20 nach unten ca 0 5 Bildschirmdrehung Ca 90 von links nach rechts Drehte...

Страница 48: ...immen Sie den Takt anhand der Anweisungen im Computer Benutzerhandbuch auf den Monitor ab Wenn der Monitor überhaupt kein Signal empfängt Sync Signal wird NO SIGNAL angezeigt VESA US Text Power Macintosh Serie Sun Ultra Serie Anzeigemodus Hsync Vsync Punktfrequenz Relevante Signaltakte digital 640x480 800x600 1024x768 1152x864 1280x960 1280x1024 720x400 31 5kHz 37 9kHz 37 5kHz 37 9kHz 48 1kHz 46 9...

Страница 49: ...naleingang 2 Grüner Videosignaleingang 3 Blauer Videosignaleingang 4 GND 5 GND 6 Für rotes Videosignal GND 7 Für grünes Videosignal GND 8 Für blaues Videosignal GND 9 5V 10 GND 11 nicht belegt 12 DDC Daten 13 Für Hsync Signaleingang 14 Für Vsync Signaleingang 15 DDC Takt Pinbelegung des DVI I Eingangsanschluss 29poliger DVI I Anschluß 1 7 6 5 4 3 2 8 9 15 14 13 12 11 10 16 17 23 22 21 20 19 18 24 ...

Страница 50: ...ge 5 Klicken Sie auf Have disk bestätigen Sie dass neben Copy manufacturer s files from A angezeigt wird und klicken Sie dann auf OK 6 Bestätigen Sie dass die Monitordetails ausgewählt sind und klicken Sie auf OK 7 Prüfen Sie ob der Monitor angezeigt wird und klicken Sie dann auf Apply 8 Klicken Sie auf OK und schließen Sie das Fenster 9 Entnehmen Sie die Utility Disk aus Laufwerk A Für Windows 98...

Страница 51: ... A Für Windows Me Installieren der Monitor Setup Informationen unter Windows Me und Festlegen des Monitor ICC Profils als vorbestimmter Wert Die in den nachstehenden Bedienungshinweisen erwähnten Windows Meldungen basieren auf der englischen Windows Version Bei dieser Beschreibung wird als Laufwerksbuchstabe für das Diskettenlaufwerk Laufwerk A angenommen Wenn der Add new Hardware Wizard angezeigt...

Страница 52: ...wissern Sie sich dass der Name des Monitors angezeigt wird und klicken Sie auf Finish 12 Klicken Sie auf Close 13 Klicken Sie auf OK und schließen Sie das Fenster 14 Entnehmen Sie die Utility Disk aus Laufwerk A Installieren des ICC Profils Installieren des Monitor ICC Profils Wenn die Setup Informationen bereits installiert wurden ist auch das Profil bereits installiert Es braucht dann nicht mehr...

Страница 53: ... auf STD Einstellen des Profils ColorSync Hinweise Sie benötigen ein Diskettenlaufwerk Außerdem muss auf Ihrem System PC Exchange oder File Exchange installiert sein Je nach dem verwendeten Computertyp oder Betriebssystem können die Befehlsnamen und Verfahren von den hier beschriebenen abweichen Lesen Sie auch das Benutzerhandbuch Ihres Computers 1 Legen Sie die mitgelieferte Utility Disk in das D...

Страница 54: ...ornehmen stellen Sie ihn aufrecht hin 2 Drücken Sie die hintere Entriegelungstaste und klappen Sie den Monitor dabei vorsichtig zusammen Entriegelungstaste Vorsichtig vorgehen und darauf achten dass die Finger nicht eingeklemmt werden Überdehnen Sie das Kabel nicht und schließen Sie kein Verlängerungskabel an da dies Funktionsstörungen hervorrufen kann 5 Achten Sie dabei darauf dass der Monitor ni...

Страница 55: ...e de l image au moniteur et volume des haut parleurs 62 Réglage du rétro éclairage 62 Réglage du volume des haut parleurs 63 Réglage du mode couleur 63 Réglage de l image du moniteur avec un signal analogique 64 Réglage automatique de l image 64 Réglage manuel de l image 65 Réglage de l image du moniteur avec un signal numérique 68 Entretien et réparation du moniteur 70 Entretien du moniteur 70 St...

Страница 56: ...rique Ne pas endommager le cordon d alimentation ne pas déposer d objets lourds sur le cordon ne pas l étendre ni le plier de manière excessive Ne pas y ajouter de rallonge non plus Tout endommagement du cordon d alimentation peut entraîner un début d incendie ou des chocs électriques Utilisez uniquement le cordon d alimentation fourni avec le moniteur Insérer la prise d alimentation directement d...

Страница 57: ...érieur connecté au moniteur peuvent être écoutés 8 Fiche pour casque audio Un casque audio en vente dans le commerce peut y être connecté 9 Borne audio La borne de sortie audio d un ordinateur peut y être connectée Le câble audio fourni doit être utilisé 10 Borne d alimentation L adaptateur secteur est raccordé ici 11 Borne d entrée DVI I La borne de sortie numérique RGB ou la borne de sortie anal...

Страница 58: ...érieure du moniteur Repliement du moniteur 1 Enlever l adaptateur secteur et câble 2 Si des réglages sont apportés au moniteur il convient de placer celui ci à la verticale 3 Tout en enfonçant le bouton arrière de déblocage du verrouillage 1 replier doucement le moniteur 2 2 1 Réglage de l inclinaison Trouver l inclinaison idéale pour bien voir Ne pas utiliser le moniteur avec une inclinaison vers...

Страница 59: ...e de signal numérique nom du modèle NL C01E Pour un raccordement RVB numérique le moniteur est équipé d une entrée pour un raccordement avec un ordinateur au moyen d un connecteur de sortie compatible DVI DVI D 24 broches ou DVI I 29 broches avec possibilité de sortie en SXGA En fonction du type d ordinateur à raccorder l écran risque de ne pas fonctionner correctement Lors du raccordement à la bo...

Страница 60: ...ordé Remarques Lorsque les casques audio sont connectés aucun son ne peut être émis à partir des haut parleurs du moniteur Borne audio Câble audio Borne de sortie audio Casque audio Fiche pour casque audio Raccordement du moniteur à une source d alimentation 1 Connecter l adaptateur secteur à la borne d alimentation du moniteur 2 Brancher le cordon d alimentation dans l adapta teur secteur et insé...

Страница 61: ... de ce dernier est réglé de façon à afficher en même temps l écran MS DOS peut ne pas s afficher correctement Dans ce cas modifier les paramètres afin que le moniteur soit le seul à afficher Mettre l ordinateur sous tension Appuyer sur le bouton d alimentation Inversion entre les bornes d entrée Utiliser le bouton INPUT pour basculer entre les bornes d entrée Borne d entrée RVB analogique Borne d ...

Страница 62: ...r sous tension 2 Appuyer simultanément sur les boutons MENU et ainsi que le bouton d alimentation Lorsque RESET apparaît sur l écran du moniteur le retour aux valeurs initiales est exécuté Remarque Il n est pas possible de retourner aux valeurs initiales lorsque le réglage est verrouillé Déver rouiller les réglages avant de tenter d utiliser les boutons de commande Fonction de verrouillage des rég...

Страница 63: ... liquides sRGB sRGB est la norme internationale de la représentation des couleurs spécifiée par la IEC International Electrotechnical Commission Com mission Electrotechnique Internationale La conversion des couleurs est réalisée en tenant compte des caractéristiques d un écran à cristaux liquides et la représentation des couleurs est très proche de l image originale VIVID Affiche une image avec de...

Страница 64: ...vec un signal analogique Remarque Si le mode d affichage de l ordinateur utilisé est réglé sur 65K couleurs il est possible de voir différents niveaux de couleurs ou il se peut que l échelle de gris ait l air colorée Ceci est dû aux caractéristiques techniques du signal d entrée il ne s agit pas d un dysfonctionnement Réglage automatique du moniteur 1 Appuyer sur le bouton MENU Le menu ADJUSTMENT ...

Страница 65: ...T OSD disparaît Remarque Le menu OSD disparaît automatiquement environ 30 secondes après la dernière commande Menu ADJUSTMENT REGLAGE ADJ USTMENT MANUAL AUTO CLOCK 127 PHASE 16 H POS 200 V POS 29 I N P U T 1 A N A L O G 1 2 8 0 x 1 0 2 4 V 6 0 H z H 6 4 0 k H z MANUAL Les options individuelles du menu sont réglées manuellement AUTO Chaque option du menu est réglée automatiquement Remarques Appuyer...

Страница 66: ...32 CONTRAST 80 I N P U T 1 A N A L O G 1 2 8 0 x 1 0 2 4 V 6 0 H z H 6 4 0 k H z MANUAL Les options individuelles du menu sont réglées manuellement AUTO Chaque option du menu est automatiquement réglée via la fonction de Auto Gain Control Remarques Presser le bouton pour sélectionner AUTO Pour choisir une option du menu Bouton MODE Pour passer au menu suivant Bouton MENU Fonction de réglage automa...

Страница 67: ...ue Lorsque le mode d affichage est réglé à un niveau inférieur à 1280 x 1024 pixels l image est étendue de manière à couvrir la totalité de l écran c est à dire que le rapport latéral de l image peut être modifié INPUT mode entrée Lors de la connexion d un Power Macintosh réglez sur MAC Boutons 400LINES degré de résolution Il est possible d utiliser une résolution horizontale d écran de 400 lignes...

Страница 68: ...quement environ 30 secondes après la dernière commande Menu WHITE BALANCE EQUILIBRE DU BLANC WH I TE BALANCE COOL S TD WARM USER R CONTRAST G CONTRAST B CONTRAST I N P U T 2 D I G I T A L 1 2 8 0 x 1 0 2 4 V 6 0 H z H 6 4 0 k H z Remarques En ce qui concerne les paramètres autres que les STD toutes les gradations ne peuvent pas être affichées Pour afficher toutes les gradations définir le paramètr...

Страница 69: ...e Boutons OSD V POSITION positionnement vertical OSD Le positionnement du menu OSD peut être modifié vers le haut et vers le bas Boutons SCALING Niveau de cadrage La netteté de l image peut être réglée Boutons Remarque Lorsque le mode d affichage est réglé à un niveau inférieur à 1280 x 1024 pixels l image est étendue de manière à couvrir la totalité de l écran c est à dire que le rapport latéral ...

Страница 70: ...r ou du réparateur agréé Sharp le plus proche Ne jamais tenter d effectuer ce remplacement soi même Au début de l utilisation en raison de la conception des lampes de rétroéclairage il se peut que l écran scintille Il ne s agit pas d un dysfonctionnement Si cela se produit essayer d abord d éteindre et de rallumer le moniteur Aucune image n apparaît à l écran du moniteur La diode d alimentation ne...

Страница 71: ... sur le DPMS DVI basé sur le DMPM Sortie des enceintes 1W 1W Raccordement entrées vidéo Analogique Mini D sub 15 broches sur 3 rangées Numérique Analogique 29 broches DVI I Fiche audio Mini prise stéréo Fiche pour casque audio Mini prise stéréo Inclinaison du moniteur Vers le haut approx 0 20 Vers le bas approx 0 5 Rotation du moniteur Approx 90 de gauche à droite de type platine tournante Aliment...

Страница 72: ...ur régler la fréquence de manière à ce qu elle soit compatible avec le moniteur Si le moniteur ne reçoit pas de signal de fréquence signal de synchronisation le message NO SIGNAL apparaîtra Saisie de texte US VESA Mode affichage Hsync Vsync Bande passante Série Macintosh Série Sun Ultra Fréquences des signaux numérique 640x480 800x600 1024x768 1152x864 1280x960 1280x1024 720x400 31 5kHz 37 9kHz 37...

Страница 73: ...ignal vidéo rouge 2 Entrée du signal vidéo vert 3 Entrée du signal vidéo bleu 4 GND 5 GND 6 Pour mise à la terre du signal vidéo rouge 7 Pour mise à la terre du signal vidéo vert 8 Pour mise à la terre du signal vidéo bleu 9 5V 10 GND 11 N C 12 Données DDC 13 Pour entrée signal H sync 14 Pour entrée signal V sync 15 Horloge DDC La broche du connecteur d entrée DVI I Connecteur DVI I à 29 broches 1...

Страница 74: ...des caractéristiques du moniteur et ensuite cliquer sur OK Installation des fichiers relatifs au paramétrage du moniteur et au profil ICC Pour Windows 7 S assurer que le moniteur affiche une image ensuite cliquer sur Apply 8 Cliquer sur OK et refermer la fenêtre 9 Retirer la disque utilitaire du lecteur A Pour Windows 98 Installation des fichiers relatifs au paramétrage du moniteur sous Windows 98...

Страница 75: ...vant se réfèrent à la version anglaise de Windows Les explications qui suivent considèrent que le lecteur de disquettes est le lecteur A Si la boîte de dialogue Add New Hardware Wizard est apparue 1 Placer la disque utilitaire fournie dans le lecteur A de l ordinateur 2 Cocher la case Specify the location of the driver Advanced et cliquer Next 3 Cocher la case Display a list of all the drivers in ...

Страница 76: ...r apparaît dans l écran et cliquer sur Finish 12 Cliquer sur Close 13 Cliquer sur OK et refermer la fenêtre 14 Retirer la disque utilitaire du lecteur A Installation du profil ICC Installation du profile ICC du moniteur Si l information relative à l installation a déjà été installée alors le profil l a été également et il n est donc plus nécessaire de l installer Les messages Windows mentionnés da...

Страница 77: ...ofil ColorSync régler COLOR MODE et WHITE BALANCE sur STD Configuration du profil ColorSync Remarques Un lecteur de disquette est nécessaire De plus PC Exchange ou File Exchange doit être installé sur votre ordinateur Le nom des commandes et les procédures peuvent varier en fonction du type d ordinateur ou du système d exploitation Veiller à suivre le propre mode d emploi de l ordinateur tout en l...

Страница 78: ...lever l écran 1 Si des réglages sont apportés au moniteur il convient de placer celui ci à la verticale 2 Tout en enfonçant le bouton arrière de déblocage du verrouillage replier doucement le moniteur Bouton de déblocage Prendre garde de ne pas se coincer les doigts Ne pas courber le câble de manière excessive ni y ajouter de rallonge car cela peut conduire à un dysfonctionnement 5 Tout en prenant...

Страница 79: ... altoparlante 86 Regolazione della retroilluminazione 86 Regolazione del volume dell altoparlante 87 Impostazione della modalità del colore 87 Regolazione della visualizzazione sullo schermo quando si usa un segnale analogico 88 Regolazione automatica dello schermo 88 Regolazione manuale dello schermo 89 Regolazione della visualizzazione sullo schermo quando si usa un segnale digitale 92 Cura e ri...

Страница 80: ...oggetti pesanti su di esso non tiratelo e non piegatelo eccessivamente Non aggiungete inoltre dei cavi di prolunga Danni al cavo possono dare luogo ad incendi o folgorazioni Usare solamente il cavo di alimentazione fornito insieme al monitor Inserite il cavo di alimentazione rete direttamente nella presa di corrente alternata L aggiunta di un cavo di prolunga può dare luogo ad un incendio derivant...

Страница 81: ...in commercio si possono collegare qui 9 Terminale audio Il terminale di uscita audio di un computer può essere collegato in questa posizione Si dovrebbe usare il cavo audio accluso 10 Terminale di alimentazione Collegate l adattatore AC corrente alternata 11 DVI I terminale di ingresso Qui si possono collegare il terminale di uscita RGB digitale oppure il terminale di uscita RGB analogico del comp...

Страница 82: ...d alzate la sezione superiore del monitor Ripiegare il monitor 1 Rimuovete l adattatore AC e cavi 2 Se eseguite delle regolazioni sul monitor dispone telo verticalmente 3 Mentre premete il pulsante per disattivare lo sbloccaggio posteriore 1 ripiegate delicatamente indietro il monitor 2 2 1 Regolazione dell angolazione Regolare su un angolazione comoda per la vista Non usate il monitor inclinato a...

Страница 83: ...nale di uscita RGB digitale Usare un cavo segnale digitali nome del modello NL C01E Per il collegamento RGB digitale il monitor ha un ingresso per il collegamento a un computer con un connettore d uscita DVI compatibile DVI D a 24 pin o DVI I a 29 pin e capacità d uscita SXGA In funzione del tipo di computer da collegare lo schermo potrebbe non funzionare correttamente In caso di collegamento a un...

Страница 84: ...Nota Quando le cuffia sono collegate non è possibile sentire nessun suono dagli altoparlanti del monitor Terminale audio Cavo audio Terminale di uscita audio Cuffia Terminale per le cuffia Collegamento del monitor ad una sorgente di alimentazione elettrica 1 Collegate l adattatore AC alterminale di alimenta zione del monitor 2 Collegate il cavo di alimentazione all adattatore AC ed inserite la spi...

Страница 85: ...te il computer Il LED di alimentazione si illuminerà in verde lo schermo visualizzerà un immagine ON Note Quando si utilizza un segnale analogico è necessario eseguire una regolazione automatica dello schermo se si verifica una delle seguenti condizioni Si utilizza il monitor per la prima volta Sono state modificate le impostazioni del sistema durante l uso A seconda del computer o del sistema ope...

Страница 86: ...i ai valori iniziali di fabbrica 1 Accendete l alimentazione del monitor 2 Premete il tasto MENU ed il tasto simultaneamente Quando sullo schermo appare RESET il reset è completo Nota Non è possibile resettare dei valori mentre il blocco delle regolazioni è in funzione Rimuovete il blocco delle regolazioni prima di tentare di far funzionare i tasti di controllo Funzione di blocco delle regolazioni...

Страница 87: ...istalli liquidi sRGB sRGB è lo standard internazionale della rappresentazione dei colori specificato dall IEC International Electrotechnical Commission Commissione Elettrotecnica Internazionale La conversione del colore si effettua tenendo conto delle caratteristiche dei cristalli liquidi e rappresenta la tonalità di colore vicina a quella dell immagine originale VIVID Visualizza un immagine con c...

Страница 88: ...omatica dello schermo Le opzioni nel menu ADJUSTMENT REGOLAZIONE si possono regolare automaticamente CLOCK PHASE FASE H POS V POS Nota Quando impostate questo monitor per la prima volta oppure dopo aver cambiato un aspetto del sistema corrente prima dell uso eseguite una regolazione automatica dello schermo Display della regolazione automatica dello schermo Per eseguire una regolazione automatica ...

Страница 89: ...l ultimo comando Menu ADJUSTMENT REGOLAZIONE ADJ USTMENT MANUAL AUTO CLOCK 127 PHASE 16 H POS 200 V POS 29 I N P U T 1 A N A L O G 1 2 8 0 x 1 0 2 4 V 6 0 H z H 6 4 0 k H z MANUAL le singole opzioni del menu vengono regolate manualmente AUTO ogni opzione di menu viene regolata automaticamente Note Premete il tasto per selezionare AUTO Per selezionare un opzione di menu Tasto MODE Per passare al me...

Страница 90: ...z H 6 4 0 k H z MANUAL le singole opzioni del menu vengono regolate manualmente AUTO ogni opzione del menu viene regolata automaticamente utilizzando la funzione Auto Gain Control Note Premete il tasto per selezionare AUTO Per selezionare un opzione di menu Tasto MODE Per passare al menu successivo Tasto MENU Auto Gain Control function funzione controllo automatico del guadagno Il Controllo automa...

Страница 91: ...dell immagine tasti Nota Quando la modalità del display è impostata su meno di 1280 x 1024 pixel il display è ingrandito per coprire l intero schermo cioè il rapporto dei lati del display può cambiare INPUT modo Input In caso di collegamento ad un computer Power Macintosh predisporre la voce sulla posizione MAC tasti 400 LINES grado di risoluzione Potete specificare la risoluzione orizzontale di u...

Страница 92: ...nu WHITE BALANCE BILANCIAMENTO DEL BIANCO WH I TE BALANCE COOL S TD WARM USER R CONTRAST G CONTRAST B CONTRAST I N P U T 2 D I G I T A L 1 2 8 0 x 1 0 2 4 V 6 0 H z H 6 4 0 k H z Note Nelle impostazioni diverse da STD non tutte le gradazioni possono essere visualizzate Per visualizzare tutte le gradazioni impostate su STD Se la modalità del colore COLOR MODE si trova su sRGB o VIVID non è possibil...

Страница 93: ...rso sinistra e verso destra tasti OSD V POSITION posizione verticale dell OSD La posizione del menu dell OSD può essere spostata in su ed in giù tasti SCALING livello della scala Si può regolare la definizione dell immagine tasti Note Quando la modalità del display è impostata su meno di 1280 x 1024 pixel il display è ingrandito per coprire l intero schermo cioè il rapporto dei lati del display pu...

Страница 94: ...ppure dal Centro del Servizio Tecnico Assi stenza Clienti della Sharp più vicino a voi Non tentate mai di eseguire la sostituzione da voi Nel periodo iniziale del loro uso a causa delle caratteristiche dei tubi fluorescenti lo schermo potrebbe presentare uno sfarfallamento Questo non è un difetto del funzionamento Se ciò dovesse verificarsi controllate spegnendo prima di tutto l alimentazione e qu...

Страница 95: ...tibile DDC1 DDC2B Gestione dell energia VESA basata su DPMS DVI basata su DMPM Uscita altoparlanti 1W 1W Terminale del segnale di ingresso Analogico 15 pin mini D sub 3 file Digitale Analogico 29 pin DVI I Terminale audio Jack stereo mini Terminale per le cuffia Jack stereo mini Inclinazione dello schermo Verso l alto circa 0 20 verso il basso circa 0 5 Rotazione dello schermo Circa 90 da sinistra...

Страница 96: ...e con quello del monitor Se il monitor non riceve nessun segnale segnale di sincronismo verrà visualizzato NO SIGNAL Frequenza punti Modalità di visualizzazione Sincronismo orizzontale Sincronismo verticale VESA Testo US Serie Power Macintosh Serie Sun Ultra Specifiche Sincronizzazioni rilevanti del segnale digitale 640x480 800x600 1024x768 1152x864 1280x960 1280x1024 720x400 31 5kHz 37 9kHz 37 5k...

Страница 97: ...esso 3 Segnale video blu in ingresso 4 GND massa 5 GND massa 6 GND massa per il segnale video rosso 7 GND massa per il segnale video verde 8 GND massa per il segnale video blu 9 5V 10 GND massa 11 N C 12 Dati DDC 13 Per l input del segnale di sincronismo orizzontale 14 Per l input del segnale di sincronismo verticale 15 Clock DDC Pin del connettore di ingresso DVI I Connettore DVI I con 29 pin 1 7...

Страница 98: ...r visualizzi quindi fate clic su Apply 8 Fate clic su OK e chiudete la finestra 9 Rimuovete il Disco delle Utilità dal drive A Installazione delle informazioni per il setup e del profilo ICC Per Windows Per Windows 98 Installazione delle informazioni di setup del monitor in Windows 98 e impostazione del profilo ICC del monitor come valore predeterminato I messaggi di Windows citati nelle istruzion...

Страница 99: ... di Win dows In questa spiegazione si parte dall ipotesi che l unità per dischetti floppy sia A Se è apparsa la schermata Add new Hardware Wizard 1 Inserite il Disco delle Utilità fornito nel drive A del computer 2 Spuntate Specify the location of the driver Advanced e fate clic su Next 3 Spuntate Display a list of all the drivers in a specific location so you can select the driver you want quindi...

Страница 100: ... sullo schermo e fate clic su Finish 12 Fate clic su Close 13 Fate clic su OK e chiudete la finestra 14 Rimuovete il Disco delle Utilità dal drive A Installazione del profilo ICC Installazione del profilo ICC del monitor Se le informazioni di setup sono già installate lo è anche il profilo e non occorre installarlo I messaggi di Windows citati nelle istruzioni per l uso che seguono si basano sulla...

Страница 101: ...OR MODE e WHITE BALANCE su STD Impostazione del profilo ColorSync Note Un drive per dischetti floppy è necessario E inoltre necessario avere PC Exchange oppure File Exchange installato nel vostro sistema A seconda del tipo di computer oppure del sistema operativo i nomi dei comandi ed i metodi possono essere differenti Per favore seguite il manuale operativo proprio del computer mentre leggete que...

Страница 102: ...lazioni sul monitor disponetelo verticalmente 2 Mentre premete il pulsante per disattivare lo sbloccaggio posteriore ripiegate delicatamente indietro il monitor Tasto di disattivazione del bloccaggio Fare attenzione a non rimanere con le dita incastrate Non curvate eccessivamente il cavo e non aggiungete delle prolunghe in quanto ciò può dar luogo a difetti di funzionamento 5 Facendo attenzione a ...

Страница 103: ... Regulación de la retroiluminación 110 Ajuste del volumen del altavoz 111 Configuración del modo de color 111 Ajuste de la pantalla cuando se utiliza una señal analógica 112 Ajuste automático de la pantalla 112 Ajuste manual de la pantalla 113 Ajuste de la pantalla cuando se utiliza una señal digital 116 Conservación y reparación del monitor 118 Conservación del monitor 118 Almacenamiento 118 Solu...

Страница 104: ...e o doble excesivamente No utilice tampoco cables de prolongación Si el cable de alimentación se daña puede provocar un incendio o una descarga eléctrica Utilice solamente el cable de alimentación suministrado con el monitor Enchufe la clavija directamente en la toma de corriente alterna El uso de un cable de prolongación puede provocar un incendio como resultado de un calentamiento excesivo Lista...

Страница 105: ...ectar unos auriculares de venta en el comercio 9 Borne de audio Aquí se puede conectar un borne de salida de audio de un ordenador Debe usarse el cable de audio incluido 10 Borne de alimentación El adaptador de CA suministrado se conecta aquí 11 Borne de entrada DVI I Retirar la cubierta para ver el borne de entrada de señal digital analógica DVI I29 vías El borne de salida RGB digital o el borne ...

Страница 106: ...ón sobre la base y levante la sección superior del monitor Bajada del monitor 1 Retire el adaptador de CA y cables 2 Si va a ajustar el monitor colóquelo en posición vertical 3 Al tiempo que presiona el botón de desbloqueo posterior 1 baje con cuidado el monitor 2 2 1 Ajuste de ángulo Ajuste un ángulo adecuado para ver la imagen con comodidad No utilice el monitor estando inclinado hacia atrás más...

Страница 107: ... Utilice un cable de señal digital nombre del modelo NL C01E Para la conexión RGB digital el monitor tiene una entrada para conectar a un ordenador con borne de salida compatible con DVI DVI D de 24 contactos y DVI I de 29 contactos y capacidad de salida SXGA Dependiendo del tipo de ordenador que vaya a ser conectado es posible que la pantalla no funcione correctamente Cuando haga la conexión a un...

Страница 108: ...uriculares de venta en el comercio Notas Cuando están conectados los auriculares no se oye ningún sonido por los altavoces del monitor Borne de audio Cable de audio Borne de salida de audio Conexión del monitor a una toma de corriente 1 Conecte el adaptador de CA en el borne de alimentación del monitor 2 Enchufe el cable de alimentación en el adaptador de CA y la clavija de alimentación en el born...

Страница 109: ...denador portátil y la pantalla del portátil está configurada de modo que funcione al mismo tiempo puede que la pantalla de MS DOS no se vea correctamente En este caso cambie la configuración de modo que sólo se vea el monitor Encienda el ordenador Pulse el botón de encendido apagado Alternar entre bornes de entrada Utilizar el botón de ENTRADA INPUT para conmutar entre bornes de entrada de señal B...

Страница 110: ...les de fábrica 1 Encienda el monitor 2 Pulse al mismo tiempo los botones MENU y Cuando RESET aparece en la pantalla significa que la reposición ha finalizado Nota No se pueden reponer los valores cuando la función de bloqueo de ajustes se encuentra activada Desactive la función de bloqueo de ajustes antes de utilizar los botones de control Función de bloqueo de ajustes Si deshabilita los botones d...

Страница 111: ... colores original del panel de cristal líquido sRGB sRGB es la norma internacional de representación cromática especificada por la IEC International Electrotechnical Commission Comisión Electrotécnica Internacional La conversión cromática se hace teniendo en cuenta las características del cristal líquido y representa una tonalidad parecida a la de la imagen original VIVID Muestra una imagen con co...

Страница 112: ...el Menú ADJUSTMENT CLOCK PHASE H POS V POS se pueden ajustar automáticamente Nota Al configurar por primera vez el monitor o un ordenador conectado conectar un ordenador adicional o tras haber modificado cualquier aspecto del sistema actual lleve a cabo un ajuste automático de la pantalla antes de utilizarla Máscara en pantalla para el ajuste automático Para llevar a cabo un ajuste automático en p...

Страница 113: ...ce Notas El menú OSD desaparece automáticamente unos 30 segundos después de la última instrucción Ajuste de la pantalla cuando se utiliza una señal analógica Menú ADJUSTMENT ADJ USTMENT MANUAL AUTO CLOCK 127 PHASE 16 H POS 200 V POS 29 I N P U T 1 A N A L O G 1 2 8 0 x 1 0 2 4 V 6 0 H z H 6 4 0 k H z MANUAL Las diferentes opciones del menú se ajustan manualmente AUTO Cada opción del menú se ajusta...

Страница 114: ...0 2 4 V 6 0 H z H 6 4 0 k H z MANUAL Las diferentes opciones del menú se ajustan manualmente AUTO Cada opción del menú se ajusta automáticamente con la función Control Automático de la Ganancia Notas Pulse el botón para seleccionar AUTO Para seleccionar una opción del menú Botón MODE Para pasar al siguiente menú Botón MENU Función Control Automático de Ganancia La función Control Automático de Gan...

Страница 115: ... La nitidez de la imagen puede regularse botones Nota Cuando el modo de pantalla se ajusta de modo que sea inferior a 1280 x 1024 píxels la imagen aumenta ocupando toda la pantalla es decir la relación lateral de la pantalla puede cambiar INPUT modo de entrada Cuando haya conectado un Power Macintosh ajuste a MAC botones 400 LINES grado de resolución Puede programar la resolución horizontal de una...

Страница 116: ... OSD desaparece Notas El menú OSD desaparece automáticamente unos 30 segundos después de la última instrucción Menú WHITE BALANCE WH I TE BALANCE COOL S TD WARM USER R CONTRAST G CONTRAST B CONTRAST I N P U T 2 D I G I T A L 1 2 8 0 x 1 0 2 4 V 6 0 H z H 6 4 0 k H z Notas No todas las gradaciones pueden verse en ajustes diferentes a STD Ajuste a STD para ver todas las gradaciones Si ajusta COLOR M...

Страница 117: ...erse hacia la izquierda y hacia la derecha botones OSD V POSITION posición vertical OSD La posición del menú OSD puede moverse hacia arriba y abajo botones SCALING nivel de graduación La nitidez de la imagen puede regularse botones Nota Cuando el modo de pantalla se ajusta de modo que sea inferior a 1280 x 1024 píxels la imagen aumenta ocupando toda la pantalla es decir la relación lateral de la p...

Страница 118: ...ted mismo este cambio Debido a las características de los tubos fluorescentes la pantalla puede reverberar durante el período inicial de uso No se trata de una anomalía Si esto ocurriera intente en primer lugar solucionar el problema apagando y encendiendo el monitor de nuevo Si no se ve ninguna imagen en el monitor el LED indicador de conexión no se enciende Están conectados correctamente el adap...

Страница 119: ...DPMS DVI basada en DMPM Salida de altavoces 1W 1W Borne de señales de entrada Analógica Mini D sub de 15 vías 3 hileras Digital Analógica DVI I de 29 vías Borne de audio de entrada Clavija estéreo mini Borne de auriculares Clavija estéreo mini Inclinación de pantalla Hacia arriba aprox 0 20 Hacia abajo aprox 0 5 Giro de pantalla Aprox 90 de izquierda a derecha tipo plataforma giratoria Suministro ...

Страница 120: ...ING Consulte el manual de instrucciones de su ordenador para ajustar la sincronización de forma compatible con el monitor Si el monitor no recibe ninguna señal synch signal aparecerá NO SIGNAL VESA US text Series Power Macintosh Series Sun Ultra Modo display Hsync Vsync Frecuencia Especificaciones Sincronizaciones de las señales correspondientes digital 640x480 800x600 1024x768 1152x864 1280x960 1...

Страница 121: ...3 4 10 6 7 8 9 15 11 12 13 14 Nº Función 1 Señal de entrada vídeo rojo 2 Señal de entrada vídeo verde 3 Señal de entrada vídeo azul 4 GND 5 GND 6 GND para señal de vídeo rojo 7 GND para señal de vídeo verde 8 GND para señal de vídeo azul 9 5V 10 GND 11 N C 12 Datos DDC 13 Para entrada de señal Hsync 14 Para entrada de señal Vsync 15 Reloj DDC Vías del conector de entrada DVI I Conector DVI I de 29...

Страница 122: ...A y a continuación haga clic sobre OK 6 Confirme que los datos sobre el monitor están seleccionados y haga clic sobre OK 7 Compruebe que el monitor está funcionando y a continuación haga clic en Apply 8 Haga clic sobre OK y cierre la ventana 9 Retire el Disquete de utilidades de la unidad A Para Windows 98 Instalación de la información de configuración del monitor en Windows 98 y configuración del...

Страница 123: ...ntinuación se refieren a la versión inglesa En la explicación se da por supuesto que la unidad de disquetes es la A Si ya ha aparecido Add new Hardware Wizard 1 Introduzca el Disquete de utilidades proporcionado en la unidad A del ordenador 2 Coloque una tilde en Specify the location of the driver Advanced y haga clic sobre Next 3 Coloque una tilde en Display a list of all the drivers in a specifi...

Страница 124: ...en la pantalla y haga clic en Finish 12 Haga clic sobre Close 13 Haga clic sobre OK y cierre la ventana 14 Retire el Disquete de utilidades de la unidad A Instalación del perfil ICC Instalación del perfil ICC del monitor Si ya ha instalado la información de configuración se habrá instalado también el perfil por lo que no hace falta que lo vuelva a instalar Los mensajes de Windows mencionados a con...

Страница 125: ...ponga COLOR MODE y WHITE BALANCE en STD Configuración del perfil ColorSync Notas Debe tener una unidad de disquetes También debe tener PC Exchange o File Exchange instalados en el sistema Dependiendo del tipo de ordenador o de sistema operativo los nombres de los comandos y los procedimientos a seguir podrían ser diferentes Siga el manual de uso propio del ordenador mientras lee esto 1 Introduzca ...

Страница 126: ...cal 2 Al tiempo que presiona el botón de desbloqueo posterior baje con cuidado el monitor Botón de desbloqueo Tenga cuidado para que sus dedos no queden atrapados No doble excesivamente el cable ni utilice cables de prolongación ya que ello podría llevar a un funcionamiento anómalo 5 Con mucho cuidado de no dañar el monitor extienda un paño suave y ponga el monitor sobre él con la parte de la pant...

Страница 127: ...127 M E M O ...

Страница 128: ...128 M E M O ...

Страница 129: ...129 M E M O ...

Страница 130: ...130 M E M O ...

Страница 131: ......

Страница 132: ...SHARP CORPORATION 2002 SHARP CORPORATION Printed in Taiwan P N 0NIT17D3 E001 1 1925 1300 4450 ...

Страница 133: ... tv dvd and othes Manual users user manuals user guide manual owners manual instruction manual manual owner manual owner s manual guide manual operation operating manual user s manual operating instructions manual operators manual operator manual product documentation manual user maintenance brochure user reference pdf manual Downloaded from http www usersmanualguide com ...

Отзывы: