


LC-42D65U
5 – 1
LC-42D65U
Service Manual
CHAPTER 5.
ADJUSTMENT
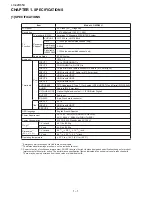
[1] ADJUSTMENT PROCEDURE
The adjustment values are set to the optimum conditions at the factory before shipping. If a value should become improper or an adjustment is
required due to part replacement, make an adjustment according to the following procedure.
1. After replacement of any PWB unit and/or IC for repair, please note the following.
•
When replacing the following units, make sure to prepare the new units loaded with updated software.
MAIN Unit: DUNTKE716FM02
2. Upgrading of each microprocessor software
CAUTION: Never “POWER OFF” the unit when software upgrade is ongoing.
Otherwise the system may be damaged beyond recovery.
2.1. Software version upgrade
The model employs the following software.
• Main software (please use a software version after LAKEA200.USB.)
• Monitor microprocessor software (please use a software version after LAKEVA05.USB and LAKEM300.BIN.)
The main software, monitor microprocessor software can be upgraded by using a general-purpose USB Memory.
The followings are the procedures for upgrading, explained separately for the main software, monitor microprocessor software.
2.2. Main software version upgrade
2.2.1 Get ready before you start
• USB Memory of 128MB or higher capacity.
• PC running on Windows 98/98SE/ME/2000/XP operating system.
• USB Memory reader/writer or PC with a USB port.
• The file system of a USB memory is FAT. (FAT32 is not applied)
• Use the USB memory without other functions. (lock and memory reader...etc)
2.2.2 Preparations
To upgrade the main software, it is necessary to get ready the USB Memory for version upgrade before you start.
Follow the steps below and create the USB Memory for version upgrade.
1. Copy the file LAKEAxxx.USB for version upgrade to the root directory (folder) of the USB Memory.
NOTE: In the USB Memory drive, do not store other folders or unrelated files, or more than one file for version upgrade.
Now the USB Memory for version upgrade is ready.
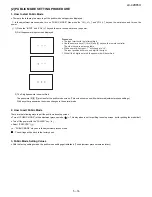
2.2.3 How to upgrade the software
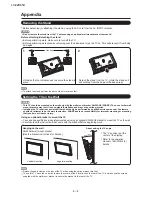
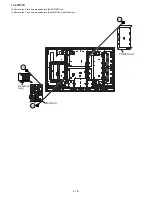
1. Unplug the AC cord.
2. Insert the USB Memory for version upgrade (prepared as above) into the service socket located Right side of Main Board terminals, under INPUT3
terminal.
3. Plug in the AC cord with power button pressed down after 5 seconds, unpress the power button.
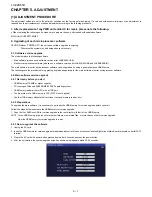
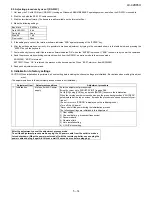
4. After the unit startup, the system upgrade screen as shown below appears within 20-40 seconds.
D65
Содержание LC42D65U - LC - 42" LCD TV
Страница 60: ...LC 42D65U 7 3 MEMO ...
Страница 66: ...LC 42D65U 9 4 A C B D E F G I H 1 2 3 4 5 6 7 8 9 10 11 12 13 14 15 16 17 18 19 20 21 22 MAIN Unit Side B ...
Страница 70: ...LC 42D65U 10 2 2 KEY Unit A C B D E F G I H 1 2 3 4 5 6 7 8 9 10 11 12 13 14 15 16 17 18 19 20 21 22 ...
Страница 72: ...LC 42D65U 10 4 MAIN Unit 2 17 A C B D E F G I H 1 2 3 4 5 6 7 8 9 10 11 12 13 14 15 16 17 18 19 20 21 22 ...
Страница 73: ...LC 42D65U 10 5 MAIN Unit 3 17 A C B D E F G I H 1 2 3 4 5 6 7 8 9 10 11 12 13 14 15 16 17 18 19 20 21 22 ...
Страница 74: ...LC 42D65U 10 6 MAIN Unit 4 17 A C B D E F G I H 1 2 3 4 5 6 7 8 9 10 11 12 13 14 15 16 17 18 19 20 21 22 ...
Страница 75: ...LC 42D65U 10 7 MAIN Unit 5 17 A C B D E F G I H 1 2 3 4 5 6 7 8 9 10 11 12 13 14 15 16 17 18 19 20 21 22 ...
Страница 76: ...LC 42D65U 10 8 MAIN Unit 6 17 A C B D E F G I H 1 2 3 4 5 6 7 8 9 10 11 12 13 14 15 16 17 18 19 20 21 22 ...
Страница 77: ...LC 42D65U 10 9 MAIN Unit 7 17 A C B D E F G I H 1 2 3 4 5 6 7 8 9 10 11 12 13 14 15 16 17 18 19 20 21 22 ...
Страница 78: ...LC 42D65U 10 10 MAIN Unit 8 17 A C B D E F G I H 1 2 3 4 5 6 7 8 9 10 11 12 13 14 15 16 17 18 19 20 21 22 ...
Страница 79: ...LC 42D65U 10 11 MAIN Unit 9 17 A C B D E F G I H 1 2 3 4 5 6 7 8 9 10 11 12 13 14 15 16 17 18 19 20 21 22 ...
Страница 80: ...LC 42D65U 10 12 MAIN Unit 10 17 A C B D E F G I H 1 2 3 4 5 6 7 8 9 10 11 12 13 14 15 16 17 18 19 20 21 22 ...
Страница 81: ...LC 42D65U 10 13 MAIN Unit 11 17 A C B D E F G I H 1 2 3 4 5 6 7 8 9 10 11 12 13 14 15 16 17 18 19 20 21 22 ...
Страница 82: ...LC 42D65U 10 14 MAIN Unit 12 17 A C B D E F G I H 1 2 3 4 5 6 7 8 9 10 11 12 13 14 15 16 17 18 19 20 21 22 ...
Страница 83: ...LC 42D65U 10 15 MAIN Unit 13 17 A C B D E F G I H 1 2 3 4 5 6 7 8 9 10 11 12 13 14 15 16 17 18 19 20 21 22 ...
Страница 84: ...LC 42D65U 10 16 MAIN Unit 14 17 A C B D E F G I H 1 2 3 4 5 6 7 8 9 10 11 12 13 14 15 16 17 18 19 20 21 22 ...
Страница 85: ...LC 42D65U 10 17 MAIN Unit 15 17 A C B D E F G I H 1 2 3 4 5 6 7 8 9 10 11 12 13 14 15 16 17 18 19 20 21 22 ...
Страница 86: ...LC 42D65U 10 18 MAIN Unit 16 17 A C B D E F G I H 1 2 3 4 5 6 7 8 9 10 11 12 13 14 15 16 17 18 19 20 21 22 ...
Страница 87: ...LC 42D65U 10 19 MAIN Unit 17 17 A C B D E F G I H 1 2 3 4 5 6 7 8 9 10 11 12 13 14 15 16 17 18 19 20 21 22 ...
Страница 88: ...LC 42D65U 10 20 4 R C LED Unit A C B D E F G I H 1 2 3 4 5 6 7 8 9 10 11 12 13 14 15 16 17 18 19 20 21 22 ...
Страница 111: ...LC 42D65U 23 8 PACKING PARTS NOT REPLACEMENT ITEM S1 S2 S7 S8 S3 S5 S6 S6 S6 S6 S10 S4 S9 ...


