background image

English

   - 28 -

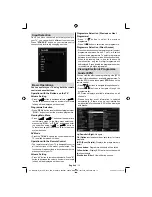
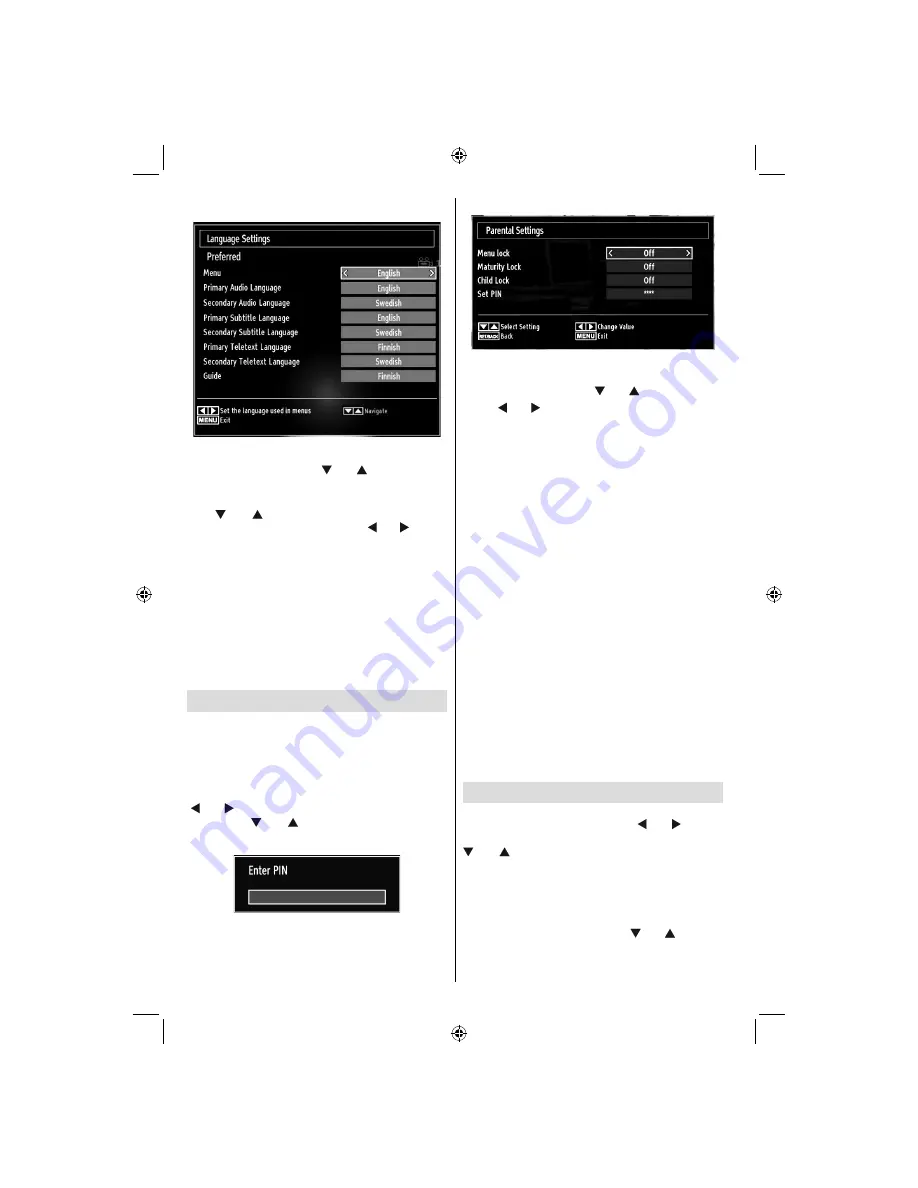
Language Settings

In the con

fi

 guration menu, highlight the Language 

Settings item by pressing “ ” or “ ” buttons. Press 
OK and Language Settings submenu will be displayed 
on the screen:
Use “ ” or “ ” buttons to highlight the menu item 
that will be adjusted and then press “ ” or “ ” button 
to set.
Notes:

System Language determines the on-screen menu 

• 

language.
Audio Language is used for selecting the soundtrack 

• 

of a channels.
Primary settings are the 

fi

rst priority when multiple 

• 

choices are available on a broadcast. Secondary 
settings are the alternatives when the 

fi

rst options 

are not available.

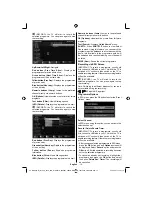
Parental Control

To prohibit viewing of certain programmes, channels 
and menus can be locked by using the parental 
control system.
This function enables or disables the menu protection 
system and allows the PIN code to be changed.

Press 

“MENU”

 button and select the icon by using 

“ ” or “ ” button. Press 

OK

 button to view Settings 

menu. Use “ ” or “ ” button to highlight 

Parental


and press 

OK

 to continue:

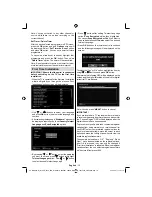
To display parental lock menu options, PIN number 
should be entered. Factory default PIN number is 

0000

. After coding the correct PIN number, parental 

settings menu will be displayed:

Parental Settings Menu Operation

Select an item by using “

• 

” or “ ” button. 

Use “

• 

” or “ ” button to set an item. 

Press

• 

 OK

 button to view more options.

Menu Lock

: Menu lock setting enables or disables 

the menu access. You can disable access to the 
installation menu or the whole menu system. 

Maturity Lock (optional)

: When set, this option 

gets the maturity information from the broadcast and 
if this maturity level is disabled, disables access to 
the broadcast.

Child Lock (optional)

: When Child Lock is set, the TV 

can only be controlled by the remote control. In this 
case the control panel buttons will not work, except 
for the Standby Off/On button. When Child Lock is 
activated you are able to switch the TV into Standby 
mode with the Standby Off/On button. To switch the 
TV on again, you need the remote control. Hence, if 
one of those buttons is pressed, 

Child Lock Is On


will be displayed on the screen when the menu screen 
is not visible.

Set PIN

: De

fi

 nes a new PIN number. Use numeric 

buttons to enter a new pin number. You will need 
to code your new pin a second time for veri

fi

 cation 

purposes.

IMPORTANT

: The factory default pin number is 

0000

if you change the pin number make sure you write it 
down and keep it safe.

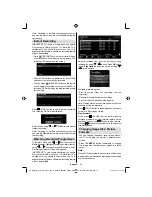
Timers

To view Timers menu, press 

“MENU”

 button and 

select Channel List icon by using “ ” or “ ” button. 
Press 

OK

 button to view Channel List menu. Use 

” or “ ”

 button to highlight Timers and press 

OK


to continue:

Setting Sleep Timer

This setting is used for setting the TV to turn off after 
a certain time.

Highlight Sleep Timer by using “

• 

” or “ ” button.

00_MB60_[GB]_1910UK_IDTV_PVR_NICKEL16_40883W_YPBPR_ROCKER_10072502_50185682.indd   28

00_MB60_[GB]_1910UK_IDTV_PVR_NICKEL16_40883W_YPBPR_ROCKER_10072502_50185682.indd   28

02.09.2011   15:57:23

02.09.2011   15:57:23

Содержание LC-40SH340K

Страница 1: ...LC 40SH340K LCD COLOUR TELEVISION OPERATION MANUAL ENGLISH 50185682 SHARP ELECTRONICS Europe GmbH Sonninstraße 3 D 20097 Hamburg SHARP CORPORATION http www sharp eu com ...

Страница 2: ...vourites 19 Button Functions 19 Managing Stations Sorting Channel List 20 On Screen Information 20 Media Playback Using Media Browser 20 Viewing Videos via USB 20 Viewing Photos via USB 21 Slideshow Options 21 Playing Music via USB 21 Recordings Library 22 Media Browser Settings 22 Timeshift Recording 22 Instant Recording 23 Watching Recorded Programmes 23 Changing Image Size Picture Formats 23 Co...

Страница 3: ...ions below IMPORTANT The wires in the mains lead are coloured in accordance with the following code Blue Neutral Brown Live As the colours of the wires in the mains lead of this product may not correspond with the coloured markings identifying the terminals in your plug proceed as follows The wire which is coloured blue must be connected to the plug terminal which is marked N or coloured black The...

Страница 4: ...st usage of the device even when the usage of electronic devices is familiar to you Please take notice of the chapter SAFETY PRECAUTIONS Carefully keep the handbook as future reference When selling the device or giving it away provide these direction for use Thank you for choosing this product This manual will guide you for the proper operation of your TV Before operating the TV please read this m...

Страница 5: ... place such as a bookcase or rack unless proper ventilation is provided or the manufacturer s instructions are followed The LCD panel used in this product is made of glass Therefore it can break when the product is dropped or impact applied If the LCD panel is broken be careful not to be injured by broken glass Heat sources Keep the product away from heat sources such as radiators heaters stoves a...

Страница 6: ...essive heat such as sunshine fire or the like Lightning In case of storm and lightning or when going on holiday disconnect the power cord from the wall outlet Replacement Parts When replacement parts are required make sure that the service technician has used replacement parts which are specified by the manufacturer or have the same specifications as the original one Unauthorized substitutions may...

Страница 7: ...operation In order to separate the device completely from mains the mains plug has to be pulled from the mains socket Because of that the device should be set up in a way that an unobstructed access to mains socket is guaranteed so that in case of emergency the mains plug can be pulled immediately To exclude the danger of fire the power cord should principally be separated from the mains socket pr...

Страница 8: ...creased to optimum level Note that some picture settings will be unavailable to be changed when the TV is in Power Save Mode When the TV is not used please switch off at the rear rocker switch to further reduce power consumption Disconnect the TV from the mains socket when it will not be used for prolonged periods When the TV is left in stand by it consumes a small amount of power switching off at...

Страница 9: ...dia Browser Loop Shuffle in Media Browser Picture mode selection Changes picture mode 21 in Media Browser video mode No function 22 Teletext Mix in TXT mode 23 Subtitle on off in DVB channels 24 Previous programme 25 AV Source selection 26 Menu on off 27 Okay Confirm Hold in TXT mode Edit 28 Channel List Exit Return Index page in TXT mode 29 No function 30 Info Reveal in TXT mode 31 Volume Up Down...

Страница 10: ...edia recorder you should connect the aerial cable through the device to the television with an appropriate antenna cable as shown in the illustration in the following pages SCART 4 input or output for external devices Connect the SCART cable between SCART socket on TV and SCART socket on your external device such as a decoder a VCR or a DVD player Note If an external device is connected via the SC...

Страница 11: ...dio sockets with a device that has component output To do this you must use the supplied component video connection cable for enabling connection First plug single jack of the cable to the TV s YPbPr socket side Afterwards insert your component cable s not supplied connectors into the plural part of the Component video connection cable Colours of the connected jacks should match Headphone 6 jack i...

Страница 12: ...may cause physical damage to the USB player and especially the USB device itself Do not pull out USB module while playing or recording a file Programme Recording To record a programme you should first connect a USB disk to your TV while the TV is switched off You should then switch on the TV to enable recording feature IMPORTANT When using a new USB hard disk drive it is recommended that you first...

Страница 13: ... so sometimes video may freezes during playback Record Play Pause Display for PlayListDialog keys could not be used when teletext is ON If a recording starts from timer when teletext is ON teletext is automatically turned off Also teletext usage is disabled when there is ongoing recording or playback If the recording time of an event is longer than the memory capacity the following message will ap...

Страница 14: ...be used for a long period Otherwise it can be damaged due to any leakage of batteries Remote range is approximately 7m 23ft Switching On Off To Switch the TV On Connect the power cord to the 220 240V AC 50 Hz Switch the button on the bottom right hand side under the screen to position so the TV will switch to standby mode Then the standby LED lights up To switch on the TV from standby mode either ...

Страница 15: ...ss CH button to select the previous programme Press CH button to select the next programme Programme Selection Direct Access Press numeric buttons on the remote control to select programmes between 0 and 9 The TV will switch to the selected programme To select programmes between press the numeric buttons consecutively When the pressing time is due for the second numeric button only the first digit...

Страница 16: ...guide will be searched and results matching your criteria will be listed SWAP Now Shows the current programme Recording via EPG Screen IMPORTANT To record a programme you should first connect a USB disk to your TV while the TV is switched off You should then switch on the TV to enable recording feature Otherwise recording feature will not be available RECORD the TV will start to record the selecte...

Страница 17: ...tion Scan Encrypted will be then highlighted You can set Scan Encrypted as Yes if you want to scan coded stations Afterwards select the desired Teletext Language Press OK button on the remote control to continue and the following message will be displayed on the screen To select the Yes or No option highlight the item by using or buttons and press OK button Afterwards the following OSD will be dis...

Страница 18: ...ue tuning using and OK buttons Automatic Channel Scan Retune Menu Operation Digital Searches and stores aerial DVB stations Analogue Searches and stores analogue stations Full Searches and stores both analogue and aerial DVB stations Whenever you select an automatic search type and press OK button a confirmation screen will appear on the screen To start installation process select Yes to cancel se...

Страница 19: ...om the Installation menu by using or and OK buttons Analogue fine tune screen will be displayed Analogue Fine Tune feature will not be available if there are no analogue channels digital channels and external sources stored Press OK button to proceed Use or button to set Fine Tune When finished press OK button again Clear Service List This setting is visible only when the Country option is set to ...

Страница 20: ...ng the numeric buttons 0 9 replaces the highlighted character with the characters printed above the button one by one as the button is pressed When finished press OK button to save Press MENU to cancel Locking a Channel You can press GREEN button to tag untag all channels YELLOW button to tag untag a single channel Select the channel that you want to lock and select Lock option Press OK button to ...

Страница 21: ...ser window press either MENU button on the remote control and then select Media Browser by pressing or button Press OK button to continue Media Browser menu options will be displayed Also when you plug USB devices media browser screen will be displayed automatically You can play music picture and video files from the connected USB memory stick Use or button to select Videos Photos Music Recording ...

Страница 22: ...ow Loop Shuffle GREEN button Press once to disable Loop Press again to disable both Loop and Shuffle Press once more to enable only Shuffle Press again to enable all You can follow the disabled functions with the change of the icons Previous Next Left Right buttons Jumps to previous or next file on slideshow Rotate Up Down buttons Rotates the image using up down buttons RETURN Back to file list IN...

Страница 23: ...hlight an item and use or button to set View Style Sets default browsing mode Music FF FR Speed Sets forwarding advancing speed Slide Show Interval Sets slide show interval time Show Subtitle Sets subtitle enabling preference Subtitle Position Sets subtitle position as up or down Subtitle Font Size Sets subtitle font size max 54pt Timeshift Recording IMPORTANT To record a programme you should firs...

Страница 24: ...you should first connect a USB disk to your TV while the TV is switched off You should then switch on the TV to enable recording feature Otherwise recording feature will not be available Select a recorded item from the list if previously recorded by using button Press OK button to view Play Options Select an option by using or OK buttons Available playback options Play from start Plays the recordi...

Страница 25: ...shift to screen up or down by pressing buttons while picture zoom is selected as panaromic 14 9 Zoom Cinema or Subtitle 14 9 This zooms up the wide picture 14 9 aspect ratio to the upper and lower limits of the screen 14 9 Zoom This option zooms to the 14 9 picture 4 3 Use to view a normal picture 4 3 aspect ratio as this is its original size Panoramic This stretches the left and right sides of a ...

Страница 26: ...t Picture Zoom Sets the picture size to Auto 16 9 Subtitle 14 9 14 9 Zoom 4 3 Panoramic or Cinema Reset Resets the picture settings to factory default settings While in VGA PC mode some items in Picture menu will be unavailable Instead VGA mode settings will be added to the Picture Settings while in PC mode PC Picture Settings For adjusting PC picture items do the following Press or button to sele...

Страница 27: ...n programmes For instance volume level of advertisements tend to be louder than programmes Dynamic Bass Dynamic Bass is used to increase bass effect of the TV set Digital Out Sets digital out audio type Configuring Your TV s Settings Detailed settings can be configured to suit your personal preferences Press MENU button and select Settings ikon by using or button Press OK button to view Settings m...

Страница 28: ...K button to view Settings menu Use or button to highlight Conditional Access and press OK to view menu items Configuring Language Preferences You can operate the TV s language settings using this menu Press MENU button and select the fifth icon by using or button Press OK button to view Settings menu Use or button to highlight Language and press OK to continue Use or button to set an item Settings...

Страница 29: ...nu access You can disable access to the installation menu or the whole menu system Maturity Lock optional When set this option gets the maturity information from the broadcast and if this maturity level is disabled disables access to the broadcast Child Lock optional When Child Lock is set the TV can only be controlled by the remote control In this case the control panel buttons will not work exce...

Страница 30: ... in the Settings menu to configure recording settings The following menu is displayed for recording configuration The following options are available for adjustments Start Early You set recording timer s starting time to start earlier by using this setting Available only for EU country options End Late You set recording timer s end time to end later by using this settings Available only for EU cou...

Страница 31: ...2 or GMT 12 Date Time on the top of the menu list will then change according to the selected Time Zone Changes are automatically stored Press MENU to exit Configuring Source Settings You can enables or disable selected source options The TV will not switch to the disabled source options when SOURCE button is pressed Select Sources in the Settings menu and press OK button Press or buttons to select...

Страница 32: ... you select Standby Search as On If the Standby Search is set to On when the TV is in standby mode available broadcasts will be searched If the TV locates any new or missing broadcasts a menu screen will be displayed asking you whether or not to execute these changes Other Features Displaying TV Information Programme Number Programme Name Sound Indicator time teletext channel type and resolution i...

Страница 33: ...n selected Sound You can not hear any sound Did you perhaps interrupt the sound pressing the button Sound is coming from only one of the speakers Is the balance set to one extreme See Sound Menu Remote Control Your TV no longer responds to the remote control Perhaps the batteries are exhausted If so you can still use the local buttons on the TV Input Sources If you cannot select an input source it...

Страница 34: ... Signals Available EXT SCART PAL 50 60 O NTSC 60 O RGB 50 O RGB 60 O Side AV PAL 50 60 O NTSC 60 O YPbPr 480I 60Hz O 480P 60Hz O 576I 50Hz O 576P 50Hz O 720P 50Hz O 720P 60Hz O 1080I 50Hz O 1080I 60Hz O 1080P 50Hz O 1080P 60Hz O HDMI1 HDMI2 480I 60Hz O 480P 60Hz O 576I 50Hz O 576P 50Hz O 720P 50Hz O 720P 60Hz O 1080I 50Hz O 1080I 60Hz O 1080P 50Hz O 1080P 60Hz O 1080P 24 HZ O X Not Available O Ava...

Страница 35: ... Formats for USB Mode Supported Players Player Stream Video Decoder MSVD Audio Decoder MSAD Audio MP3 None MP3 Audio WAV AIFF None LPCM MPEG1 Program Stream MPEG 1 MPEG1 MP3 AC 3 and PCM MPEG2 Program Stream MPEG 2 MPEG2 MP3 AC 3 and PCM AVI Xvid XVID MPEG2 MP3 AC 3 and PCM 00_MB60_ GB _1910UK_IDTV_PVR_NICKEL16_40883W_YPBPR_ROCKER_10072502_50185682 indd 34 00_MB60_ GB _1910UK_IDTV_PVR_NICKEL16_408...

Страница 36: ...ot operation Reboot is the last step in software upgrade operation if download of new software is finished successfully During reboot TV makes final initializations In reboot sequence panel power is closed and front led indicates the activity with blinking Around 5 minutes later TV restarts with new software activated If your TV fails to restart in 10 minutes unplug power for 10 minutes and re plu...

Страница 37: ...ING CHANNELS VHF BAND I III UHF BAND U HYPERBAND NUMBER OF PRESET CHANNELS 1000 CHANNEL INDICATOR On Screen Display RF AERIAL INPUT 75 Ohm unbalanced OPERATING VOLTAGE 220 240V AC 50Hz AUDIO German Nicam Stereo AUDIO OUTPUT POWER WRMS 10 THD 2 x 6 POWER CONSUMPTION W 190 W max 0 5 W Standby PANEL 16 9 display 40 102 cm Screen Size DIMENSIONS mm DxLxH With foot 232 x 969 7 x 657 2 Weight Kg 17 35 D...

Страница 38: ...nal Drawings 00_MB60_ GB _1910UK_IDTV_PVR_NICKEL16_40883W_YPBPR_ROCKER_10072502_50185682 indd 37 00_MB60_ GB _1910UK_IDTV_PVR_NICKEL16_40883W_YPBPR_ROCKER_10072502_50185682 indd 37 02 09 2011 15 57 26 02 09 2011 15 57 26 ...

Страница 39: ...ife disposal 00_MB60_ GB _1910UK_IDTV_PVR_NICKEL16_40883W_YPBPR_ROCKER_10072502_50185682 indd 38 00_MB60_ GB _1910UK_IDTV_PVR_NICKEL16_40883W_YPBPR_ROCKER_10072502_50185682 indd 38 02 09 2011 15 57 40 02 09 2011 15 57 40 ...

Страница 40: ...moved Unscrew the 4 screws that attach the foot assembly to the panel and remove the foot assembly from the panel 00_MB60_ GB _1910UK_IDTV_PVR_NICKEL16_40883W_YPBPR_ROCKER_10072502_50185682 indd 39 00_MB60_ GB _1910UK_IDTV_PVR_NICKEL16_40883W_YPBPR_ROCKER_10072502_50185682 indd 39 02 09 2011 15 57 41 02 09 2011 15 57 41 ...

Страница 41: ... the product LC 32LE510E LC 32LE530E Ø4 30 8 200 x 100 W x H To the wall M4 18 4 To the product LC 40LE510E LC 40LE530E Ø4 30 8 400 x 400 W x H To the wall M8 30 4 To the product LC 32SH130E LC 32SH130K LC 32SH340E Ø4 30 8 200 x 100 W x H To the wall M6 30 4 To the product LC 40SH340E LC 40SH340K Ø4 30 8 400 x 400 W x H To the wall M6 30 4 To the product 00_MB60_ GB _1910UK_IDTV_PVR_NICKEL16_40883...

Отзывы: