EN-15
EN-8
4
EN-17, 18
EN-6
EN-4
Click!
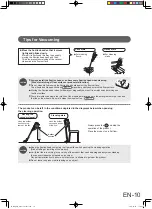
Tips
1
2
3
②
①
Slot
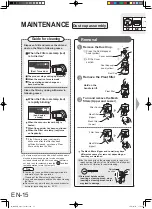
MAINTENANCE
Dust cup assembly
Guide for cleaning
(Red: Turned on)
(Red: Rapidly
blinking)
The operating sound changes or
becomes louder
When fine powder has been suctioned
When the vacuum cleaner body is
heated.
When the Filter care lamp (red) turns
on frequently.
Do not use any paint thinner, benzene product or
hot water (exceeding approx. 40°C).
Care must be taken when
inserting a cleaning brush, since
inserting a cleaning brush too far
may lead to damage.
The Mesh filters (Upper and Lower) may have
different sequence for removal, depending on
how they are matched.
Mesh filter
(Upper)
Mesh filter
(Lower)
Mesh filter
(Upper)
Pleat filter
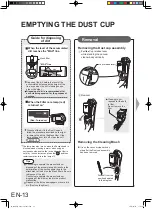
Hold on the
handle to lift.
Lift the Cover
section.
Press the Dust disposal
hook (yellow).
Filter Cover
Filter Cover
Dust Cup
Dust disposal
hook (yellow)
Cover section
Turn and remove the Mesh
filters (Upper and Lower).
Remove the Pleat filter
Remove the Dust Cup.
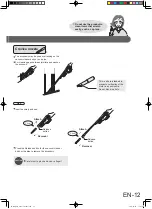
Insert the battery into the vacuum cleaner body.
Notices
Information on Charging
When the remaining charge in the battery becomes low, the
Battery level indicator lamp (green) blinks to notify the
status.
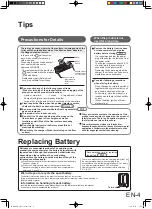
There is no malfunction if the product blinks in an environment with a low temperature (about 5°C or lower) or a high
temperature (about 35°C or higher). Charge the battery in an environment that is between 5°C to 35°C.
The operating time gradually becomes shorter as the
battery is used repeatedly.
If the blinking occurs when the room temperature is between 5°C and 35°C, then it is time to replace the battery.
Information on operating time
The Charging lamp (red) of the charger blinks slowly)
When the Charging lamp (red) of the charger rapidly blinks, that may be caused by malfunction of the charger,
or deterioration or malfunction of the battery. Contact your nearest service center approved by SHARP.
The charging time may be long in following cases.
The battery is charged in an environment at a low temperature (approx. 5°C or lower) or a high temperature
(approx. 35°C or higher) (charge the battery in an environment with at room temperature between 5°C and 35°C).
When not in use for long period of time
Is the battery correctly set to the charger?
Is the power plug of the charger dislodged?
Is there any dirt or foreign matter attached to a terminal of
the charger or the battery? Remove the dirt or foreign
matter with dry cloth.
In cases where charging is not possible, verify followings.
Remove the battery
from the charger.
Insert the battery
into the vacuum
cleaner body.
Securely insert the battery along the
grooves on the vacuum cleaner body until
the "click" sound is emitted.
Once the terminals are connected, the Battery Level
Indicator lamp on the vacuum cleaner body turns on
for about five seconds to notify the remaining
charge in the battery. Be sure to securely insert the
battery until the "click" sound is heard, even if the
lamp starts to light up during the process.
Align the
terminals.
Use the hand grip on the cleaning brush to tap on the
raised section (plastic) of the Pleat filter to dislodge dirt
and dust with vibration for easier cleaning.
Continuing the use without cleaning will lead to
automatic stop of the operation.
Cleaning of the filters must be performed.
Lay down newspapers and the like when cleaning
the filters.
If the Filter care lamp (red) rapidly
blinks even after the filter has been
sufficiently cleaned, purchase a Pleat
filter and replace the filter.
The lamp may also turn on when the Suction head is
blocked (when cleaning a mat or when using an
enclosed nozzle and the like) even when the filter is
not dirty. In such instances, press the and then
restart operation to turn the lamp off.
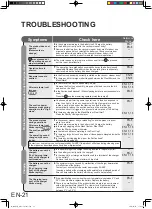
When the suction force is weak
The product stops during operations
Removal
Dispose of dirt and remove the dirt and
dust on the filter in following cases.
Clean the filter by rinsing with water in
following cases.
When the Filter care lamp (red)
is turned on*
When the Filter care lamp (red)
is rapidly blinking*
When a single battery is used
(fully charged and initial condition
of the battery / 20°C). Conditions
may vary depending on the
material of the floor surface,
environment in which the product
is used and the condition under
which the product is used.
Continuous operation time*
High mode
About 8
minutes
About 30
minutes
Standard mode
Raised
section
EN-7
Insert securely to as far as it goes.
Power plug
Charger
-
1
2
3
CAUTION
Notices
EN-6
EN-16
Battery release button
CAUTION
1
Turn
2
3
Turn
Click!
Protrusion
EN-17
EN-17
EN-17
Top side
Warning
PREPARATION
See for
tips for making the
battery last.
Charging battery
The battery is not charged when the product is purchased, so the battery must be removed from
the vacuum cleaner body and charged until the Charging lamp on the charger is turned off.
Remove the battery from the vacuum cleaner body.
Insert the power plug of
the charger in the power
outlet.
Set the battery on the charger and recharge.
Align the terminals.
Verify that the Charging
lamp (red) is turned on.
If the lamp blinks (repeating the "blinking" in
intervals of about one second) the battery has
not been securely inserted.
Insert the battery securely to as far as it goes.
Remove the battery by
sliding it in the direction
of the arrow.
In case your outlet is for 2-flat-pin
plug, use the enclosed adapter.
(Make sure the plug is fully
inserted into the plug adapter.)
Press the Battery release
button in the direction of
the arrow
The estimated duration of
time required for charging
varies depending on the
remaining charge in the
battery at the time charging
starts.
Do not touch the terminals of the charger or the
battery since they become hot while charging
or immediately after completing charging. [Risk
of burns.]
Do not apply any hot air, such as air blown by a hair dryer.
[Risk of deformation or product malfunction.]
Caution is required to ensure that the
Mesh filters (Upper and Lower) are
not lost while throwing out dirt or
cleaning.
Each part must be assembled
correctly in order for them to fit onto
the vacuum cleaner body.
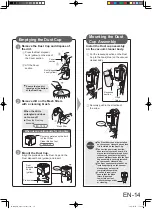
Align the protrusion on the Dust Cup and the
Dust disposal hook (yellow) and insert.
Align the salient part of the Pleat
filter to the recessed section of the
Filter Cover and press in.
Install the Filter Cover and the Mesh
filters (Upper and Lower).
Install the Dust Cup.
Align the
positions..
Align the
positions..
Install the Dust Cup.
Properly remove moisture, gently wipe off moisture
with a towel or the like, dry in shade at a well
ventilated location to thoroughly dry.[Risk of
emission of odor or product malfunction.]
Thoroughly dry prior to assembling.
[Risk of filter clogging not improving even after
cleaning.]
Wash with water or thinned neutral detergent.
Pleat filter
Remove dirt and dust with a cleaning brush.
Dislodge and remove dirt and dust by
dusting.
Pleat Filter
Parts that may be washed with water
Dust in the direction illustrated in
the diagram on the right as dirt
tends to accumulate on the back
side.
Do not use a cleaning brush
[Risk of damages].
Mesh filters (Upper and Lower), Filter Cover
When heavily dirtied, wash with water.
Cleaning the Filters
Assembling the Filters
Filter Cover
Carefully wash
the back side.
When the odor stands out,
dilute bleach for clothing in
water and immerse the filter
in this solution following
instruction for the bleach,
then rinse with
water.
Mesh filter
Dust Cup
Dry the parts after washing with
water.
Estimated
drying time:
12 hours.
(This may vary depending on
the environment and season.)
The charger or the
battery becomes hot
while charging, but this
is not abnormal.
Lamp state
Charging status
Charging
Turned on
Turned off
Charging completed
(fully charged)
About 80 minutes
Estimated duration from start
of charging*
[Risk of electrocution or injury.]
Always do followings during maintenance
Disconnect the power cord of the charger from the
electrical outlet.
Press the to stop the operation of the product
and remove the battery.
Dust
disposal
hook
(yellow)
Recessed
section
Salient
section
Gently rub
the mesh.
EC-A1RA_Eng_A4(ai sorted).indd 16
2017/07/07 11:43:21

