background image

EN-9

CAUTION

EN-14

EN-13, 14

EN-7

EN-17

1

Click!

3

2

CAUTION

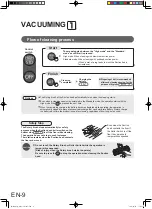
VACUUMING

Flow of cleaning process

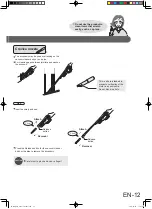
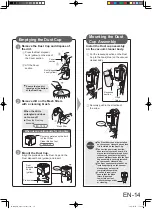
Emptying the Dust Cup

Remove the Dust Cup and dispose of 

the dirt.

Remove dirt on the Mesh filters 

with a cleaning brush.

Press the Dust disposal 

hook (yellow) on the side of 

the Cover section.

Lift the Cover 

section.

Ensure that no dirt 

remains at the bottom 

of the Dust Cup.

Cover 

section

Mesh filter

Mount the Dust Cup.

Protrusion

Dust 

disposal 

hook 

(yellow)

Align the protrusion on the Dust Cup and the 

Dust disposal hook (yellow) and insert.

When used continuously for long time

Dust disposal 

hook (yellow)

Securely push in the direction of 

the arrow

Hook
(blue)

Click!

Recessed 

section

Put the recessed section on the Dust 

Cup to the hook (blue) on the vacuum 

cleaner body

Install the Dust cup assembly 

on the vacuum cleaner body.

When the dirt is 

entangled and does 

not come off

Clean the Dust cup 

assembly.

Dust accumulates on the built 

in Pleat Filter.

Clean this dust out.

Mounting the Dust 

Cup Assembly

Control 

switch

The mode toggles between the "High mode" and the "Standard 

mode" each time it is pressed.

High mode: When cleaning with maximum suction power.
Standard mode: When cleaning with subdued suction power.

(When a mat or a rug tends to block the Suction head, 

for instance.)

Start

Finish

The Rotary brush stops automatically for safety 

purpose when the Suction head (roller switch on the 

bottom side                 ) is off the floor while cleaning. 

The operation does not stop in such instances.

The rotation restarts when the Suction head contacts 

the floor and moved.

Cleaning 

completed

Notices

Safety Stop

Even when a cleaning session is completed in the Standard mode, the operation starts with the 
High mode if the        is pressed the next time.

The Rotary brush of the Suction head automatically turns when the cleaning starts.

When the remaining charge in the battery becomes depleted while operating, the operation is 

automatically stopped to prevent excessive discharge that can deteriorate battery. Always charge 

the battery each time the product is used for cleaning, regardless of how long it was used.

Charging the 

battery

Disposing of dirt is recommended 

after each cleaning session, for the 

purpose of hygiene.

Even when the Suction 

head contacts the floor if 

the Roller Switch is off the 

floor the operation is 

temporarily suspended.

Do not touch the Rotary Brush or Roller Switch while the operation is 

temporarily suspended.

[Risk of injury when the Rotary brush starts to operate]

Be sure to press the        to stop the operation when cleaning the Suction 

head.

Caution is required to 

ensure that the Mesh 

filters (Upper and 

Lower) are not lost 

while throwing out dirt 

or cleaning.

The Dust cup assembly cannot be 

installed properly on the vacuum 

cleaner body unless it is 

completely assembled.

The Pleat filter cannot be installed 

on the vacuum cleaner body unless 

it is installed on the Dust Cup.
The suction power may decline, 

abnormal noise may be heard, dirt 

may enter into the motor and other 

issues may arise that may lead to 

product malfunction unless the Dust 

cup assembly is securely installed 

on the vacuum cleaner body.

EN-15, 16

EN-15, 16

EN-13

Tips

EN-15, 16

CAUTION

EN-10

CAUTION

EN-17

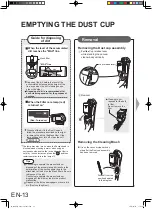
EMPTYING THE DUST CUP

Guide for disposing 

of dirt

Mesh filter

Disposing of dirt is recommended after 

each cleaning session, for the purpose of 

hygiene.

"MAX" line

MAX

(Red: Turned on)

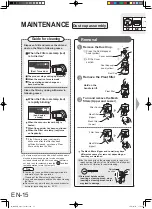
Pull out from the 

position depicted 

in the diagram.

It is on the vacuum cleaner body 

side after the Dust cup assembly 

has been removed.

Removing the Cleaning Brush

Removal

Removing the Dust cup assembly

Cup release lever

For cleaning 

floors.

Moving the Suction head (wheel) sideways or diagonally can result in scratches and markings on 

the floor surface.

The product can be left in the conditions depicted in the diagrams below when pausing 

the cleaning operation.

Resting the 

vacuum cleaner

Do not leave the product while leaning on an object.

Verify that there is nothing in the vicinity of the product that can be damaged easily when standing 

the vacuum cleaner body leaned on an object.

Pay particular attention to ensure no infant or pet is allowed to get near the product.

Keep the Suction head contacting the floor surface when pausing the cleaning operation.

[Risk of falling or tumbling of the product]

Hook the holder 

section onto a 

table or the like.

Hook the holder 

section on a chair 

or the like.

Place the product on a flat floor.

Always press the        and stop the 

operation of the product.

Standing state

Do not clean while pressing the Suction head hard against the floor surface.

The wheels and Napped cushions                  may wear quickly and scratch the floor surface.

Always install the Suction head or an Accessory Suction head when cleaning.

[Risk of scratching of floor surface or product malfunction]

There are instances where the rotation of the wheels deteriorate due to the entanglement of pet hair and 

the like on the wheels. Be sure to clean the wheels often.

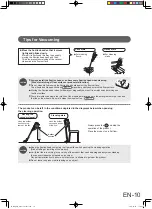
Move the Suction head so that it moves 

lightly and glides slowly.

More dirt is suctioned this way than quickly 

moving the Suction head back and forth.

This also prevents scratching of the vacuum 

cleaner and the floor surface.

Stick state

Handy state

For cleaning 

stairs.

Pull the 

Cup release lever 

while standing the vacuum 

cleaner body vertically.

Cleaning is not 

required for the built 

in filter.

Do not remove the 

filter.

Dispose of the dirt in the Dust Cup and 

follow the procedure described on the right 

to remove the dirt on the Mesh filter. If the 

lamp still does not turn off, clean the unit.

The lamp may also turn on when the Suction head is 

blocked (when cleaning a mat or when using an 

enclosed nozzle and the like) even when the filter is 

not dirty. In such instances, press the          and then 

restart operation to turn the lamp off.

Dispose of the dirt on newspapers or over a dirt 

bin. [Dust could spill out]

Continuing to operate the product without 

disposing of the accumulating dirt results in the 

deterioration of the suction power due to the 

attachment of the dirt on the Mesh filters. Be sure 

to dispose of the dirt.

Continuing to operate the product without 

disposing of the dirt may lead to the product 

malfunction.

When the level of the accumulated 

dirt reaches the "MAX" line.

When the Filter care lamp (red) 

is turned on*

Removal

Tips for Vacuuming

Dispose of the dirt before the level of the 

accumulated dirt exceeds the height of the 

line, even when the dirt is leaning on one 

side or the other.

Holder 

section

MAX

EN-17

EC-A1RA_Eng_A4(ai sorted).indd   10

2017/07/07   11:43:19

Содержание EC-A1RA

Страница 1: ...516 Panduan Operasional Penyedot Debu Nirkabel Penggunaan Rumah Tangga เคร องดูดฝุ นด ามจับไร สาย คู มือการใช งาน สำหรับใช ภายในครัวเรือน Household use Hướng dẫn sử dụng Máy hút bụi không dây Dùng cho gia đình Model EC A1RA_Hyo_contens_A4 ai sorted indd 1 2017 07 07 14 39 45 ...

Страница 2: ...EN 19 SPECIFICATIONS EN 20 TROUBLESHOOTING EN 21 DAFTAR ISI Halaman TINDAK PENCEGAHAN UNTUK KESELAMATAN ID 1 NAMA NAMA SUKU CADANG ID 5 PERSIAPAN ID 7 PROSES PENGHISAPAN ID 9 PENGOSONGAN WADAH PENAMPUNG DEBU ID 13 PERAWATAN ID 15 PENYIMPANAN ID 19 SPESIFIKASI ID 20 PEMECAHAN MASALAH ID 21 EC A1RA_Hyo_contens_A4 ai sorted indd 2 2017 07 07 14 39 45 ...

Страница 3: ...จัดเก บ ข อมูลจำเพาะ การแก ป ญหาเบื องต น TH 1 TH 5 TH 7 TH 9 TH 13 TH 15 TH 19 TH 20 TH 21 MỤC LỤC Trang CÁC BIỆN PHÁP PHÒNG NGỪA AN TOÀN VN 1 TÊN CÁC BỘ PHẬN VN 5 CHUẨN BỊ VN 7 HÚT BỤI VN 9 LÀM SẠCH HỘP CHỨA BỤI BẢO TRÌ VN 15 CẤT GIỮ VN 19 ĐẶC TÍNH KỸ THUẬT XỬ LÝ SỰ CỐ VN 21 VN 20 VN 13 EC A1RA_Hyo_contens_A4 ai sorted indd 3 2017 07 07 14 39 45 ...

Страница 4: ... EN 6 EN 4 EN 13 14 EN 13 14 EN 15 16 EN 6 EN 6 EN 7 EN 7 EN 1 EN 7 EN 8 EN 14 EN 16 EN 4 Reference Pages EN 6 EN 6 TROUBLESHOOTING Symptoms Check here The product does not operate Movements are strange Operation time is shorter was pressed but the operation does not stop immediately Abnormal sound is emitted The suction power becomes weak during operation in the High mode The suction power is wea...

Страница 5: ... be observed are explained using following symbols Do not do this Must do this When product is used When product is used Charger Matters for preventing electrocution fire disaster and malfunction of vacuum cleaner body Risk of deformation of vacuum cleaner body ignition of fire and fire disaster due to overheating Risk of electrocution and malfunction of product Risk of injury or malfunction of pr...

Страница 6: ... pins Do not use the battery when there is emission of smell heat liquid leakage discoloration deformation and any other abnormality that was not present previously When the liquid from inside the battery leaks and comes in contact with the eye do not rub and immediately rinse out the liquid from the eye using clean water such as tap water and receive treatment by a physician right away Do not use...

Страница 7: ...d at the same time Sharp objects glass razor blade and the like Liquid or moist dirt A large amount of sand Risk of heating ignition of fire or electrocution Furthermore store the product in a location where there is little humidity or dust Do not transport or store the product together with any metal object such as a needle necklace or hair pin It is recommended that the power plug of the charger...

Страница 8: ...ary brush cover Release lever Belt Gear MAINTENANCE Suction head vacuum cleaner body Enclosed nozzles and contacts terminals of charging section Suction head Rotary brush Vacuum cleaner body Enclosed nozzles and contacts terminals of charging section When lint rubber band hair or pet hair and the like is attached Removing the dirt Roller Switch Napped cushion Remove dirt that became attached to fi...

Страница 9: ...tion of the battery According to tests conducted based on Sharp s standard for repeatedly charging and charge discharge a battery The life of a battery can vary depending on the conditions of use and the environment 2 1 EN 7 Lamps notify status of the vacuum cleaner body Filter care lamp red Battery level indicator lamp green 1 Indicated State Explanation Lamp State Filter care lamp red Battery le...

Страница 10: ...al Dispose of dirt and remove the dirt and dust on the filter in following cases Clean the filter by rinsing with water in following cases When the Filter care lamp red is turned on When the Filter care lamp red is rapidly blinking Raised section EN 7 Insert securely to as far as it goes Power plug Charger 1 2 3 CAUTION Notices EN 6 Battery release button PREPARATION See for tips for making the ba...

Страница 11: ...l of the floor surface environment in which the product is used and the condition under which the product is used Continuous operation time High mode About 8 minutes About 30 minutes Standard mode EN 16 CAUTION 1 Turn 2 3 Turn Click Protrusion EN 17 EN 17 EN 17 Top side Warning Do not apply any hot air such as air blown by a hair dryer Risk of deformation or product malfunction Caution is required...

Страница 12: ... press the to stop the operation when cleaning the Suction head EN 13 Tips EN 15 16 EMPTYING THE DUST CUP Guide for disposing of dirt Mesh filter Disposing of dirt is recommended after each cleaning session for the purpose of hygiene MAX line MAX Red Turned on Pull out from the position depicted in the diagram It is on the vacuum cleaner body side after the Dust cup assembly has been removed Remov...

Страница 13: ... 10 CAUTION EN 17 For cleaning floors Moving the Suction head wheel sideways or diagonally can result in scratches and markings on the floor surface The product can be left in the conditions depicted in the diagrams below when pausing the cleaning operation Resting the vacuum cleaner Do not leave the product while leaning on an object Verify that there is nothing in the vicinity of the product tha...

Страница 14: ...e rotating section when changing the angle Insert securely and use Turn while pressing the Lock Release to change the angle Do not press the while operating when cleaning with the vacuum cleaner body facing up Press the after facing the Suction head downward to stop the operation Pressing the while the product is facing up may lead to the dirt spilling out of the vacuum cleaner body For cleaning h...

Страница 15: ...body or the pipe to remove the accessory Insert securely and use Crevice nozzle For cleaning gaps between furniture and sash on the windows Do not use the product to clean items that scratch easily such as a piano The accessory may be used by attaching on the vacuum cleaner body or on a pipe This is a hole intended to prevent overheating of the motor in an enclosure Do not block the hole EC A1RA_E...

Страница 16: ...eds the height of the line even when the dirt is leaning on one side or the other MAX EN 9 CAUTION EN 13 14 EN 7 EN 17 VACUUMING Flow of cleaning process Control switch The mode toggles between the High mode and the Standard mode each time it is pressed High mode When cleaning with maximum suction power Standard mode When cleaning with subdued suction power When a mat or a rug tends to block the S...

Страница 17: ...h This also prevents scratching of the vacuum cleaner and the floor surface Stick state Handy state For cleaning stairs Tips for Vacuuming Holder section EN 17 EN 14 1 Click 3 2 CAUTION Emptying the Dust Cup Remove the Dust Cup and dispose of the dirt Remove dirt on the Mesh filters with a cleaning brush Press the Dust disposal hook yellow on the side of the Cover section Lift the Cover section En...

Страница 18: ...l Dispose of dirt and remove the dirt and dust on the filter in following cases Clean the filter by rinsing with water in following cases When the Filter care lamp red is turned on When the Filter care lamp red is rapidly blinking Raised section EN 7 Insert securely to as far as it goes Power plug Charger 1 2 3 CAUTION Notices EN 6 Battery release button PREPARATION See for tips for making the bat...

Страница 19: ... of the floor surface environment in which the product is used and the condition under which the product is used Continuous operation time High mode About 8 minutes About 30 minutes Standard mode EN 16 CAUTION 1 Turn 2 3 Turn Click Protrusion EN 17 EN 17 EN 17 Top side Warning Do not apply any hot air such as air blown by a hair dryer Risk of deformation or product malfunction Caution is required ...

Страница 20: ...move the Rotary brush After removing the Rotary brush and washing it with water remove water and moisture properly and sufficiently dry in a ventilated location before re installing Rotary brush Remove the belt EN 11 12 Duster Nozzle 1 piece Crevice Nozzle 1 piece 1 piece 2 flat pin adapter Use the adapter if your outlet is for 2 flat pin plug Enclosed Nozzles Plug Adapter EN 5 Accessories EN 4 7 ...

Страница 21: ...in the battery is quite low There is no charge remaining in the battery Charge the battery Empty the dust cup and clean the filter The Battery level indicator lamp is turned on in following situations The lamp is not turned on when there is no charge left in the battery The lamp may also turn on when the Suction head is clogged even when the filter is not dirty In such instances press the and then...

Страница 22: ...rging is not completed even after exceeding the prescribed charging time and replace the battery Keep the battery at a place that is out of reach of infants Do not touch the battery with a wet hand Always use a battery that is specified by Sharp Do not use any charger for a battery that is not specified by Sharp Do not immerse or wet the product with water Do not place the product near fire or spa...

Страница 23: ... 35 C or higher Charge the battery in an environment that is between 5 C to 35 C Recommended time for replacing the battery When the Charging lamp red of the charger blinks slowly whenever charging in an environment with room temperature of between 5 C and 35 C When the operating time is extremely short even when the battery has been charged We invite you to recycle the spent battery Information o...

Страница 24: ...he filter by rinsing with water Is the charge remaining in the battery low Charge the battery De ex W Problems with vacuum cleaner body during operation Charging Th lac a p Ch If t pe Th the EN 1 Caution Danger Warning Warning SAFETY PRECAUTIONS Matters that must be observed in order to prevent danger to humans and damages to property are explained Details that related to matters with high probabi...

Страница 25: ...s in order to avoid a hazard The Suction head and Pipe accessories are only to be used with the appliance Do not connect these accessories with the power outlet or plug socket outlet connector or appliance inlet that is connected with the power outlet EN 22 EN 9 EN 15 16 EN 13 14 EN 16 EN 16 EN 17 EN 17 EN 14 EN 16 EN 16 EN 15 16 Reference Pages rs with or y est do ter nce wet ure o be If the Filt...

Страница 26: ...alaman acuan ID 6 ID 6 PEMECAHAN MASALAH Gejala Lihat bagian ini terlebih dahulu Produk tidak berfungsi Gerakannya aneh Waktu penggunaan lebih pendek Tombol sudah ditekan namun produk tidak langsung berhenti Terdengar suara yang tidak biasa Daya penghisapan menjadi lemah selama penggunaan pada setelan High Daya hisap lemah Produk berhenti berfungsi selama digunakan Lampu perawatan saringan merah b...

Страница 27: ...pai dengan 40ºC selama penggunaan tetapi peningkatan suhu ini adalah hal yang Pengisi daya atau baterai menjadi panas saat proses pengisian daya Udara yang keluar dari bagian badan penghisap debu adalah udara yang berbau Gejala Lihat bagian ini terlebih dahulu Cek rincian rincian di bawah ini sebelum meminta jasa perbaikan atau menghubungi kami untuk mengajukan pertanyaan Panas Rangkaian wadah pen...

Страница 28: ... atau menyimpan produk yang mengandung benda benda tersebut seperti kalung atau jepit rambut Jangan menggunakan baterai jika keluar bau panas ada kebocoran cairan perubahan warna perubahan bentuk dan keanehan lainnya pada produk yang tidak muncul sebelumnya Saat cairan dari dalam baterai bocor dan masuk ke mata jangan mengusap mata dan segera bilas mata dengan menggunakan air bersih seperti air ke...

Страница 29: ... 0 5 W daya listrik saat steker disambungkan ke stop kontak Melepaskan steker saat alat pengisi daya tidak digunakan dapat membantu penghematan daya listrik yang terbuang percuma Lakukan tindak pencegahan berikut ini saat menyimpan baterai Lepaskan baterai dari unit dasar dan isi penuh daya baterai sebelum produk disimpan Benda benda tajam kaca pisau cukur dan benda serupa Jangan mengoleskan pelum...

Страница 30: ...gian sudah aus Periksa dan hubungi pusat servis terdekat yang disetujui oleh SHARP ID 17 Penutup sikat berputar ID 16 ID 4 Pelepasan Hati Hat Roda Penutup sikat Berputar Tuas Release Sabuk Gigi PERAWATAN Ujung Penghisap bagian badan penghisap debu nosel yang disertakan dan kontak terminal bagian pengisian daya Ujung Penghisap sikat berputar Bagian badan penghisap debu nosel yang disertakan dan kon...

Страница 31: ...rai bisa menjadi aus Menurut uji yang dilakukan berdasarkan pada standar Sharp untuk pengisian daya berulang kali dan pengisian daya tanpa pengisian daya untuk suatu baterai Masa pakai baterai bisa berbeda beda dengan tergantung pada keadaan penggunaan dan lingkungan 2 1 ID 7 Lampu lampu keterangan status bagian badan penghisap debu Lampu perawatan saringan merah FILTER FILTER Lampu indikator ting...

Страница 32: ...hisap Saat bagian badan penghisap debu menjadi panas Saat Lampu perawatan saringan merah menyala terus menerus Jangan menggunakan thinner cat produk benzene atau air panas yang melebihi kira kira 40 C Berhati hatilah saat memasukkan sikat pembersih karena jika sikat pembersih masuk terlalu dalam bisa menyebabkan kerusakan Saringan jaring jaring bagian atas dan bagian bawah dapat memiliki urutan ya...

Страница 33: ...kan baterai Kait pembuan debu kuning Bagian berongga Bagian yang menonjol Lap jaring jaring dengan lembut ID 8 4 ID 17 18 ID 6 ID 4 Klik Tempat baterai Masukkan baterai ke dalam bagian badan penghisap debu Keterangan Informasi mengenai Pengisian Daya Saat sisa daya pada baterai menjadi lemah maka lampu indikator tingkat daya Baterai hijau berkedip untuk memberitahukan status Tidak terjadi malfungs...

Страница 34: ...rgerak Pastikan Anda menekan tombol untuk menghentikan penggunaan produk saat membersihkan Ujung Penghisap ID 17 EC A1R_2nd ID 13 Tips ID 15 16 MENGOSONGKAN WADAH PENAMPUNG DEBU Panduan untuk membuang kotoran Saringan jaring jaring Pembuangan kotoran disarankan untuk dilakukan setelah setiap sesi pembersihan untuk tujuan higienitas Garis MAX MAX Merah Menyala Tarik dari posisi yang digambarkan di ...

Страница 35: ...kan lantai Jika Ujung Penghisap roda digerakkan ke arah samping atau diagonal maka permukaan lantai bisa tergores dan cara penggunaan tersebut dapat meninggalkan jejak pada permukaan lantai Produk bisa diletakkan dengan posisi posisi yang digambarkan pada diagram di bawah ini saat proses pembersihan sedang dihentikan sementara waktu Menyandarkan penghisap debu Jangan meninggalkan produk saat produ...

Страница 36: ...ri saat Anda bermaksud mengubah arah sudut Penghisap Masukkan dengan benar dan gunakan Putar sambil menekan Lock Release pembuka pengaman untuk mengubah sudut Jangan menekan tombol saat menggunakan produk untuk membersihkan dengan posisi badan penghisap debu menghadap ke atas Tekan tombol setelah mengarahkan ujung Penghisap ke arah bawah untuk menghentikan penggunaan Untuk membersihkan tempat yang...

Страница 37: ...gian badan penghisap debu atau pipa untuk melepaskan aksesoris Masukkan dengan benar dan gunakan Nosel Crevice Untuk membersihkan rongga di antara perabotan dan rongga jendela Jangan menggunakan produk untuk membersihkan benda benda yang mudah tergores seperti piano Aksesoris ini bisa digunakan dengan melekatkannya pada bagian badan penghisap debu atau pipa Lubang ini dimaksudkan untuk mencegah pa...

Страница 38: ...gerak Pastikan Anda menekan tombol untuk menghentikan penggunaan produk saat membersihkan Ujung Penghisap ID 17 EC A1R_2nd ID 13 Tips ID 15 16 MENGOSONGKAN WADAH PENAMPUNG DEBU Panduan untuk membuang kotoran Saringan jaring jaring Pembuangan kotoran disarankan untuk dilakukan setelah setiap sesi pembersihan untuk tujuan higienitas Garis MAX MAX Merah Menyala Tarik dari posisi yang digambarkan di d...

Страница 39: ...kan lantai Jika Ujung Penghisap roda digerakkan ke arah samping atau diagonal maka permukaan lantai bisa tergores dan cara penggunaan tersebut dapat meninggalkan jejak pada permukaan lantai Produk bisa diletakkan dengan posisi posisi yang digambarkan pada diagram di bawah ini saat proses pembersihan sedang dihentikan sementara waktu Menyandarkan penghisap debu Jangan meninggalkan produk saat produ...

Страница 40: ...isap Saat bagian badan penghisap debu menjadi panas Saat Lampu perawatan saringan merah menyala terus menerus Jangan menggunakan thinner cat produk benzene atau air panas yang melebihi kira kira 40 C Berhati hatilah saat memasukkan sikat pembersih karena jika sikat pembersih masuk terlalu dalam bisa menyebabkan kerusakan Saringan jaring jaring bagian atas dan bagian bawah dapat memiliki urutan yan...

Страница 41: ...kan baterai Kait pembuan debu kuning Bagian berongga Bagian yang menonjol Lap jaring jaring dengan lembut ID 8 4 ID 17 18 ID 6 ID 4 Klik Tempat baterai Masukkan baterai ke dalam bagian badan penghisap debu Keterangan Informasi mengenai Pengisian Daya Saat sisa daya pada baterai menjadi lemah maka lampu indikator tingkat daya Baterai hijau berkedip untuk memberitahukan status Tidak terjadi malfungs...

Страница 42: ...gian sudah aus Periksa dan hubungi pusat servis terdekat yang disetujui oleh SHARP ID 17 Penutup sikat berputar ID 16 ID 4 Pelepasan Hati Hat Roda Penutup sikat Berputar Tuas Release Sabuk Gigi PERAWATAN Ujung Penghisap bagian badan penghisap debu nosel yang disertakan dan kontak terminal bagian pengisian daya Ujung Penghisap sikat berputar Bagian badan penghisap debu nosel yang disertakan dan kon...

Страница 43: ...anpa diisi maka baterai bisa menjadi aus Menurut uji yang dilakukan berdasarkan pada standar Sharp untuk pengisian daya berulang kali dan pengisian daya tanpa pengisian daya untuk suatu baterai Masa pakai baterai bisa berbeda beda dengan tergantung pada keadaan penggunaan dan lingkungan 2 1 ID 7 Lampu lampu keterangan status bagian badan penghisap debu Lampu perawatan saringan merah FILTER FILTER ...

Страница 44: ... atau menyimpan produk yang mengandung benda benda tersebut seperti kalung atau jepit rambut Jangan menggunakan baterai jika keluar bau panas ada kebocoran cairan perubahan warna perubahan bentuk dan keanehan lainnya pada produk yang tidak muncul sebelumnya Saat cairan dari dalam baterai bocor dan masuk ke mata jangan mengusap mata dan segera bilas mata dengan menggunakan air bersih seperti air ke...

Страница 45: ...0 5 W daya listrik saat steker disambungkan ke stop kontak Melepaskan steker saat alat pengisi daya tidak digunakan dapat membantu penghematan daya listrik yang terbuang percuma Lakukan tindak pencegahan berikut ini saat menyimpan baterai Lepaskan baterai dari unit dasar dan isi penuh daya baterai sebelum produk disimpan Benda benda tajam kaca pisau cukur dan benda serupa Jangan mengoleskan peluma...

Страница 46: ...alaman acuan ID 6 ID 6 PEMECAHAN MASALAH Gejala Lihat bagian ini terlebih dahulu Produk tidak berfungsi Gerakannya aneh Waktu penggunaan lebih pendek Tombol sudah ditekan namun produk tidak langsung berhenti Terdengar suara yang tidak biasa Daya penghisapan menjadi lemah selama penggunaan pada setelan High Daya hisap lemah Produk berhenti berfungsi selama digunakan Lampu perawatan saringan merah b...

Страница 47: ...ai dengan 40ºC selama penggunaan tetapi peningkatan suhu ini adalah hal yang Pengisi daya atau baterai menjadi panas saat proses pengisian daya Udara yang keluar dari bagian badan penghisap debu adalah udara yang berbau Gejala Lihat bagian ini terlebih dahulu Cek rincian rincian di bawah ini sebelum meminta jasa perbaikan atau menghubungi kami untuk mengajukan pertanyaan Panas Rangkaian wadah pena...

Страница 48: ...ไฟไหม หรือไฟดูด หน า TH 21 22 TH 1 หน า อ างอิง หน า TH 6 หน า TH 6 อาการ ตรวจสอบที นี ป ญ หาที เ กิ ด กั บ ตั ว เคร อ งดู ด ฝุ น ระหว า งการทำงาน การชาร จ แบตเตอรี ใน การแก ไขป ญหาเบื องต น ระดับแบตเตอรี เหลือต ำ ชาร จแบตเตอรี ติดตั งแบตเตอรี กับตัวเคร องดูดฝุ นถูกต องไหม ถอดแบตเตอรี ออกจากเคร องดูดฝุ น รอสักประมาณหนึ งนาทีแล วจึงใส แบตเตอรี กลับ เข าไปใหม และรีสตาร ทเคร อง วงจรของเคร องดูดฝุ นจะ...

Страница 49: ...องเคร องดูดฝุ นอาจเพิ มขึ นถึงประมาณ 40 องศาเซลเซียสระหว างการทำงาน ไม ใช เร องผิดปกติ อาการ ตรวจสอบที นี ตรวจสอบรายละเอียดด านล าง ก อนการติดต อ ขอรับบริการซ อมแซมหรือ การติดต อสอบถาม ร อ น ชิ น ส ว นของถั ง เก บ ฝุ น หั ว ดู ด ฝุ น และ แปรงหมุ น มี ก ลิ น อ น ๆ TH 22 หน า TH 7 ขั วไฟ ขั วไฟ ขั วไฟ ห ามทำสิ งนี ต องทำสิ งนี ต องปฏิบัติตามคำแนะนำต อไปนี ข อควรระวัง รายละเอียดเกี ยวกับสิ งที พึงปฏิ...

Страница 50: ...กลิ นผิดปกติ แบตเตอรี ร อน มีของเหลวรั วไหลออกมา สีเปลี ยน รูปร างบิดเบี ยวและ ความผิดปกติอ นใดที ไม เคยปรากฎมาก อน อาจเกิดความร อน ควัน ระเบิด หรือประกายไฟได ห ามสัมผัสแบตเตอรี ด วยมือเป ยก อาจเกิดความร อน ประกายไฟ หรือ ถูกไฟดูดได ถ าของเหลวในแบตเตอรี รั วไหลและสัมผัสกับผิวหนังหรือเสื อผ า รีบล างออกด วยน ำสะอาด เช น น ำประปา ทันที อาจเกิดอันตรายต อผิวหนัง เก บแบตเตอรี ในที ๆ ห างจากมือเด ก เลิกช...

Страница 51: ...ดฝุ นไร สายนี ผลิตมาเพ อการใช งานภายใน ครัวเรือน ไม ใช ในกิจการเชิงพาณิชย นอกจากนี ต องไม ใช งานเคร องเพ อจุดประสงค อ นใด นอกเหนือ จากการทำความสะอาด มีกรณีที การทำงานของผลิตภัณฑ ทำให เกิดสัญญาณ รบกวนปรากฏบนหน าจอโทรทัศน แต ไม มีผลเสียหาย ต อโทรทัศน แต อย างใด กรณีที ไม ได ใช ผลิตภัณฑ เป น เวลานาน ต องถอดแบตเตอรี ออกจากแท นชาร จ และชาร จให เต มก อนจัดเก บแบตเตอรี แนะนำให ถอดเต าเสียบของแท นชาร จออก...

Страница 52: ...น และ ท อ ที กล าวถึงข างต นจัดเป นอุปกรณ เสริมเช นกัน หน า TH 7 TH 5 ฝาปิดแปรงหมุน การถอดชิ นส วน ข อควร ระวัง ล อเลื อน ฝาปิดแปรงหมุน ปุ มปลดล อค สายพาน เกียร การบำรุงรักษา หัวดูดฝุ น ตัวเครื องดูดฝุ น หัวดูดแยกส วน และขั วไฟของเครื องชาร ไฟ หัวดูดฝุ น แปรงหมุน เมื อมีเศษสำลี ยางรัด เศษผมหรือขนสัตว เข าไปติด การกำจัดเศษสิ งสกปรก วิธีทำความสะอาดตัวเครื อง สวิตช ลูกกลิ ง แผ นรองลดการกระแทก หัวดูดเ...

Страница 53: ...วนานขึ นถ าชาร จก อนที จะลดลงอยู ในระดับต ำ การปล อยให แบตเตอรี คลายประจุโดยไม มีการชาร จเพิ ม จะทำให แบตเตอรี เสื อมได 2 1 หลอดไฟแสดงสถานะของตัวเครื องดูดฝุ น TH 7 หน า TH 4 หน า TH 13 14 หน า TH 15 16 หน า หลอดไฟแสดงระดับแบตเตอรี จะสว างในสถานการณ ต อไปนี หลอดไฟจะไม สว างถ าไม มีประจุไฟเหลืออยู ในแบตเตอรี ประมาณ 5 วินาทีหลังจากแบตเตอรี ถูกใส กลับเข าไปในตัวเครื องดูดฝุ น ระหว างใช ผลิตภัณฑ เพื อ...

Страница 54: ...ไฟแจ งเตือนการดูแลไส กรอง สีแดง ติดถี ๆ ไส กรองตาข าย ส วนล าง ไส กรองตาข าย ส วนบน ไส กรองจีบ ดึงที จับไปทางซ าย ยกส วนฝาขึ น กดตะขอปลดกระบอกเก บฝุ น สีเหลือง ฝาครอบไส กรอง ส วนสันจีบ ฝาครอบไส กรอง กระบอกเก บฝุ น ตะขอปลดกระบอก เก บฝุ น สีเหลือง สีเหลือง ฝุ น ส วนฝา หมุนและถอดไส กรองตาข าย ส วนบนและส วนล าง การถอดไส กรองจีบ การถอดกระบอกเก บฝุ น เมื อแรงดูดอ อน ผลิตภัณฑ หยุดการทำงาน การถอดชิ นส วน ...

Страница 55: ...ตเตอรี เข าตัวเครื องดูดฝุ น หมายเหตุ ในกรณีที ไม สามารถทำการชาร จไฟ ให ตรวจสอบดังต อไปนี ถอดแบตเตอรี ออกจาก แท นชาร จ สอดแบตเตอรี เข าตัว เครื องดูดฝุ น อายุการใช งานต อเนื อง คลิ ก สอดแบตเตอรี ตามแนวร องบนตัวเครื องดูดฝุ น กดลงจนมีเสียงดัง คลิ ก ปรับขั วไฟให ตรงกัน เวลาของการชาร จอาจจะยาวนานขึ นในกรณีต อไปนี เมื อไม ได ใช งานเป นเวลานาน แบตเตอรี ถูกชาร จในสภาพแวดล อมที มีอุณหภูมิต ำ ประมาณ 5 องศ...

Страница 56: ...สวิตช ลูกกลิ ง ขณะที การทำงานหยุดชั วคราว อาจได รับบาดเจ บเม อแปรงหมุนเริ มทำงาน ต องแน ใจว ากดปุ ม เพ อหยุดการทำงานเวลาทำความสะอาดหัวดูดฝุ น การดูดฝุ น หน า TH 13 14 หน า TH 7 หน า TH 17 TH 9 MAX MAX การนำกระบอกเก บฝุ นออกมาเททิ ง คำแนะนำเกี ยวกับ การนำขยะออกมาทิ ง เม อระดับของเศษสิ งสกปรก สะสมขึ นถึงเส น MAX สูงสุด ไส กรองตาข าย เส น MAX เทเศษสิ งสกปรกทิ งก อนที ระดับของการสะสมจะสูงกว า ความสูงข...

Страница 57: ...ที เทเศษ สิ งสกปรกทิ งหรือ ตอนทำความสะอาด หน า TH 15 16 หน า TH 15 16 TH 14 เทคนิคการใช งานเคร องดูดฝุ นเคร องนี เคล อนที หัวแปรงดูดฝุ นไปบนพื นโดย วิธีการไถลไปอย างช าๆ วิธีนี ทำให ดูดฝุ นได มากกว าการขยับหัวดูดไปข างหน า ข างหลังการถูไปมาอย างรวดเร ว นอกจากนี ยังป องกัน รอยขีดข วนบนตัวเคร องดูดฝุ นและพื นผิวอาคารได ด วย แบบท อยาว สำหรับทำ ความสะอาดพื นผิว แบบท อสั น สำหรับทำความสะอาด ขั นบันได ข...

Страница 58: ...วดูดฝุ นคว ำหน าลง แล วเพ อหยุดการทำงาน กดปุ ม ขณะที ผลิตภัณฑ กำลังเชิดขึ น อาจทำให ฝุ นกระจายออกจากเคร องดูดฝุ น การใช งาน สอดเข าไปให แน นและเริ มใช งาน นำมาต อกัน ปลดออก คลิ ก ปุ มปลด นำมาต อกัน ปลดออก คลิ ก ปุ มปลด หมุนและกดปุ มปลดล อก ที ปลดล อก กด ปุ มปลด เพ อแยกตัวเคร องดูดฝุ นหรือท อกับอุปกรณ เสริมออกจากกัน ข ร ข อควร ระวัง ต องระวังอย าแหย มือหรือนิ วไปใน ส วนข อต อเวลาปรับเปลี ยนมุม ข อต...

Страница 59: ...น เป ยโน ใช งานอุปกรณ เสริมด วยการต อเข ากับเคร องดูดฝุ นหรือท อ สำหรับทำความสะอาดตามซอกมุมของเฟอร นิเจอร และร องหน าต าง นี คือรูที มีไว เพ อการระบาย ความร อนของมอเตอร ไม ให ร อนเกินไป ห ามอุดรูนี เด ดขาด การใช งาน สอดเข าไปให แน นและเริ มใช งาน กด ปุ มปลด เพ อแยกตัวเคร องดูดฝุ น หรือท อกับอุปกรณ เสริมออกจากกัน ต องระวังอย าแหย มือหรือนิ วเข าไปเด ดขาด TH 12 EC A1RA_Tha A4 ai sorted indd 12 2017 ...

Страница 60: ...วิตช ลูกกลิ ง ขณะที การทำงานหยุดชั วคราว อาจได รับบาดเจ บเม อแปรงหมุนเริ มทำงาน ต องแน ใจว ากดปุ ม เพ อหยุดการทำงานเวลาทำความสะอาดหัวดูดฝุ น การดูดฝุ น หน า TH 13 14 หน า TH 7 หน า TH 17 TH 9 MAX MAX การนำกระบอกเก บฝุ นออกมาเททิ ง คำแนะนำเกี ยวกับ การนำขยะออกมาทิ ง เม อระดับของเศษสิ งสกปรก สะสมขึ นถึงเส น MAX สูงสุด ไส กรองตาข าย เส น MAX เทเศษสิ งสกปรกทิ งก อนที ระดับของการสะสมจะสูงกว า ความสูงขอ...

Страница 61: ...ที เทเศษ สิ งสกปรกทิ งหรือ ตอนทำความสะอาด หน า TH 15 16 หน า TH 15 16 TH 14 เทคนิคการใช งานเคร องดูดฝุ นเคร องนี เคล อนที หัวแปรงดูดฝุ นไปบนพื นโดย วิธีการไถลไปอย างช าๆ วิธีนี ทำให ดูดฝุ นได มากกว าการขยับหัวดูดไปข างหน า ข างหลังการถูไปมาอย างรวดเร ว นอกจากนี ยังป องกัน รอยขีดข วนบนตัวเคร องดูดฝุ นและพื นผิวอาคารได ด วย แบบท อยาว สำหรับทำ ความสะอาดพื นผิว แบบท อสั น สำหรับทำความสะอาด ขั นบันได ข...

Страница 62: ...น เมื อหลอดไฟแจ งเตือนการดูแลไส กรอง สีแดง ติดถี ๆ ไส กรองตาข าย ส วนล าง ไส กรองตาข าย ส วนบน ไส กรองจีบ ดึงที จับไปทางซ าย ยกส วนฝาขึ น กดตะขอปลดกระบอกเก บฝุ น สีเหลือง ฝาครอบไส กรอง ส วนสันจีบ ฝาครอบไส กรอง กระบอกเก บฝุ น ตะขอปลดกระบอก เก บฝุ น สีเหลือง สีเหลือง ฝุ น ส วนฝา หมุนและถอดไส กรองตาข าย ส วนบนและส วนล าง การถอดไส กรองจีบ การถอดกระบอกเก บฝุ น เมื อแรงดูดอ อน ผลิตภัณฑ หยุดการทำงาน การถ...

Страница 63: ...รี เข าตัวเครื องดูดฝุ น หมายเหตุ ในกรณีที ไม สามารถทำการชาร จไฟ ให ตรวจสอบดังต อไปนี ถอดแบตเตอรี ออกจาก แท นชาร จ สอดแบตเตอรี เข าตัว เครื องดูดฝุ น อายุการใช งานต อเนื อง คลิ ก สอดแบตเตอรี ตามแนวร องบนตัวเครื องดูดฝุ น กดลงจนมีเสียงดัง คลิ ก ปรับขั วไฟให ตรงกัน เวลาของการชาร จอาจจะยาวนานขึ นในกรณีต อไปนี เมื อไม ได ใช งานเป นเวลานาน แบตเตอรี ถูกชาร จในสภาพแวดล อมที มีอุณหภูมิต ำ ประมาณ 5 องศาเซล...

Страница 64: ...น และ ท อ ที กล าวถึงข างต นจัดเป นอุปกรณ เสริมเช นกัน หน า TH 7 TH 5 ฝาปิดแปรงหมุน การถอดชิ นส วน ข อควร ระวัง ล อเลื อน ฝาปิดแปรงหมุน ปุ มปลดล อค สายพาน เกียร การบำรุงรักษา หัวดูดฝุ น ตัวเครื องดูดฝุ น หัวดูดแยกส วน และขั วไฟของเครื องชาร ไฟ หัวดูดฝุ น แปรงหมุน เมื อมีเศษสำลี ยางรัด เศษผมหรือขนสัตว เข าไปติด การกำจัดเศษสิ งสกปรก วิธีทำความสะอาดตัวเครื อง สวิตช ลูกกลิ ง แผ นรองลดการกระแทก หัวดูดเ...

Страница 65: ...มีอายุยาวนานขึ นถ าชาร จก อนที จะลดลงอยู ในระดับต ำ การปล อยให แบตเตอรี คลายประจุโดยไม มีการชาร จเพิ ม จะทำให แบตเตอรี เสื อมได 2 1 หลอดไฟแสดงสถานะของตัวเครื องดูดฝุ น TH 7 หน า TH 4 หน า TH 13 14 หน า TH 15 16 หน า หลอดไฟแสดงระดับแบตเตอรี จะสว างในสถานการณ ต อไปนี หลอดไฟจะไม สว างถ าไม มีประจุไฟเหลืออยู ในแบตเตอรี ประมาณ 5 วินาทีหลังจากแบตเตอรี ถูกใส กลับเข าไปในตัวเครื องดูดฝุ น ระหว างใช ผลิตภั...

Страница 66: ...กลิ นผิดปกติ แบตเตอรี ร อน มีของเหลวรั วไหลออกมา สีเปลี ยน รูปร างบิดเบี ยวและ ความผิดปกติอ นใดที ไม เคยปรากฎมาก อน อาจเกิดความร อน ควัน ระเบิด หรือประกายไฟได ห ามสัมผัสแบตเตอรี ด วยมือเป ยก อาจเกิดความร อน ประกายไฟ หรือ ถูกไฟดูดได ถ าของเหลวในแบตเตอรี รั วไหลและสัมผัสกับผิวหนังหรือเสื อผ า รีบล างออกด วยน ำสะอาด เช น น ำประปา ทันที อาจเกิดอันตรายต อผิวหนัง เก บแบตเตอรี ในที ๆ ห างจากมือเด ก เลิกช...

Страница 67: ...ฝุ นไร สายนี ผลิตมาเพ อการใช งานภายใน ครัวเรือน ไม ใช ในกิจการเชิงพาณิชย นอกจากนี ต องไม ใช งานเคร องเพ อจุดประสงค อ นใด นอกเหนือ จากการทำความสะอาด มีกรณีที การทำงานของผลิตภัณฑ ทำให เกิดสัญญาณ รบกวนปรากฏบนหน าจอโทรทัศน แต ไม มีผลเสียหาย ต อโทรทัศน แต อย างใด กรณีที ไม ได ใช ผลิตภัณฑ เป น เวลานาน ต องถอดแบตเตอรี ออกจากแท นชาร จ และชาร จให เต มก อนจัดเก บแบตเตอรี แนะนำให ถอดเต าเสียบของแท นชาร จออก ...

Страница 68: ...ไฟไหม หรือไฟดูด หน า TH 21 22 TH 1 หน า อ างอิง หน า TH 6 หน า TH 6 อาการ ตรวจสอบที นี ป ญ หาที เ กิ ด กั บ ตั ว เคร อ งดู ด ฝุ น ระหว า งการทำงาน การชาร จ แบตเตอรี ใน การแก ไขป ญหาเบื องต น ระดับแบตเตอรี เหลือต ำ ชาร จแบตเตอรี ติดตั งแบตเตอรี กับตัวเคร องดูดฝุ นถูกต องไหม ถอดแบตเตอรี ออกจากเคร องดูดฝุ น รอสักประมาณหนึ งนาทีแล วจึงใส แบตเตอรี กลับ เข าไปใหม และรีสตาร ทเคร อง วงจรของเคร องดูดฝุ นจะ...

Страница 69: ...องเคร องดูดฝุ นอาจเพิ มขึ นถึงประมาณ 40 องศาเซลเซียสระหว างการทำงาน ไม ใช เร องผิดปกติ อาการ ตรวจสอบที นี ตรวจสอบรายละเอียดด านล าง ก อนการติดต อ ขอรับบริการซ อมแซมหรือ การติดต อสอบถาม ร อ น ชิ น ส ว นของถั ง เก บ ฝุ น หั ว ดู ด ฝุ น และ แปรงหมุ น มี ก ลิ น อ น ๆ TH 22 หน า TH 7 ขั วไฟ ขั วไฟ ขั วไฟ ห ามทำสิ งนี ต องทำสิ งนี ต องปฏิบัติตามคำแนะนำต อไปนี ข อควรระวัง รายละเอียดเกี ยวกับสิ งที พึงปฏิ...

Страница 70: ...ng không đúng cách được xếp theo các loại sau đây với mục đích là để giải thích rõ VN 21 Và 22 vào lửa hoặc làm nóng VN 21 VN 13 14 VN 15 16 VN 15 16 VN 17 18 VN 6 VN 4 VN 13 14 VN 13 14 VN 15 16 VN 6 VN 6 VN 7 VN 7 VN 1 VN 7 VN 8 VN 14 VN 16 VN 4 Xem trang 6 VN XỬ LÝ SỰ CỐ Hiện tượng Kiểm tra Máy hút bụi không hoạt động di chuyển khác thường Thời gian làm việc ngắn hơn Nhấn nút nhưng máy vẫn khôn...

Страница 71: ...ng Bộ sạc hoặc pin nóng trong lúc đang sạc Khí thải phát ra từ thân máy hút bụi có mùi Hiện tượng Kiểm tra Nóng Lắp ráp hộp chứa bụi Mùi Sự cố khác Đầu hút Bàn chải quay Kiểm tra chi tiết bộ phận theo bảng mô tả dưới đây trước khi yêu cầu sửa chữa hoặc liên hệ để được hướng dẫn VN 2 đầu cuối đầu cuối Tháo phích cắm CẨNTRỌNG 7 VN đầu cuối Để đảm bảo chắc chắn nên theo những lời khuyên này Chi tiết ...

Страница 72: ...ùng với các loại sản phẩm như dây chuyền hoặc ghim tóc Không sử dụng pin khi phát tán mùi nhiệt rò rỉ chất lỏng đổi màu biến dạng và các bất thường khác trước đây chưa thấy Khi chất lỏng bên trong pin rò rỉ và tiếp xúc với mắt không chà xát và ngay lập tức rửa sạch chất lỏng từ mắt bằng nước sạch như nước máy và đến ngay bác sĩ để được điều trị Không sử dụng pin với bất kỳ thiết bị nào khác ngoài ...

Страница 73: ...c ra khỏi ổ cắm điện Bộ sạc tiêu thụ khoảng 0 5 W điện năng khi phích cắm được nối với ổ cắm điện Tháo phích cắm điện khi bộ sạc khi không sử dụng có thể làm giảm lượng điện tiêu thụ tránh lãng phí Xem các biện pháp phòng ngừa khi cất giữ pin Tháo pin ra khỏi bộ phận bệ máy và sạc đầy pin trước khi cất giữ Vải dệt kim Không tra dầu vào bàn chải quay Nguy cơ gây các bộ phận nhựa bị nứt Không để chạ...

Страница 74: ... trên cũng là những phụ kiện VN 17 Nắp bàn chải quay VN 16 Tháo Gỡ Chú ý Bánh xe Nắp bàn chải quay Cần trượt Dây đai bánh răng BẢO TRÌ Đầu hút hụi thân máy hút bụi các vòi hút kèm theo và chân tiếp pin của bộ sạc Đầu hút Bàn chải quay Thân máy hút bụi Đầu hút kèm theo và chân tiếp pin của bộ sạc Sử dụng khi chất bẩn là vải vụn băng cao su tóc hoặc lông thú Lấy bụi ra Bàn chải lăn Miếng đệm Lấy các...

Страница 75: ...p Để pin xả mà không sạc pin sẽ xuống cấp Theo các kiểm tra thử nghiệm được tiến hành dựa trên tiêu chuẩn của Sharp liên tục sạc và số lần sạc xả pin Tuổi thọ pin có thể khác nhau tùy thuộc vào điều kiện và môi trường sử dụng 2 1 7 VN Đèn báo trạng thái trên thân của máy hút bụi Đèn báo chú ý đến bộ lọc màu đỏ Đèn hiển thị mức pin màu xanh lá cây 1 Hiển thị trạng thái Diễn giải Đèn báo Trạng thái ...

Страница 76: ... Đèn báo cần chú ý Bộ lọc màu đỏ thường xuyên sáng lên Không sử dụng chất pha loãng sơn sản phẩm benzen hoặc nước nóng quá 40 C Phải cẩn thận khi đưa bàn chải vào làm vệ sinh vì nếu đưa bàn chải vào làm vệ sinh quá sâu có thể dẫn đến hư hỏng Các bộ Lưới lọc Trên và Dưới có thể có trình tự khác nhau để lấy ra tùy vào cách chúng được kết hợp Lưới lọc trên Lưới lọc dưới Lưới lọc trên bộ lọc gấp nếp C...

Страница 77: ...N 8 4 17 18 VN 6 VN rãnh Lắp pin vào thân máy hút bụi Chú ý Chi tiết về việc sạc pin Lượng pin còn lại ở mức yếu Đèn báo mức pin màu xanh lá cây nhấp nháy là để thông báo trạng thái Không có sự cố nếu thiết bị nhấp nháy trong môi trường có nhiệt độ thấp khoảng 5 C hoặc thấp hơn hoặc ở nhiệt độ cao khoảng 35 C trở lên Sạc pin trong môi trường trong khoảng từ 5 C đến 35 C Thời gian hoạt động dần dần...

Страница 78: ...ưng chạy máy vì có thể gây chấn thương khi bàn chải quay bắt đầu quay Để đảm bảo bạn nhấn vào nút để dừng chạy máy khi làm vệ sinh đầu hút VN 13 Lời khuyên 15 16 VN LÀM SẠCH HỘP CHỨA BỤI Hướng dẫn xử lý bụi Lưới lọc Đề nghị loại bỏ bụi bẩn sau mỗi lần lau chùi vì mục đích vệ sinh Mức MAX MAX Đỏ đèn đã bật Kéo ra khỏi vị trí được mô tả trong hình Chổi quét bụi ở trên thân máy hút bụi sau khi hộp ch...

Страница 79: ...VN 17 VN 17 để hút bụi trên sàn nhà Di chuyển đầu hút bánh xe sang hai bên hoặc theo đường chéo có thể làm trầy xước và để lằn dấu trên bề mặt sàn Máy hút bụi có thể được tạm nghỉ theo các điều kiện được mô tả trong sơ đồ dưới đây khi tạm dừng hút bụi Để máy hút bụi dựa điểm tựa Không để máy hút bụi tựa đồ vật khác khi đang thao tác hút bụi Kiểm tra không có đồ vật nào trong vùng lân cận đặt máy h...

Страница 80: ...uay khi thay đổi góc Gắn thật chắc vào rồi mới sử dụng Bật trong khi bấm nút Nhả Khóa để thay đổi góc Không bấm nút trong khi đang hút bụi với thân máy hút bụi hướng lên Nhấn nút sau khi đầu hút bụi hướng xuống để dừng máy hút bụi Nhấn nút trong lúc máy hút bụi đang hướng lên có thể làm cho bụi bẩn tràn ra ngoài thân máy hút bụi Dùng để hút bụi ở nơi cao như mặt trên đồ vật đặt trên cao Phụ kiện n...

Страница 81: ...áy hút bụi hoặc ống Gắn thật chắc vào rồi mới sử dụng Vòi khía rãnh Để hút bụi khe giữa của đồ nội thất và khe trượt của cửa sổ Không sử dụng máy hút bụi để hút bụi các vật dụng dễ bị xước như Phụ kiện này có thể được sử dụng bằng cách gắn trên thân máy hút bụi hoặc trên ống Đây là lỗ có mục đích ngăn ngừa quá nhiệt của động cơ khi bị bịt kín Không chặn lỗ Cách sử dụng EC A1RA_VN A4 ai sorted indd...

Страница 82: ...ưng chạy máy vì có thể gây chấn thương khi bàn chải quay bắt đầu quay Để đảm bảo bạn nhấn vào nút để dừng chạy máy khi làm vệ sinh đầu hút VN 13 Lời khuyên 15 16 VN LÀM SẠCH HỘP CHỨA BỤI Hướng dẫn xử lý bụi Lưới lọc Đề nghị loại bỏ bụi bẩn sau mỗi lần lau chùi vì mục đích vệ sinh Mức MAX MAX Đỏ đèn đã bật Kéo ra khỏi vị trí được mô tả trong hình Chổi quét bụi ở trên thân máy hút bụi sau khi hộp ch...

Страница 83: ...VN 17 VN 17 để hút bụi trên sàn nhà Di chuyển đầu hút bánh xe sang hai bên hoặc theo đường chéo có thể làm trầy xước và để lằn dấu trên bề mặt sàn Máy hút bụi có thể được tạm nghỉ theo các điều kiện được mô tả trong sơ đồ dưới đây khi tạm dừng hút bụi Để máy hút bụi dựa điểm tựa Không để máy hút bụi tựa đồ vật khác khi đang thao tác hút bụi Kiểm tra không có đồ vật nào trong vùng lân cận đặt máy h...

Страница 84: ...Đèn báo cần chú ý Bộ lọc màu đỏ thường xuyên sáng lên Không sử dụng chất pha loãng sơn sản phẩm benzen hoặc nước nóng quá 40 C Phải cẩn thận khi đưa bàn chải vào làm vệ sinh vì nếu đưa bàn chải vào làm vệ sinh quá sâu có thể dẫn đến hư hỏng Các bộ Lưới lọc Trên và Dưới có thể có trình tự khác nhau để lấy ra tùy vào cách chúng được kết hợp Lưới lọc trên Lưới lọc dưới Lưới lọc trên bộ lọc gấp nếp Cầ...

Страница 85: ... 8 4 17 18 VN 6 VN rãnh Lắp pin vào thân máy hút bụi Chú ý Chi tiết về việc sạc pin Lượng pin còn lại ở mức yếu Đèn báo mức pin màu xanh lá cây nhấp nháy là để thông báo trạng thái Không có sự cố nếu thiết bị nhấp nháy trong môi trường có nhiệt độ thấp khoảng 5 C hoặc thấp hơn hoặc ở nhiệt độ cao khoảng 35 C trở lên Sạc pin trong môi trường trong khoảng từ 5 C đến 35 C Thời gian hoạt động dần dần ...

Страница 86: ...trên cũng là những phụ kiện VN 17 Nắp bàn chải quay VN 16 Tháo Gỡ Chú ý Bánh xe Nắp bàn chải quay Cần trượt Dây đai bánh răng BẢO TRÌ Đầu hút hụi thân máy hút bụi các vòi hút kèm theo và chân tiếp pin của bộ sạc Đầu hút Bàn chải quay Thân máy hút bụi Đầu hút kèm theo và chân tiếp pin của bộ sạc Sử dụng khi chất bẩn là vải vụn băng cao su tóc hoặc lông thú Lấy bụi ra Bàn chải lăn Miếng đệm Lấy các ...

Страница 87: ... sạc ở mức thấp Để pin xả mà không sạc pin sẽ xuống cấp Theo các kiểm tra thử nghiệm được tiến hành dựa trên tiêu chuẩn của Sharp liên tục sạc và số lần sạc xả pin Tuổi thọ pin có thể khác nhau tùy thuộc vào điều kiện và môi trường sử dụng 2 1 7 VN Đèn báo trạng thái trên thân của máy hút bụi Đèn báo chú ý đến bộ lọc màu đỏ Đèn hiển thị mức pin màu xanh lá cây 1 Hiển thị trạng thái Diễn giải Đèn b...

Страница 88: ...ng với các loại sản phẩm như dây chuyền hoặc ghim tóc Không sử dụng pin khi phát tán mùi nhiệt rò rỉ chất lỏng đổi màu biến dạng và các bất thường khác trước đây chưa thấy Khi chất lỏng bên trong pin rò rỉ và tiếp xúc với mắt không chà xát và ngay lập tức rửa sạch chất lỏng từ mắt bằng nước sạch như nước máy và đến ngay bác sĩ để được điều trị Không sử dụng pin với bất kỳ thiết bị nào khác ngoài m...

Страница 89: ... ra khỏi ổ cắm điện Bộ sạc tiêu thụ khoảng 0 5 W điện năng khi phích cắm được nối với ổ cắm điện Tháo phích cắm điện khi bộ sạc khi không sử dụng có thể làm giảm lượng điện tiêu thụ tránh lãng phí Xem các biện pháp phòng ngừa khi cất giữ pin Tháo pin ra khỏi bộ phận bệ máy và sạc đầy pin trước khi cất giữ Vải dệt kim Không tra dầu vào bàn chải quay Nguy cơ gây các bộ phận nhựa bị nứt Không để chạm...

Страница 90: ...ng không đúng cách được xếp theo các loại sau đây với mục đích là để giải thích rõ VN 21 Và 22 vào lửa hoặc làm nóng VN 21 VN 13 14 VN 15 16 VN 15 16 VN 17 18 VN 6 VN 4 VN 13 14 VN 13 14 VN 15 16 VN 6 VN 6 VN 7 VN 7 VN 1 VN 7 VN 8 VN 14 VN 16 VN 4 Xem trang 6 VN XỬ LÝ SỰ CỐ Hiện tượng Kiểm tra Máy hút bụi không hoạt động di chuyển khác thường Thời gian làm việc ngắn hơn Nhấn nút nhưng máy vẫn khôn...

Страница 91: ...ng Bộ sạc hoặc pin nóng trong lúc đang sạc Khí thải phát ra từ thân máy hút bụi có mùi Hiện tượng Kiểm tra Nóng Lắp ráp hộp chứa bụi Mùi Sự cố khác Đầu hút Bàn chải quay Kiểm tra chi tiết bộ phận theo bảng mô tả dưới đây trước khi yêu cầu sửa chữa hoặc liên hệ để được hướng dẫn VN 2 đầu cuối đầu cuối Tháo phích cắm CẨNTRỌNG 7 VN đầu cuối Để đảm bảo chắc chắn nên theo những lời khuyên này Chi tiết ...

Страница 92: ... LL1 2 Gedung No 01 Desa Sirnabaya Kec Teluk Jambe Timur Kabupaten Karawang 41361 บริษัท ชาร ป ไทย จำกัด 6 10 อาคารพิพัฒนสิน ชั น 19 20 ซอยพัฒนสิน ถนนนราธิวาสราชนครินทร แขวงทุ งมหาเมฆ เขตสาทร กรุงเทพฯ 10120 http www sharpthai co th โทรศัพท 0 2855 8899 แฟกซ 0 2855 8500 ศูนย ลูกค าสัมพันธ 0 2855 8888 M EC A1RA_Hyo_contens_A4 ai sorted indd 4 2017 07 07 14 39 45 ...

Отзывы: