background image

– 29 –

EN

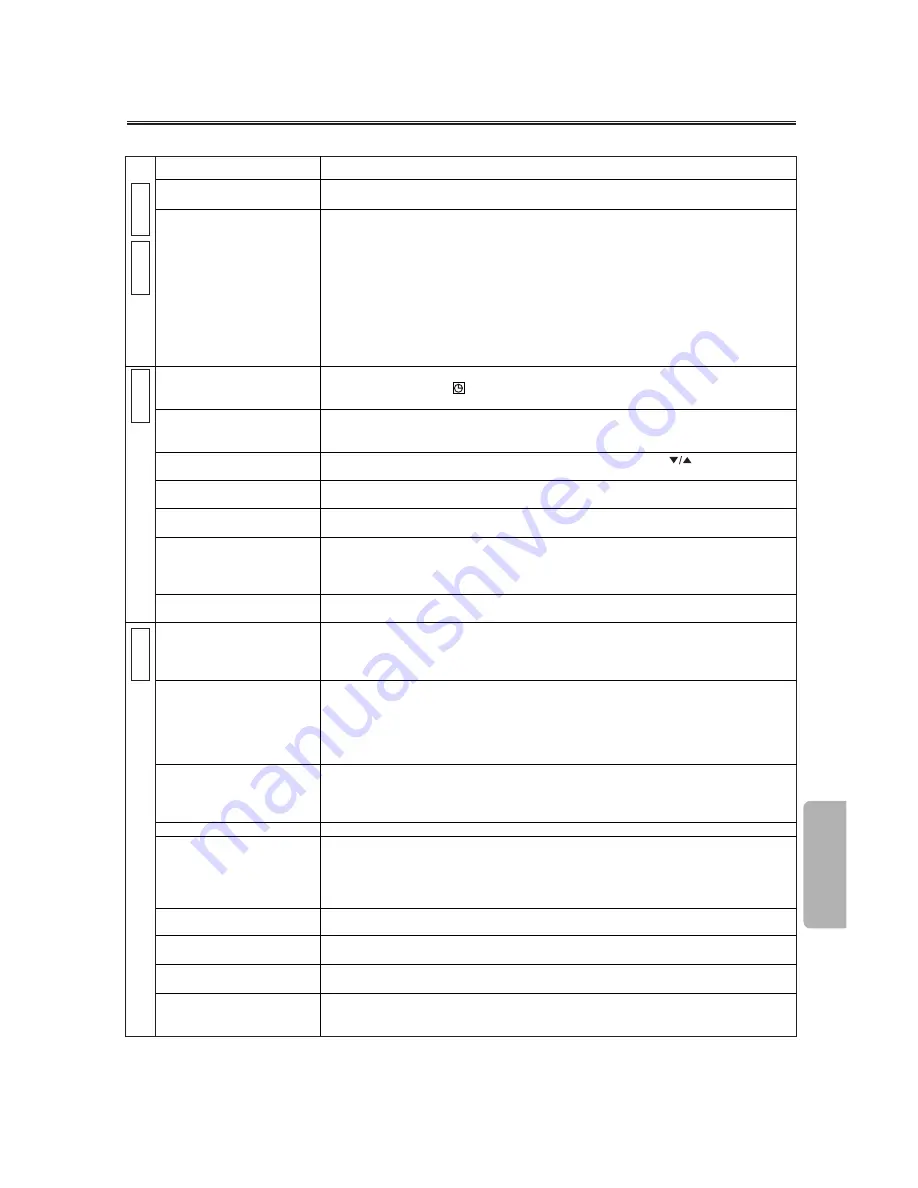
Troubleshooting Guide

If this unit does not perform properly when operated as instructed in this Operation Manual, check this unit con-
sulting the following checklist.

Some functions are not available in specific modes, but this is not a malfunction. Read the description in this Operation
Manual for details on correct operations.

Playback from a desired track and random playback are not available during program playback.

Some functions are prohibited on some discs.

V

C
R

D

V

D

D

V

D

V

C
R

CORRECTIVE ACTION

• Make sure the power plug is connected to an AC outlet.
• Make sure the power is turned on.
• Check if the power plug is connected to an AC outlet.
• Check the batteries in the remote control.
• Aim the remote control directly at the remote sensor. If necessary, remove all the 

obstacles between the sensor and the remote.

• You have to be within 23 feet of this unit.
• Check if the right mode is selected. If it’s not in the right mode, press the DVD or VCR

buttons, whichever you need, on the remote control.

• Check if a cassette tape is in this unit.
• Tune your radio to an empty AM station so that you hear a lot of noises. Turn the vol-

ume up, then. If you hear some signal sound from the radio in response to your press-
ing buttons on the remote, the remote control is working.

• Make sure the timer recording is set correctly.
• Make sure the TIMER and 

lights appear on the VCR/DVD. If not, press the SUBTITLE/T-SET button.

• Make sure the VCR clock is set correctly.
• Make sure the tape has a safety tab. If needed, cover the hole with cellophane tape.
• Activate this unit in VCR mode. Press the VCR button on the remote control so that

the green VCR OUTPUT light is lit.

• Adjust tracking control for a better picture by pressing the CH 

buttons on the VCR/DVD or the SKIP/CH.(

K

/

L

) buttons on the remote control.

• Head cleaning may be necessary. Refer to “AUTO HEAD CLEANING” .
• Make sure the VCR is not in the Menu mode.
• Change the RF output channel to CH4. Then select the same channel on the TV.
• Fine tune your TV.
• Re-check the ANT. IN and ANT. OUT connections. See pages 1 and 7.
• Press the VCR/TV button.
• Press the VCR button on the remote control to activate it in the VCR mode. Check if the green

VCR OUTPUT light is lit. Then, set it to the TV position by pressing the VCR/TV button.

• You cannot copy a copyrighted video tape. You are experiencing copy guard protection.

• Connect the video cables firmly.
• Insert a correct video disc that plays on this unit.
• Press the DVD button on the remote control. Check if the DVD OUTPUT light is lit.

Then try other DVD features.

• Insert the disc.
• Clean the disc.
• Place the disc correctly with the label side up.
• Cancel the parental lock or change the control levels.
• Handle a disc with special care so that it does not have fingerprints, scratches, or dusts 

on its surface.

• Connect the audio cables firmly.
• Turn the power of the audio component on.
• Correct the audio output settings.
• Correct the input settings on the audio component.
• Use a DIGITAL AUDIO OUT jack when outputting the DTS audio.
• Connect this unit directly to the TV.
• There are some cases where pictures may be slightly distorted, and those are not a sign 

of a malfunction.

• Although pictures may stop for a moment, this is not a malfunction.
• Check if the INTERLACE/PROGRESSIVE mode is set correctly according to your TV. See page 9.
• The selected language is not available for audio or subtitles on the DVD.

This is not a malfunction.

• The DVD does not contain sequences recorded from different camera angles.

This is not a malfunction.

• The DVD does not contain audio source or subtitles in the selected language.

This is not a malfunction.

• That operation is prohibited by this unit or the disc. This is not a malfunction.

(

)

PROBLEM

No power.

This unit does not respond to 
the remote control.

Timer recording is impossible.

Cannot go into Record mode.

Playback picture is partially
noisy.
Cannot view a tape but the
audio is OK.
No, or poor, playback picture.

TV programs cannot be seen
normally.

Video or color fades in and out when
making a copy of a video tape.

No picture.

Disc cannot be played.

No sound.

No DTS audio is output.
Distorted picture.

Audio or subtitle language
does not match the set up.
The camera angle cannot be
changed.
Audio or subtitle language
cannot be changed.
“Prohibited icon” appears on
the screen, prohibiting an
operation.

Inf

ormation

Содержание DV-NC150U

Страница 1: ...INSTRUCCIONES EN ESPAÑOL INCLUIDAS Precautions DVD Functions Setup VCR Functions Information Español Basic TV Connection ANT OUT ANT IN Round Coaxial cable supplied AC outlets 5 Plug in 4 From TV From VCR DVD Please refer to Connections on page 7 or Cable Signal Cable Signal Back of VCR DVD Back of TV or Antenna 2 Connect 3 Connect Back of TV Disconnect Antenna ...

Страница 2: ...pursuant to Part 15 of the FCC Rules These limits are designed to provide reasonable protection against harmful interference in a residential installation This equipment generates uses and can radiate radio frequency energy and if not installed and used in accordance with the instructions may cause harmful interference to radio communications However there is no guar antee that interference will n...

Страница 3: ...enna Grounding If an outside antenna or cable system is connected to the video product be sure the antenna or cable system is grounded so as to provide some protection against voltage surges and built up static charges Article 810 of the National Electrical Code ANSI NFPA No 70 provides information with regard to proper grounding of the mast and supporting structure grounding of the lead in wire t...

Страница 4: ...ge Audio Language Camera Angle Stereo Sound Mode 22 Black Level Setting Virtual Surround 23 DVD Set Up 23 LANGUAGE Setting 24 DISPLAY Setting 24 AUDIO Setting 25 PARENTAL Setting 26 To return the All Selections of SET UP except for PARENTAL to the Default Setting 26 Information Language List 27 Specifications 28 Service Information 28 Troubleshooting Guide 29 Español 30 Importantes Medidas de Segu...

Страница 5: ...n the cassette compartment Location and Handling Location and Handling Do not cover or place the VCR DVD in enclosed spaces to prevent excessive temperature build up Do not place the VCR DVD in direct sunlight or near heat sources Depending on the use environment the temperature of the VCR DVD may increase slightly This is not a malfunction Keep the VCR DVD away from strong magnetic objects Do not...

Страница 6: ...p unit DISC HANDLING Handle the discs so that fingerprints and dust do not adhere to the surfaces of the discs Always store the disc in its protective case when it is not used AUTO HEAD CLEANING Automatically cleans video heads as you insert or remove a cassette so you can see a clear picture Playback picture may become blurred or interrupted while the TV program reception is clear Dirt accumulate...

Страница 7: ... Playable Discs Unplayable Discs On the following discs only the sound can be heard picture cannot be viewed CDV CD G NEVER play back the following discs Otherwise malfunction may result DVD RAM CD I Photo CD Video CD DVD with region codes other than 1 or ALL DVD ROM for personal computers CD ROM for personal computers On the following disc the sound MAY NOT be heard Super Audio CD Any other discs...

Страница 8: ...le you are recording on the VCR DVD press the VCR TV but ton so that the VCR light disappears on the VCR DVD 2 At the cable box or satellite box select the channel you want to view ANT OUT ANT IN Back of VCR DVD IN OUT E Back of TV Cable Signal Connection A Cable box or Satellite box Round Coaxial cable supplied ANT OUT ANT IN Round Coaxial cable supplied Round Coaxial cable Back of TV IN OUT Cabl...

Страница 9: ... VCR DVD VCR S VIDEO OUT COMPONENT VIDEO OUT AUDIO IN VIDEO IN AUDIO OUT VIDEO OUT L L Y CB PB CR PR L R R R AUDIO IN L R VCR DVD VCR AUDIO IN VIDEO IN AUDIO OUT VIDEO OUT L L R R DIGITAL AUDIO OUT COAXIAL AUDIO OUT DVD S VIDEO OUT COMPONEN VIDEO OUT L R or VIDEO IN VCR DVD VCR AUDIO IN VIDEO IN AUDIO OUT VIDEO OUT L L R R S VIDEO IN DIGITAL AUDIO OUT COAXIAL AUDIO OUT DVD S VIDEO OUT COMPONENT VI...

Страница 10: ...nce playback one frame at a time To pause disc playback To pause disc playback To pause tape playback or recording To stop playback To stop playback To stop playback or recording To skip chapters To skip tracks To return to the top file of the highest hierarchy in the program and MP3 menu MP3 To change channels To adjust the tracking manually during playback To begin disc playback To begin disc pl...

Страница 11: ...up when playing back in slow mode DVD Displays how long the current title or track has been played back When a chapter or track is switched the number of a new title chapter or track is displayed Lights up when the ALL repeat function is on GROUP P SCAN DVD CD Lights up when the progressive scan system is activated MP3 MP3 CD CD DVD V DVD V Lights up when the inserted cassette is being played back...

Страница 12: ...s unit by using the SKIP CH K L buttons If AUTO SET UP appears on the TV screen again check the cable connections Then press the B button once again Y Yes es Press the MENU button to exit Refer to Hint for Cable Box or Satellite Box section on page 8 Do you connect the cable from the cable box or the satellite box to the VCR DVD s ANT IN jack YES NO Turn on the unit for the first time TV Screen Re...

Страница 13: ...ing another 1 While you are recording on the VCR DVD press the VCR TV button so that the VCR light disappears on the VCR DVD 2 At the cable box or satellite box select the channel you want to view If you have connect ed the VCR DVD to a cable box or satel lite box refer to Hint for Cable Box or Satellite Box section on page 8 STOP EJECT A You can select a fixed recording time by press ing the REC ...

Страница 14: ...EL REC SPEED AM B PM Select AM or PM 7 7 Repeat the procedure in steps 5 and 6 to set the end time Select the desired channel Timer Recording If you have connected the VCR DVD to a cable box or satellite box as the Connection A on page 8 select the VCR to channel 3 or 4 the RF output channel of the VCR Then select the desired channel at the cable box or satellite box Leave the cable box or satelli...

Страница 15: ...en you receive a broadcast on the VCR you can check the type of the broadcast by pressing the DISPLAY button When TV STEREO or SAP selection is valid select them by following steps This selection is needed when you record the pro gram SAP means Second Audio Program usually second lan guage Type of broadcast Regular monaural audio Bilingual broadcast Stereo Bilingual broadcast Stereo broadcast Disp...

Страница 16: ...SELECT AUDIO OUT TV STEREO ON SAP Hint Hint To cancel Auto Repeat follow steps 1 2 above Then press the B button so that OFF appears beside AUTO REPEAT Press the CLEAR C RESET button to exit If menu remains on the TV screen at step 3 press the CLEAR C RESET button to exit You can repeat playback of a whole tape automatically Insert a tape into this unit VCR VCR VCR Pro 1 Pro 2 Pro 3 Pro 4 Pro 5 02...

Страница 17: ... mode VR mode VR mode DVD V DVD V 2 2 Hint Hint When you play an MP3 file details on page 19 A prohibited icon may appear at the top right on the TV screen when the operation is prohibited by the disc or this unit Some DVDs may be played from title 2 or 3 due to specific pro grams During the playback of a two layered disc pic tures may stop for a moment This happens while the 1st layer is being sw...

Страница 18: ...ross the screen 4 To exit zoom mode press the ZOOM button to select OFF DVD V DVD V VR mode VR mode VR mode DVD V DVD V x2 x4 Hint Hint ORIGINAL A list of titles which are recorded with a DVD recorder PLAYLIST A list of titles which is made based on the ORIGINAL edited list Hint Hint Zooming function does not work while the disc menu is showing up x4 zoom is not available on some discs Playing the...

Страница 19: ...of the current chapter Remaining time of the current chapter Elapsed time of the current title Remaining time of the current title Layer numbers appears only when playing a two layered Disc L0 Layer 0 is playing L1 Layer 1 is playing If you are playing a DVD RW with setting the PLAYLIST the following will also be dis played ORG Playing the ORIGINAL PL Playing the PLAYLIST DVD MP3 MP3 TRACK 01 1 36...

Страница 20: ...itle Chapter Search Using the SEARCH Using the SEARCH MODE MODE b button utton DVD DVD V DVD V VR mode VR mode VR mode DVD V DVD V 1 1 2 2 Within 30 seconds 12 12 x1 Press once for the chapter search x2 Press twice for the title search 1 2 3 4 5 6 7 8 9 0 10 SEARCH MODE SEARCH MODE 1 2 3 4 5 6 7 8 9 0 10 1 2 3 4 5 6 7 8 9 0 10 1 1 PLAY TR 1 TR 2 TR 3 TR 4 Current Track TR SKIP SKIP Using the SKIP ...

Страница 21: ... 2 ENTER Point B should be in the same title or track as point A is Up to 99 programs can be stored While a MP3 folder is open For the next hierarchy press the B button For the previous hierarchy press the s button CHAPTER TITLE ALL OFF current chapter repeat current title repeat entire disc repeat repeat off DVD V DVD V VR mode VR mode VR mode Hint Hint If you want to repeat the current track in ...

Страница 22: ...r pressing the AUDIO or SUBTITLE T SET button several times the disc may not have that language However some discs allow audio lan guage or subtitle language setting on the disc menu Operation varies depending on the discs so refer to the manual along with the disc When NOT AVAILABLE appears on the TV screen it means no subtitle is recorded on the scene If you choose a language that has a 3 letter...

Страница 23: ...R MENU TV ASPECT DOLBY DIGITAL or DTS section on pages 23 25 You can change the DVD player s settings SETUP MENU SETUP MENU Confirm that QUICK is selected You can select the PLAYER MENU TV ASPECT DOLBY DIGITAL or DTS from the QUICK SETUP menu quickly ENTER LANGUAGE menu AUDIO menu DISPLAY menu PARENTAL menu DVD Set Up DVD P24 Step 5 P24 Step 5 P25 Step 5 A B C page 24 A page 24 B page 25 C page 26...

Страница 24: ...F 4 3 LETTER BOX AUTO OFF OFF Select the desired setting or ENTER STILL MODE Default AUTO See Tips to the right TV ASPECT 4 3 LETTER BOX STILL MODE AUTO ANGLE ICON ON PROGRESSIVE OFF STILL MODE AUTO FIELD FRAME Select the desired setting or ENTER ENTER ENTER ENTER ENTER DISPLAY TV ASPECT 4 3 LETTER BOX STILL MODE AUTO ANGLE ICON ON PROGRESSIVE OFF ENTER Hint Hint 1 Language options are not availab...

Страница 25: ...ICK DRC ON DOWN SAMPLING ON DOLBY DIGITAL BITSTREAM DTS OFF OFF ON BITSTREAM OFF ENTER ENTER DOWN SAMPLING Default ON Set to ON when outputting in 48 kHz Set to OFF when outputting the original sound DRC ON DOWN SAMPLING ON DOLBY DIGITAL BITSTREAM DTS OFF ON ON DPCM OFF DRC ON DOWN SAMPLING ON DOLBY DIGITAL BITSTREAM DTS OFF ON OFF BITSTREAM OFF Hint Hint DRC This function is available only on the...

Страница 26: ... 3 LETTER BOX BITSTREAM OFF INITIALIZE Initialize NO YES 1 2 3 4 5 6 7 8 9 0 1 2 3 4 5 6 7 8 9 0 PARENTAL menu 4 4 PARENTAL PASSWORD Please enter a 4 digit password 5 5 PARENTAL Setting Parental Control limits the disc viewing that exceed your settings if an incorrect password is entered the disc will not play This feature prevents your children from viewing inappropriate materials P Parental aren...

Страница 27: ...acedonian 5957 Malagasy 5953 Malay 5965 Malayalam 5958 Maltese 5966 Maori 5955 Marathi 5964 Moldavian 5961 Mongolian 5960 Nauru 6047 Nepali 6051 Norwegian NOR 6061 O R Occitan 6149 Oriya 6164 Oromo Afan 6159 Panjabi 6247 Pashto Pushto 6265 Persian 5247 Polish 6258 Portuguese POR 6266 Quechua 6367 Rhaeto Romance 6459 Romanian RUM 6461 Russian RUS 6467 S Samoan 6559 Sangho 6553 Sanskrit 6547 Scots G...

Страница 28: ... Coaxial digital audio output One pin jack 500mVpp 75 Ω Component output Y output level 1Vp p 75Ω CB PB output level 0 7Vp p 75Ω CR PR output level 0 7Vp p 75Ω VCR section NUMBER OF VIDEO HEADS 4 VIDEO SIGNAL STANDARD NTSC color system AUDIO RECORDING SYSTEM 1 Stationary head for liner audio 2 Rotary heads for Hi Fi stereo WOW AND FLUTTER Below the measurement limitation 0 001 W PEAK JEITA CHANNEL...

Страница 29: ...d 7 Press the VCR TV button Press the VCR button on the remote control to activate it in the VCR mode Check if the green VCR OUTPUT light is lit Then set it to the TV position by pressing the VCR TV button You cannot copy a copyrighted video tape You are experiencing copy guard protection Connect the video cables firmly Insert a correct video disc that plays on this unit Press the DVD button on th...

Страница 30: ...IGROSA COMO LOS RAYOS LASER UTILIZADOS EN ESTA UNIDAD PUEDEN RESULTAR PERJUDICIALES PARA SUS OJOS NO INTENTE DESARMAR EL GABINETE SOLICITE EL SERVICIO UNICAMENTE A PERSONAL CUALIFICADO ADVERTENCIA Las reglas de la FCC Comisión Federal de Comunicaciones estip ulan que cualquier modificación o cambio a este equipo no aprobado expresamente por el fabricante podrá anular la autorización del usuario pa...

Страница 31: ...na exterior o sistema de cable es conectado al aparato de vídeo asegúrese de que la antena o el cableado tenga conexión tierra para conseguir de esta manera una pro tección contra voltajes no deseados y cargas estáticas El artículo 810 del Código de Electricidad Nacional ANSI NFPA número 70 proporciona información acerca de la manera adecuada de conexiones a tierra de la estructura del mástil y la...

Страница 32: ...morizados en esta unidad con los botones SKIP CH K L Si aparece de nuevo AJUSTE AUTO en la pantalla del televisor compruebe las conexiones de los cables y luego pulse otra vez el botón B Si Si Pulse el botón MENU para salir Conecta el cable de la caja de canales de cable o la caja de satélite en la toma ANT IN de VCR DVD SI NO Pantalladeltelevisor Mando a distancia VCR VCR o VCR Consulte la Conexi...

Страница 33: ...USTE DE RELOJ MES DIA AÑO 0 3 1 5 LUN 2 0 0 4 HORA MINUTO AM PM 0 5 AJUSTE DE RELOJ MES DIA AÑO 0 3 1 5 LUN 2 0 0 4 HORA MINUTO AM PM 0 5 4 0 AJUSTE DE RELOJ MES DIA AÑO 0 3 1 5 LUN 2 0 0 4 HORA MINUTO AM PM 0 5 4 0 P M AM B PM Seleccione el año actual Seleccione AM o PM 8 8 Para salir de la pantalla AJUSTE DE RELOJ Seleccione la hora actual Seleccione los minutos actuales o o o o 3 3 4 4 5 5 6 6 ...

Страница 34: ...en avance retroceso en un disco Para el avance retroceso de una cinta Para avanzar la reproducción un cuadro a la vez Para avanzar la reproducción un cuadro a la vez Para hacer una pausa de reproducción del disco Para hacer una pausa en la reproducción del disco Para hacer una pausa de la reproducción o grabación de la cinta Para parar la grabación Para parar la grabación Para parar la reproducció...

Страница 35: ... remedy available to the purchaser Correction of defects in the manner and for the period of time described herein shall constitute complete fulfillment of all liabilities and responsibilities of Sharp to the purchaser with respect to the Product and shall constitute full satisfaction of all claims whether based on contract negligence strict liability or otherwise In no event shall Sharp be liable...

Отзывы: